Project Quay provides a comprehensive permissions model so that you can control who can access, manage, and modify repositories. You can manage user access, team roles, and repository visibility by using the UI or the API.
You can complete tasks such as the following:
-
Configure role-based access controls
-
Adjust repository visibility
-
Create and manage robot accounts
-
Review Clair vulnerability reporting
Project Quay permissions model
Project Quay provides a fine-grained permissions model that controls access to repositories and their content. Administrators can grant read, write, or admin access to users, robots, and teams to support secure collaboration and automation.
Project Quay administrators can grant users and robot accounts one of the following levels of access:
-
Read: Allows users, robots, and teams to pull images.
-
Write: Allows users, robots, and teams to push images.
-
Admin: Provides users, robots, and teams administrative privileges.
|
Note
|
Administrative users can delegate new permissions for existing users and teams, change existing permissions, and revoke permissions when necessary |
Collectively, these levels of access provide users or robot accounts the ability to perform specific tasks, like pulling images, pushing new versions of an image into the registry, or managing the settings of a repository. These permissions can be delegated across the entire organization and on specific repositories. For example, Read permissions can be set to a specific team within the organization, while Admin permissions can be given to all users across all repositories within the organization.
Project Quay teams overview
A team in Quay is a group of users that share permissions, which simplifies access control and collaboration across organizations and repositories. You can assign a team specific permissions so that its members have appropriate access based on their roles.
Setting a team role by using the UI
To assign a role to a team within a Quay organization, you can use the UI. Team roles determine a member’s permissions, such as administrative or contributor access.
-
You have created a team.
-
On the Project Quay landing page, click the name of your Organization.
-
In the navigation pane, click Teams and Membership.
-
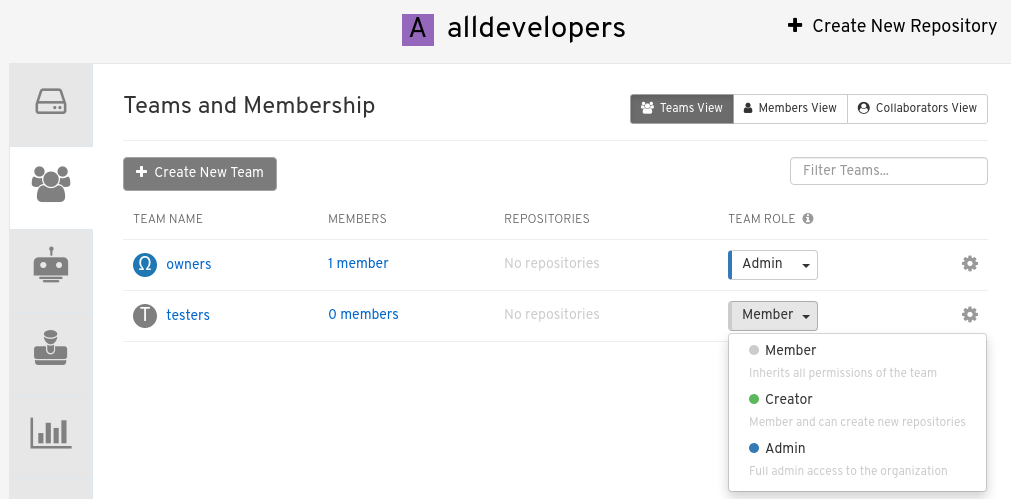
Select the TEAM ROLE drop-down menu, as shown in the following figure:
-
For the selected team, choose one of the following roles:
-
Admin. Full administrative access to the organization, including the ability to create teams, add members, and set permissions.
-
Member. Inherits all permissions set for the team.
-
Creator. All member permissions, plus the ability to create new repositories.
-
Managing team members and repository permissions
To manage team members and set repository permissions for a team, you can use the Quay UI. You can add or remove members, and adjust access levels for each repository.
-
On the Teams and membership page of your organization, you can also manage team members and set repository permissions.
-
Click the kebab menu, and select one of the following options:
-
Manage Team Members. On this page, you can view all members, team members, robot accounts, or users who have been invited. You can also add a new team member by clicking Add new member.
-
Set repository permissions. On this page, you can set the repository permissions to one of the following:
-
None. Team members have no permission to the repository.
-
Read. Team members can view and pull from the repository.
-
Write. Team members can read (pull) from and write (push) to the repository.
-
Admin. Full access to pull from, and push to, the repository, plus the ability to do administrative tasks associated with the repository.
-
-
Delete. This popup window allows you to delete the team by clicking Delete.
-
Setting the role of a team within an organization by using the API
To view repository permissions for a team or set a team’s role in an Project Quay organization, you can use the organization team API endpoints with an OAuth access token.
-
You have created an OAuth access token.
-
Enter the following
GET /api/v1/organization/{orgname}/team/{teamname}/permissionscommand to return a list of repository permissions for the organization’s team. Note that your team must have been added to a repository for this command to return information.$ curl -X GET \ -H "Authorization: Bearer <your_access_token>" \ "<quay-server.example.com>/api/v1/organization/<organization_name>/team/<team_name>/permissions"Example output{"permissions": [{"repository": {"name": "api-repo", "is_public": true}, "role": "admin"}]} -
You can create or update a team within an organization to have a specified role of admin, member, or creator using the
PUT /api/v1/organization/{orgname}/team/{teamname}command. For example:$ curl -X PUT \ -H "Authorization: Bearer <your_access_token>" \ -H "Content-Type: application/json" \ -d '{ "role": "<role>" }' \ "<quay-server.example.com>/api/v1/organization/<organization_name>/team/<team_name>"Example output{"name": "testteam", "description": "", "can_view": true, "role": "creator", "avatar": {"name": "testteam", "hash": "827f8c5762148d7e85402495b126e0a18b9b168170416ed04b49aae551099dc8", "color": "#ff7f0e", "kind": "team"}, "new_team": false}
Creating and managing default permissions by using the UI
To grant access automatically when users create repositories in Project Quay, you can configure default permissions in the UI. Default permissions apply to a selected user, robot, or team in addition to the repository creator.
-
Click the name of an organization.
-
Click Default permissions.
-
Click Create default permissions. A toggle drawer appears.
-
Select either Anyone or Specific user to create a default permission when a repository is created.
-
If selecting Anyone, the following information must be provided:
-
Applied to. Search, invite, or add a user/robot/team.
-
Permission. Set the permission to one of Read, Write, or Admin.
-
-
If selecting Specific user, the following information must be provided:
-
Repository creator. Provide either a user or robot account.
-
Applied to. Provide a username, robot account, or team name.
-
Permission. Set the permission to one of Read, Write, or Admin.
-
-
-
Click Create default permission. A confirmation box appears, returning the following alert: Successfully created default permission for creator.
Creating and managing default permissions by using the API
To create, update, or delete default permissions for an Project Quay organization, you can use the API. Default permissions grant access when a repository is created.
-
You have Created an OAuth access token.
-
Enter the following command to create a default permission with the
POST /api/v1/organization/{orgname}/prototypesendpoint:$ curl -X POST -H "Authorization: Bearer <bearer_token>" -H "Content-Type: application/json" --data '{ "role": "<admin_read_or_write>", "delegate": { "name": "<username>", "kind": "user" }, "activating_user": { "name": "<robot_name>" } }' https://<quay-server.example.com>/api/v1/organization/<organization_name>/prototypesExample output{"activating_user": {"name": "test-org+test", "is_robot": true, "kind": "user", "is_org_member": true, "avatar": {"name": "test-org+test", "hash": "aa85264436fe9839e7160bf349100a9b71403a5e9ec684d5b5e9571f6c821370", "color": "#8c564b", "kind": "robot"}}, "delegate": {"name": "testuser", "is_robot": false, "kind": "user", "is_org_member": false, "avatar": {"name": "testuser", "hash": "f660ab912ec121d1b1e928a0bb4bc61b15f5ad44d5efdc4e1c92a25e99b8e44a", "color": "#6b6ecf", "kind": "user"}}, "role": "admin", "id": "977dc2bc-bc75-411d-82b3-604e5b79a493"} -
Enter the following command to update a default permission using the
PUT /api/v1/organization/{orgname}/prototypes/{prototypeid}endpoint, for example, if you want to change the permission type. You must include the ID that was returned when you created the policy.$ curl -X PUT \ -H "Authorization: Bearer <bearer_token>" \ -H "Content-Type: application/json" \ --data '{ "role": "write" }' \ https://<quay-server.example.com>/api/v1/organization/<organization_name>/prototypes/<prototypeid>Example output{"activating_user": {"name": "test-org+test", "is_robot": true, "kind": "user", "is_org_member": true, "avatar": {"name": "test-org+test", "hash": "aa85264436fe9839e7160bf349100a9b71403a5e9ec684d5b5e9571f6c821370", "color": "#8c564b", "kind": "robot"}}, "delegate": {"name": "testuser", "is_robot": false, "kind": "user", "is_org_member": false, "avatar": {"name": "testuser", "hash": "f660ab912ec121d1b1e928a0bb4bc61b15f5ad44d5efdc4e1c92a25e99b8e44a", "color": "#6b6ecf", "kind": "user"}}, "role": "write", "id": "977dc2bc-bc75-411d-82b3-604e5b79a493"} -
You can delete the permission by entering the
DELETE /api/v1/organization/{orgname}/prototypes/{prototypeid}command:curl -X DELETE \ -H "Authorization: Bearer <bearer_token>" \ -H "Accept: application/json" \ https://<quay-server.example.com>/api/v1/organization/<organization_name>/prototypes/<prototype_id>This command does not return an output. Instead, you can obtain a list of all permissions by entering the
GET /api/v1/organization/{orgname}/prototypescommand:$ curl -X GET \ -H "Authorization: Bearer <bearer_token>" \ -H "Accept: application/json" \ https://<quay-server.example.com>/api/v1/organization/<organization_name>/prototypesExample output{"prototypes": []}
Adjusting access settings for a repository by using the UI
To change access for a user or robot account on a repository, you can use the Quay UI. You can set Read, Write, or Admin permissions.
-
You have created a user account or robot account.
-
Log into Quay.
-
On the v2 UI, click Repositories.
-
Click the name of a repository, for example,
quayadmin/busybox. -
Click the Settings tab.
-
Optional. Click User and robot permissions. You can adjust the settings for a user or robot account by clicking the dropdown menu option under Permissions. You can change the settings to Read, Write, or Admin.
-
Read. The User or Robot Account can view and pull from the repository.
-
Write. The User or Robot Account can read (pull) from and write (push) to the repository.
-
Admin. The User or Robot account has access to pull from, and push to, the repository, plus the ability to do administrative tasks associated with the repository.
-
Adjusting access settings for a repository by using the API
To change or remove access for a user or robot account on a repository, you can use the Project Quay API. You can grant Read, Write, or Admin permissions, or delete an existing permission.
-
You have created a user account or robot account.
-
You have Created an OAuth access token.
-
Enter the following
PUT /api/v1/repository/{repository}/permissions/user/{username}command to change the permissions of a user:$ curl -X PUT \ -H "Authorization: Bearer <bearer_token>" \ -H "Content-Type: application/json" \ -d '{"role": "admin"}' \ https://<quay-server.example.com>/api/v1/repository/<namespace>/<repository>/permissions/user/<username>Example output{"role": "admin", "name": "quayadmin+test", "is_robot": true, "avatar": {"name": "quayadmin+test", "hash": "ca9afae0a9d3ca322fc8a7a866e8476dd6c98de543decd186ae090e420a88feb", "color": "#8c564b", "kind": "robot"}} -
To delete the current permission, you can enter the
DELETE /api/v1/repository/{repository}/permissions/user/{username}command:$ curl -X DELETE \ -H "Authorization: Bearer <bearer_token>" \ -H "Accept: application/json" \ https://<quay-server.example.com>/api/v1/repository/<namespace>/<repository>/permissions/user/<username>This command does not return any output in the CLI. Instead, you can confirm deletion by entering the
GET /api/v1/repository/{repository}/permissions/user/command:$ curl -X GET \ -H "Authorization: Bearer <bearer_token>" \ -H "Accept: application/json" \ https://<quay-server.example.com>/api/v1/repository/<namespace>/<repository>/permissions/user/<username>/Example output{"message":"User does not have permission for repo."}
Registry-wide access management
Registry-wide access settings in Project Quay control what users and superusers can do across the entire registry. You can restrict ordinary users and grant superusers broader access when needed.
Managing restricted users
With restricted users in Project Quay, you can prevent registry members from creating organizations or pushing to their own namespaces unless they belong to an organization team. You can allowlist specific users so that they keep those capabilities.
By default, all Project Quay members part of a registry can create repositories and upload content to their own user account. For example, when user1 pushes an artifact tag such as /<user1>/<image>:<tag>, a repository of the name user1/image is created. Inside of that repository is information about the artifact tag.
With the FEATURE_RESTRICTED_USERS configuration field, Project Quay administrators can restrict all users that are part of their registry from pushing images or artifacts to the registry. This configuration field effectively renders all users from creating new organizations or pushing content altogether unless they are already part of that organization and defined as a team member of that organization; that is, restricted users still have normal permissions in organizations based on the teams that they are members of.
For example, a Project Quay administrator sets the FEATURE_RESTRICTED_USERS configuration field in their config.yaml file as follows:
FEATURE_RESTRICTED_USERS: trueWhen set as shown, user1 is unable to create a new organization by using the Project Quay UI. Upon attempt, the following error message is returned: Unauthorized. Additionally, if user1 attempts to push an image to their own namespace by using the CLI (that is, /<user1>/<image>:<tag>), the following error message is returned: Error: writing blob: initiating layer upload to /v2/user1/<image>/blobs/uploads/ in <quay-server.example.com>: unauthorized: access to the requested resource is not authorized. However, if user1 is part of an organization’s team as defined by an administrator, they maintain the permissions capable of that team. For example, if user1 is added to an organization’s team and given the Admin role, they have administrative privileges for that organization.
When you combine FEATURE_RESTRICTED_USERS with the RESTRICTED_USERS_WHITELIST configuration field, Project Quay administrators can allow specified members to continue to push to the registry or create organizations. In general, when FEATURE_RESTRICTED_USERS is set, Project Quay administrators might also set RESTRICTED_USERS_WHITELIST, otherwise all members of the registry (with the exception of those defined by a team) are rendered incapable of doing basic tasks.
For example, a Project Quay administrator sets the FEATURE_RESTRICTED_USERS and RESTRICTED_USERS_WHITELIST configuration fields in their config.yaml file as follows:
# ...
FEATURE_RESTRICTED_USERS: true
RESTRICTED_USERS_WHITELIST:
      - user2
# ...
With this configuration, all users except user2 are restricted from pushing images or creating organizations. Other users who are part of a team also have these privileges. Users in the registry who are neither defined by the RESTRICTED_USERS_WHITELIST field nor part of an organization team have no permissions within the registry, and therefore cannot perform basic tasks.
|
Note
|
This feature works differently for LDAP deployment types. |
About superuser full access
Superuser full access in Project Quay lets administrators grant superusers read, write, and delete rights in organizations that they do not own. You enable the feature with the FEATURE_SUPERUSERS_FULL_ACCESS configuration field.
When a user, for example, user1 creates an organization within a registry, they own the access and permissions to that organization. As such, they can create repositories, define teams and memberships, create robot accounts, set default permissions, view logs, and adjust other settings as warranted. That organization is effectively the user’s organization.
By default, superusers do not have access to a user’s organization. When the FEATURE_SUPERUSERS_FULL_ACCESS field is enabled (true), all organizations and members of the registry are revealed on the Organizations page of the UI. However, when this field is enabled, the superuser cannot view the image repository of every organization at once. This is a known limitation. As a temporary workaround, the superuser can view image repositories by navigating to them from the Organizations page.
|
Note
|
When |
To grant superusers full access to all organizations within the registry, you can use the following YAML configuration:
# ...
FEATURE_SUPERUSERS_FULL_ACCESS: true
# ...
After you set FEATURE_SUPERUSERS_FULL_ACCESS: true, all organizations are visible on the superuser Organization page.
Project Quay repository overview
A repository provides a central location for storing a related set of container images that share a namespace in Quay. You can group repositories under namespaces for individual users, teams, or organizations.
For example, you might have a namespace for your personal projects, one for your company, or one for a specific team within your organization.
Private repositories provide control over the users that have access to your images by allowing you to define users or teams who can push to, or pull from, the repository, thereby enhancing the security of your registry.
Adjusting repository visibility by using the UI
To control who can pull or interact with a repository, you can adjust its visibility to public or private by using the Project Quay UI.
-
On the Project Quay UI, click Repositories in the navigation pane.
-
Click the name of a repository.
-
Click Settings in the navigation pane.
-
Click Repository visibility.
-
Click Make private. The repository is made private, and only users on the permissions list can view and interact with it.
Adjusting repository visibility by using the API
To control who can pull or interact with a repository, you can set its visibility to public or private by using the Project Quay API.
The visibility of your repository can be set to private or public by using the POST /api/v1/repository/{repository}/changevisibility command.
-
You have Created an OAuth access token.
-
You have created a repository.
-
You can change the visibility of your repository to public or private by specifying the desired option in the
visibilityschema. For example:$ curl -X POST \ -H "Authorization: Bearer <bearer_token>" \ -H "Content-Type: application/json" \ -d '{ "visibility": "private" }' \ "https://quay-server.example.com/api/v1/repository/my_namespace/test_repo_three/changevisibility"Example output{"success": true}
Project Quay Robot Account overview
A robot account provides automated, credential-based access to repositories in your registry, similar to OpenShift Container Platform service accounts. You can use robot accounts to grant container clients push and pull permissions without sharing personal credentials.
Setting up a Robot Account results in the following:
-
Credentials are generated for the Robot Account.
-
Repositories and images that the Robot Account can push and pull images from are identified.
-
Generated credentials can be copied and pasted to use with different container clients, such as Docker, Podman, Kubernetes, Mesos, and so on, to access each defined repository.
You can use robot accounts to improve security in your Project Quay registry with advantages such as the following:
-
Specifying repository access.
-
Granular permissions, such as
Read(pull) orWrite(push) access. They can also be equipped withAdminpermissions if warranted. -
Designed for CI/CD pipelines, system integrations, and other automation tasks, helping avoid credential exposure in scripts, pipelines, or other environment variables.
-
Robot Accounts use tokens instead of passwords, so an administrator can revoke a compromised token.
Each Robot Account is limited to a single user namespace or Organization. For example, the Robot Account could provide access to all repositories for the user quayadmin. However, it cannot provide access to repositories that are not in the user’s list of repositories.
Robot Accounts can be created using the Project Quay UI, or through the CLI using the Project Quay API. After creation, Project Quay administrators can leverage more advanced features with Robot Accounts, such as keyless authentication.
Creating a robot account by using the UI
To automate access to your repositories, you can create a robot account by using the Project Quay v2 UI. Robot accounts generate credentials that container clients can use to push and pull images without a personal login.
-
On the v2 UI, click Organizations.
-
Click the name of the organization that you create the robot account for, for example,
test-org. -
Click the Robot accounts tab → Create robot account.
-
In the Provide a name for your robot account box, enter a name, for example,
robot1. The name of your Robot Account becomes a combination of your username plus the name of the robot, for example,quayadmin+robot1 -
Optional. The following options are available if desired:
-
Add the robot account to a team.
-
Add the robot account to a repository.
-
Adjust the robot account’s permissions.
-
-
On the Review and finish page, review the information you have provided, then click Review and finish. The following alert appears: Successfully created robot account with robot name: <organization_name> + <robot_name>.
Alternatively, if you tried to create a robot account with the same name as another robot account, you might receive the following error message: Error creating robot account.
-
Optional. You can click Expand or Collapse to reveal descriptive information about the robot account.
-
Optional. You can change permissions of the robot account by clicking the kebab menu → Set repository permissions. The following message appears: Successfully updated repository permission.
-
Optional. You can click the name of your robot account to obtain the following information:
-
Robot Account: Select this obtain the robot account token. You can regenerate the token by clicking Regenerate token now.
-
Kubernetes Secret: Select this to download credentials in the form of a Kubernetes pull secret YAML file.
-
Podman: Select this to copy a full
podman logincommand line that includes the credentials. -
Docker Configuration: Select this to copy a full
docker logincommand line that includes the credentials.
-
Creating a robot account by using the Project Quay API
To automate access to your repositories, you can create a robot account by using the Project Quay API. You can create robot accounts for an organization or for your own user account.
-
You have created an OAuth access token.
-
Enter the following command to create a new robot account for an organization by using the
PUT /api/v1/organization/{orgname}/robots/{robot_shortname}endpoint:$ curl -X PUT -H "Authorization: Bearer <bearer_token>" "https://<quay-server.example.com>/api/v1/organization/<organization_name>/robots/<robot_name>"Example output{"name": "orgname+robot-name", "created": "Fri, 10 May 2024 15:11:00 -0000", "last_accessed": null, "description": "", "token": "<example_secret>", "unstructured_metadata": null} -
Enter the following command to create a new robot account for the current user with the
PUT /api/v1/user/robots/{robot_shortname}endpoint:$ curl -X PUT -H "Authorization: Bearer <bearer_token>" "https://<quay-server.example.com>/api/v1/user/robots/<robot_name>"Example output{"name": "quayadmin+robot-name", "created": "Fri, 10 May 2024 15:24:57 -0000", "last_accessed": null, "description": "", "token": "<example_secret>", "unstructured_metadata": null}
Bulk managing robot account repository access
To grant a robot account access to several repositories at once, you can set its permissions in bulk by using the Project Quay v2 UI.
-
You have created a robot account.
-
You have created multiple repositories under a single organization.
-
On the Project Quay v2 UI landing page, click Organizations in the navigation pane.
-
On the Organizations page, select the name of the organization that has multiple repositories. The number of repositories under a single organization can be found under the Repo Count column.
-
On your organization’s page, click Robot accounts.
-
For the robot account that you want to add to multiple repositories, click the kebab icon → Set repository permissions.
-
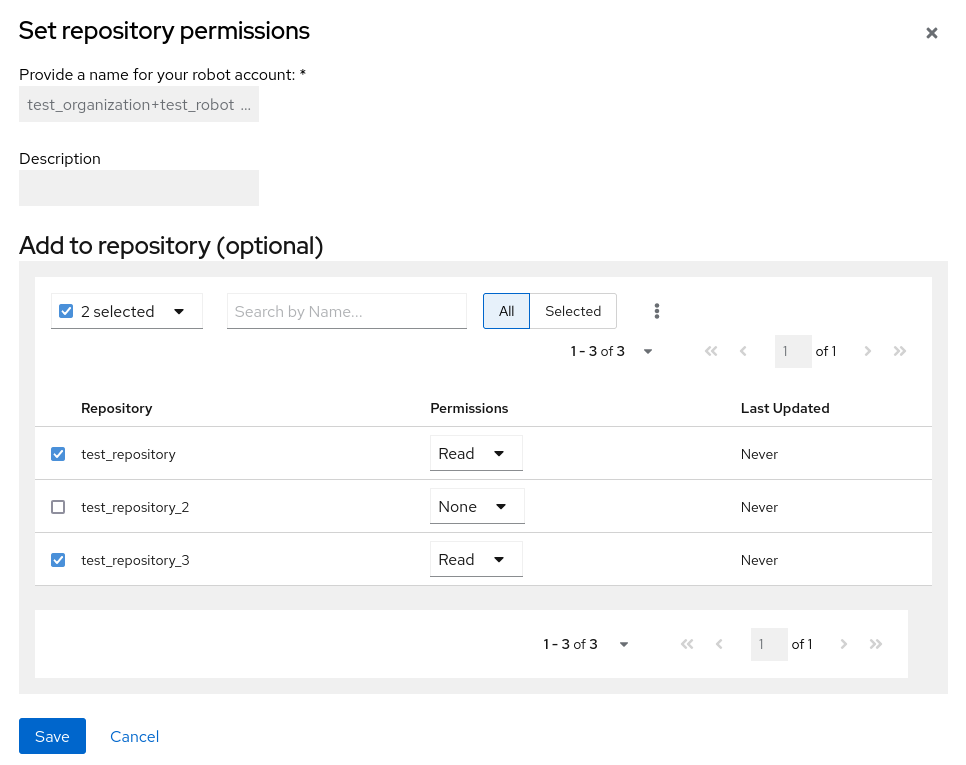
On the Set repository permissions page, check the boxes of the repositories that you want to add the robot account to. For example:
-
Set the permissions for the robot account, for example, None, Read, Write, Admin.
-
Click save. An alert that says Success alert: Successfully updated repository permission appears on the Set repository permissions page, confirming the changes.
-
Return to the Organizations → Robot accounts page. Now, the Repositories column of your robot account shows the number of repositories that the robot account has been added to.
Disabling robot accounts
To prevent users from creating new robot accounts, you can disable robot account creation in your Project Quay configuration file. This setting also blocks robot accounts required for repository mirroring, so review your mirroring setup first.
|
Important
|
Robot accounts are mandatory for repository mirroring. Setting the |
-
You have created multiple robot accounts.
-
Update your
config.yamlfield to add theROBOTS_DISALLOWvariable, for example:ROBOTS_DISALLOW: true -
Restart your Project Quay deployment.
-
Navigate to your Project Quay repository.
-
Click the name of a repository.
-
In the navigation pane, click Robot Accounts.
-
Click Create Robot Account.
-
Enter a name for the robot account, for example,
<organization-name/username>+<robot-name>. -
Click Create robot account to confirm creation. The following message appears:
Cannot create robot account. Robot accounts have been disabled. Please contact your administrator.
-
On the command-line interface (CLI), attempt to log in as one of the robot accounts by entering the following command:
$ podman login -u="<organization-name/username>+<robot-name>" -p="KETJ6VN0WT8YLLNXUJJ4454ZI6TZJ98NV41OE02PC2IQXVXRFQ1EJ36V12345678" <quay-server.example.com>The following error message is returned:
Error: logging into "<quay-server.example.com>": invalid username/password -
You can pass in the
log-level=debugflag to confirm that robot accounts have been deactivated:$ podman login -u="<organization-name/username>+<robot-name>" -p="KETJ6VN0WT8YLLNXUJJ4454ZI6TZJ98NV41OE02PC2IQXVXRFQ1EJ36V12345678" --log-level=debug <quay-server.example.com>... DEBU[0000] error logging into "quay-server.example.com": unable to retrieve auth token: invalid username/password: unauthorized: Robot accounts have been disabled. Please contact your administrator.
Regenerating a robot account token by using the Project Quay API
To replace a compromised or outdated robot account credential, you can regenerate a robot account token by using the Project Quay API for organization or user robots.
-
You have created an OAuth access token.
-
Enter the following command to regenerate a robot account token for an organization by using the
POST /api/v1/organization/{orgname}/robots/{robot_shortname}/regenerateendpoint:$ curl -X POST \ -H "Authorization: Bearer <bearer_token>" \ "<quay-server.example.com>/api/v1/organization/<orgname>/robots/<robot_shortname>/regenerate"Example output{"name": "test-org+test", "created": "Fri, 10 May 2024 17:46:02 -0000", "last_accessed": null, "description": "", "token": "<example_secret>"} -
Enter the following command to regenerate a robot account token for the current user by using the
POST /api/v1/user/robots/{robot_shortname}/regenerateendpoint:$ curl -X POST \ -H "Authorization: Bearer <bearer_token>" \ "<quay-server.example.com>/api/v1/user/robots/<robot_shortname>/regenerate"Example output{"name": "quayadmin+test", "created": "Fri, 10 May 2024 14:12:11 -0000", "last_accessed": null, "description": "", "token": "<example_secret>"}
Deleting a robot account by using the UI
To remove a robot account that you no longer need, you can delete it by using the Project Quay UI.
-
Log into your Project Quay registry:
-
Click the name of the Organization that has the robot account.
-
Click Robot accounts.
-
Check the box of the robot account to be deleted.
-
Click the kebab menu.
-
Click Delete.
-
Type
confirminto the textbox, then click Delete.
Deleting a robot account by using the Project Quay API
To remove a robot account that you no longer need, you can delete it by using the Project Quay API. You can delete robot accounts that belong to an organization or to your own user account.
-
You have created an OAuth access token.
-
Enter the following command to delete a robot account for an organization by using the
DELETE /api/v1/organization/{orgname}/robots/{robot_shortname}endpoint:$ curl -X DELETE \ -H "Authorization: Bearer <bearer_token>" \ "<quay-server.example.com>/api/v1/organization/<organization_name>/robots/<robot_shortname>" -
The CLI does not return information when deleting a robot account with the API. To confirm deletion, you can check the Project Quay UI, or you can enter the following
GET /api/v1/organization/{orgname}/robotscommand to see if details are returned for the robot account:$ curl -X GET -H "Authorization: Bearer <bearer_token>" "https://<quay-server.example.com>/api/v1/organization/<organization_name>/robots"Example output{"robots": []} -
Enter the following command to delete a robot account for the current user with the
DELETE /api/v1/user/robots/{robot_shortname}endpoint:$ curl -X DELETE \ -H "Authorization: Bearer <bearer_token>" \ "<quay-server.example.com>/api/v1/user/robots/<robot_shortname>" -
The CLI does not return information when deleting a robot account for the current user with the API. To confirm deletion, you can check the Project Quay UI, or you can enter the following
GET /api/v1/user/robots/{robot_shortname}command to see if details are returned for the robot account:$ curl -X GET \ -H "Authorization: Bearer <bearer_token>" \ "<quay-server.example.com>/api/v1/user/robots/<robot_shortname>"Example output{"message":"Could not find robot with specified username"}
Clair security scanner
Clair is a vulnerability scanner that analyzes container image layers and reports security issues from upstream CVE databases in Project Quay. You can use these reports to identify vulnerabilities that affect image content.
Clair v4 (Clair) leverages static code analyses for parsing image content and reporting vulnerabilities affecting the content. Project Quay includes Clair for both standalone and Operator deployments. You can run Clair in highly scalable configurations, where components can be scaled separately as appropriate for enterprise environments.