Clair is the vulnerability scanner for container images on Project Quay. This guide explains Clair concepts, releases, deployment options, and configuration.
Clair security scanner
Clair is a vulnerability scanner that analyzes container image layers and reports security issues from upstream CVE databases in Project Quay. You can use these reports to identify vulnerabilities that affect image content.
Clair v4 (Clair) leverages static code analyses for parsing image content and reporting vulnerabilities affecting the content. Quay.io includes Clair, enables it automatically, and the Project Quay development team manages it.
For Quay.io users, images are automatically indexed after they are pushed to your repository. Reports are then fetched from Clair, which matches images against its CVE database to report security information. This process happens automatically on Quay.io, and manual rescans are not required.
For standalone or Operator-based deployments of Project Quay, Clair can be deployed and scaled separately. Configuration fields for Clair are documented in the Clair configuration overview. Red Hat removes this chapter in a future version of Project Quay.
About Clair
Clair scans container images for known vulnerabilities in Project Quay. You can use National Vulnerability Database (NVD) enrichment, including CVSS severity scores, to prioritize remediation.
The NVD is a United States government repository of security-related information, including known vulnerabilities and security issues in various software components and systems. NVD scores provide the following benefits:
-
Data synchronization. Clair can periodically synchronize its vulnerability database with the NVD. This ensures that it has the latest vulnerability data.
-
Matching and enrichment. Clair compares the metadata and identifiers of vulnerabilities it discovers in container images with the data from the NVD. This process involves matching the unique identifiers, such as Common Vulnerabilities and Exposures (CVE) IDs, to the entries in the NVD. When a match is found, Clair can enrich its vulnerability information with additional details from NVD, such as severity scores, descriptions, and references.
-
Severity scores. The NVD assigns severity scores to vulnerabilities, such as the Common Vulnerability Scoring System (CVSS) score, to indicate the potential impact and risk associated with each vulnerability. By incorporating NVD severity scores, Clair can provide more context on the seriousness of the vulnerabilities it detects.
If Clair finds vulnerabilities from NVD, a detailed and standardized assessment of the severity and potential impact of vulnerabilities detected within container images is reported to users on the UI. CVSS enrichment data provides the following benefits:
-
Vulnerability prioritization. By using CVSS scores, you can prioritize vulnerabilities based on their severity and address the most critical issues first.
-
Assess risk. CVSS scores can help you understand the potential risk a vulnerability poses to your containerized applications.
-
Communicate severity. CVSS scores provide a standardized way to communicate the severity of vulnerabilities across teams and organizations.
-
Inform remediation strategies. CVSS enrichment data can guide Quay.io users in developing appropriate remediation strategies.
-
Compliance and reporting. Integrating CVSS data into reports generated by Clair can help organizations demonstrate their commitment to addressing security vulnerabilities and complying with industry standards and regulations.
Clair releases
New versions of Clair are regularly released. The source code needed to build Clair is packaged as an archive and attached to each release. For a list of Clair releases, see the Additional resources section.
Release artifacts also include the clairctl command line interface tool, which obtains updater data from the internet by using an open host.
- Clair 4.9
-
Clair 4.9 was released on 25-12-10. For information about this release, see the Additional resources section.
- Clair 4.8
-
Clair 4.8 was released on 24-10-28. The following changes have been made:
-
Clair on Project Quay now requires that you update the Clair PostgreSQL database from version 13 to version 15. For more information about this procedure, see the Additional resources section.
-
This release deprecates the updaters that rely on the Red Hat OVAL v2 security data in favor of the Red Hat VEX data. This change includes a database migration to delete all the vulnerabilities that originated from the OVAL v2 feeds. Because of this, there could be intermittent downtime in production environments before the VEX updater completes for the first time when no vulnerabilities exist.
-
- Clair 4.8.0 known issues
-
-
When pushing SUSE Enterprise Linux Images with HIGH image vulnerabilities, Clair 4.8.0 does not report these vulnerabilities. This is a known issue that a future version of Project Quay addresses.
-
- Clair 4.7.4
-
Clair 4.7.4 was released on 2024-05-01. The following changes have been made:
-
The default layer download location has changed. For more information, see the Additional resources section.
-
- Clair 4.7.3
-
Clair 4.7.3 was released on 2024-02-26. The following changes have been made:
-
The minimum TLS version for Clair is now 1.2. Previously, servers allowed for 1.1 connections.
-
- Clair 4.7.2
-
Clair 4.7.2 was released on 2023-10-09. The following changes have been made:
-
CRDA support has been removed.
-
- Clair 4.7.1
-
Clair 4.7.1 was released as part of Project Quay 3.9.1. The following changes have been made:
-
With this release, you can view unpatched vulnerabilities from Red Hat Enterprise Linux (RHEL) sources. If you want to view unpatched vulnerabilities, you can set the
ignore_unpatchedparameter toFalse. For example:updaters: config: rhel: ignore_unpatched: falseTo disable this feature, you can set
ignore_unpatchedtoTrue.
-
- Clair 4.7
-
Clair 4.7 was released as part of Project Quay 3.9, and includes support for the following features:
-
Native support for indexing Golang modules and RubyGems in container images.
-
Change to the OSV.dev vulnerability database as the source for any programming language package managers.
-
This includes popular sources like GitHub Security Advisories or PyPA.
-
This allows offline capability.
-
-
Use of pyup.io for Python and CRDA for Java is suspended.
-
Clair now supports Java, Golang, Python, and Ruby dependencies.
-
Clair containers
Official downstream Clair containers bundled with Project Quay can be found on the Red Hat Ecosystem Catalog.
Official upstream containers are packaged and released under the Clair project on Quay.io. The latest tag tracks the Git development branch. Version tags are built from the corresponding release.
Clair severity mapping
Clair maps severity strings from multiple security databases to a common set of values in Project Quay. You can use the mapped severities to assess vulnerabilities consistently.
Clair severity strings
Clair alerts users with the following severity strings:
-
Unknown
-
Negligible
-
Low
-
Medium
-
High
-
Critical
These severity strings are similar to the strings found within the relevant security database.
The Alpine SecDB database does not provide severity information. All vulnerability severities are Unknown.
| Alpine Severity | Clair Severity |
|---|---|
* |
Unknown |
The AWS UpdateInfo database provides severity information.
| AWS Severity | Clair Severity |
|---|---|
low |
Low |
medium |
Medium |
important |
High |
critical |
Critical |
The Debian Oval database provides severity information.
| Debian Severity | Clair Severity |
|---|---|
* |
Unknown |
Unimportant |
Low |
Low |
Medium |
Medium |
High |
High |
Critical |
The Oracle Oval database provides severity information.
| Oracle Severity | Clair Severity |
|---|---|
N/A |
Unknown |
LOW |
Low |
MODERATE |
Medium |
IMPORTANT |
High |
CRITICAL |
Critical |
The RHEL Oval database provides severity information.
| RHEL Severity | Clair Severity |
|---|---|
None |
Unknown |
Low |
Low |
Moderate |
Medium |
Important |
High |
Critical |
Critical |
The SUSE Oval database provides severity information.
| Severity | Clair Severity |
|---|---|
None |
Unknown |
Low |
Low |
Moderate |
Medium |
Important |
High |
Critical |
Critical |
The Ubuntu Oval database provides severity information.
| Severity | Clair Severity |
|---|---|
Untriaged |
Unknown |
Negligible |
Negligible |
Low |
Low |
Medium |
Medium |
High |
High |
Critical |
Critical |
The following table shows how CVSSv3 base scores map to Clair severities:
| Base Score | Clair Severity |
|---|---|
0.0 |
Negligible |
0.1-3.9 |
Low |
4.0-6.9 |
Medium |
7.0-8.9 |
High |
9.0-10.0 |
Critical |
The following table shows how CVSSv2 base scores map to Clair severities:
| Base Score | Clair Severity |
|---|---|
0.0-3.9 |
Low |
4.0-6.9 |
Medium |
7.0-10 |
High |
Clair concepts
Clair breaks container image analysis into indexing, matching, and notification. You can use these concepts to understand how Clair builds and updates vulnerability reports in Project Quay.
Indexing
Clair’s indexer service plays a crucial role in understanding the makeup of a container image. In Clair, container image representations are called "manifests." Manifests are used to comprehend the contents of the image’s layers. To streamline this process, Clair takes advantage of the fact that Open Container Initiative (OCI) manifests and layers are designed for content addressing, reducing repetitive tasks.
During indexing, a manifest that represents a container image is taken and broken down into its essential components. The indexer’s job is to uncover the image’s contained packages, its origin distribution, and the package repositories it relies on. This valuable information is then recorded and stored within Clair’s database. The insights gathered during indexing serve as the basis for generating a comprehensive vulnerability report. This report can be seamlessly transferred to a matcher node for further analysis and action, helping users make informed decisions about their container images' security.
In Quay.io, Clair automatically feeds the IndexReport to a matcher node to compute the vulnerability report after an image is pushed to a repository. On standalone Project Quay deployments or when Quay is deployed on OpenShift Container Platform, it can be fed to a matcher node to compute the vulnerability report.
Matching
With Clair, a matcher node is responsible for matching vulnerabilities to a provided index report.
Matchers are responsible for keeping the database of vulnerabilities up to date. Matchers run a set of updaters, which periodically probe their data sources for new content. New vulnerabilities are stored in the database when they are discovered.
The matcher API is designed to always provide the most recent vulnerability report when queried. The vulnerability report summarizes both a manifest’s content and any vulnerabilities affecting the content. The matcher API is designed to be used often. The matcher API always provides the most recent VulnerabilityReport when queried. The VulnerabilityReport summarizes both a manifest’s content and any vulnerabilities affecting the content. On Quay.io, this interval is set to 6 hours.
Notifier service
Clair uses a notifier service that keeps track of new security database updates and informs users if new or removed vulnerabilities affect an indexed manifest.
When the notifier becomes aware of new vulnerabilities affecting a previously indexed manifest, it uses the configured methods in your config.yaml file to issue notifications about the new changes. Returned notifications express the most severe vulnerability discovered because of the change. This avoids creating excessive notifications for the same security database update.
When a user receives a notification, it issues a new request against the matcher to receive an up-to-date vulnerability report.
You can subscribe to notifications through the following mechanics:
-
Webhook delivery
-
AMQP delivery
-
STOMP delivery
Configuring the notifier is done through the Clair YAML configuration file.
|
Note
|
By default, the notifier service on Quay.io is disabled. As a result, repository owners cannot configure notifications when new CVEs are reported. However, when CVE databases are updated, which is every 6 hours on Quay.io, new vulnerabilities affecting previously indexed manifests are automatically updated. As a result, manual re-scans are not required, and users can view new CVEs directly on Quay.io. |
Clair authentication
Clair handles authentication internally by using configuration under the auth key. You can configure pre-shared key (PSK) JWT authentication for Clair in Project Quay.
|
Note
|
Previous versions of Clair used JWT Proxy to gate authentication. |
You configure authentication by specifying configuration objects underneath the auth key of the configuration. Multiple authentication configurations might be present, but they are used preferentially in the following order:
-
PSK. With this authentication configuration, Clair implements JWT-based authentication using a pre-shared key.
-
Configuration. For example:
auth:
  psk:
    key: >-
      MDQ4ODBlNDAtNDc0ZC00MWUxLThhMzAtOTk0MzEwMGQwYTMxCg==
    iss: 'issuer'
In this configuration the
authfield requires two parameters:iss, which is the issuer to validate all incoming requests, andkey, which is a base64 coded symmetric key for validating the requests.
Clair updaters
Clair uses Go packages called updaters to fetch and parse vulnerability databases. You can control which databases Clair imports and how often vulnerability data is updated in Project Quay.
Updaters are usually paired with a matcher to interpret if, and how, any vulnerability is related to a package. Administrators might want to update the vulnerability database less frequently, or not import vulnerabilities from databases that they know are not used.
Selecting updater sets for full Red Hat Enterprise Linux (RHEL) coverage
You can select Clair updater sets to cover vulnerabilities in Red Hat Enterprise Linux (RHEL). Use the rhel, rhcc, clair.cvss, and osv updater sets for full coverage.
For full coverage of vulnerabilities in Red Hat Enterprise Linux (RHEL), you must use the following updater sets:
-
rhel. This updater ensures that you have the latest information on the vulnerabilities that affect RHEL. -
rhcc. This updater keeps track of vulnerabilities related to Red Hat’s container images. -
clair.cvss. This updater offers a comprehensive view of the severity and risk assessment of vulnerabilities by providing Common Vulnerabilities and Exposures (CVE) scores. -
osv. This updater focuses on tracking vulnerabilities in open-source software components. This updater is recommended due to how common the use of Java and Go are in RHEL products.
#...
updaters:
  sets:
    - rhel
    - rhcc
    - clair.cvss
    - osv
#...
Advanced updater configuration
In some cases, users might want to configure updaters for specific behavior, for example, if you want to allowlist specific ecosystems for the Open Source Vulnerabilities (OSV) updaters.
Advanced updater configuration might be useful for proxy deployments or air-gapped deployments. Configuration for specific updaters in these scenarios can be passed by putting a key underneath the config environment variable of the updaters object. Users should examine their Clair logs to double-check names.
The following YAML snippets detail the various settings available to some Clair updaters.
|
Important
|
For most users, advanced updater configuration is unnecessary. |
Configuring the alpine updater
#...
updaters:
  sets:
    - alpine
  config:
    alpine:
      url: https://secdb.alpinelinux.org/
#...
Configuring the debian updater
#...
updaters:
  sets:
    - debian
  config:
    debian:
      mirror_url: https://deb.debian.org/
      json_url: https://security-tracker.debian.org/tracker/data/json
#...
Configuring the clair.cvss updater
#...
updaters:
  config:
    clair.cvss:
      url: https://nvd.nist.gov/feeds/json/cve/1.1/
#...
Configuring the oracle updater
#...
updaters:
  sets:
    - oracle
  config:
    oracle-2023-updater:
      url:
        - https://linux.oracle.com/security/oval/com.oracle.elsa-2023.xml.bz2
    oracle-2022-updater:
      url:
        - https://linux.oracle.com/security/oval/com.oracle.elsa-2022.xml.bz2
#...
Configuring the photon updater
#...
updaters:
  sets:
    - photon
  config:
    photon:
      url: https://packages.vmware.com/photon/photon_oval_definitions/
#...
Configuring the rhel updater
#...
updaters:
  sets:
    - rhel
  config:
    rhel:
      url: https://access.redhat.com/security/data/oval/v2/PULP_MANIFEST
      ignore_unpatched: true
#...
ignore_unpatched is a Boolean that indicates whether to include information about vulnerabilities that do not have corresponding patches or updates available.
Configuring the rhcc updater
#...
updaters:
  sets:
    - rhcc
  config:
    rhcc:
      url: https://access.redhat.com/security/data/metrics/cvemap.xml
#...
Configuring the suse updater
#...
updaters:
  sets:
    - suse
  config:
    suse:
      url: https://support.novell.com/security/oval/
#...
Configuring the ubuntu updater
#...
updaters:
  config:
    ubuntu:
      url: https://api.launchpad.net/1.0/
      name: ubuntu
      force:
        - name: focal
          version: 20.04
#...
where:
updaters.config.ubuntu.force-
Specifies the inclusion of specific distribution and version details in the resulting UpdaterSet, regardless of their status in the API response. Useful when you want to ensure that particular distributions and versions are consistently included in your updater configuration.
updaters.config.ubuntu.force.name-
Specifies the distribution name that you want to force to be included in the UpdaterSet.
updaters.config.ubuntu.force.version-
Specifies the version of the distribution you want to force into the UpdaterSet.
Configuring the osv updater
#...
updaters:
  sets:
    - osv
  config:
    osv:
      url: https://osv-vulnerabilities.storage.googleapis.com/
      allowlist:
        - npm
        - pypi
#...
allowlist is the list of ecosystems to allow. When left unset, all ecosystems are allowed. Must be lowercase.
Disabling the Clair Updater component
You can disable the Clair updater component when you run Project Quay in a disconnected environment. Set matcher.disable_updaters to true in the Clair configuration.
In the following example, Clair updaters are disabled:
#...
matcher:
  disable_updaters: true
#...
Information about Clair updaters
Clair updaters fetch vulnerability data from distribution-specific and open source sources. You can use this table of updater URLs and components to configure Clair and proxy allowlists in Project Quay.
This list is not exhaustive, and some servers might issue redirects, while certain request URLs are dynamically constructed to ensure accurate vulnerability data retrieval.
For Clair, each updater is responsible for fetching and parsing vulnerability data related to a specific package type or distribution. For example, the Debian updater focuses on Debian-based Linux distributions, while the AWS updater focuses on vulnerabilities specific to Amazon Web Services' Linux distributions. Understanding the package type is important for vulnerability management because different package types might have unique security concerns and require specific updates and patches.
|
Note
|
If you are using a proxy server in your environment with Clair’s updater URLs, you must identify which URL needs to be added to the proxy allowlist to ensure that Clair can access them unimpeded. Use the following table to add updater URLs to your proxy allowlist. |
| Updater | Description | URLs | Component |
|---|---|---|---|
|
The Alpine updater is responsible for fetching and parsing vulnerability data related to packages in Alpine Linux distributions. |
|
Alpine Linux SecDB database |
|
The AWS updater is focused on AWS Linux-based packages, ensuring that vulnerability information specific to Amazon Web Services' custom Linux distributions is kept up-to-date. |
|
Amazon Web Services (AWS) UpdateInfo |
|
The Debian updater is essential for tracking vulnerabilities in packages associated with Debian-based Linux distributions. |
|
Debian Security Tracker |
|
The Clair Common Vulnerability Scoring System (CVSS) updater focuses on maintaining data about vulnerabilities and their associated CVSS scores. This is not tied to a specific package type but rather to the severity and risk assessment of vulnerabilities in general. |
|
National Vulnerability Database (NVD) feed for Common Vulnerabilities and Exposures (CVE) data in JSON format |
|
The Oracle updater is dedicated to Oracle Linux packages, maintaining data on vulnerabilities that affect Oracle Linux systems. |
|
Oracle Oval database |
|
The Photon updater deals with packages in VMware Photon OS. |
|
VMware Photon OS oval definitions |
|
The Red Hat Enterprise Linux (RHEL) updater is responsible for maintaining vulnerability data for packages in Red Hat’s Enterprise Linux distribution. |
|
Red Hat Enterprise Linux (RHEL) Oval database |
|
The Red Hat Container Catalog (RHCC) updater is connected to Red Hat’s container images. This updater ensures that vulnerability information related to Red Hat’s containerized software is kept current. |
|
Resource Handler Configuration Controller (RHCC) database |
|
The SUSE updater manages vulnerability information for packages in the SUSE Linux distribution family, including openSUSE, SUSE Enterprise Linux, and others. |
|
SUSE Oval database |
|
The Ubuntu updater is dedicated to tracking vulnerabilities in packages associated with Ubuntu-based Linux distributions. Ubuntu is a popular distribution in the Linux ecosystem. |
|
Ubuntu Oval Database |
|
The Open Source Vulnerability (OSV) updater specializes in tracking vulnerabilities within open source software components. OSV is a critical resource that provides detailed information about security issues found in various open source projects. |
|
Open Source Vulnerabilities database |
|
The CISA Known Exploited Vulnerabilities (KEV) updater retrieves data on CVEs that are confirmed to be actively exploited in the wild. This information helps prioritize remediation efforts by focusing on vulnerabilities that pose the greatest immediate risk. |
|
CISA Known Exploited Vulnerabilities (KEV) catalog |
Configuring updaters
You can configure Clair updaters by using the updaters.sets key in clair-config.yaml. Use the following examples to select one or more updater sets for your Project Quay deployment.
|
Important
|
|
- Configuring Clair for multiple updaters
-
.Multiple specific updaters
#...
updaters:
  sets:
    - alpine
    - aws
    - osv
#...- Configuring Clair for Alpine
-
.Alpine config.yaml example
#...
updaters:
  sets:
    - alpine
#...- Configuring Clair for AWS
-
.AWS config.yaml example
#...
updaters:
  sets:
    - aws
#...- Configuring Clair for Debian
-
.Debian config.yaml example
#...
updaters:
  sets:
    - debian
#...- Configuring Clair for Clair CVSS
-
.Clair CVSS config.yaml example
#...
updaters:
  sets:
    - clair.cvss
#...- Configuring Clair for Oracle
-
.Oracle config.yaml example
#...
updaters:
  sets:
    - oracle
#...- Configuring Clair for Photon
-
.Photon config.yaml example
#...
updaters:
  sets:
    - photon
#...- Configuring Clair for SUSE
-
.SUSE config.yaml example
#...
updaters:
  sets:
    - suse
#...- Configuring Clair for Ubuntu
-
.Ubuntu config.yaml example
#...
updaters:
  sets:
    - ubuntu
#...- Configuring Clair for OSV
-
.OSV config.yaml example
#...
updaters:
  sets:
    - osv
#...
CVE ratings from the National Vulnerability Database
Clair enriches vulnerability findings with Common Vulnerability Scoring System (CVSS) scores from the National Vulnerability Database. You can view CVSS enrichment data in the Project Quay UI.
With this change, if the vulnerability has a CVSS score that is within 2 levels of the distribution score, the Project Quay UI presents the distribution’s score by default. For example:
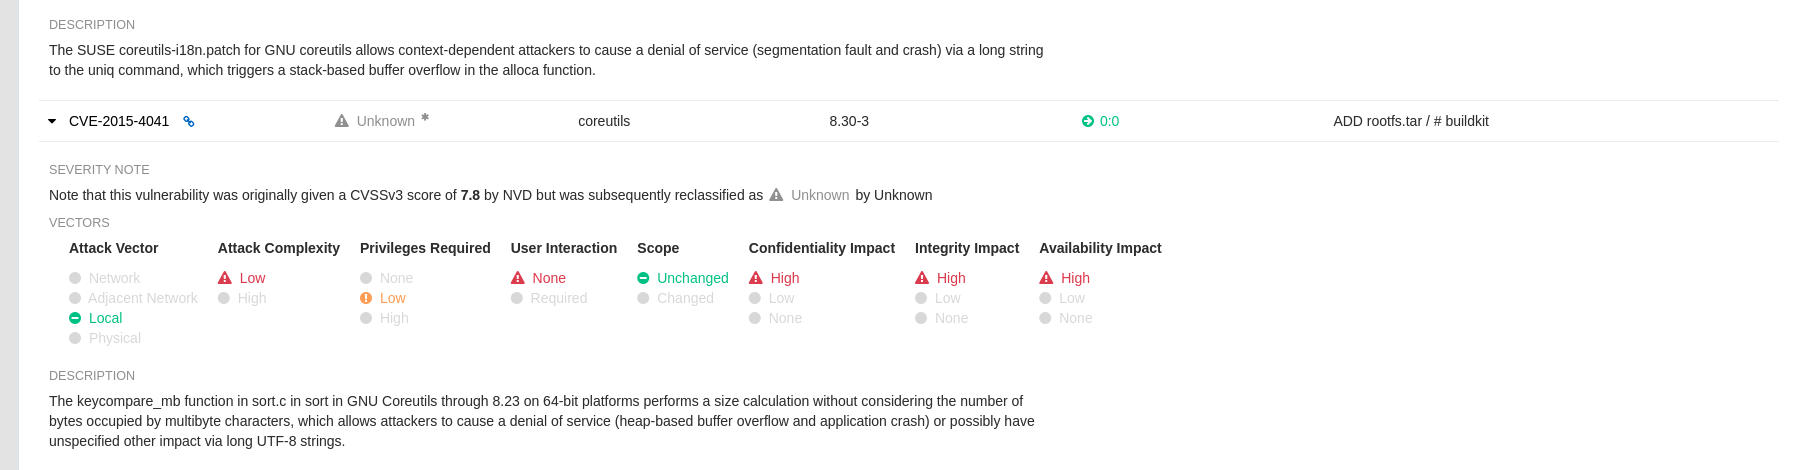
This differs from the previous interface, which would only display the following information:

Federal Information Processing Standard (FIPS) readiness and compliance
The Federal Information Processing Standard (FIPS) developed by the National Institute of Standards and Technology (NIST) is regarded as the highly regarded for securing and encrypting sensitive data, notably in highly regulated areas such as banking, healthcare, and the public sector. Red Hat Enterprise Linux (RHEL) and OpenShift Container Platform support FIPS by providing a FIPS mode, in which the system only allows usage of specific FIPS-validated cryptographic modules like openssl. This ensures FIPS compliance.
Enabling FIPS compliance
To enable FIPS compliance for your Project Quay deployment, you can set the FEATURE_FIPS configuration field to True in your config.yaml file. This ensures that Project Quay uses only FIPS-validated cryptographic modules for securing sensitive data.
-
If you are running a standalone deployment of Project Quay, your Red Hat Enterprise Linux (RHEL) deployment is version 8 or later and FIPS-enabled.
-
If you are deploying Red Hat Quay on OpenShift Container Platform, OpenShift Container Platform is version 4.10 or later.
-
Your Project Quay version is 3.5.0 or later.
-
If you are using the Red Hat Quay on OpenShift Container Platform on an IBM Power or IBM Z cluster:
-
OpenShift Container Platform version 4.14 or later is required
-
Project Quay version 3.10 or later is required
-
-
You have administrative privileges for your Project Quay deployment.
-
In your Project Quay
config.yamlfile, set theFEATURE_FIPSconfiguration field toTrue. For example:# ... FEATURE_FIPS = true # ...With
FEATURE_FIPSset toTrue, Project Quay runs using FIPS-compliant hash functions.
Setting up Clair on standalone Project Quay deployments
To configure Clair on a standalone Project Quay deployment, you can deploy a Clair PostgreSQL database, enable security scanning in the configuration tool, and start the Clair container.
-
In your Project Quay installation directory, create a new directory for the Clair database data:
$ mkdir /home/<user-name>/quay-poc/postgres-clairv4 -
Set the appropriate permissions for the
postgres-clairv4file by entering the following command:$ setfacl -m u:26:-wx /home/<user-name>/quay-poc/postgres-clairv4 -
Deploy a Clair PostgreSQL database by entering the following command:
$ sudo podman run -d --name postgresql-clairv4 \ -e POSTGRESQL_USER=clairuser \ -e POSTGRESQL_PASSWORD=clairpass \ -e POSTGRESQL_DATABASE=clair \ -e POSTGRESQL_ADMIN_PASSWORD=adminpass \ -p 5433:5432 \ -v /home/<user-name>/quay-poc/postgres-clairv4:/var/lib/pgsql/data:Z \ registry.redhat.io/rhel8/postgresql-15 -
Install the PostgreSQL
uuid-osspmodule for your Clair deployment:$ sudo podman exec -it postgresql-clairv4 /bin/bash -c 'echo "CREATE EXTENSION IF NOT EXISTS \"uuid-ossp\"" | psql -d clair -U postgres'Example outputCREATE EXTENSIONNoteClair requires the
uuid-osspextension to be added to its PostgreSQL database. For users with proper privileges, Clair automatically adds the extension. If users do not have the proper privileges, the extension must be added before you start Clair.If the extension is not present, the following error is displayed when Clair attempts to start:
ERROR: Please load the "uuid-ossp" extension. (SQLSTATE 42501). -
Stop the
Quaycontainer if the container is running and restart it in configuration mode, loading the existing configuration as a volume:$ sudo podman run --rm -it --name quay_config \ -p 80:8080 -p 443:8443 \ -v $QUAY/config:/conf/stack:Z \ {productrepo}/{quayimage}:{productminv} config secret -
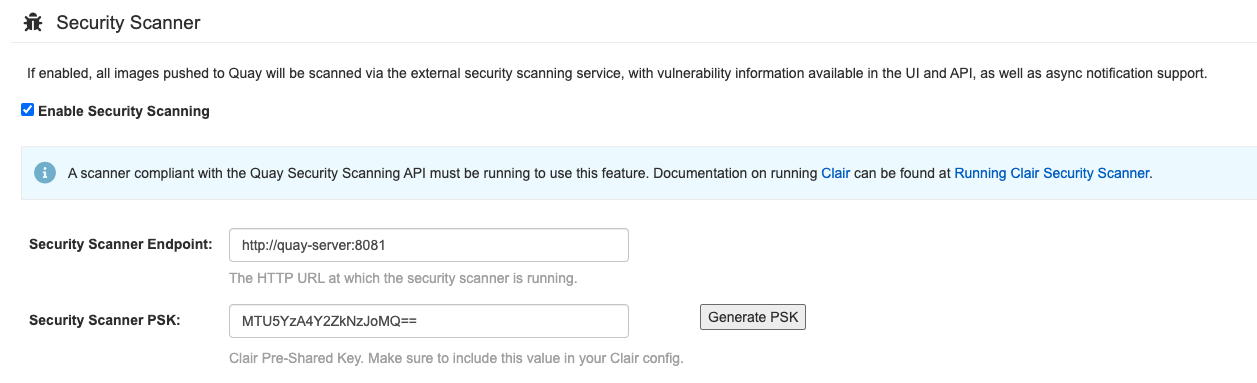
Log in to the configuration tool and click Enable Security Scanning in the Security Scanner section of the UI.
-
Set the HTTP endpoint for Clair using a port that is not already in use on the
quay-serversystem, for example,8081. -
Create a pre-shared key (PSK) using the Generate PSK button.
The following image shows the Security Scanner UI:
-
Validate and download the
config.yamlfile for Project Quay, and then stop theQuaycontainer that is running the configuration editor. -
Extract the new configuration bundle into your Project Quay installation directory, for example:
$ tar xvf quay-config.tar.gz -d /home/<user-name>/quay-poc/ -
Create a folder for your Clair configuration file, for example:
$ mkdir /etc/opt/clairv4/config/ -
Change into the Clair configuration folder:
$ cd /etc/opt/clairv4/config/ -
Create a Clair configuration file, for example:
http_listen_addr: :8081 introspection_addr: :8088 log_level: debug indexer: connstring: host=quay-server.example.com port=5433 dbname=clair user=clairuser password=clairpass sslmode=disable scanlock_retry: 10 layer_scan_concurrency: 5 migrations: true matcher: connstring: host=quay-server.example.com port=5433 dbname=clair user=clairuser password=clairpass sslmode=disable max_conn_pool: 100 migrations: true indexer_addr: clair-indexer notifier: connstring: host=quay-server.example.com port=5433 dbname=clair user=clairuser password=clairpass sslmode=disable delivery_interval: 1m poll_interval: 5m migrations: true auth: psk: key: "MTU5YzA4Y2ZkNzJoMQ==" iss: ["quay"] # tracing and metrics trace: name: "jaeger" probability: 1 jaeger: agent: endpoint: "localhost:6831" service_name: "clair" metrics: name: "prometheus" -
Start Clair by using the container image, mounting in the configuration from the file you created:
$ sudo podman run -d --name clairv4 \ -p 8081:8081 -p 8088:8088 \ -e CLAIR_CONF=/clair/config.yaml \ -e CLAIR_MODE=combo \ -v /etc/opt/clairv4/config:/clair:Z \ {productrepo}/{clairimage}:{productminv}NoteRunning multiple Clair containers is also possible, but for deployment scenarios beyond a single container the use of a container orchestrator like Kubernetes or OpenShift Container Platform is strongly recommended.
Migrating the Clair PostgreSQL database from version 13 to 15
To migrate your Clair PostgreSQL database from version 13 to version 15 in Project Quay, you can stop Clair and Quay, run the data migration container, and restart the services.
If you are upgrading Project Quay to version 13, you must migrate your Clair PostgreSQL database version from PostgreSQL version 13 to version 15. This requires bringing down your Clair PostgreSQL 13 database and running a migration script to initiate the process.
|
Important
|
Clair security scans might become temporarily disrupted after the migration procedure has succeeded. |
-
Stop the Project Quay container by entering the following command:
$ sudo podman stop <quay_container_name> -
Stop the Clair container by running the following command:
$ sudo podman stop <clair_container_id> -
Run the following Podman process from SCLOrg’s Data Migration procedure, which allows for data migration from a remote PostgreSQL server:
$ sudo podman run -d --name <clair_migration_postgresql_database> \
  -e POSTGRESQL_MIGRATION_REMOTE_HOST=<container_ip_address> \
  -e POSTGRESQL_MIGRATION_ADMIN_PASSWORD=remoteAdminP@ssword \
  -v </host/data/directory:/var/lib/pgsql/data:Z> \
  [ OPTIONAL_CONFIGURATION_VARIABLES ]
  registry.redhat.io/rhel8/postgresql-15
where:
<clair_migration_postgresql_database>-
Specifies a name for your Clair PostgreSQL 15 migration database.
<container_ip_address>-
Specifies your new Clair PostgreSQL 15 database container IP address. Can be obtained by running the following command:
sudo podman inspect -f "{{.NetworkSettings.IPAddress}}" postgresql-quay. </host/data/directory:/var/lib/pgsql/data:Z>-
Specifies a different volume mount point than the one from your initial Clair PostgreSQL 13 deployment. Modify the access control lists for said directory. For example:
$ mkdir -p /host/data/clair-postgresql15-directory$ setfacl -m u:26:-wx /host/data/clair-postgresql15-directoryThis prevents data from being overwritten by the new container.
-
Stop the Clair PostgreSQL 13 container:
$ sudo podman stop <clair_postgresql13_container_name> -
After completing the PostgreSQL migration, run the Clair PostgreSQL 15 container, using the new data volume mount from Step 3, for example,
</host/data/clair-postgresql15-directory:/var/lib/postgresql/data>:$ sudo podman run -d --rm --name <postgresql15-clairv4> \ -e POSTGRESQL_USER=<clair_username> \ -e POSTGRESQL_PASSWORD=<clair_password> \ -e POSTGRESQL_DATABASE=<clair_database_name> \ -e POSTGRESQL_ADMIN_PASSWORD=<admin_password> \ -p 5433:5432 \ -v </host/data/clair-postgresql15-directory:/var/lib/postgresql/data:Z> \ registry.redhat.io/rhel8/postgresql-15 -
Start the Project Quay container by entering the following command:
$ sudo podman run -d --rm -p 80:8080 -p 443:8443 --name=quay \ -v /home/<quay_user>/quay-poc/config:/conf/stack:Z \ -v /home/<quay_user>/quay-poc/storage:/datastorage:Z \ {productrepo}/{quayimage}:{productminv} -
Start the Clair container by entering the following command:
$ sudo podman run -d --name clairv4 \
-p 8081:8081 -p 8088:8088 \
-e CLAIR_CONF=/clair/config.yaml \
-e CLAIR_MODE=combo \
registry.redhat.io/quay/clair-rhel8:{productminv}
Using Clair with an upstream image for Project Quay
To run an upstream Clair image with Project Quay, you can stop the current Clair container, pull an image from the upstream repository, and start Clair with your existing configuration.
For most users, independent upgrades of Clair from the current version ({clairproductminv}) are unnecessary. In some cases, however, customers might want to pull an image of Clair from the upstream repository for various reasons, such as for specific bug fixes or to try new features that have not yet been released downstream. You can use the following procedure to run an upstream version of Clair with Project Quay.
|
Important
|
Upstream versions of Clair have not been fully tested for compatibility with Project Quay. As a result, this combination might cause issues with your deployment. |
-
Enter the following command to stop Clair if the container is running:
$ podman stop <clairv4_container_name> -
Navigate to the upstream repository, find the version of Clair that you want to use, and pull it to your local machine. For example:
$ podman pull quay.io/projectquay/clair:nightly-2024-02-03 -
Start Clair by using the container image, mounting in the configuration from the file you created:
$ podman run -d --name clairv4 \
-p 8081:8081 -p 8088:8088 \
-e CLAIR_CONF=/clair/config.yaml \
-e CLAIR_MODE=combo \
-v /etc/opt/clairv4/config:/clair:Z \
quay.io/projectquay/clair:nightly-2024-02-03
Setting up Clair on OpenShift Container Platform
The Project Quay Operator installs and configures Clair automatically when you deploy Project Quay on OpenShift Container Platform. You can increase Clair scratch storage for large images by configuring ephemeral volume overrides on the clair component.
Configuring ephemeral storage for managed Clair
To increase Clair scratch space for image layer extraction on Project Quay, you can set volumeSize and storageClassName overrides on the managed clair component in the QuayRegistry custom resource.
When you deploy managed Clair, the Operator provisions an ephemeral volume named indexer-layer-storage for temporary image layer extraction during vulnerability scanning. If your registry scans large images, this scratch space can fill and cause Clair pods to fail.
By default, the ephemeral volume requests 20Gi of storage and uses the cluster default storage class. You can override the capacity and storage class without adding new fields to the QuayRegistry CR. The Operator applies these values to the ephemeral volume mounted at /var/tmp.
|
Note
|
These overrides apply to Clair scratch storage at |
-
Edit your
QuayRegistrycustom resource. For example:$ oc edit quayregistry <registry_name> -n <namespace> -
Under
spec.components, addoverrides.volumeSizeand, optionally,overrides.storageClassNameto the managedclaircomponent. For example:spec: components: - kind: clair managed: true overrides: volumeSize: 50Gi storageClassName: fast-ssdWhen no overrides are specified, the Operator preserves the default
20Girequest and does not set a storage class. -
Save the changes and wait for the Operator to reconcile the Clair deployment.
-
Verify that the Clair deployment includes the updated ephemeral volume claim template. Confirm that the
storageandstorageClassNamevalues match your overrides:$ oc get deploy -n <namespace> <registry_name>-clair-app \ -o jsonpath='{.spec.template.spec.volumes[?(@.name=="indexer-layer-storage")].ephemeral.volumeClaimTemplate.spec}{"\n"}'Example output{"accessModes":["ReadWriteOnce"],"resources":{"requests":{"storage":"50Gi"}},"storageClassName":"fast-ssd","volumeMode":"Filesystem"}
Testing Clair
To confirm that Clair is scanning images on Project Quay, you can push a sample image to your registry and open the vulnerability report in the UI.
-
You have deployed the Clair container image.
-
Pull a sample image by entering the following command:
$ podman pull ubuntu:20.04 -
Tag the image to your registry by entering the following command:
$ sudo podman tag docker.io/library/ubuntu:20.04 <quay-server.example.com>/<user-name>/ubuntu:20.04 -
Push the image to your Project Quay registry by entering the following command:
$ sudo podman push --tls-verify=false quay-server.example.com/quayadmin/ubuntu:20.04 -
Log in to your Project Quay deployment through the UI.
-
Click the repository name, for example, quayadmin/ubuntu.
-
In the navigation pane, click Tags.
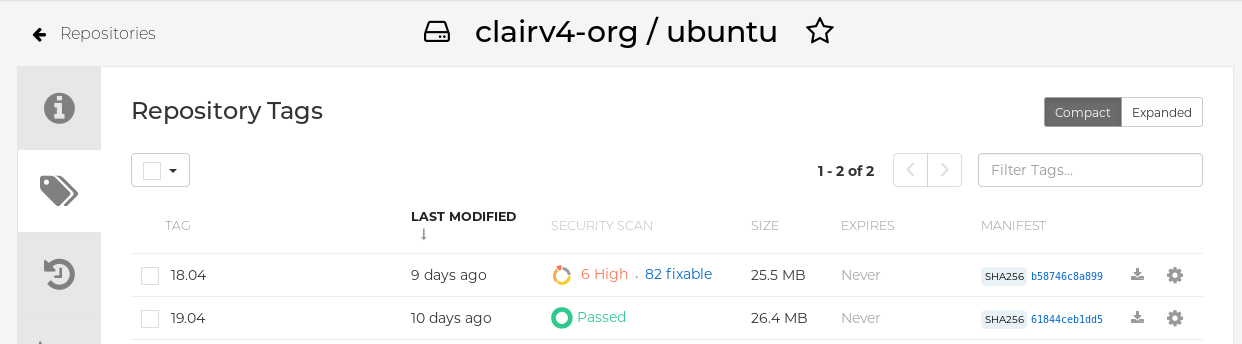
-
Click the image report, for example, 45 medium, to show a more detailed report:
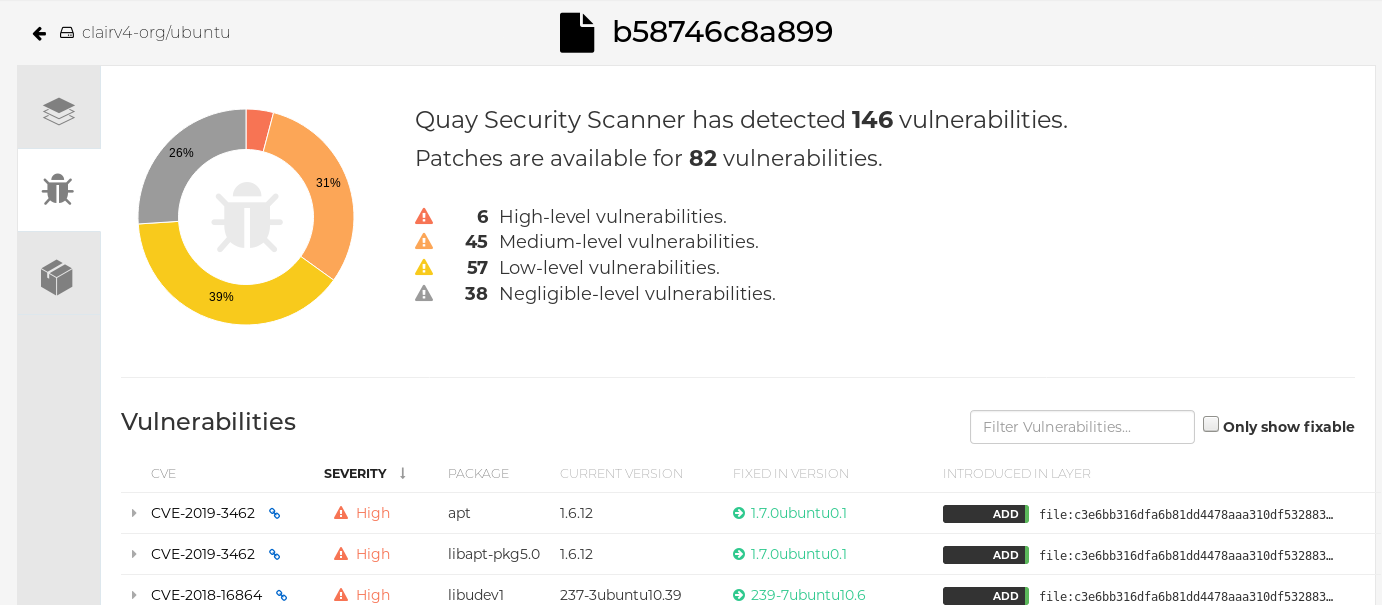 Note
NoteIn some cases, Clair shows duplicate reports on images, for example,
ubi8/nodejs-12orubi8/nodejs-16. This occurs because vulnerabilities with the same name are for different packages. You can expect this behavior with Clair vulnerability reporting. Duplicate reports are not a bug.
Unmanaged Clair configuration
Unmanaged Clair configuration lets you run a custom Clair deployment or use an external Clair database with the Project Quay Operator. You can use this option for geo-replicated environments or highly available databases outside your cluster.
Running a custom Clair configuration with an unmanaged Clair database
To use an external Clair database with the Project Quay Operator, you can set the clairpostgres component to unmanaged in your QuayRegistry custom resource.
|
Important
|
You must not use the same externally managed PostgreSQL database for both Project Quay and Clair deployments. Your PostgreSQL database must also not be shared with other workloads, as it might exhaust the natural connection limit on the PostgreSQL side when connection-intensive workloads, like Project Quay or Clair, contend for resources. Additionally, pgBouncer is not supported with Project Quay or Clair, so pgBouncer is not an option to resolve this issue. |
-
In the Quay Operator, set the
clairpostgrescomponent of theQuayRegistrycustom resource tomanaged: false:apiVersion: quay.redhat.com/v1 kind: QuayRegistry metadata: name: quay370 spec: configBundleSecret: config-bundle-secret components: - kind: objectstorage managed: false - kind: route managed: true - kind: tls managed: false - kind: clairpostgres managed: false
Configuring a custom Clair database with an unmanaged Clair database
To configure a custom Clair database with SSL/TLS certificates on Project Quay, you can create a Quay configuration bundle secret that includes the clair-config.yaml file.
|
Note
|
The following procedure configures Clair with SSL/TLS certificates. |
-
Create a Quay configuration bundle secret that includes the
clair-config.yamlby entering the following command:$ oc create secret generic --from-file config.yaml=./config.yaml --from-file extra_ca_cert_rds-ca-2019-root.pem=./rds-ca-2019-root.pem --from-file clair-config.yaml=./clair-config.yaml --from-file ssl.cert=./ssl.cert --from-file ssl.key=./ssl.key config-bundle-secretExample Clairconfig.yamlfileindexer: connstring: host=quay-server.example.com port=5432 dbname=quay user=quayrdsdb password=quayrdsdb sslrootcert=/run/certs/rds-ca-2019-root.pem sslmode=verify-ca layer_scan_concurrency: 6 migrations: true scanlock_retry: 11 log_level: debug matcher: connstring: host=quay-server.example.com port=5432 dbname=quay user=quayrdsdb password=quayrdsdb sslrootcert=/run/certs/rds-ca-2019-root.pem sslmode=verify-ca migrations: true metrics: name: prometheus notifier: connstring: host=quay-server.example.com port=5432 dbname=quay user=quayrdsdb password=quayrdsdb sslrootcert=/run/certs/rds-ca-2019-root.pem sslmode=verify-ca migrations: trueNote-
The database certificate is mounted under
/run/certs/rds-ca-2019-root.pemon the Clair application pod in theclair-config.yaml. It must be specified when configuring yourclair-config.yaml.
-
-
Add the
clair-config.yamlfile to your bundle secret, for example:apiVersion: v1 kind: Secret metadata: name: config-bundle-secret namespace: quay-enterprise data: config.yaml: <base64 encoded Quay config> clair-config.yaml: <base64 encoded Clair config> extra_ca_cert_<name>: <base64 encoded ca cert> ssl.crt: <base64 encoded SSL certificate> ssl.key: <base64 encoded SSL private key>NoteWhen updated, the provided
clair-config.yamlfile is mounted into the Clair pod. Any fields not provided are automatically populated with defaults using the Clair configuration module. -
You can check the status of your Clair pod by clicking the commit in the Build History page, or by running
oc get pods -n <namespace>. For example:$ oc get pods -n <namespace>Example outputNAME READY STATUS RESTARTS AGE f192fe4a-c802-4275-bcce-d2031e635126-9l2b5-25lg2 1/1 Running 0 7s
Running a custom Clair configuration with a managed Clair database
You can customize Clair settings while the Project Quay Operator manages the Clair database. Use this approach to disable updater resources or configure Clair for disconnected environments.
|
Note
|
|
Setting a Clair database to managed
To have the Project Quay Operator manage your Clair database, you can set the clairpostgres component to managed in your QuayRegistry custom resource.
-
In the Quay Operator, set the
clairpostgrescomponent of theQuayRegistrycustom resource tomanaged: true:apiVersion: quay.redhat.com/v1 kind: QuayRegistry metadata: name: quay370 spec: configBundleSecret: config-bundle-secret components: - kind: objectstorage managed: false - kind: route managed: true - kind: tls managed: false - kind: clairpostgres managed: true
Configuring a custom Clair database with a managed Clair configuration
To supply a custom clair-config.yaml while the Operator manages Clair on Project Quay, you can create a Quay configuration bundle secret that includes your Clair configuration file.
-
Create a Quay configuration bundle secret that includes the
clair-config.yamlby entering the following command:$ oc create secret generic --from-file config.yaml=./config.yaml --from-file extra_ca_cert_rds-ca-2019-root.pem=./rds-ca-2019-root.pem --from-file clair-config.yaml=./clair-config.yaml config-bundle-secretExample Clairconfig.yamlfileindexer: connstring: host=quay-server.example.com port=5432 dbname=quay user=quayrdsdb password=quayrdsdb sslmode=disable layer_scan_concurrency: 6 migrations: true scanlock_retry: 11 log_level: debug matcher: connstring: host=quay-server.example.com port=5432 dbname=quay user=quayrdsdb password=quayrdsdb sslmode=disable migrations: true metrics: name: prometheus notifier: connstring: host=quay-server.example.com port=5432 dbname=quay user=quayrdsdb password=quayrdsdb sslmode=disable migrations: trueNoteThe database certificate is mounted under
/run/certs/rds-ca-2019-root.pemon the Clair application pod in theclair-config.yaml. It must be specified when configuring yourclair-config.yaml. -
Add the
clair-config.yamlfile to your bundle secret, for example:apiVersion: v1 kind: Secret metadata: name: config-bundle-secret namespace: quay-enterprise data: config.yaml: <base64 encoded Quay config> clair-config.yaml: <base64 encoded Clair config>NoteWhen updated, the provided
clair-config.yamlfile is mounted into the Clair pod. Any fields not provided are automatically populated with defaults using the Clair configuration module. -
You can check the status of your Clair pod by clicking the commit in the Build History page, or by running
oc get pods -n <namespace>. For example:$ oc get pods -n <namespace>Example outputNAME READY STATUS RESTARTS AGE f192fe4a-c802-4275-bcce-d2031e635126-9l2b5-25lg2 1/1 Running 0 7s
Clair in disconnected environments
Clair supports disconnected Project Quay deployments that have no direct internet access. You can use the clairctl tool to transfer vulnerability database updates from an open host so Clair can scan images offline.
Clair uses a set of components called updaters to handle the fetching and parsing of data from various vulnerability databases. By default, updaters pull vulnerability data directly from the internet and work for immediate use.
|
Note
|
Currently, Clair enrichment data is CVSS data. Enrichment data is currently unsupported in disconnected environments. |
Setting up Clair in a disconnected OpenShift Container Platform cluster
To install the clairctl command-line utility on a disconnected OpenShift Container Platform cluster, you can copy the binary from a running Clair pod and make it executable.
-
Install the
clairctlprogram for a Clair deployment in an OpenShift Container Platform cluster by entering the following command:$ oc -n quay-enterprise exec example-registry-clair-app-64dd48f866-6ptgw -- cat /usr/bin/clairctl > clairctl -
Set the permissions of the
clairctlfile so that it can be executed and run by the user, for example:$ chmod u+x ./clairctl
Retrieving and decoding the Clair configuration secret for Clair deployments on OpenShift Container Platform
To prepare Clair for a disconnected OpenShift Container Platform environment, you can retrieve and decode the Clair configuration secret, then set disable_updaters and airgap to true in clair-config.yaml.
-
You have installed the
clairctlcommand line utility tool.
-
Enter the following command to retrieve and decode the configuration secret, and then save it to a Clair configuration YAML:
$ oc get secret -n quay-enterprise example-registry-clair-config-secret -o "jsonpath={$.data['config\.yaml']}" | base64 -d > clair-config.yaml -
Update the
clair-config.yamlfile so that thedisable_updatersandairgapparameters are set toTrue, for example:# ... indexer: airgap: true # ... matcher: disable_updaters: true # ...
Exporting the updaters bundle from a connected Clair instance
To export vulnerability database updates from a connected Clair instance, you can run clairctl export-updaters with your configuration file.
-
You have installed the
clairctlcommand line utility tool. -
You have retrieved and decoded the Clair configuration secret, and saved it to a Clair
config.yamlfile. -
The
disable_updatersandairgapparameters are set toTruein your Clairconfig.yamlfile.
-
From a Clair instance that has access to the internet, use the
clairctlCLI tool with your configuration file to export the updaters bundle. For example:$ ./clairctl --config ./config.yaml export-updaters updates.gz
Configuring access to the Clair database in the disconnected OpenShift Container Platform cluster
To access the Clair database in a disconnected OpenShift Container Platform cluster, you can identify the database service, forward its port, and point your Clair configuration at localhost.
-
You have installed the
clairctlcommand line utility tool. -
You have retrieved and decoded the Clair configuration secret, and saved it to a Clair
config.yamlfile. -
The
disable_updatersandairgapparameters are set toTruein your Clairconfig.yamlfile. -
You have exported the updaters bundle from a Clair instance that has access to the internet.
-
Determine your Clair database service by using the
ocCLI tool, for example:$ oc get svc -n quay-enterpriseExample outputNAME TYPE CLUSTER-IP EXTERNAL-IP PORT(S) AGE example-registry-clair-app ClusterIP 172.30.224.93 <none> 80/TCP,8089/TCP 4d21h example-registry-clair-postgres ClusterIP 172.30.246.88 <none> 5432/TCP 4d21h ... -
Forward the Clair database port so that the local machine can access it. For example:
$ oc port-forward -n quay-enterprise service/example-registry-clair-postgres 5432:5432 -
Update your Clair
config.yamlfile, for example:indexer: connstring: host=localhost port=5432 dbname=postgres user=postgres password=postgres sslmode=disable layer_scan_concurrency: 5 migrations: true scanlock_retry: 10 airgap: true scanner: repo: rhel-repository-scanner: repo2cpe_mapping_file: /data/repository-to-cpe.json package: rhel_containerscanner: name2repos_mapping_file: /data/container-name-repos-map.jsonwhere:
indexer.connstring-
Specifies the connection string for the database.
indexer.scanner.repo.rhel-repository-scanner-
Specifies the repository scanner configuration.
indexer.scanner.package.rhel_containerscanner-
Specifies the container scanner configuration.
Importing the updaters bundle into the disconnected OpenShift Container Platform cluster
To load vulnerability data into Clair on a disconnected OpenShift Container Platform cluster, you can run clairctl import-updaters with your configuration file and updaters bundle.
-
You have installed the
clairctlcommand line utility tool. -
You have retrieved and decoded the Clair configuration secret, and saved it to a Clair
config.yamlfile. -
The
disable_updatersandairgapparameters are set toTruein your Clairconfig.yamlfile. -
You have exported the updaters bundle from a Clair instance that has access to the internet.
-
You have transferred the updaters bundle into your disconnected environment.
-
Use the
clairctlCLI tool to import the updaters bundle into the Clair database on OpenShift Container Platform. For example:$ ./clairctl --config ./clair-config.yaml import-updaters updates.gz
Setting up a self-managed deployment of Clair for a disconnected OpenShift Container Platform cluster
To install the clairctl command-line utility for a self-managed Clair deployment on OpenShift Container Platform, you can copy the binary from a Clair container with Podman and make it executable.
-
Install the
clairctlprogram for a self-managed Clair deployment by using thepodman cpcommand, for example:$ sudo podman cp clairv4:/usr/bin/clairctl ./clairctl -
Set the permissions of the
clairctlfile so that it can be executed and run by the user, for example:$ chmod u+x ./clairctl
Deploying a self-managed Clair container for disconnected OpenShift Container Platform clusters
To deploy a self-managed Clair container for disconnected OpenShift Container Platform clusters, you can create a configuration directory, set disable_updaters and airgap in the Clair configuration file, and start the container with Podman.
-
You have installed the
clairctlcommand line utility tool.
-
Create a folder for your Clair configuration file, for example:
$ mkdir /etc/clairv4/config/ -
Create a Clair configuration file with the
disable_updatersparameter set toTrue, for example:--- indexer: airgap: true --- matcher: disable_updaters: true --- -
Start Clair by using the container image, mounting in the configuration from the file you created:
$ sudo podman run -it --rm --name clairv4 \
-p 8081:8081 -p 8088:8088 \
-e CLAIR_CONF=/clair/config.yaml \
-e CLAIR_MODE=combo \
-v /etc/clairv4/config:/clair:Z \
{productrepo}/{clairimage}:{productminv}
Exporting the updaters bundle from a connected Clair instance
To export vulnerability database updates from a connected self-managed Clair instance, you can run clairctl export-updaters with your configuration file.
-
You have installed the
clairctlcommand line utility tool. -
You have deployed Clair.
-
The
disable_updatersandairgapparameters are set toTruein your Clairconfig.yamlfile.
-
From a Clair instance that has access to the internet, use the
clairctlCLI tool with your configuration file to export the updaters bundle. For example:$ ./clairctl --config ./config.yaml export-updaters updates.gz
Configuring access to the Clair database in the disconnected OpenShift Container Platform cluster
To access the Clair database in a disconnected OpenShift Container Platform cluster for a self-managed deployment, you can identify the database service, forward its port, and point your Clair configuration at localhost.
-
You have installed the
clairctlcommand line utility tool. -
You have deployed Clair.
-
The
disable_updatersandairgapparameters are set toTruein your Clairconfig.yamlfile. -
You have exported the updaters bundle from a Clair instance that has access to the internet.
-
Determine your Clair database service by using the
ocCLI tool, for example:$ oc get svc -n quay-enterpriseExample outputNAME TYPE CLUSTER-IP EXTERNAL-IP PORT(S) AGE example-registry-clair-app ClusterIP 172.30.224.93 <none> 80/TCP,8089/TCP 4d21h example-registry-clair-postgres ClusterIP 172.30.246.88 <none> 5432/TCP 4d21h ... -
Forward the Clair database port so that the local machine can access it. For example:
$ oc port-forward -n quay-enterprise service/example-registry-clair-postgres 5432:5432 -
Update your Clair
config.yamlfile, for example:indexer: connstring: host=localhost port=5432 dbname=postgres user=postgres password=postgres sslmode=disable layer_scan_concurrency: 5 migrations: true scanlock_retry: 10 airgap: true scanner: repo: rhel-repository-scanner: repo2cpe_mapping_file: /data/repository-to-cpe.json package: rhel_containerscanner: name2repos_mapping_file: /data/container-name-repos-map.jsonwhere:
indexer.connstring-
Specifies the connection string for the database.
indexer.scanner.repo.rhel-repository-scannerindexer.scanner.package.rhel_containerscanner-
Specifies the container scanner configuration.
Importing the updaters bundle into the disconnected OpenShift Container Platform cluster
To load vulnerability data into a self-managed Clair deployment on a disconnected OpenShift Container Platform cluster, you can run clairctl import-updaters with your configuration file and updaters bundle.
-
You have installed the
clairctlcommand line utility tool. -
You have deployed Clair.
-
The
disable_updatersandairgapparameters are set toTruein your Clairconfig.yamlfile. -
You have exported the updaters bundle from a Clair instance that has access to the internet.
-
You have transferred the updaters bundle into your disconnected environment.
-
Use the
clairctlCLI tool to import the updaters bundle into the Clair database on OpenShift Container Platform:$ ./clairctl --config ./clair-config.yaml import-updaters updates.gz
Common Product Enumeration mapping in Clair
Clair uses Common Product Enumeration (CPE) mapping files to map RPM packages to security data for Red Hat Enterprise Linux (RHEL) container images. Accurate vulnerability reports depend on these mapping files being available to the Clair scanner.
The scanner requires the CPE file to be present and accessible to process RPM packages properly. If these files are missing or inaccessible, RPM packages installed in the container image are skipped during the scanning process.
By default, the Clair indexer includes the repos2cpe and names2repos data files within the Clair container. This allows you to reference local paths such as /data/repository-to-cpe.json without additional external configuration.
|
Important
|
While Red Hat Product Security updates CPE files regularly, the versions bundled within the Clair container are only updated during Project Quay releases. This can lead to temporary discrepancies between the latest security data and the versions bundled with your current installation. |
Clair configuration overview
You can configure Clair with a structured YAML file and run each node in indexer, matcher, or combo mode. Use this overview to understand Clair configuration, proxy requirements, and the configuration reference for Project Quay.
Each Clair node needs to specify what mode it runs in and a path to a configuration file through CLI flags or environment variables. For example:
$ clair -conf ./path/to/config.yaml -mode indexeror
$ clair -conf ./path/to/config.yaml -mode matcherThe aforementioned commands each start two Clair nodes using the same configuration file. One runs the indexing facilities, while other runs the matching facilities.
If you are running Clair in combo mode, you must supply the indexer, matcher, and notifier configuration blocks in the configuration.
Information about using Clair in a proxy environment
Environment variables respected by the Go standard library can be specified if needed, for example:
-
HTTP_PROXY$ export HTTP_PROXY=http://<user_name>:<password>@<proxy_host>:<proxy_port> -
HTTPS_PROXY.$ export HTTPS_PROXY=https://<user_name>:<password>@<proxy_host>:<proxy_port> -
SSL_CERT_DIR$ export SSL_CERT_DIR=/<path>/<to>/<ssl>/<certificates> -
NO_PROXY$ export NO_PROXY=<comma_separated_list_of_hosts_and_domains>
If you are using a proxy server in your environment with Clair’s updater URLs, you must identify which URL needs to be added to the proxy allowlist to ensure that Clair can access them unimpeded. For example, the osv updater requires access to https://osv-vulnerabilities.storage.googleapis.com to fetch ecosystem data dumps. In this scenario, the URL must be added to the proxy allowlist.
You must also ensure that the standard Clair URLs are added to the proxy allowlist:
-
https://search.maven.org/solrsearch/select -
https://catalog.redhat.com/api/containers/ -
https://access.redhat.com/security/data/metrics/repository-to-cpe.json -
https://access.redhat.com/security/data/metrics/container-name-repos-map.json
When configuring the proxy server, take into account any authentication requirements or specific proxy settings needed to enable seamless communication between Clair and these URLs. By thoroughly documenting and addressing these considerations, you can ensure that Clair functions effectively while routing its updater traffic through the proxy.
Clair configuration reference
The following YAML shows an example Clair configuration:
http_listen_addr: ""
introspection_addr: ""
log_level: ""
tls: {}
indexer:
    connstring: ""
    scanlock_retry: 0
    layer_scan_concurrency: 5
    migrations: false
    scanner: {}
    airgap: false
matcher:
    connstring: ""
    indexer_addr: ""
    migrations: false
    period: ""
    disable_updaters: false
    update_retention: 2
matchers:
    names: nil
    config: nil
updaters:
    sets: nil
    config: nil
notifier:
    connstring: ""
    migrations: false
    indexer_addr: ""
    matcher_addr: ""
    poll_interval: ""
    delivery_interval: ""
    disable_summary: false
    webhook: null
    amqp: null
    stomp: null
auth:
  psk: nil
trace:
    name: ""
    probability: null
    jaeger:
        agent:
            endpoint: ""
        collector:
            endpoint: ""
            username: null
            password: null
        service_name: ""
        tags: nil
        buffer_max: 0
metrics:
    name: ""
    prometheus:
        endpoint: null
    dogstatsd:
url: ""|
Note
|
The above YAML file lists every key for completeness. Using this configuration file as-is results in some options not having their defaults set normally. |
Clair general fields
You can use the general Clair configuration fields to set the HTTP API listen address, introspection endpoints, log level, and TLS options for Clair in Project Quay.
| Field | Type | Description |
|---|---|---|
http_listen_addr |
String |
Configures where the HTTP API is exposed. Default: |
introspection_addr |
String |
Configures where Clair’s metrics and health endpoints are exposed. |
log_level |
String |
Sets the logging level. Requires one of the following strings: debug-color, debug, info, warn, error, fatal, panic |
tls |
String |
A map containing the configuration for serving the HTTP API of TLS/SSL and HTTP/2. |
.cert |
String |
The TLS certificate to be used. Must be a full-chain certificate. |
Example configuration for general Clair fields
The following example shows a Clair configuration.
# ...
http_listen_addr: 0.0.0.0:6060
introspection_addr: 0.0.0.0:8089
log_level: info
# ...
Clair indexer configuration fields
You can use the Clair indexer configuration fields to control database connections, scan concurrency, air-gap mode, and scanner options in Project Quay.
| Field | Type | Description |
|---|---|---|
indexer |
Object |
Provides Clair indexer node configuration. |
.airgap |
Boolean |
Disables HTTP access to the internet for indexers and fetchers. Private IPv4 and IPv6 addresses are allowed. Database connections are unaffected. |
.connstring |
String |
A Postgres connection string. Accepts format as a URL or libpq connection string. |
.index_report_request_concurrency |
Integer |
Rate limits the number of index report creation requests. Setting this to The API returns a |
.scanlock_retry |
Integer |
A positive integer representing seconds. Concurrent indexers lock on manifest scans to avoid clobbering. This value tunes how often a waiting indexer polls for the lock. |
.layer_scan_concurrency |
Integer |
Positive integer limiting the number of concurrent layer scans. Indexers will match a manifest’s layer concurrently. This value tunes the number of layers an indexer scans in parallel. |
.migrations |
Boolean |
Whether indexer nodes handle migrations to their database. |
.scanner |
String |
Indexer configuration. Scanner allows for passing configuration options to layer scanners. The scanner will have this configuration pass to it on construction if designed to do so. |
.scanner.dist |
String |
A map with the name of a particular scanner and arbitrary YAML as a value. |
.scanner.package |
String |
A map with the name of a particular scanner and arbitrary YAML as a value. |
.scanner.repo |
String |
A map with the name of a particular scanner and arbitrary YAML as a value. |
Example indexer configuration
The following example shows a hypothetical indexer configuration for Clair.
# ...
indexer:
  connstring: host=quay-server.example.com port=5433 dbname=clair user=clairuser password=clairpass sslmode=disable
  scanlock_retry: 10
  layer_scan_concurrency: 5
  migrations: true
# ...
Clair matcher configuration fields
You can use the Clair matcher configuration fields to control database connections, update periods, and indexer addresses for Clair in Project Quay.
|
Note
|
Differs from |
| Field | Type | Description |
|---|---|---|
matcher |
Object |
Provides Clair matcher node configuration. |
.cache_age |
String |
Controls how long users should be hinted to cache responses for. |
.connstring |
String |
A Postgres connection string. Accepts format as a URL or libpq connection string. |
.max_conn_pool |
Integer |
Limits the database connection pool size. Clair allows for a custom connection pool size. This number directly sets how many active database connections are allowed concurrently. This parameter will be ignored in a future version. Users should configure this through the connection string. |
.indexer_addr |
String |
A matcher contacts an indexer to create a vulnerability report. The location of this indexer is required. Defaults to |
.migrations |
Boolean |
Whether matcher nodes handle migrations to their databases. |
.period |
String |
Determines how often updates for new security advisories take place. Defaults to |
.disable_updaters |
Boolean |
Whether to run background updates or not. Default: |
.update_retention |
Integer |
Sets the number of update operations to retain between garbage collection cycles. This should be set to a safe MAX value based on database size constraints. Defaults to If a value of less than |
Example matcher configuration
# ...
matcher:
  connstring: >-
    host=<DB_HOST> port=5432 dbname=<matcher> user=<DB_USER> password=D<B_PASS>
    sslmode=verify-ca sslcert=/etc/clair/ssl/cert.pem sslkey=/etc/clair/ssl/key.pem
    sslrootcert=/etc/clair/ssl/ca.pem
  indexer_addr: http://clair-v4/
  disable_updaters: false
  migrations: true
  period: 6h
  update_retention: 2
# ...
Clair matchers configuration fields
You can use the Clair matchers configuration fields to enable specific in-tree matchers and pass matcher-specific options in Project Quay.
|
Note
|
Differs from |
| Field | Type | Description |
|---|---|---|
matchers |
Array of strings |
Provides configuration for the in-tree |
.names |
String |
A list of string values informing the matcher factory about enabled matchers. If value is set to |
.config |
String |
Provides configuration to a specific matcher. A map keyed by the name of the matcher containing a sub-object which will be provided to the matchers factory constructor. For example: |
Example matchers configuration
The following example shows a hypothetical Clair deployment that only requires only the alpine, aws, debian, oracle matchers.
# ...
matchers:
  names:
  - "alpine-matcher"
  - "aws"
  - "debian"
  - "oracle"
# ...
Clair updaters configuration fields
You can use the Clair updaters configuration fields to select which updater sets run and to pass updater-specific options in Project Quay.
| Field | Type | Description |
|---|---|---|
updaters |
Object |
Provides configuration for the matcher’s update manager. |
.sets |
String |
A list of values informing the update manager which updaters to run. If value is set to If left blank, zero updaters run. |
.config |
String |
Provides configuration to specific updater sets. A map keyed by the name of the updater set containing a sub-object which will be provided to the updater set’s constructor. For a list of the sub-objects for each updater, see "Advanced updater configuration". |
Example updaters configuration
In the following configuration, only the rhel set is configured. The ignore_unpatched variable, which is specific to the rhel updater, is also defined.
# ...
updaters:
  sets:
    - rhel
  config:
    rhel:
      ignore_unpatched: false
# ...
Clair notifier configuration fields
You can use the Clair notifier configuration fields to set database connections, polling intervals, and webhook, AMQP, or STOMP delivery options in Project Quay.
| Field | Type | Description |
|---|---|---|
notifier |
Object |
Provides Clair notifier node configuration. |
.connstring |
String |
Postgres connection string. Accepts format as URL, or libpq connection string. |
.migrations |
Boolean |
Whether notifier nodes handle migrations to their database. |
.indexer_addr |
String |
A notifier contacts an indexer to create or obtain manifests affected by vulnerabilities. The location of this indexer is required. |
.matcher_addr |
String |
A notifier contacts a matcher to list update operations and acquire diffs. The location of this matcher is required. |
.poll_interval |
String |
The frequency at which the notifier will query a matcher for update operations. |
.delivery_interval |
String |
The frequency at which the notifier attempts delivery of created, or previously failed, notifications. |
.disable_summary |
Boolean |
Controls whether notifications should be summarized to one per manifest. |
Example notifier configuration
The following notifier snippet is for a minimal configuration.
# ...
notifier:
  connstring: >-
    host=DB_HOST port=5432 dbname=notifier user=DB_USER password=DB_PASS
    sslmode=verify-ca sslcert=/etc/clair/ssl/cert.pem sslkey=/etc/clair/ssl/key.pem
    sslrootcert=/etc/clair/ssl/ca.pem
  indexer_addr: http://clair-v4/
  matcher_addr: http://clair-v4/
  delivery_interval: 5s
  migrations: true
  poll_interval: 15s
  webhook:
    target: "http://webhook/"
    callback: "http://clair-notifier/notifier/api/v1/notifications"
    headers: ""
  amqp: null
  stomp: null
# ...
Clair webhook configuration fields
The following webhook fields are available for the Clair notifier environment.
.webhook |
Object |
Configures the notifier for webhook delivery. |
.webhook.target |
String |
URL where the webhook will be delivered. |
.webhook.callback |
String |
The callback URL where notifications can be retrieved. The notification ID will be appended to this URL. This will typically be where the Clair notifier is hosted. |
.webhook.headers |
String |
A map associating a header name to a list of values. |
Example webhook configuration
# ...
notifier:
# ...
  webhook:
    target: "http://webhook/"
    callback: "http://clair-notifier/notifier/api/v1/notifications"
# ...
Clair amqp configuration fields
The following Advanced Message Queuing Protocol (AMQP) fields are available for the Clair notifier environment.
.amqp |
Object |
Configures the notifier for AMQP delivery. [NOTE] ==== Clair does not declare any AMQP components on its own. All attempts to use an exchange or queue are passive only and will fail. Broker administrators should setup exchanges and queues ahead of time. ==== |
.amqp.direct |
Boolean |
If |
.amqp.rollup |
Integer |
When |
.amqp.exchange |
Object |
The AMQP exchange to connect to. |
.amqp.exchange.name |
String |
The name of the exchange to connect to. |
.amqp.exchange.type |
String |
The type of the exchange. Typically one of the following: direct, fanout, topic, headers. |
.amqp.exchange.durability |
Boolean |
Whether the configured queue is durable. |
.amqp.exchange.auto_delete |
Boolean |
Whether the configured queue uses an |
.amqp.routing_key |
String |
The name of the routing key each notification is sent with. |
.amqp.callback |
String |
If |
.amqp.uris |
String |
A list of one or more AMQP brokers to connect to, in priority order. |
.amqp.tls |
Object |
Configures TLS/SSL connection to an AMQP broker. |
.amqp.tls.root_ca |
String |
The filesystem path where a root CA can be read. |
.amqp.tls.cert |
String |
The filesystem path where a TLS/SSL certificate can be read. [NOTE]
====
Clair also allows |
.amqp.tls.key |
String |
The filesystem path where a TLS/SSL private key can be read. |
Example AMQP configuration
The following example shows a hypothetical AMQP configuration for Clair.
# ...
notifier:
# ...
  amqp:
    exchange:
        name: ""
        type: "direct"
        durable: true
        auto_delete: false
    uris: ["amqp://user:pass@host:10000/vhost"]
    direct: false
    routing_key: "notifications"
    callback: "http://clair-notifier/notifier/api/v1/notifications"
    tls:
     root_ca: "optional/path/to/rootca"
     cert: "madatory/path/to/cert"
     key: "madatory/path/to/key"
# ...
Clair STOMP configuration fields
The following Simple Text Oriented Message Protocol (STOMP) fields are available for the Clair notifier environment.
| .stomp | Object | Configures the notifier for STOMP delivery. |
|---|---|---|
.stomp.direct |
Boolean |
If |
.stomp.rollup |
Integer |
If |
.stomp.callback |
String |
If |
.stomp.destination |
String |
The STOMP destination to deliver notifications to. |
.stomp.uris |
String |
A list of one or more STOMP brokers to connect to in priority order. |
.stomp.tls |
Object |
Configured TLS/SSL connection to STOMP broker. |
.stomp.tls.root_ca |
String |
The filesystem path where a root CA can be read. [NOTE]
====
Clair also respects |
.stomp.tls.cert |
String |
The filesystem path where a TLS/SSL certificate can be read. |
.stomp.tls.key |
String |
The filesystem path where a TLS/SSL private key can be read. |
.stomp.user |
String |
Configures login details for the STOMP broker. |
.stomp.user.login |
String |
The STOMP login to connect with. |
.stomp.user.passcode |
String |
The STOMP passcode to connect with. |
Example STOMP configuration
The following example shows a hypothetical STOMP configuration for Clair.
# ...
notifier:
# ...
  stomp:
    desitnation: "notifications"
    direct: false
    callback: "http://clair-notifier/notifier/api/v1/notifications"
    login:
      login: "username"
      passcode: "passcode"
    tls:
     root_ca: "optional/path/to/rootca"
     cert: "madatory/path/to/cert"
     key: "madatory/path/to/key"
# ...
Clair authorization configuration fields
You can use the Clair authorization configuration fields to configure JWT authentication with a pre-shared key for Clair in Project Quay.
| Field | Type | Description |
|---|---|---|
auth |
Object |
Defines Clair’s external and intra-service JWT based authentication. If multiple |
.psk |
String |
Defines pre-shared key authentication. |
.psk.key |
String |
A shared base64 encoded key distributed between all parties signing and verifying JWTs. |
.psk.iss |
String |
A list of JWT issuers to verify. An empty list accepts any issuer in a JWT claim. |
Example authorization configuration
The following authorization snippet is for a minimal configuration.
# ...
auth:
  psk:
    key: MTU5YzA4Y2ZkNzJoMQ==
    iss: ["quay"]
# ...
Clair trace configuration fields
You can use the Clair trace configuration fields to configure OpenTelemetry and Jaeger distributed tracing for Clair in Project Quay.
| Field | Type | Description |
|---|---|---|
trace |
Object |
Defines distributed tracing configuration based on OpenTelemetry. |
.name |
String |
The name of the application traces will belong to. |
.probability |
Integer |
The probability a trace will occur. |
.jaeger |
Object |
Defines values for Jaeger tracing. |
.jaeger.agent |
Object |
Defines values for configuring delivery to a Jaeger agent. |
.jaeger.agent.endpoint |
String |
An address in the |
.jaeger.collector |
Object |
Defines values for configuring delivery to a Jaeger collector. |
.jaeger.collector.endpoint |
String |
An address in the |
.jaeger.collector.username |
String |
A Jaeger username. |
.jaeger.collector.password |
String |
A Jaeger password. |
.jaeger.service_name |
String |
The service name registered in Jaeger. |
.jaeger.tags |
String |
Key-value pairs to provide additional metadata. |
.jaeger.buffer_max |
Integer |
The maximum number of spans that can be buffered in memory before they are sent to the Jaeger backend for storage and analysis. |
Example trace configuration
The following example shows a hypothetical trace configuration for Clair.
# ...
trace:
  name: "jaeger"
  probability: 1
  jaeger:
    agent:
      endpoint: "localhost:6831"
    service_name: "clair"
# ...
Clair metrics configuration fields
You can use the Clair metrics configuration fields to configure Prometheus metrics export for Clair in Project Quay.
| Field | Type | Description |
|---|---|---|
metrics |
Object |
Defines distributed tracing configuration based on OpenTelemetry. |
.name |
String |
The name of the metrics in use. |
.prometheus |
String |
Configuration for a Prometheus metrics exporter. |
.prometheus.endpoint |
String |
Defines the path where metrics are served. |
Example metrics configuration
The following example shows a hypothetical metrics configuration for Clair.
# ...
metrics:
  name: "prometheus"
  prometheus:
    endpoint: "/metricsz"
# ...