Install Red Hat Quay on OpenShift Container Platform Container Platform
Install the Red Hat Quay Operator from OperatorHub and deploy a QuayRegistry, including infrastructure-node options.
Installing the Project Quay Operator from the OperatorHub
To install the Project Quay Operator from the OpenShift Container Platform OperatorHub, you can configure the installation mode and update approval strategy. Install the Operator cluster-wide to ensure the monitoring component is available.
-
On the OpenShift Container Platform web console, click Operators → OperatorHub.
-
In the search box, type Project Quay and select the official Project Quay Operator provided by Red Hat.
-
Select Install.
-
Select the update channel, for example, stable-{producty} and the version.
-
For the Installation mode, select one of the following:
-
All namespaces on the cluster. Select this option if you want the Project Quay Operator to be available cluster-wide. It is recommended that you install the Project Quay Operator cluster-wide. If you choose a single namespace, the monitoring component is not available.
-
A specific namespace on the cluster. Select this option if you want Project Quay deployed within a single namespace. Note that selecting this option renders the
monitoringcomponent unavailable.
-
-
Select an Approval Strategy. Choose to approve either automatic or manual updates. Automatic update strategy is recommended.
-
Select Install.
Deploying the Project Quay registry by using the OpenShift Container Platform web console
To deploy a basic Project Quay registry instance, you can use the OpenShift Container Platform web console to create a QuayRegistry custom resource. You configure managed or unmanaged object storage during the deployment process.
-
You have installed the Project Quay Operator.
-
You have have administrative privileges to the cluster.
-
On the OpenShift Container Platform web console, click Operators → Installed Operators → Red Hat Quay.
-
On the Red Hat Quay dashboard, click Create instance.
-
On the Create QuayRegistry page, review the default settings of the
QuayRegistrycustom resource (CR). Here, you decide whether to to use managed or unmanaged object storage.-
If you are using the Multicloud Object Gateway or Red Hat OpenShift Data Foundation as your object storage, keep the following settings:
- kind: objectstorage managed: true -
If you are using a different storage provider, such as Google Cloud Platform, AWS S3, or Nutanix, set the
objectstoragecomponent as follows:- kind: objectstorage managed: false
-
-
Click Create. You are redirected to the Quay Registry tab on the Operator page.
-
Click the name of the Project Quay registry that you created, then click Events to view the status of creation. If you used managed storage and leveraged the Multicloud Object Gateway, the registry completes creation. If you are using Red Hat OpenShift Data Foundation or an unmanaged storage backend provider, complete the following steps:
-
Click the Details page of the Project Quay registry.
-
Click the name of the Config Bundle Secret resource, for example, <example_registry_name_config-bundle-secret-12345>.
-
Click Actions → Edit Secret, and pass in the following information from your backend storage provider:
# ... DISTRIBUTED_STORAGE_CONFIG: <storage_provider>: - <storage_provider_name> - access_key: <access_key> bucket_name: <bucket_name> secret_key: <secret_key> storage_path: /datastorage/registry # ...NoteDepending on your storage provider, different information is required. For more information, see see Storage object configuration fields.
-
Click Save, and then re-navigate to the Events page of the registry to ensure successful deployment.
-
Deploying the Project Quay registry by using the CLI
To deploy a basic Project Quay registry instance, you can use the oc CLI to create a QuayRegistry custom resource. You configure managed or unmanaged object storage during the deployment process.
|
Note
|
The following For more information, see Automation configuration options. |
-
You have logged into OpenShift Container Platform using the CLI.
-
Create a namespace, for example,
quay-enterprise, by entering the following command:$ oc new-project quay-enterprise -
Create the
QuayRegistrycustom resource (CR).-
If the
objectstoragecomponent is set tomanaged: true, complete the following steps:-
Create the
QuayRegistryCR by entering the following command:$ cat <<EOF | oc create -n quay-enterprise -f - apiVersion: quay.redhat.com/v1 kind: QuayRegistry metadata: name: example-registry namespace: quay-enterprise EOF
-
-
If the
objectstoragecomponent is set tomanaged: false, complete the following steps:-
Create the
config.yamlfile for Project Quay by entering the following command. You must include the information required for your backend storage provider. During this step, you can enable additional Project Quay features. The following example is for a minimal configuration that includes the configuration options for automating early setup tasks:$ cat <<EOF > config.yaml ALLOW_PULLS_WITHOUT_STRICT_LOGGING: false AUTHENTICATION_TYPE: Database DEFAULT_TAG_EXPIRATION: 2w FEATURE_USER_INITIALIZE: true SUPER_USERS: - <username> BROWSER_API_CALLS_XHR_ONLY: false FEATURE_USER_CREATION: false DISTRIBUTED_STORAGE_CONFIG: <storage_provider>: - <storage_provider_name> - access_key: <access_key> bucket_name: <bucket_name> secret_key: <secret_key> storage_path: /datastorage/registry ENTERPRISE_LOGO_URL: /static/img/RH_Logo_Quay_Black_UX-horizontal.svg FEATURE_BUILD_SUPPORT: false FEATURE_DIRECT_LOGIN: true FEATURE_MAILING: false REGISTRY_TITLE: Red Hat Quay REGISTRY_TITLE_SHORT: Red Hat Quay SETUP_COMPLETE: true TAG_EXPIRATION_OPTIONS: - 2w TEAM_RESYNC_STALE_TIME: 60m TESTING: false EOF-
FEATURE_USER_INITIALIZE: Set this field totrueif you plan to create the first user by using API. -
SUPER_USERS: Include this field and the username that you plan to leverage as a Project Quay administrator. -
BROWSER_API_CALLS_XHR_ONLY: Set this field tofalseto allow general browser-based access to the API. -
FEATURE_USER_CREATION: Set this field tofalseto relegate the creation of new users to only superusers.
-
-
-
Create a secret for the configuration by entering the following command:
$ oc create secret generic <quay_config_bundle_name> \ --from-file=config.yaml=</path/to/config.yaml> \ -n quay-enterprise \ --dry-run=client -o yaml | oc apply -f - -
Create the
QuayRegistryCR by entering the following command:$ cat <<EOF | oc create -n quay-enterprise -f - apiVersion: quay.redhat.com/v1 kind: QuayRegistry metadata: name: example-registry namespace: quay-enterprise spec: configBundleSecret: <quay_config_bundle_name> components: - kind: clair managed: true - kind: objectstorage managed: false - kind: mirror managed: true - kind: monitoring managed: true EOFobjectstorage: Set this field tofalsewhen providing your own storage backend.
-
-
Check the status of your registry by entering the following command:
$ oc describe quayregistry <registry_name> -n quay-enterprise... Events: Type Reason Age From Message ---- ------ ---- ---- ------- Normal ComponentsCreationSuccess 23s (x2458 over 42h) quayregistry-controller All objects created/updated successfully -
Alternatively, you can check pod statuses for your registry deployment by entering the following command:
-
Enter the following command to view the deployed components:
$ oc get pods -n quay-enterpriseNAME READY STATUS RESTARTS AGE example-registry-clair-app-5ffc9f77d6-jwr9s 1/1 Running 0 3m42s example-registry-clair-app-5ffc9f77d6-wgp7d 1/1 Running 0 3m41s example-registry-clair-postgres-54956d6d9c-rgs8l 1/1 Running 0 3m5s example-registry-quay-app-79c6b86c7b-8qnr2 1/1 Running 4 3m42s example-registry-quay-app-79c6b86c7b-xk85f 1/1 Running 4 3m41s example-registry-quay-app-upgrade-5kl5r 0/1 Completed 4 3m50s example-registry-quay-database-b466fc4d7-tfrnx 1/1 Running 2 3m42s example-registry-quay-mirror-6d9bd78756-6lj6p 1/1 Running 0 2m58s example-registry-quay-mirror-6d9bd78756-bv6gq 1/1 Running 0 2m58s example-registry-quay-postgres-init-dzbmx 0/1 Completed 0 3m43s example-registry-quay-redis-8bd67b647-skgqx 1/1 Running 0 3m42s
Deploying Project Quay on infrastructure nodes
Deploying Project Quay on infrastructure nodes dedicates specific nodes for registry workloads to improve performance and isolate critical components. You can use infrastructure machine sets or label and taint worker nodes to control where quay pods are scheduled.
By default, all quay-related pods are scheduled on available worker nodes in your OpenShift Container Platform cluster. In some environments, you might want to dedicate certain nodes specifically for infrastructure workloads—such as registry, database, and monitoring pods—to improve performance, isolate critical components, or simplify maintenance.
OpenShift Container Platform supports this approach using infrastructure machine sets, which automatically create and manage nodes reserved for infrastructure.
As an OpenShift Container Platform administrator, you can achieve the same result by labeling and tainting worker nodes. This ensures that only infrastructure workloads, like quay pods, are scheduled on these nodes. After your infrastructure nodes are configured, you can control where quay pods run using node selectors and tolerations.
The following procedures is intended for new deployments that install the Project Quay Operator in a single namespace and provide their own backend storage. The procedure shows you how to prepare nodes and deploy Project Quay on dedicated infrastructure nodes. In this procedure, all quay-related pods are placed on dedicated infrastructure nodes.
Labeling and tainting nodes for infrastructure use
To dedicate nodes for infrastructure workloads like quay pods, you can label and taint worker nodes with the infra role. This prevents user workloads from being scheduled on infrastructure nodes and ensures only infrastructure pods run on these dedicated nodes.
|
Note
|
The following procedure labels three worker nodes with the |
-
Obtain a list of worker nodes in your deployment by entering the following command:
$ oc get nodes | grep workerNAME STATUS ROLES AGE VERSION --- example-cluster-new-c5qqp-worker-b-4zxx5.c.quay-devel.internal Ready worker 401d v1.31.11 example-cluster-new-c5qqp-worker-b-kz6jn.c.quay-devel.internal Ready worker 402d v1.31.11 example-cluster-new-c5qqp-worker-b-wrhw4.c.quay-devel.internal Ready worker 401d v1.31.11 --- -
Add the
node-role.kubernetes.io/infra=label to the worker nodes by entering the following command. The number of infrastructure nodes required depends on your environment. Production environments should provision enough infra nodes to ensure high availability and sufficient resources for allquay-related components. Monitor CPU, memory, and storage utilization to determine if additional infra nodes are required.$ oc label node --overwrite <infra_node_one> <infra_node_two> <infra_node_three> node-role.kubernetes.io/infra= -
Confirm that the
node-role.kubernetes.io/infra=label has been added to the proper nodes by entering the following command:$ oc get node | grep infra--- example-cluster-new-c5qqp-worker-b-4zxx5.c.quay-devel.internal Ready infra,worker 405d v1.32.8 example-cluster-new-c5qqp-worker-b-kz6jn.c.quay-devel.internal Ready infra,worker 406d v1.32.8 example-cluster-new-c5qqp-worker-b-wrhw4.c.quay-devel.internal Ready infra,worker 405d v1.32.8 --- -
When a worker node is assigned the
infrarole, there is a chance that user workloads could get inadvertently assigned to an infra node. To avoid this, you can apply a taint to the infra node, and then add tolerations for the pods that you want to control. Taint the worker nodes with theinfralabel by entering the following command:$ oc adm taint nodes -l node-role.kubernetes.io/infra \ node-role.kubernetes.io/infra=reserved:NoSchedule --overwritenode/example-cluster-new-c5qqp-worker-b-4zxx5.c.quay-devel.internal modified node/example-cluster-new-c5qqp-worker-b-kz6jn.c.quay-devel.internal modified node/example-cluster-new-c5qqp-worker-b-wrhw4.c.quay-devel.internal modified
Creating a project with node selector and tolerations
To ensure that Project Quay pods run on infrastructure nodes, you can create a project with node selector and tolerations annotations. These annotations direct pods to infrastructure nodes and allow them to tolerate the node taints.
-
Add the
node-selectorannotation to the namespace by entering the following command:$ oc annotate namespace <namespace> openshift.io/node-selector='node-role.kubernetes.io/infra=' -
Add the
tolerationsannotation to the namespace by entering the following command:$ oc annotate namespace <namespace> scheduler.alpha.kubernetes.io/defaultTolerations='[{"operator":"Equal","value":"reserved","effect":"NoSchedule","key":"node-role.kubernetes.io/infra"},{"operator":"Equal","value":"reserved","effect":"NoExecute","key":"node-role.kubernetes.io/infra"}]' --overwritenamespace/<namespace> annotatedImportantThe tolerations in this example are specific to two taints commonly applied to infra nodes. The taints configured in your environment might differ. You must set the tolerations accordingly to match the taints applied to your infra nodes.
Installing the Project Quay Operator on the annotated namespace
To install the Project Quay Operator on infrastructure nodes, you can install it in the namespace that has node-selector and tolerations annotations. This ensures the Operator and its pods run on the dedicated infrastructure nodes.
-
On the OpenShift Container Platform web console, click Operators → OperatorHub.
-
In the search box, type Project Quay.
-
Click Project Quay → Install.
-
Select the update channel, for example, stable-{producty} and the version.
-
Click A specific namespace on the cluster for the installation mode, and then select the namespace that you applied the
node-selectorandtolerationsannotations to. -
Click Install.
-
Confirm that the Operator is installed by entering the following command:
$ oc get pods -n <annotated_namespace> -o wide | grep quay-operatorquay-operator.v3.15.1-858b5c5fdc-lf5kj 1/1 Running 0 29m 10.130.6.18 example-cluster-new-c5qqp-worker-f-mhngl.c.quay-devel.internal <none> <none>
Creating the Project Quay registry on infrastructure nodes
To create a Project Quay registry that runs on infrastructure nodes, you can create a QuayRegistry custom resource in the annotated namespace. You must patch the registry components (clair, postgres, redis, and so on) with toleration annotations so they can schedule onto the infra worker nodes.
-
On the OpenShift Container Platform web console, click Operators → Installed Operators → Red Hat Quay.
-
On the Project Quay Operator details page, click Quay Registry → Create QuayRegistry.
-
On the Create QuayRegistry page, set the
monitoringandobjectstoragefields tofalse. The monitoring component cannot be enabled when Project Quay is installed in a single namespace. For example:# ... - kind: monitoring managed: false - kind: objectstorage managed: false # ... -
Click Create.
-
Optional: Confirm that the pods are running on infra nodes.
-
List all
Quay-related pods along with the nodes that they are scheduled on by entering the following command:$ oc get pods -n <annotated_namespace> -o wide | grep example-registry
-
...
NAME                                               READY   STATUS      RESTARTS   AGE   IP             NODE                                                              NOMINATED NODE   READINESS GATES
example-registry-clair-app-5f95d685bd-dgjf6        1/1     Running     0          52m   10.128.4.12    example-cluster-new-c5qqp-worker-b-wrhw4.c.quay-devel.internal   <none>           <none>
...
-
Confirm that the nodes listed include only nodes labeled
infraby running the following command:$ oc get nodes -l node-role.kubernetes.io/infra -o nameExample outputnode/example-cluster-new-c5qqp-worker-b-4zxx5.c.quay-devel.internal modified node/example-cluster-new-c5qqp-worker-b-kz6jn.c.quay-devel.internal modified node/example-cluster-new-c5qqp-worker-b-wrhw4.c.quay-devel.internal modified
NoteIf any pod appears on a non-infra node, revisit your namespace annotations and deployment patching.
-
Restart all pods for the Project Quay registry by entering the following command:
$ oc delete pod -n <annotated_namespace> --all -
Check the status of the pods by entering the following command:
$ oc get pods -n <annotated_namespace>... NAME READY STATUS RESTARTS AGE example-registry-clair-app-5f95d685bd-dgjf6 1/1 Running 0 5m4s ...
-
Prepare a host for Red Hat Quay proof of concept
Prepare a RHEL host with Podman, network access, authentication, firewall, and port mapping before deploying a proof of concept Red Hat Quay registry.
Installing Podman
To install Podman on Red Hat Enterprise Linux (RHEL) for a proof of concept Project Quay deployment, you can use yum to install the podman package or the container-tools module. Podman is required for running registry containers in this guide.
This document uses Podman for creating and deploying containers.
|
Important
|
If you do not have Podman installed on your system, the use of equivalent Docker commands might be possible, however this is not recommended. Docker is not tested with Project Quay {producty}, and will be deprecated in a future release. Podman is recommended for highly available, production quality deployments of Project Quay {producty}. |
-
Enter the following command to install Podman:
$ sudo yum install -y podman -
Alternatively, install the
container-toolsmodule, which pulls in the full set of container software packages:$ sudo yum module install -y container-tools
Preparing Red Hat Enterprise Linux for a Project Quay proof of concept deployment
Preparing Red Hat Enterprise Linux (RHEL) for a Project Quay proof of concept deployment includes server registration, registry authentication, firewall rules, and network addressing. You can complete these host configuration tasks before deploying the registry container.
Install and register the RHEL server
To prepare Red Hat Enterprise Linux (RHEL) for a proof of concept Project Quay deployment, you can install RHEL 9, register the system, and attach a subscription. You can then update to the latest packages before deploying components.
-
Install the latest RHEL 9 server. You can do a minimal, shell-access only install, or Server plus GUI if you want a desktop.
-
Register and subscribe your RHEL server system as described in How to register and subscribe a RHEL system to the Red Hat Customer Portal using Red Hat Subscription-Manager
-
Enter the following commands to register your system and list available subscriptions. Choose an available RHEL server subscription, attach to its pool ID, and upgrade to the latest software:
# subscription-manager register --username=<user_name> --password=<password>
# subscription-manager refresh
# subscription-manager list --available
# subscription-manager attach --pool=<pool_id>
# yum update -y
Registry authentication
To pull Project Quay container images for a proof of concept deployment, you can authenticate to registry.redhat.io and log in with Podman. Images are hosted on the Red Hat container registry rather than Quay.io.
-
Configure authentication to
registry.redhat.ioby following the Red Hat Container Registry Authentication procedure. Configuring authentication allows you to pull theQuaycontainer.NoteThis differs from earlier versions of Project Quay, when the images were hosted on Quay.io.
-
Enter the following command to log in to the registry:
$ sudo podman login registry.redhat.ioYou are prompted to enter your
usernameandpassword.
Firewall configuration
To allow network access to your proof of concept Project Quay deployment, you can open firewall ports that match your container port mappings. The required ports depend on which services you expose on the host.
If you have a firewall running on your system, you might have to add rules that allow access to Project Quay.
-
Enter firewall commands for the ports that you have mapped on your system, for example:
# firewall-cmd --permanent --add-port=80/tcp \
&& firewall-cmd --permanent --add-port=443/tcp \
&& firewall-cmd --permanent --add-port=5432/tcp \
&& firewall-cmd --permanent --add-port=5433/tcp \
&& firewall-cmd --permanent --add-port=6379/tcp \
&& firewall-cmd --reload
IP addressing and naming services for a proof of concept deployment
Container networking for a proof of concept Project Quay deployment can use naming services, host networking, or port mapping. This guide uses port mapping with a static host IP address.
You can configure the component containers in Project Quay to communicate with each other in several ways, for example:
-
Using a naming service. If you want your deployment to survive container restarts, which typically result in changed IP addresses, you can implement a naming service. For example, the
dnsnameplugin allows containers to resolve each other by name. -
Using the host network. You can use the
podman runcommand with the--net=hostoption and then use container ports on the host when specifying the addresses in the configuration. This option is susceptible to port conflicts when two containers want to use the same port. This method is not recommended. -
Configuring port mapping. You can use port mappings to expose ports on the host and then use these ports in combination with the host IP address or host name.
This document uses port mapping and assumes a static IP address for your host system.
| Component | Port mapping | Address |
|---|---|---|
Quay |
|
http://quay-server.example.com |
Postgres for Quay |
|
quay-server.example.com:5432 |
Redis |
|
quay-server.example.com:6379 |
Postgres for Clair V4 |
|
quay-server.example.com:5433 |
Clair V4 |
|
http://quay-server.example.com:8081 |
Preparing your system to deploy Project Quay
For a proof of concept Project Quay deployment, you must configure port mapping, a database, and Redis prior to deploying the registry.
Configuring port mapping for Project Quay
To reach your proof of concept Project Quay registry by hostname, you can map container ports on the host and add a static IP and hostname to /etc/hosts.
You can use port mappings to expose ports on the host and then use these ports in combination with the host IP address or host name to navigate to the Project Quay endpoint.
-
Enter the following command to obtain your static IP address for your host system:
$ ip aExample output--- link/ether 6c:6a:77:eb:09:f1 brd ff:ff:ff:ff:ff:ff inet 192.168.1.132/24 brd 192.168.1.255 scope global dynamic noprefixroute wlp82s0 --- -
Add the IP address and a local hostname, for example,
quay-server.example.comto your/etc/hostsfile that you use to reach the Project Quay endpoint. You can confirm that the IP address and hostname have been added to the/etc/hostsfile by entering the following command:$ cat /etc/hostsExample output192.168.1.132 quay-server.example.com
Deploy Red Hat Quay proof of concept
Deploy the database, Redis, and Red Hat Quay containers for a proof of concept registry with local storage.
Configuring the database
Project Quay requires a database for storing metadata. To configure the database for your proof of concept Project Quay deployment, you can create a local PostgreSQL data directory and start a Postgres container with Podman. You must also install the pg_trgm extension required by the registry.
-
In the installation folder, denoted here by the
$QUAYvariable, create a directory for the database data by entering the following command:$ mkdir -p $QUAY/postgres-quay -
Set the appropriate permissions by entering the following command:
$ setfacl -m u:26:-wx $QUAY/postgres-quay -
Start the
Postgrescontainer, specifying the username, password, and database name and port, with the volume definition for database data:$ sudo podman run -d --rm --name postgresql-quay \ -e POSTGRESQL_USER=quayuser \ -e POSTGRESQL_PASSWORD=quaypass \ -e POSTGRESQL_DATABASE=quay \ -e POSTGRESQL_ADMIN_PASSWORD=adminpass \ -p 5432:5432 \ -v $QUAY/postgres-quay:/var/lib/pgsql/data:Z \ {postgresimage} -
Ensure that the Postgres
pg_trgmmodule is installed by running the following command:$ sudo podman exec -it postgresql-quay /bin/bash -c 'echo "CREATE EXTENSION IF NOT EXISTS pg_trgm" | psql -d quay -U postgres'NoteThe
pg_trgmmodule is required for theQuaycontainer.
Configuring Redis
To configure Redis for your proof of concept Project Quay deployment, you can start a Redis container with Podman and expose port 6379 with a password. Project Quay uses Redis for live builder logs during image builds.
Redis is a key-value store that is used by Project Quay for live builder logs.
-
Start the
Rediscontainer, specifying the port and password, by entering the following command:$ sudo podman run -d --rm --name redis \ -p 6379:6379 \ -e REDIS_PASSWORD=strongpassword \ {redisimage}
Deploying Project Quay
To deploy your proof of concept Project Quay registry, you can create a config.yaml file, prepare local storage for images, and start the registry container with Podman. You can optionally configure a superuser account during setup.
Preparing the YAML configuration file by using the CLI
To prepare your proof of concept Project Quay deployment for launch, you can create a config.yaml file with database, Redis, and storage settings and copy it to your configuration directory. You can use the CLI to build the configuration bundle that the registry container reads at startup.
-
Enter the following command to create a minimal
config.yamlfile that is used to deploy the Project Quay container:$ touch config.yaml -
Copy and paste the following YAML configuration into the
config.yamlfile:BUILDLOGS_REDIS: host: quay-server.example.com password: strongpassword port: 6379 CREATE_NAMESPACE_ON_PUSH: true DATABASE_SECRET_KEY: a8c2744b-7004-4af2-bcee-e417e7bdd235 DB_URI: postgresql://quayuser:quaypass@quay-server.example.com:5432/quay DISTRIBUTED_STORAGE_CONFIG: default: - LocalStorage - storage_path: /datastorage/registry DISTRIBUTED_STORAGE_DEFAULT_LOCATIONS: [] DISTRIBUTED_STORAGE_PREFERENCE: - default FEATURE_MAILING: false SECRET_KEY: e9bd34f4-900c-436a-979e-7530e5d74ac8 SERVER_HOSTNAME: quay-server.example.com SETUP_COMPLETE: true USER_EVENTS_REDIS: host: quay-server.example.com password: strongpassword port: 6379 -
Create a directory to copy the Project Quay configuration bundle to:
$ mkdir $QUAY/config -
Copy the Project Quay configuration file to the directory:
$ cp -v config.yaml $QUAY/config
Configuring a Project Quay superuser
To configure a superuser account for your proof of concept Project Quay deployment, you can add the SUPER_USERS array to config.yaml. Superusers can manage users, organizations, service keys, and global settings from the admin panel.
-
Add the
SUPER_USERSarray to theconfig.yamlfile:SERVER_HOSTNAME: quay-server.example.com SETUP_COMPLETE: true SUPER_USERS: - quayadmin ...
Preparing local storage for image data
To prepare local storage for your proof of concept Project Quay deployment, you can create a directory for registry images and set file system permissions for the registry user. Local storage lets the registry container persist image data on the host.
-
Create a local directory that stores registry images by entering the following command:
$ mkdir $QUAY/storage -
Set the directory to store registry images:
$ setfacl -m u:1001:-wx $QUAY/storage
Deploy the Project Quay registry by using the CLI
To deploy your proof of concept Project Quay registry, you can start the registry container with Podman.
-
Enter the following command to start the
Quayregistry container, specifying the appropriate volumes for configuration data and local storage for image data:$ sudo podman run -d --rm -p 80:8080 -p 443:8443 \ --name=quay \ -v $QUAY/config:/conf/stack:Z \ -v $QUAY/storage:/datastorage:Z \ {productrepo}/{quayimage}:{productminv}
Configure IPv6 for Quay proof of concept
Configure certificates, Podman trust, and dual-stack networking for an IPv6 or dual-stack proof of concept Red Hat Quay deployment.
Testing the SSL/TLS configuration using a browser
To test your SSL/TLS configuration in a browser, you can open your Project Quay registry endpoint and review the connection warnings for a self-signed certificate. Expected browser warnings confirm that TLS is active before you trust the certificate authority on clients.
-
Navigate to your Project Quay registry endpoint, for example,
https://quay-server.example.com. If configured correctly, the browser warns of the potential risk: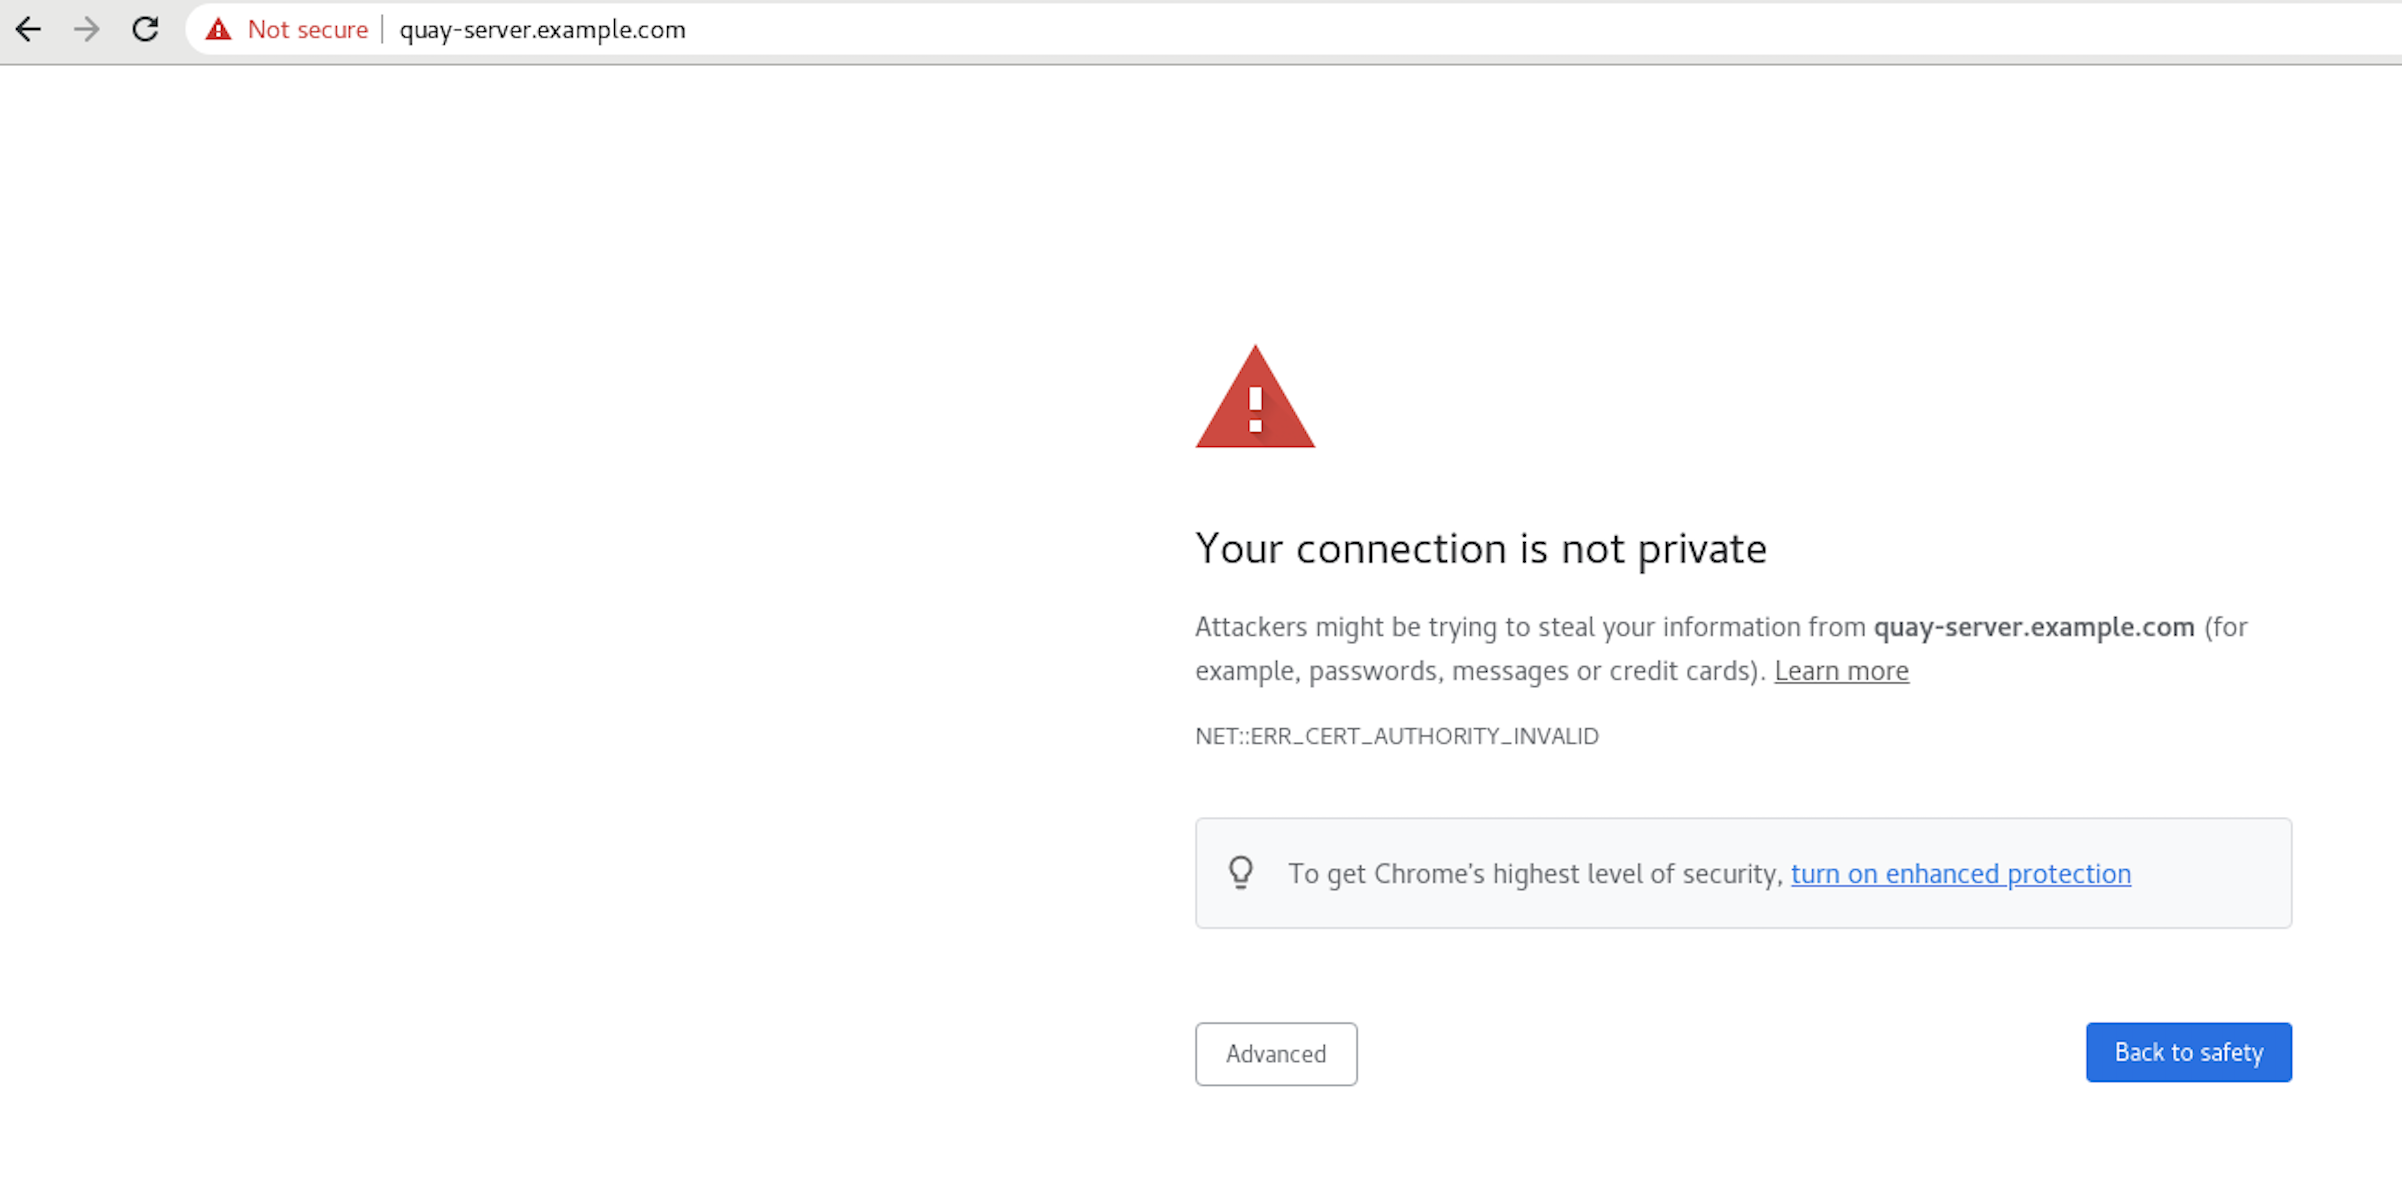
-
Proceed to the log in screen. The browser notifies you that the connection is not secure. For example:
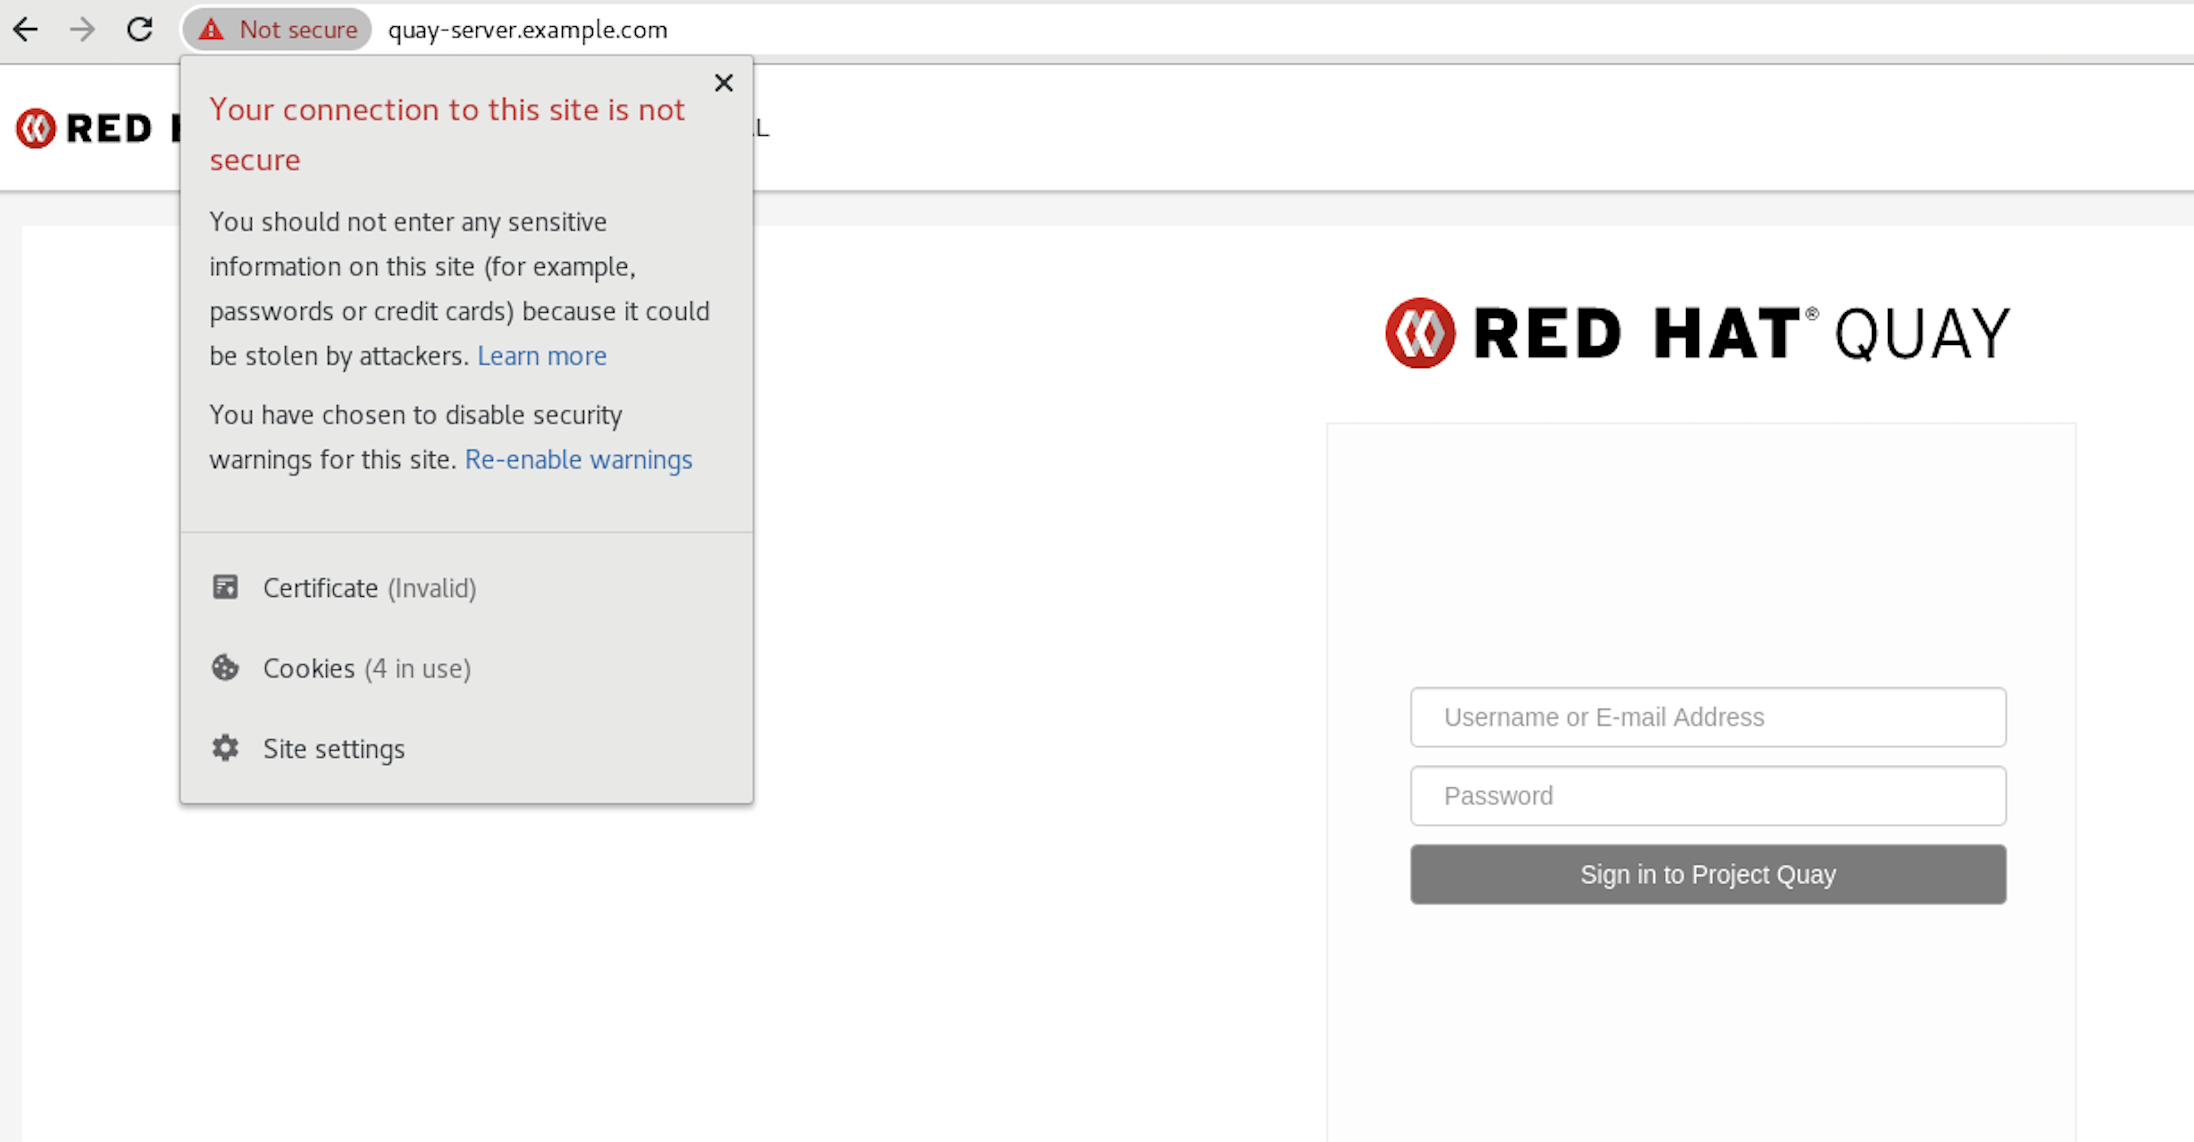
In the following section, you configure Podman to trust the root Certificate Authority.
Configuring Podman to trust the Certificate Authority
To configure Podman to trust your self-signed certificate authority for Project Quay, you can copy the root CA to the hostname-specific certificate directory under /etc/containers/certs.d/ or /etc/docker/certs.d/.
.Procedure
-
Copy the root CA file to one of
/etc/containers/certs.d/or/etc/docker/certs.d/. Use the exact path determined by the server hostname, and name the fileca.crt:$ sudo cp rootCA.pem /etc/containers/certs.d/quay-server.example.com/ca.crt -
Verify that you no longer need to use the
--tls-verify=falseoption when logging in to your Project Quay registry:$ sudo podman login quay-server.example.comExample outputLogin Succeeded!
Configuring the system to trust the certificate authority
To trust your self-signed certificate authority, you can add the root CA to the system-wide trust store and update certificate configuration. You can verify trust with the trust list command before browsing your Project Quay registry over HTTPS.
-
Enter the following command to copy the
rootCA.pemfile to the consolidated system-wide trust store:$ sudo cp rootCA.pem /etc/pki/ca-trust/source/anchors/ -
Enter the following command to update the system-wide trust store configuration:
$ sudo update-ca-trust extract -
Optional. You can use the
trust listcommand to ensure that theQuayserver has been configured:$ trust list | grep quay label: quay-server.example.comNow, when you browse to the registry at
https://quay-server.example.com, the lock icon shows that the connection is secure: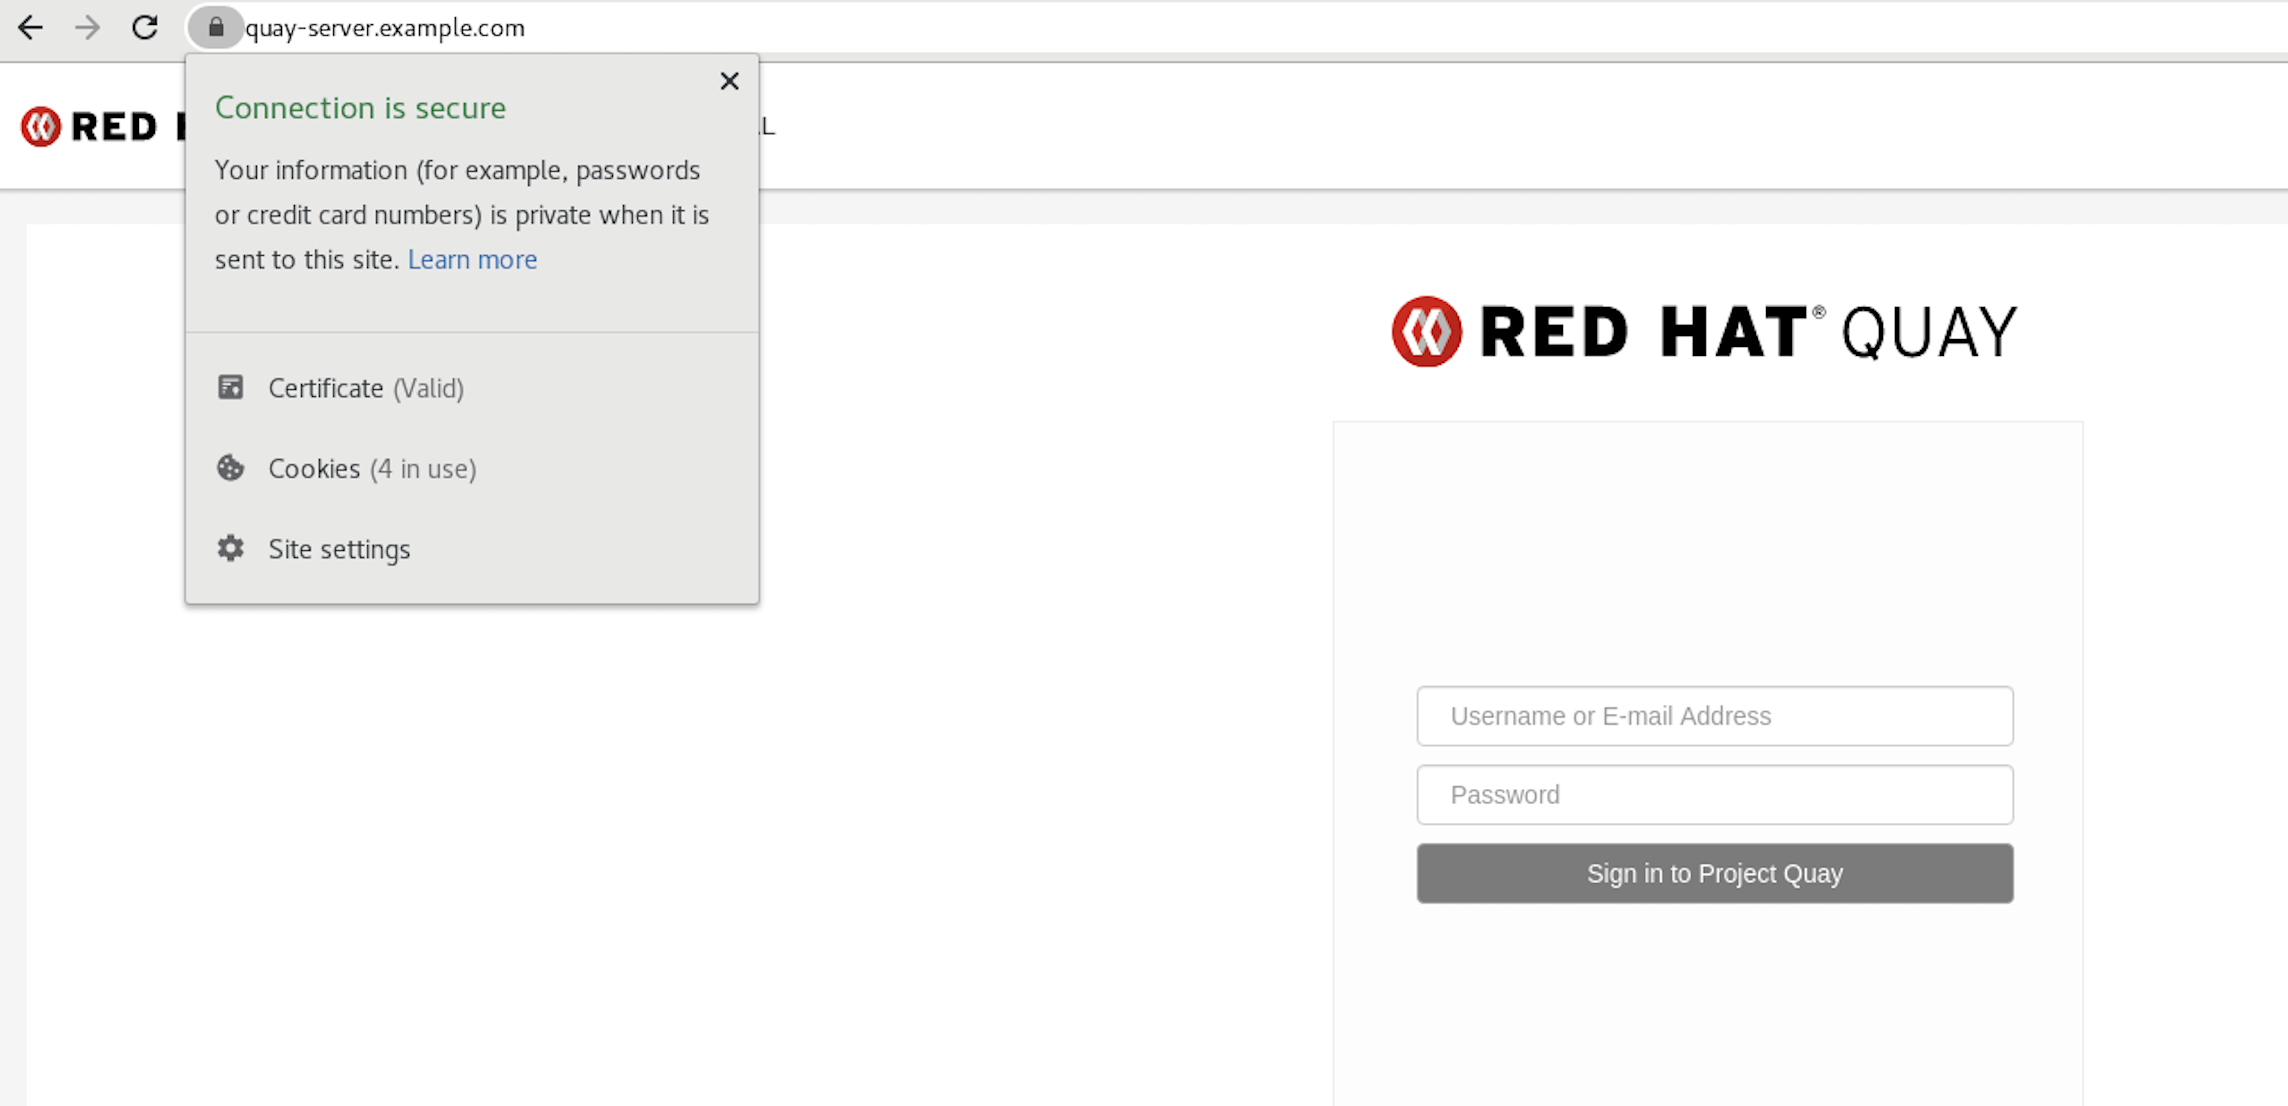
-
To remove the
rootCA.pemfile from system-wide trust, delete the file and update the configuration:$ sudo rm /etc/pki/ca-trust/source/anchors/rootCA.pem$ sudo update-ca-trust extract$ trust list | grep quay
Configuring the Podman CNI to use IPv6
You can configure the Podman Container Network Interface for IPv4 and IPv6 to run a local Project Quay instance over IPv6 for development or testing. By default, the root user Podman network uses IPv4 only.
In some cases, you might want to run a local instance of Project Quay to use IPv6. This setup is common for development or testing purposes.
Creating a dual-stack container network
To run a local Project Quay instance over IPv6, you can create a new Podman container network with IPv6 enabled instead of changing the default root network. New containers on this network are natively dual-stack.
-
Unless the default container network must use both IPv4 and IPv6, create a new dual-stack container network. As a root user, create a new container network that is dual-stack by running the following command:
# podman network create ip-dual-stack --ipv6With this command, new containers use this network are a natively dual-stack.
Deploying a local instance of Project Quay in IPv6
To deploy a local Project Quay instance over IPv6, you can set FEATURE_LISTEN_IP_VERSION in config.yaml and start the registry container with explicit IPv6 port mappings.
After you have created a new dual-stack container network, you can deploy a local instance of Project Quay.
-
You have configured Redis, your PostgreSQL database, local image storage, and creating a
config.yamlfile with the desired settings.
-
In your Project Quay
config.yamlfile, set theFEATURE_LISTEN_IP_VERSIONfield toIPv6. For example:# ... FEATURE_LISTEN_IP_VERSION: dual-stack # ... -
Enter the following command to start the
Quayregistry container, specifying the appropriate volumes for configuration data and local storage for image data. Note that if you are using dual-stack, you must specify explicit IPv6 port mapping when starting the container.$ sudo podman run -d --rm -p "[::]:80:8080" -p "[::]:443:8443" \ --name=quay \ -v $QUAY/config:/conf/stack:Z \ -v $QUAY/storage:/datastorage:Z \ {productrepo}/{quayimage}:{productminv}
Configure SSL/TLS for Red Hat Quay proof of concept
Configure SSL/TLS certificates for a proof of concept Red Hat Quay deployment to enable encrypted communication.
Proof of concept deployment using SSL/TLS certificates
To secure a proof of concept Project Quay deployment with SSL/TLS, you can create certificates, configure your registry, and test secure connections. You can also add the certificate authority to system or Podman trust stores.
Creating a Certificate Authority
To secure your Project Quay deployment with self-signed certificates, you can create a root certificate authority and generate a server certificate for your registry hostname. You can use OpenSSL to create the CA key, signing request, and certificate files.
-
Generate the root CA key by entering the following command:
$ openssl genrsa -out rootCA.key 2048 -
Generate the root CA certificate by entering the following command:
$ openssl req -x509 -new -nodes -key rootCA.key -sha256 -days 1024 -out rootCA.pem -
Enter the information to incorporate into your certificate request, including the server hostname, for example:
Country Name (2 letter code) [XX]:IE State or Province Name (full name) []:GALWAY Locality Name (eg, city) [Default City]:GALWAY Organization Name (eg, company) [Default Company Ltd]:QUAY Organizational Unit Name (eg, section) []:DOCS Common Name (eg, your name or your server's hostname) []:quay-server.example.com -
Generate the server key by entering the following command:
$ openssl genrsa -out ssl.key 2048 -
Generate a signing request by entering the following command:
$ openssl req -new -key ssl.key -out ssl.csr -
Enter the information to incorporate into your certificate request, including the server hostname, for example:
Country Name (2 letter code) [XX]:IE State or Province Name (full name) []:GALWAY Locality Name (eg, city) [Default City]:GALWAY Organization Name (eg, company) [Default Company Ltd]:QUAY Organizational Unit Name (eg, section) []:DOCS Common Name (eg, your name or your server's hostname) []:quay-server.example.com Email Address []: -
Create a configuration file
openssl.cnf, specifying the server hostname, for example:Exampleopenssl.cnffile[req] req_extensions = v3_req distinguished_name = req_distinguished_name [req_distinguished_name] [ v3_req ] basicConstraints = CA:FALSE keyUsage = nonRepudiation, digitalSignature, keyEncipherment subjectAltName = @alt_names [alt_names] DNS.1 = <quay-server.example.com> IP.1 = 192.168.1.112 -
Use the configuration file to generate the certificate
ssl.cert:$ openssl x509 -req -in ssl.csr -CA rootCA.pem -CAkey rootCA.key -CAcreateserial -out ssl.cert -days 356 -extensions v3_req -extfile openssl.cnf -
Confirm your created certificates and files by entering the following command:
$ ls /path/to/certificatesExample outputrootCA.key ssl-bundle.cert ssl.key custom-ssl-config-bundle-secret.yaml rootCA.pem ssl.cert openssl.cnf rootCA.srl ssl.csr
Configuring custom SSL/TLS certificates by using the command line interface
To enable custom SSL/TLS certificates on your Project Quay deployment, you can copy certificate files to your configuration directory and update the config.yaml file to use HTTPS. You can then restart the registry container to apply the SSL/TLS configuration.
-
You have created a certificate authority and signed the certificate.
-
Copy the certificate file and primary key file to your configuration directory, ensuring they are named
ssl.certandssl.keyrespectively:cp ~/ssl.cert ~/ssl.key /path/to/configuration_directory -
Navigate to the configuration directory by entering the following command:
$ cd /path/to/configuration_directory -
Edit the
config.yamlfile and specify that you want Project Quay to handle SSL/TLS:Exampleconfig.yamlfile# ... SERVER_HOSTNAME: <quay-server.example.com> ... PREFERRED_URL_SCHEME: https # ... -
Optional: Append the contents of the
rootCA.pemfile to the end of thessl.certfile by entering the following command:$ cat rootCA.pem >> ssl.cert -
Stop the
Quaycontainer by entering the following command:$ sudo podman stop <quay_container_name> -
Restart the registry by entering the following command:
$ sudo podman run -d --rm -p 80:8080 -p 443:8443  \
   --name=quay \
   -v $QUAY/config:/conf/stack:Z \
   -v $QUAY/storage:/datastorage:Z \
   {productrepo}/{quayimage}:{productminv}
Testing the SSL/TLS configuration
SSL/TLS testing confirms that your Project Quay registry serves encrypted connections after you configure certificates. You can verify the setup from the CLI or a web browser before you add the certificate authority to client trust stores.
Testing the SSL/TLS configuration using the CLI
To test your SSL/TLS configuration from the CLI, you can use podman login against your Project Quay registry endpoint and review the certificate error for a self-signed authority. You can then log in with the --tls-verify=false option before configuring Podman to trust the certificate authority.
-
Enter the following command to attempt to log in to the Project Quay registry with SSL/TLS enabled:
$ sudo podman login quay-server.example.comExample outputError: error authenticating creds for "quay-server.example.com": error pinging docker registry quay-server.example.com: Get "https://quay-server.example.com/v2/": x509: certificate signed by unknown authority -
Because Podman does not trust self-signed certificates, you must use the
--tls-verify=falseoption:$ sudo podman login --tls-verify=false quay-server.example.comExample outputLogin Succeeded!
Install Red Hat Quay in high availability
Prepare hosts, HAProxy, PostgreSQL, Ceph, Redis, and Red Hat Quay nodes for a high availability deployment.
Preparing hosts for a high availability deployment
To prepare for a high availability Project Quay deployment, you need compatible database, object storage, load balancer, and RHEL systems that meet the sizing requirements in this guide.
|
Important
|
The Project Quay configuration tool is unsupported for standalone high availability deployments. Create and maintain the |
|
Note
|
This procedure presents guidance on how to set up a highly available, production-quality deployment of Project Quay. |
Prerequisites
Here are a few things you need to know before you begin the Project Quay high availability deployment:
-
Either Postgres or MySQL can be used to provide the database service. Postgres was chosen here as the database because it includes the features needed to support Clair security scanning. Other options include:
-
Crunchy Data PostgreSQL Operator: Although not supported directly by Red Hat, the Postgres Operator is available from Crunchy Data for use with Project Quay. If you take this route, you should have a support contract with Crunchy Data and work directly with them for usage guidance or issues relating to the operator and their database.
-
If your organization already has a high-availability (HA) database, you can use that database with Project Quay. See the Project Quay Support Policy for details on support for third-party databases and other components.
-
-
Ceph Object Gateway (also called RADOS Gateway) is one example of a product that can provide the object storage needed by Project Quay. If you want your Project Quay setup to do geo-replication, Ceph Object Gateway or other supported object storage is required. For cloud installations, you can use any of the following cloud object storage:
-
Amazon S3 (see Additional resources for details on configuring an S3 bucket policy for Quay)
-
Azure Blob Storage
-
Google Cloud Storage
-
Ceph Object Gateway
-
OpenStack Swift
-
CloudFront + S3
-
NooBaa S3 Storage
-
-
The haproxy server is used in this example, although you can use any proxy service that works for your environment.
-
Number of systems: This procedure uses seven systems (physical or virtual) that are assigned with the following tasks:
-
A: db01: Load balancer and database: Runs the haproxy load balancer and a Postgres database. Note that these components are not themselves highly available, but are used to indicate how you might set up your own load balancer or production database.
-
B: quay01, quay02, quay03: Quay and Redis: Three (or more) systems are assigned to run the Quay and Redis services.
-
C: ceph01, ceph02, ceph03, ceph04, ceph05: Ceph: Three (or more) systems provide the Ceph service, for storage. If you are deploying to a cloud, you can use the cloud storage features described earlier. This procedure employs an additional system for Ansible (ceph05) and one for a Ceph Object Gateway (ceph04).
-
Each system should have the following attributes:
-
Red Hat Enterprise Linux (RHEL) 8: Obtain the latest Red Hat Enterprise Linux 8 server media from the Downloads page and follow the installation instructions available in the Red Hat Enterprise Linux 9 product documentation.
-
Valid Red Hat Subscription: Configure a valid Red Hat Enterprise Linux 8 server subscription.
-
CPUs: Two or more virtual CPUs
-
RAM: 4GB for each A and B system; 8GB for each C system
-
Disk space: About 20GB of disk space for each A and B system (10GB for the operating system and 10GB for docker storage). At least 30GB of disk space for C systems (or more depending on required container storage).
-
Using podman
This document uses podman for creating and deploying containers. If you do not have podman available on your system, you should be able to use the equivalent docker commands. For more information on podman and related technologies, see Additional resources.
|
Note
|
Production quality deployments of Project Quay generally use Podman. Docker has not been tested with Project Quay {producty}, and will be deprecated in a future release. |
Setting up the HAProxy load balancer and the PostgreSQL database
To configure the HAProxy load balancer and PostgreSQL database for Project Quay, you can configure HAProxy front ends, open required ports, and deploy a PostgreSQL container with the pg_trgm extension.
-
You have installed the Podman or Docker CLI.
-
On the first two systems,
q01andq02, install the HAProxy load balancer and the PostgreSQL database. This configures HAProxy as the access point and load balancer for the following services running on other systems:-
Project Quay (ports 80 and 443 on B systems)
-
Redis (port 6379 on B systems)
-
RADOS (port 7480 on C systems)
-
-
Open all HAProxy ports in SELinux and selected HAProxy ports in the firewall:
# setsebool -P haproxy_connect_any=on
# firewall-cmd --permanent --zone=public --add-port=6379/tcp --add-port=7480/tcp
success
# firewall-cmd --reload
success
-
Configure the
/etc/haproxy/haproxy.cfgto point to the systems and ports providing the Project Quay, Redis and Ceph RADOS services. The following are examples of defaults and added frontend and backend settings:#--------------------------------------------------------------------- # common defaults that all the 'listen' and 'backend' sections will # use if not designated in their block #--------------------------------------------------------------------- defaults mode tcp log global option httplog option dontlognull option http-server-close option forwardfor except 127.0.0.0/8 option redispatch retries 3 timeout http-request 10s timeout queue 1m timeout connect 10s timeout client 1m timeout server 1m timeout http-keep-alive 10s timeout check 10s maxconn 3000 #--------------------------------------------------------------------- # main frontend which proxys to the backends #--------------------------------------------------------------------- frontend fe_http *:80 default_backend be_http frontend fe_https *:443 default_backend be_https frontend fe_redis *:6379 default_backend be_redis frontend fe_rdgw *:7480 default_backend be_rdgw backend be_http balance roundrobin server quay01 quay01:80 check server quay02 quay02:80 check server quay03 quay03:80 check backend be_https balance roundrobin server quay01 quay01:443 check server quay02 quay02:443 check server quay03 quay03:443 check backend be_rdgw balance roundrobin server ceph01 ceph01:7480 check server ceph02 ceph02:7480 check server ceph03 ceph03:7480 check backend be_redis server quay01 quay01:6379 check inter 1s server quay02 quay02:6379 check inter 1s server quay03 quay03:6379 check inter 1sAfter the new
haproxy.cfgfile is in place, restart the HAProxy service by entering the following command:# systemctl restart haproxy -
Create a folder for the PostgreSQL database by entering the following command:
$ mkdir -p /var/lib/pgsql/data -
Set the following permissions for the
/var/lib/pgsql/datafolder:$ chmod 777 /var/lib/pgsql/data -
Enter the following command to start the PostgreSQL database:
$ sudo podman run -d --name postgresql_database \ -v /var/lib/pgsql/data:/var/lib/pgsql/data:Z \ -e POSTGRESQL_USER=quayuser -e POSTGRESQL_PASSWORD=quaypass \ -e POSTGRESQL_DATABASE=quaydb -p 5432:5432 \ registry.redhat.io/rhel8/postgresql-13:1-109NoteData from the container will be stored on the host system in the
/var/lib/pgsql/datadirectory. -
List the available extensions by entering the following command:
$ sudo podman exec -it postgresql_database /bin/bash -c 'echo "SELECT * FROM pg_available_extensions" | /opt/rh/rh-postgresql96/root/usr/bin/psql'Example outputname | default_version | installed_version | comment -----------+-----------------+-------------------+---------------------------------------- adminpack | 1.0 | | administrative functions for PostgreSQL ... -
Create the
pg_trgmextension by entering the following command:$ sudo podman exec -it postgresql_database /bin/bash -c 'echo "CREATE EXTENSION IF NOT EXISTS pg_trgm;" | /opt/rh/rh-postgresql96/root/usr/bin/psql -d quaydb' -
Confirm that the
pg_trgmhas been created by entering the following command:$ sudo podman exec -it postgresql_database /bin/bash -c 'echo "SELECT * FROM pg_extension" | /opt/rh/rh-postgresql96/root/usr/bin/psql'Example outputextname | extowner | extnamespace | extrelocatable | extversion | extconfig | extcondition ---------+----------+--------------+----------------+------------+-----------+-------------- plpgsql | 10 | 11 | f | 1.0 | | pg_trgm | 10 | 2200 | t | 1.3 | | (2 rows) -
Alter the privileges of the Postgres user
quayuserand grant them thesuperuserrole to give the user unrestricted access to the database:$ sudo podman exec -it postgresql_database /bin/bash -c 'echo "ALTER USER quayuser WITH SUPERUSER;" | /opt/rh/rh-postgresql96/root/usr/bin/psql'Example outputALTER ROLE -
If you have a firewalld service active on your system, run the following commands to make the PostgreSQL port available through the firewall:
# firewall-cmd --permanent --zone=trusted --add-port=5432/tcp# firewall-cmd --reload -
Optional. If you do not have the
postgresCLI package installed, install it by entering the following command:# yum install postgresql -y -
Use the
psqlcommand to test connectivity to the PostgreSQL database.NoteTo verify that you can access the service remotely, run the following command on a remote system.
# psql -h localhost quaydb quayuser
Example outputPassword for user test: psql (9.2.23, server 9.6.5) WARNING: psql version 9.2, server version 9.6. Some psql features might not work. Type "help" for help. test=> \q
Setting up Ceph object storage
To provide object storage for Project Quay, you can install a multi-node Ceph cluster and configure a Ceph Object Gateway for registry image data.
For this Project Quay configuration, we create a three-node Ceph cluster, with several other supporting nodes, as follows:
-
ceph01, ceph02, and ceph03 - Ceph Monitor, Ceph Manager and Ceph OSD nodes
-
ceph04 - Ceph RGW node
-
ceph05 - Ceph Ansible administration node
For details on installing Ceph nodes, see Additional resources.
Once you have set up the Ceph storage cluster, create a Ceph Object Gateway (also referred to as a RADOS gateway). See Additional resources for details.
Installing each Ceph node
To prepare Ceph nodes for a Project Quay deployment, you can verify prerequisites, configure OSD storage, install RHEL, and create an Ansible administration user on each node.
-
Review prerequisites for setting up Ceph nodes in Additional resources. In particular:
-
Decide if you want to use RAID controllers on OSD nodes.
-
Decide if you want a separate cluster network for your Ceph network configuration.
-
-
Prepare OSD storage (ceph01, ceph02, and ceph03 only). Set up the OSD storage on the three OSD nodes (ceph01, ceph02, and ceph03). See OSD Ansible Settings in Additional resources for details on supported storage types that you will enter into your Ansible configuration later. For this example, a single, unformatted block device (
/dev/sdb), that is separate from the operating system, is configured on each of the OSD nodes. If you are installing on metal, you might want to add an extra hard drive to the machine for this purpose. -
Install Red Hat Enterprise Linux Server edition, as described in Additional resources.
-
Register and subscribe each Ceph node as described in Additional resources. Here is how to subscribe to the necessary repos:
# subscription-manager repos --disable=* # subscription-manager repos --enable=rhel-7-server-rpms # subscription-manager repos --enable=rhel-7-server-extras-rpms # subscription-manager repos --enable=rhel-7-server-rhceph-3-mon-rpms # subscription-manager repos --enable=rhel-7-server-rhceph-3-osd-rpms # subscription-manager repos --enable=rhel-7-server-rhceph-3-tools-rpms -
Create an ansible user with root privilege on each node. Choose any name you like. For example:
# USER_NAME=ansibleadmin
# useradd $USER_NAME -c "Ansible administrator"
# passwd $USER_NAME
New password: *********
Retype new password: *********
# cat << EOF >/etc/sudoers.d/admin
admin ALL = (root) NOPASSWD:ALL
EOF
# chmod 0440 /etc/sudoers.d/$USER_NAME
Configuring the Ceph Ansible node (ceph05)
To deploy a Ceph cluster with Ansible, you can configure the ceph05 administration node, prepare inventory files, and run the ceph-ansible playbook against the monitor and OSD nodes.
Log into the Ceph Ansible node (ceph05) and configure it as follows. You will need the ceph01, ceph02, and ceph03 nodes to be running to complete these steps.
-
In the Ansible user’s home directory create a directory to store temporary values created from the ceph-ansible playbook
# USER_NAME=ansibleadmin # sudo su - $USER_NAME [ansibleadmin@ceph05 ~]$ mkdir ~/ceph-ansible-keys -
Enable password-less ssh for the ansible user. Run ssh-keygen on ceph05 (leave passphrase empty), then run and repeat ssh-copy-id to copy the public key to the Ansible user on ceph01, ceph02, and ceph03 systems:
# USER_NAME=ansibleadmin # sudo su - $USER_NAME [ansibleadmin@ceph05 ~]$ ssh-keygen [ansibleadmin@ceph05 ~]$ ssh-copy-id $USER_NAME@ceph01 [ansibleadmin@ceph05 ~]$ ssh-copy-id $USER_NAME@ceph02 [ansibleadmin@ceph05 ~]$ ssh-copy-id $USER_NAME@ceph03 [ansibleadmin@ceph05 ~]$ exit # -
Install the ceph-ansible package:
# yum install ceph-ansible -
Create a symbolic between these two directories:
# ln -s /usr/share/ceph-ansible/group_vars \ /etc/ansible/group_vars -
Create copies of Ceph sample yml files to modify:
# cd /usr/share/ceph-ansible # cp group_vars/all.yml.sample group_vars/all.yml # cp group_vars/osds.yml.sample group_vars/osds.yml # cp site.yml.sample site.yml -
Edit the copied group_vars/all.yml file. See General Ansible Settings in Additional resources for details. For example:
ceph_origin: repository
ceph_repository: rhcs
ceph_repository_type: cdn
ceph_rhcs_version: 3
monitor_interface: eth0
public_network: 192.168.122.0/24
Note that your network device and address range may differ.
-
Edit the copied
group_vars/osds.ymlfile. See the OSD Ansible Settings in Additional resources for details. In this example, the second disk device (/dev/sdb) on each OSD node is used for both data and journal storage:osd_scenario: collocated devices: - /dev/sdb dmcrypt: true osd_auto_discovery: false -
Edit the
/etc/ansible/hostsinventory file to identify the Ceph nodes as Ceph monitor, OSD and manager nodes. In this example, the storage devices are identified on each node as well:[mons] ceph01 ceph02 ceph03 [osds] ceph01 devices="[ '/dev/sdb' ]" ceph02 devices="[ '/dev/sdb' ]" ceph03 devices="[ '/dev/sdb' ]" [mgrs] ceph01 devices="[ '/dev/sdb' ]" ceph02 devices="[ '/dev/sdb' ]" ceph03 devices="[ '/dev/sdb' ]" -
Add this line to the
/etc/ansible/ansible.cfgfile, to save the output from each Ansible playbook run into your Ansible user’s home directory:retry_files_save_path = ~/ -
Check that Ansible can reach all the Ceph nodes you configured as your Ansible user:
# USER_NAME=ansibleadmin # sudo su - $USER_NAME [ansibleadmin@ceph05 ~]$ ansible all -m ping ceph01 | SUCCESS => { "changed": false, "ping": "pong" } ceph02 | SUCCESS => { "changed": false, "ping": "pong" } ceph03 | SUCCESS => { "changed": false, "ping": "pong" } [ansibleadmin@ceph05 ~]$ -
Run the ceph-ansible playbook (as your Ansible user):
[ansibleadmin@ceph05 ~]$ cd /usr/share/ceph-ansible/
[ansibleadmin@ceph05 ~]$ ansible-playbook site.yml
At this point, the Ansible playbook checks your Ceph nodes and configures them for the services you requested. If anything fails, make needed corrections and rerun the command.
-
Log into one of the three Ceph nodes (ceph01, ceph02, or ceph03) and check the health of the Ceph cluster:
# ceph health HEALTH_OK -
On the same node, verify that monitoring is working using rados:
# ceph osd pool create test 8
# echo 'Hello World!' > hello-world.txt
# rados --pool test put hello-world hello-world.txt
# rados --pool test get hello-world fetch.txt
# cat fetch.txt
Hello World!
Installing the Ceph Object Gateway
To expose Ceph storage to Project Quay, you can install a Ceph Object Gateway on the RADOS gateway node and connect it to your Ceph cluster.
On the Ansible system (ceph05), configure a Ceph Object Gateway to your Ceph Storage cluster (which will ultimately run on ceph04). See Additional resources for details.
Setting up Redis
To run Redis for Project Quay builder logs and locking, you can deploy the Redis container on each registry node and verify connectivity through the load balancer.
With Red Hat Enterprise Linux 8 server installed on each of the three Project Quay systems (quay01, quay02, and quay03), install and start the Redis service as follows:
-
Run Redis as a container on each of the three quay0* systems:
# mkdir -p /var/lib/redis # chmod 777 /var/lib/redis # sudo podman run -d -p 6379:6379 \ -v /var/lib/redis:/var/lib/redis/data:Z \ registry.redhat.io/rhel8/redis-5 -
Use the
telnetcommand to test connectivity to the redis service. Type MONITOR (to begin monitoring the service) and QUIT to exit:# yum install telnet -y # telnet 192.168.122.99 6379 Trying 192.168.122.99... Connected to 192.168.122.99. Escape character is '^]'. MONITOR +OK +1525703165.754099 [0 172.17.0.1:43848] "PING" QUIT +OK Connection closed by foreign host.NoteFor more information on using
podmanand restarting containers, see "Using Podman."
Configuring Project Quay for high availability
To configure Project Quay for high availability, you can create a config.yaml file that defines database, Redis, storage, and registry settings before starting the registry containers.
-
You completed the load balancer, database, Ceph, and Redis setup procedures in this guide.
-
You generated unique values for
SECRET_KEYandDATABASE_SECRET_KEY. These values must remain consistent across all Project Quay nodes.
-
On the first Project Quay node, for example
quay01, create a directory for the configuration bundle:# mkdir -p /mnt/quay/config -
Create a
config.yamlfile in that directory. The following example shows the minimum fields for a high availability deployment that uses the PostgreSQL database, Redis, and Ceph Object Gateway resources from earlier procedures:AUTHENTICATION_TYPE: Database PREFERRED_URL_SCHEME: https SERVER_HOSTNAME: quay.example.com SECRET_KEY: <secret_key_value> DATABASE_SECRET_KEY: <database_secret_key_value> SETUP_COMPLETE: true DB_URI: postgresql://quayuser:quaypass@db01:5432/quaydb BUILDLOGS_REDIS: host: db01 port: 6379 USER_EVENTS_REDIS: host: db01 port: 6379 DISTRIBUTED_STORAGE_CONFIG: radosGWStorage: - RadosGWStorage - access_key: <access_key> bucket_name: <bucket_name> hostname: db01 is_secure: false port: '7480' secret_key: <secret_key> storage_path: /datastorage/registry DISTRIBUTED_STORAGE_PREFERENCE: - radosGWStorage DISTRIBUTED_STORAGE_DEFAULT_LOCATIONS: [] SUPER_USERS: - quayadminwhere:
SERVER_HOSTNAME-
Specifies the hostname or IP address that clients use to reach the Project Quay service, typically the load balancer front end.
DB_URI-
Specifies the database user, password, host, and database name from "Setting up the HAProxy load balancer and the PostgreSQL database."
BUILDLOGS_REDIS.host-
Specifies the load balancer hostname that exposes Redis on port
6379. USER_EVENTS_REDIS.host-
Specifies the load balancer hostname that exposes Redis on port
6379. DISTRIBUTED_STORAGE_CONFIG.radosGWStorage.hostname-
Specifies the load balancer hostname that exposes the Ceph RADOS gateway on port
7480. For additional RadosGW fields, see "Ceph Object Gateway (RadosGW) storage example." SUPER_USERS-
Specifies an initial superuser account. This field is optional.
-
Configure additional registry settings as needed. The following fields are commonly updated for production high availability deployments:
-
TLS certificates: Place
ssl.certandssl.keyin/mnt/quay/configand setPREFERRED_URL_SCHEME: https. See Using SSL to protect connections to Project Quay.ImportantUsing SSL certificates is recommended for production deployments. If you do not use SSL, configure your container clients to treat the registry as an insecure registry, as described in Test an Insecure Registry.
-
Clair image scanning: Configure security scanner settings before enabling Clair. See Clair Security Scanning.
-
Repository mirroring: Set
FEATURE_REPO_MIRROR: trueand related fields inconfig.yaml. See Enabling repository mirroring for Project Quay. -
Action log storage, authentication, and access control: See Configure Project Quay for the complete list of supported configuration fields.
-
-
Copy the configuration directory, including
config.yamland any TLS certificate files, to each Project Quay node in the cluster, for examplequay02andquay03.
Deploying Project Quay registry nodes
To deploy Project Quay in a high availability cluster, you can start the registry container on each node with the shared config.yaml bundle and verify access through the load balancer.
For a basic setup, you can deploy on a single node. For high availability, deploy three or more nodes, for example quay01, quay02, and quay03.
|
Note
|
The resulting Project Quay service listens on port |
-
On each Project Quay node, confirm that
/mnt/quay/configcontainsconfig.yamland any required TLS certificate files from Configuring Project Quay. -
Deploy Project Quay on the node. After you authenticate to
registry.redhat.io(see Additional resources), run the following command:NoteAdd
-e DEBUGLOG=trueto thepodman runcommand line for theQuaycontainer to enable debug-level logging. Add-e IGNORE_VALIDATION=trueto bypass validation during the startup process.# sudo podman run --restart=always -p 443:8443 -p 80:8080 \ --sysctl net.core.somaxconn=4096 \ --privileged=true \ -v /mnt/quay/config:/conf/stack:Z \ -v /mnt/quay/storage:/datastorage:Z \ -d {productrepo}/{quayimage}:{productminv}NoteCreate
/mnt/quay/storageon each node before running the registry container. Image blobs are stored in Ceph Object Gateway for this high availability example, but Project Quay still uses/datastoragefor thestorage_pathdefined inconfig.yaml. -
Open a browser to the URL of the node running the
Quaycontainer. -
Log in to Project Quay with the superuser account defined in
config.yamland confirm that the registry is working. -
Repeat the deployment on the remaining Project Quay nodes in the cluster.
-
Optional. To add Clair image scanning or repository mirroring, continue with the following sections.
Install Clair for Red Hat Quay
Install Clair for standalone, including ephemeral storage for managed Clair. Clair for Red Hat Quay on OpenShift Container Platform is automatically configured.
Setting up Clair on standalone Project Quay deployments
To configure Clair on a standalone Project Quay deployment, you can deploy a Clair PostgreSQL database, enable security scanning in the configuration tool, and start the Clair container.
-
In your Project Quay installation directory, create a new directory for the Clair database data:
$ mkdir /home/<user-name>/quay-poc/postgres-clairv4 -
Set the appropriate permissions for the
postgres-clairv4file by entering the following command:$ setfacl -m u:26:-wx /home/<user-name>/quay-poc/postgres-clairv4 -
Deploy a Clair PostgreSQL database by entering the following command:
$ sudo podman run -d --name postgresql-clairv4 \ -e POSTGRESQL_USER=clairuser \ -e POSTGRESQL_PASSWORD=clairpass \ -e POSTGRESQL_DATABASE=clair \ -e POSTGRESQL_ADMIN_PASSWORD=adminpass \ -p 5433:5432 \ -v /home/<user-name>/quay-poc/postgres-clairv4:/var/lib/pgsql/data:Z \ registry.redhat.io/rhel8/postgresql-15 -
Install the PostgreSQL
uuid-osspmodule for your Clair deployment:$ sudo podman exec -it postgresql-clairv4 /bin/bash -c 'echo "CREATE EXTENSION IF NOT EXISTS \"uuid-ossp\"" | psql -d clair -U postgres'Example outputCREATE EXTENSIONNoteClair requires the
uuid-osspextension to be added to its PostgreSQL database. For users with proper privileges, Clair automatically adds the extension. If users do not have the proper privileges, the extension must be added before you start Clair.If the extension is not present, the following error is displayed when Clair attempts to start:
ERROR: Please load the "uuid-ossp" extension. (SQLSTATE 42501). -
Stop the
Quaycontainer if the container is running and restart it in configuration mode, loading the existing configuration as a volume:$ sudo podman run --rm -it --name quay_config \ -p 80:8080 -p 443:8443 \ -v $QUAY/config:/conf/stack:Z \ {productrepo}/{quayimage}:{productminv} config secret -
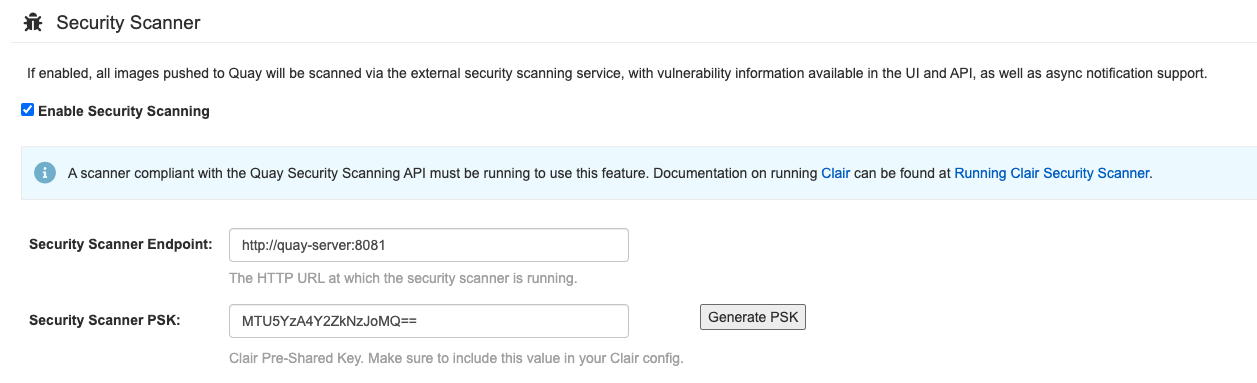
Log in to the configuration tool and click Enable Security Scanning in the Security Scanner section of the UI.
-
Set the HTTP endpoint for Clair using a port that is not already in use on the
quay-serversystem, for example,8081. -
Create a pre-shared key (PSK) using the Generate PSK button.
The following image shows the Security Scanner UI:
-
Validate and download the
config.yamlfile for Project Quay, and then stop theQuaycontainer that is running the configuration editor. -
Extract the new configuration bundle into your Project Quay installation directory, for example:
$ tar xvf quay-config.tar.gz -d /home/<user-name>/quay-poc/ -
Create a folder for your Clair configuration file, for example:
$ mkdir /etc/opt/clairv4/config/ -
Change into the Clair configuration folder:
$ cd /etc/opt/clairv4/config/ -
Create a Clair configuration file, for example:
http_listen_addr: :8081 introspection_addr: :8088 log_level: debug indexer: connstring: host=quay-server.example.com port=5433 dbname=clair user=clairuser password=clairpass sslmode=disable scanlock_retry: 10 layer_scan_concurrency: 5 migrations: true matcher: connstring: host=quay-server.example.com port=5433 dbname=clair user=clairuser password=clairpass sslmode=disable max_conn_pool: 100 migrations: true indexer_addr: clair-indexer notifier: connstring: host=quay-server.example.com port=5433 dbname=clair user=clairuser password=clairpass sslmode=disable delivery_interval: 1m poll_interval: 5m migrations: true auth: psk: key: "MTU5YzA4Y2ZkNzJoMQ==" iss: ["quay"] # tracing and metrics trace: name: "jaeger" probability: 1 jaeger: agent: endpoint: "localhost:6831" service_name: "clair" metrics: name: "prometheus" -
Start Clair by using the container image, mounting in the configuration from the file you created:
$ sudo podman run -d --name clairv4 \ -p 8081:8081 -p 8088:8088 \ -e CLAIR_CONF=/clair/config.yaml \ -e CLAIR_MODE=combo \ -v /etc/opt/clairv4/config:/clair:Z \ {productrepo}/{clairimage}:{productminv}NoteRunning multiple Clair containers is also possible, but for deployment scenarios beyond a single container the use of a container orchestrator like Kubernetes or OpenShift Container Platform is strongly recommended.
Setting up Clair on OpenShift Container Platform
The Project Quay Operator installs and configures Clair automatically when you deploy Project Quay on OpenShift Container Platform. You can increase Clair scratch storage for large images by configuring ephemeral volume overrides on the clair component.
Configuring ephemeral storage for managed Clair
To increase Clair scratch space for image layer extraction on Project Quay, you can set volumeSize and storageClassName overrides on the managed clair component in the QuayRegistry custom resource.
When you deploy managed Clair, the Operator provisions an ephemeral volume named indexer-layer-storage for temporary image layer extraction during vulnerability scanning. If your registry scans large images, this scratch space can fill and cause Clair pods to fail.
By default, the ephemeral volume requests 20Gi of storage and uses the cluster default storage class. You can override the capacity and storage class without adding new fields to the QuayRegistry CR. The Operator applies these values to the ephemeral volume mounted at /var/tmp.
|
Note
|
These overrides apply to Clair scratch storage at |
-
Edit your
QuayRegistrycustom resource. For example:$ oc edit quayregistry <registry_name> -n <namespace> -
Under
spec.components, addoverrides.volumeSizeand, optionally,overrides.storageClassNameto the managedclaircomponent. For example:spec: components: - kind: clair managed: true overrides: volumeSize: 50Gi storageClassName: fast-ssdWhen no overrides are specified, the Operator preserves the default
20Girequest and does not set a storage class. -
Save the changes and wait for the Operator to reconcile the Clair deployment.
-
Verify that the Clair deployment includes the updated ephemeral volume claim template. Confirm that the
storageandstorageClassNamevalues match your overrides:$ oc get deploy -n <namespace> <registry_name>-clair-app \ -o jsonpath='{.spec.template.spec.volumes[?(@.name=="indexer-layer-storage")].ephemeral.volumeClaimTemplate.spec}{"\n"}'Example output{"accessModes":["ReadWriteOnce"],"resources":{"requests":{"storage":"50Gi"}},"storageClassName":"fast-ssd","volumeMode":"Filesystem"}