Get Red Hat Quay release notifications
Subscribe to Red Hat Customer Portal notifications so you know when new Red Hat Quay releases and related product updates are available.
Getting Project Quay release notifications
To keep up with the latest Project Quay releases and other changes related to Project Quay, you can sign up for update notifications on the Red Hat Customer Portal.
-
Log into the Red Hat Customer Portal with your Red Hat customer account credentials.
-
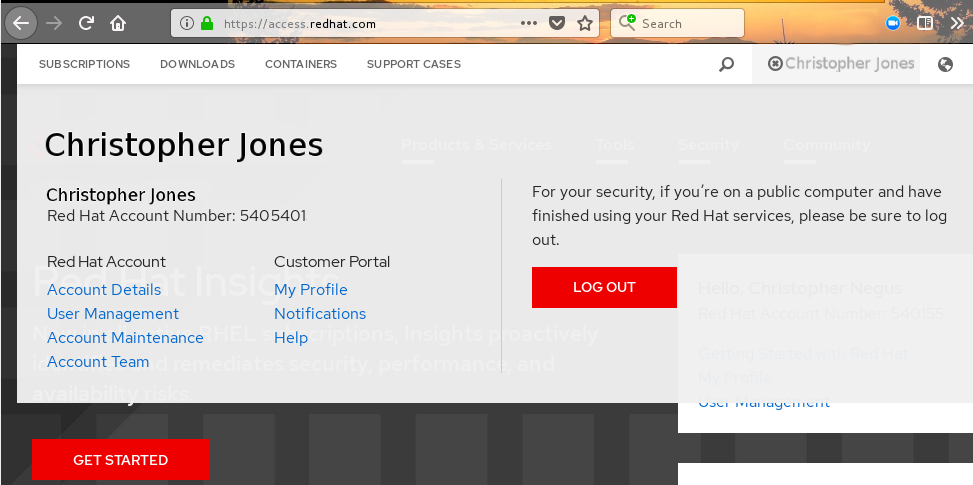
Select your user name (upper-right corner) to see Red Hat Account and Customer Portal selections:
-
Select Notifications. Your profile activity page appears.
-
Select the Notifications tab.
-
Select Manage Notifications.
-
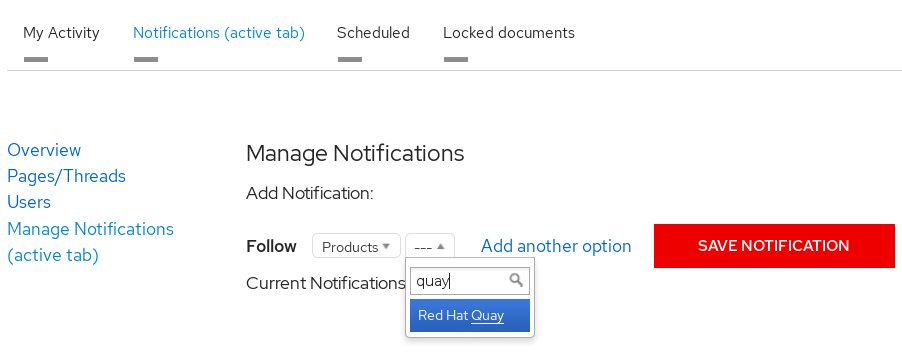
Select Follow, then choose Products from the drop-down box.
-
From the drop-down box next to the Products, search for and select Project Quay:
-
Select the SAVE NOTIFICATION button. Going forward, you will receive notifications when there are changes to the Project Quay product, such as a new release.
Upgrade Red Hat Quay on OpenShift Container Platform Container Platform
Upgrade the Red Hat Quay Operator and QuayRegistry on OpenShift, preserve TLS settings, and apply database migrations safely.
Operator upgrade versioning
The Project Quay Operator uses synchronized versioning: each Operator version deploys a single, matching version of Project Quay and its components. You can use this scheme to plan upgrades and keep components compatible.
|
Note
|
There is no field on the |
Operator Lifecycle Manager
Operator Lifecycle Manager (OLM) installs and upgrades the Project Quay Operator. You can use automatic or manual approval in the Subscription to control when new Operator versions are applied.
|
Warning
|
When the Project Quay Operator is installed by Operator Lifecycle Manager, it might be configured to support automatic or manual upgrades. This option is shown on the OperatorHub page for the Project Quay Operator during installation. It can also be found in the Project Quay Operator |
Upgrading the Project Quay Operator
To upgrade the Project Quay Operator, use the standard OpenShift Container Platform process for installed Operators and follow N-1 minor version paths.
In general, Project Quay supports upgrades from a prior (N-1) minor version only. For example, upgrading directly from Project Quay 3.9 to the latest version of {producty} is not supported. Instead, users would have to upgrade as follows:
-
3.9.z → 3.10.z
-
3.10.z → 3.11.z
-
3.11.z → 3.14.z
-
3.14.z → 3.16.z
-
3.16.z → 3.17.z
-
3.17.z → 3.18.z
-
3.18.z → 5.0.z
This is required to ensure that any necessary database migrations are done correctly and in the right order during the upgrade.
In some cases, Project Quay supports direct, single-step upgrades from prior (N-2, N-3) minor versions. This simplifies the upgrade procedure for customers on older releases. The following upgrade paths are supported for Project Quay {productmin}:
-
3.16.z → {productmin}
-
3.17.z → {productmin}
-
3.18.z → {productmin}
Preserving TLS settings before upgrading Red Hat Quay on OpenShift Container Platform
The Project Quay Operator can inherit the cluster-wide TLS security profile. Before upgrading, review your cluster profile and set SSL_PROTOCOLS and SSL_CIPHERS if you need to preserve your current TLS behavior.
The Operator inherits the cluster-wide TLS security profile from the OpenShift APIServer configuration when neither SSL_PROTOCOLS nor SSL_CIPHERS is set in the configBundleSecret resource.
When the tls component is set to managed, the OpenShift Route already enforces the cluster TLS profile, and no action is required.
When the tls component is set to unmanaged, Project Quay terminates TLS directly and inherits the cluster profile after the upgrade unless you override it in the config bundle. If you have already set both SSL_PROTOCOLS and SSL_CIPHERS, no additional TLS configuration is required before upgrading. Setting only one field disables cluster-profile inheritance for both fields.
-
You have cluster administrator access to review the OpenShift Container Platform
APIServerconfiguration. -
You can edit the
configBundleSecretreferenced by yourQuayRegistrycustom resource (CR).
-
Review the cluster TLS security profile:
$ oc get apiserver cluster -o jsonpath='{.spec.tlsSecurityProfile}{"\n"}' -
If you must preserve your current TLS settings, add
SSL_PROTOCOLSandSSL_CIPHERSto theconfig.yamlfile in yourconfigBundleSecretbefore upgrading. For example:# ... SSL_PROTOCOLS: - TLSv1.2 - TLSv1.3 SSL_CIPHERS: - ECDHE-RSA-AES128-GCM-SHA256 - ECDHE-ECDSA-AES128-GCM-SHA256 - ECDHE-RSA-AES256-GCM-SHA384 - ECDHE-ECDSA-AES256-GCM-SHA384 # Add other required ciphers # ...NoteInclude every cipher suite your clients require. To fully override cluster-profile inheritance, set both
SSL_PROTOCOLSandSSL_CIPHERS. Setting either field disables inheritance for both fields. -
Update the
configBundleSecretwith the modifiedconfig.yamlfile. You can edit the secret in the OpenShift Container Platform web console or recreate it from a local file. For example:$ oc create secret generic <config_bundle_secret_name> \ --from-file config.yaml=./config.yaml \ --dry-run=client -o yaml | oc apply -f - -
Proceed with the Project Quay Operator upgrade. If the cluster TLS profile is acceptable and neither
SSL_PROTOCOLSnorSSL_CIPHERSis set, no additional TLS configuration is required.
Upgrading Project Quay to version {productmin}
To upgrade Project Quay to the next version, change the Operator update channel in the OpenShift Container Platform Web Console and wait for the upgrade pods to complete. You can then verify the database images and access your registry.
-
In the OpenShift Container Platform Web Console, navigate to Operators → Installed Operators.
-
Click on the Project Quay Operator.
-
Navigate to the Subscription tab.
-
Under Subscription details click Update channel.
-
Select stable-5 → Save.
-
Check the progress of the new installation under Upgrade status. Wait until the upgrade status changes to 1 installed before proceeding.
-
In your OpenShift Container Platform cluster, navigate to Workloads → Pods. Existing pods should be terminated, or in the process of being terminated.
-
Wait for the following pods, which are responsible for upgrading the database and alembic migration of existing data, to spin up:
clair-postgres-upgrade,quay-postgres-upgrade, andquay-app-upgrade. -
After the
clair-postgres-upgrade,quay-postgres-upgrade, andquay-app-upgradepods are marked as Completed, the remaining pods for your Project Quay deployment spin up. This takes approximately ten minutes. -
Verify that the
quay-databaseuses thepostgresql-13image, andclair-postgrespods now uses thepostgresql-15image. -
After the
quay-apppod is marked as Running, you can reach your Project Quay registry.
Upgrading to the next minor release version
Z-stream upgrades, for example, 3.13.1 → 3.13.2, for Project Quay use your existing channel and approval strategy. With Automatic approval, the Operator applies new z-stream updates with little or no downtime; with Manual approval, you approve each update first.
Manually approving a pending Operator upgrade
To approve a pending Project Quay Operator upgrade when using Manual approval, open the Subscription tab, review the install plan and resources, and click Approve. You can then monitor the upgrade progress on the Installed Operators page.
The following image shows the Subscription tab in the UI, including the update Channel, the Approval strategy, the Upgrade status and the InstallPlan:
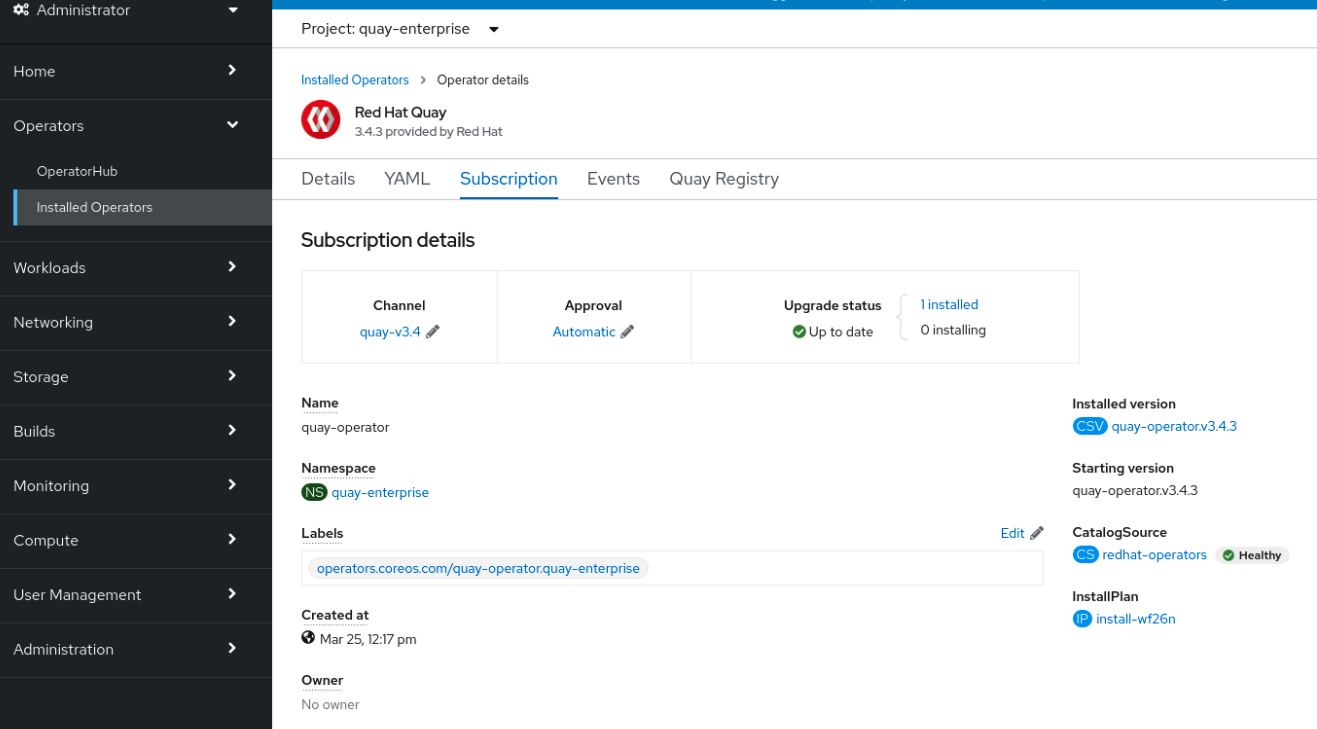
The list of Installed Operators provides a high-level summary of the current Quay installation:

Upgrading a QuayRegistry resource
The Project Quay Operator reconciles QuayRegistry resources and upgrades them when the Operator version differs from the current version. When an upgrade is supported, the Operator applies it and updates status; when not, it returns an error and leaves the QuayRegistry unchanged.
The following logic is used:
-
If
status.currentVersionis unset, reconcile as normal. -
If
status.currentVersionequals the Operator version, reconcile as normal. -
If
status.currentVersiondoes not equal the Operator version, check if it can be upgraded. If it can, perform upgrade tasks and set thestatus.currentVersionto the Operator’s version once complete. If it cannot be upgraded, return an error and leave theQuayRegistryand its deployed Kubernetes objects alone.
Upgrade a standalone Red Hat Quay deployment
Review supported standalone upgrade paths and access the correct Red Hat Quay container images for your target version.
Supported standalone upgrade paths
To upgrade a standalone Project Quay and Clair deployment, follow the procedure for your current version in sequential order. You stop the containers, back up the database and storage, then start the new Clair and Project Quay images.
In general, single-step upgrades from prior (N-2, N-3) minor versions. This helps simplify the upgrade procedure for customers on older releases. The following upgrade paths are supported for Project Quay {productmin}:
-
3.16.z → {productmin}
-
3.17.z → {productmin}
-
3.18.z → {productmin}
Upgrading to {producty} from releases older than those listed above is unsupported. This helps ensure that any necessary database migrations are done correctly and in the right order during the upgrade.
For Operator-based upgrades, see Operator upgrade versioning and the OpenShift Container Platform upgrade procedures in this guide.
Determine your current version and follow the upgrade steps in sequential order, starting with your current version and working up to your desired target version. Upgrade procedures are available for 3.16.z, 3.17.z, and 3.18.z to {productmin}.
For information on features in individual releases, see the Project Quay Release Notes.
The general procedure for a manual upgrade consists of the following steps:
-
Stop the
QuayandClaircontainers. -
Backup the database and image storage (optional but recommended).
-
Start Clair using the new version of the image.
-
Wait until Clair is ready to accept connections before starting the new version of Project Quay.
Accessing images
To access Project Quay and Clair images for standalone upgrades, pull from registry.redhat.io or registry.access.redhat.com and configure authentication as described in Red Hat Container Registry Authentication.
Project Quay images from version 3.4.0 and later are available from registry.redhat.io and registry.access.redhat.com. Configure authentication before pulling images.
Upgrade to {productminv} from 3.18.z
-
Quay: {productrepo}/{quayimage}:{productminv}
-
PostgreSQL: {postgresimage}
-
Redis: {redisimage}
-
Clair-PostgreSQL: {postgresimage}
Upgrade to {productminv} from 3.17.z
-
Quay: {productrepo}/{quayimage}:{productminv}
-
PostgreSQL: {postgresimage}
-
Redis: {redisimage}
-
Clair-PostgreSQL: {postgresimage}
Upgrade to {productminv} from 3.16.z
-
Quay: {productrepo}/{quayimage}:{productminv}
-
PostgreSQL: {postgresimage}
-
Redis: {redisimage}
-
Clair-PostgreSQL: {postgresimage}
Upgrade a geo-replicated Red Hat Quay deployment
Upgrade geo-replicated Red Hat Quay deployments on standalone or Operator installations in the supported order.
Upgrading standalone geo-replication
To upgrade a geo-replication deployment of standalone Project Quay, stop operations on all instances, back up the deployment, then follow the procedure to upgrade each system. Expect intermittent downtime when upgrading to the next y-stream release.
|
Important
|
|
|
Note
|
This procedure assumes that you are running Project Quay services on three (or more) systems. For more information, see Preparing for Project Quay high availability. |
-
You have logged into
registry.redhat.io
-
Obtain a list of all Project Quay instances on each system running a Project Quay instance.
-
Enter the following command on System A to reveal the Project Quay instances:
$ sudo podman psExample outputCONTAINER ID IMAGE COMMAND CREATED STATUS PORTS NAMES ec16ece208c0 registry.redhat.io/quay/quay-rhel8:v{producty-n1} registry 6 minutes ago Up 6 minutes ago 0.0.0.0:80->8080/tcp, 0.0.0.0:443->8443/tcp quay01 -
Enter the following command on System B to reveal the Project Quay instances:
$ sudo podman psExample outputCONTAINER ID IMAGE COMMAND CREATED STATUS PORTS NAMES 7ae0c9a8b37d registry.redhat.io/quay/quay-rhel8:v{producty-n1} registry 5 minutes ago Up 2 seconds ago 0.0.0.0:82->8080/tcp, 0.0.0.0:445->8443/tcp quay02 -
Enter the following command on System C to reveal the Project Quay instances:
$ sudo podman psExample outputCONTAINER ID IMAGE COMMAND CREATED STATUS PORTS NAMES e75c4aebfee9 registry.redhat.io/quay/quay-rhel8:v{producty-n1} registry 4 seconds ago Up 4 seconds ago 0.0.0.0:84->8080/tcp, 0.0.0.0:447->8443/tcp quay03
-
-
Temporarily shut down all Project Quay instances on each system.
-
Enter the following command on System A to shut down the Project Quay instance:
$ sudo podman stop ec16ece208c0 -
Enter the following command on System B to shut down the Project Quay instance:
$ sudo podman stop 7ae0c9a8b37d -
Enter the following command on System C to shut down the Project Quay instance:
$ sudo podman stop e75c4aebfee9
-
-
Obtain the latest Project Quay version, for example, Project Quay {producty}, on each system.
-
Enter the following command on System A to obtain the latest Project Quay version:
$ sudo podman pull registry.redhat.io/quay/quay-rhel8:{productminv} -
Enter the following command on System B to obtain the latest Project Quay version:
$ sudo podman pull registry.redhat.io/quay/quay-rhel8:v{producty} -
Enter the following command on System C to obtain the latest Project Quay version:
$ sudo podman pull registry.redhat.io/quay/quay-rhel8:{productminv}
-
-
On System A of your highly available Project Quay deployment, run the new image version, for example, Project Quay {producty}:
# sudo podman run --restart=always -p 443:8443 -p 80:8080 \ --sysctl net.core.somaxconn=4096 \ --name=quay01 \ -v /mnt/quay/config:/conf/stack:Z \ -v /mnt/quay/storage:/datastorage:Z \ -d registry.redhat.io/quay/quay-rhel8:{productminv} -
Wait for the new Project Quay container to become fully operational on System A. You can check the status of the container by entering the following command:
$ sudo podman psExample outputCONTAINER ID IMAGE COMMAND CREATED STATUS PORTS NAMES 70b9f38c3fb4 registry.redhat.io/quay/quay-rhel8:v{producty} registry 2 seconds ago Up 2 seconds ago 0.0.0.0:82->8080/tcp, 0.0.0.0:445->8443/tcp quay01 -
Optional: Ensure that Project Quay is fully operation by navigating to the Project Quay UI.
-
After ensuring that Project Quay on System A is fully operational, run the new image versions on System B and on System C.
-
On System B of your highly available Project Quay deployment, run the new image version, for example, Project Quay {producty}:
# sudo podman run --restart=always -p 443:8443 -p 80:8080 \ --sysctl net.core.somaxconn=4096 \ --name=quay02 \ -v /mnt/quay/config:/conf/stack:Z \ -v /mnt/quay/storage:/datastorage:Z \ -d registry.redhat.io/quay/quay-rhel8:{productminv} -
On System C of your highly available Project Quay deployment, run the new image version, for example, Project Quay {producty}:
# sudo podman run --restart=always -p 443:8443 -p 80:8080 \
   --sysctl net.core.somaxconn=4096 \
   --name=quay03 \
   -v /mnt/quay/config:/conf/stack:Z \
   -v /mnt/quay/storage:/datastorage:Z \
   -d registry.redhat.io/quay/quay-rhel8:{productminv}
-
-
You can check the status of the containers on System B and on System C by entering the following command:
$ sudo podman ps
Upgrading Operator geo-replication
To upgrade your geo-replicated Red Hat Quay on OpenShift Container Platform deployment, you must stop operations, scale down secondary systems, upgrade the primary system, then upgrade secondary systems. This ensures a safe upgrade process with minimal downtime across your geo-replicated registry.
|
Important
|
|
The following procedure assumes that you are running the Project Quay registry on three or more systems. For this procedure, three systems named System A, System B, and System C are used. System A serves as the primary system in which the Project Quay Operator is deployed.
-
On System B and System C, scale down your Project Quay registry. This is done by disabling auto scaling and overriding the replica county for Project Quay, mirror workers, and Clair if it is managed. Note that you must keep the Project Quay registry running on System A. Do not update the
quayregistry.yamlfile on System A.Use the following
quayregistry.yamlfile as a reference:apiVersion: quay.redhat.com/v1 kind: QuayRegistry metadata: name: registry namespace: ns spec: components: … - kind: horizontalpodautoscaler managed: false - kind: quay managed: true overrides: replicas: 0 - kind: clair managed: true overrides: replicas: 0 - kind: mirror managed: true overrides: replicas: 0 …where:
managed: false-
Disables auto scaling of
Quay,ClairandMirroringworkers overrides-
Sets the replica count to 0 for components accessing the database and objectstorage
-
Wait for the
registry-quay-app,registry-quay-mirror, andregistry-clair-apppods to disappear. Enter the following command to check their status:oc get pods -n <quay-namespace>Example outputquay-operator.v3.7.1-6f9d859bd-p5ftc 1/1 Running 0 12m quayregistry-clair-postgres-7487f5bd86-xnxpr 1/1 Running 1 (12m ago) 12m quayregistry-quay-app-upgrade-xq2v6 0/1 Completed 0 12m quayregistry-quay-redis-84f888776f-hhgms 1/1 Running 0 12m -
On System A, initiate a Project Quay upgrade to the latest y-stream version. This is a manual process. For more information about upgrading installed Operators, see Upgrading installed Operators. For more information about Project Quay upgrade paths, see Upgrading the Project Quay Operator.
-
After the new Project Quay registry is installed, the necessary upgrades on the cluster are automatically completed. Afterwards, new Project Quay pods are started with the latest y-stream version. Additionally, new
Quaypods are scheduled and started. -
Confirm that the update has properly worked by navigating to the Project Quay UI:
-
In the OpenShift console, navigate to Operators → Installed Operators, and click the Registry Endpoint link.
ImportantDo not execute the following step until the Project Quay UI is available. Do not upgrade the Project Quay registry on System B and on System C until the UI is available on System A.
-
-
Confirm that the update has properly worked on System A, initiate the Project Quay upgrade on System B and on System C. The Operator upgrade results in an upgraded Project Quay installation, and the pods are restarted.
NoteBecause the database schema is correct for the new y-stream installation, the new pods on System B and on System C should quickly start.
-
After updating, revert the changes made in step 1 of this procedure by removing
overridesfor the components. For example:apiVersion: quay.redhat.com/v1 kind: QuayRegistry metadata: name: registry namespace: ns spec: components: … - kind: horizontalpodautoscaler managed: true - kind: quay managed: true - kind: clair managed: true - kind: mirror managed: true …where:
kind: horizontalpodautoscaler::Set this resource toTrueif thehorizontalpodautoscalerresource was set toTruebefore the upgrade procedure, or if you want Project Quay to scale in case of a resource shortage.
Upgrade the Quay Bridge Operator
Change the Quay Bridge Operator update channel to upgrade Red Hat Quay on OpenShift Container Platform integration safely.
Changing the Quay Bridge Operator update channel
To receive the latest Project Quay upgrades and features, you can upgrade the Quay Bridge Operator by changing the update channel in the operator subscription.
-
You have installed Project Quay.
-
You are logged in to OpenShift Container Platform as a cluster administrator.
-
On the OpenShift Container Platform web console, click Operators → Installed Operators → Quay Bridge Operator.
-
Click the Subscription tab.
-
Under Update channel, click stable-3.15 → Save.
Upgrade the Clair PostgreSQL database
Migrate the Clair PostgreSQL database from version 13 to 15 when required by your Red Hat Quay upgrade path.
Migrating the Clair PostgreSQL database from version 13 to 15
To migrate your Clair PostgreSQL database from version 13 to version 15 in Project Quay, you can stop Clair and Quay, run the data migration container, and restart the services.
If you are upgrading Project Quay to version 13, you must migrate your Clair PostgreSQL database version from PostgreSQL version 13 to version 15. This requires bringing down your Clair PostgreSQL 13 database and running a migration script to initiate the process.
|
Important
|
Clair security scans might become temporarily disrupted after the migration procedure has succeeded. |
-
Stop the Project Quay container by entering the following command:
$ sudo podman stop <quay_container_name> -
Stop the Clair container by running the following command:
$ sudo podman stop <clair_container_id> -
Run the following Podman process from SCLOrg’s Data Migration procedure, which allows for data migration from a remote PostgreSQL server:
$ sudo podman run -d --name <clair_migration_postgresql_database> \
  -e POSTGRESQL_MIGRATION_REMOTE_HOST=<container_ip_address> \
  -e POSTGRESQL_MIGRATION_ADMIN_PASSWORD=remoteAdminP@ssword \
  -v </host/data/directory:/var/lib/pgsql/data:Z> \
  [ OPTIONAL_CONFIGURATION_VARIABLES ]
  registry.redhat.io/rhel8/postgresql-15
where:
<clair_migration_postgresql_database>-
Specifies a name for your Clair PostgreSQL 15 migration database.
<container_ip_address>-
Specifies your new Clair PostgreSQL 15 database container IP address. Can be obtained by running the following command:
sudo podman inspect -f "{{.NetworkSettings.IPAddress}}" postgresql-quay. </host/data/directory:/var/lib/pgsql/data:Z>-
Specifies a different volume mount point than the one from your initial Clair PostgreSQL 13 deployment. Modify the access control lists for said directory. For example:
$ mkdir -p /host/data/clair-postgresql15-directory$ setfacl -m u:26:-wx /host/data/clair-postgresql15-directoryThis prevents data from being overwritten by the new container.
-
Stop the Clair PostgreSQL 13 container:
$ sudo podman stop <clair_postgresql13_container_name> -
After completing the PostgreSQL migration, run the Clair PostgreSQL 15 container, using the new data volume mount from Step 3, for example,
</host/data/clair-postgresql15-directory:/var/lib/postgresql/data>:$ sudo podman run -d --rm --name <postgresql15-clairv4> \ -e POSTGRESQL_USER=<clair_username> \ -e POSTGRESQL_PASSWORD=<clair_password> \ -e POSTGRESQL_DATABASE=<clair_database_name> \ -e POSTGRESQL_ADMIN_PASSWORD=<admin_password> \ -p 5433:5432 \ -v </host/data/clair-postgresql15-directory:/var/lib/postgresql/data:Z> \ registry.redhat.io/rhel8/postgresql-15 -
Start the Project Quay container by entering the following command:
$ sudo podman run -d --rm -p 80:8080 -p 443:8443 --name=quay \ -v /home/<quay_user>/quay-poc/config:/conf/stack:Z \ -v /home/<quay_user>/quay-poc/storage:/datastorage:Z \ {productrepo}/{quayimage}:{productminv} -
Start the Clair container by entering the following command:
$ sudo podman run -d --name clairv4 \
-p 8081:8081 -p 8088:8088 \
-e CLAIR_CONF=/clair/config.yaml \
-e CLAIR_MODE=combo \
registry.redhat.io/quay/clair-rhel8:{productminv}
Downgrade or roll back Red Hat Quay
Review downgrade and rollback limits before you restore a Project Quay version.
Downgrade and rollback limits
Project Quay only supports rolling back, or downgrading, to previous z-stream versions, for example, 3.12.3 → 3.12.2.
Rolling back to previous y-stream versions ({producty} → {producty-n1}) is not supported. This is because Project Quay updates might contain database schema upgrades that are applied when upgrading to a new version of Project Quay. Database schema upgrades are not considered backwards compatible.
|
Important
|
Downgrading to previous z-streams is neither recommended nor supported by either Operator based deployments or virtual machine based deployments. Downgrading should only be done in extreme circumstances. The decision to rollback your Project Quay deployment must be made in conjunction with the Project Quay support and development teams. For more information, contact Project Quay support. |