To configure and manage advanced capabilities in Red Hat Quay on OpenShift Container Platform, you can use this guide. It covers features such as vulnerability scanning with Clair, geo-replication, backup and restore operations, FIPS compliance, monitoring and alerting, and custom SSL certificates.
Federal Information Processing Standard (FIPS) readiness and compliance
The Federal Information Processing Standard (FIPS) developed by the National Institute of Standards and Technology (NIST) is regarded as the highly regarded for securing and encrypting sensitive data, notably in highly regulated areas such as banking, healthcare, and the public sector. Red Hat Enterprise Linux (RHEL) and OpenShift Container Platform support FIPS by providing a FIPS mode, in which the system only allows usage of specific FIPS-validated cryptographic modules like openssl. This ensures FIPS compliance.
Enabling FIPS compliance
To enable FIPS compliance for your Project Quay deployment, you can set the FEATURE_FIPS configuration field to True in your config.yaml file. This ensures that Project Quay uses only FIPS-validated cryptographic modules for securing sensitive data.
-
If you are running a standalone deployment of Project Quay, your Red Hat Enterprise Linux (RHEL) deployment is version 8 or later and FIPS-enabled.
-
If you are deploying Red Hat Quay on OpenShift Container Platform, OpenShift Container Platform is version 4.10 or later.
-
Your Project Quay version is 3.5.0 or later.
-
If you are using the Red Hat Quay on OpenShift Container Platform on an IBM Power or IBM Z cluster:
-
OpenShift Container Platform version 4.14 or later is required
-
Project Quay version 3.10 or later is required
-
-
You have administrative privileges for your Project Quay deployment.
-
In your Project Quay
config.yamlfile, set theFEATURE_FIPSconfiguration field toTrue. For example:# ... FEATURE_FIPS = true # ...With
FEATURE_FIPSset toTrue, Project Quay runs using FIPS-compliant hash functions.
Console monitoring and alerting
Project Quay provides monitoring and alerting features in the OpenShift Container Platform console for instances deployed by the Operator. You can use Grafana dashboards, individual metrics, and alerts to monitor registry performance and receive notifications when Quay pods restart frequently.
|
Note
|
To enable the monitoring features, you must select All namespaces on the cluster as the installation mode when installing the Project Quay Operator. |
Dashboard
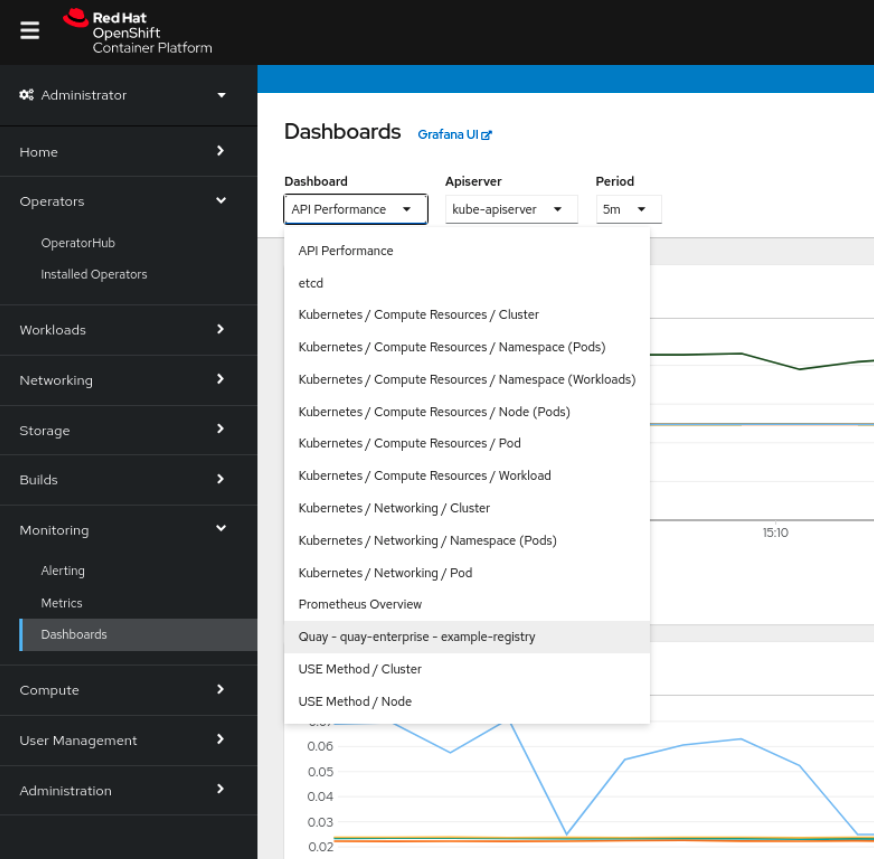
On the OpenShift Container Platform console, click Monitoring → Dashboards and search for the dashboard of your desired Project Quay registry instance:
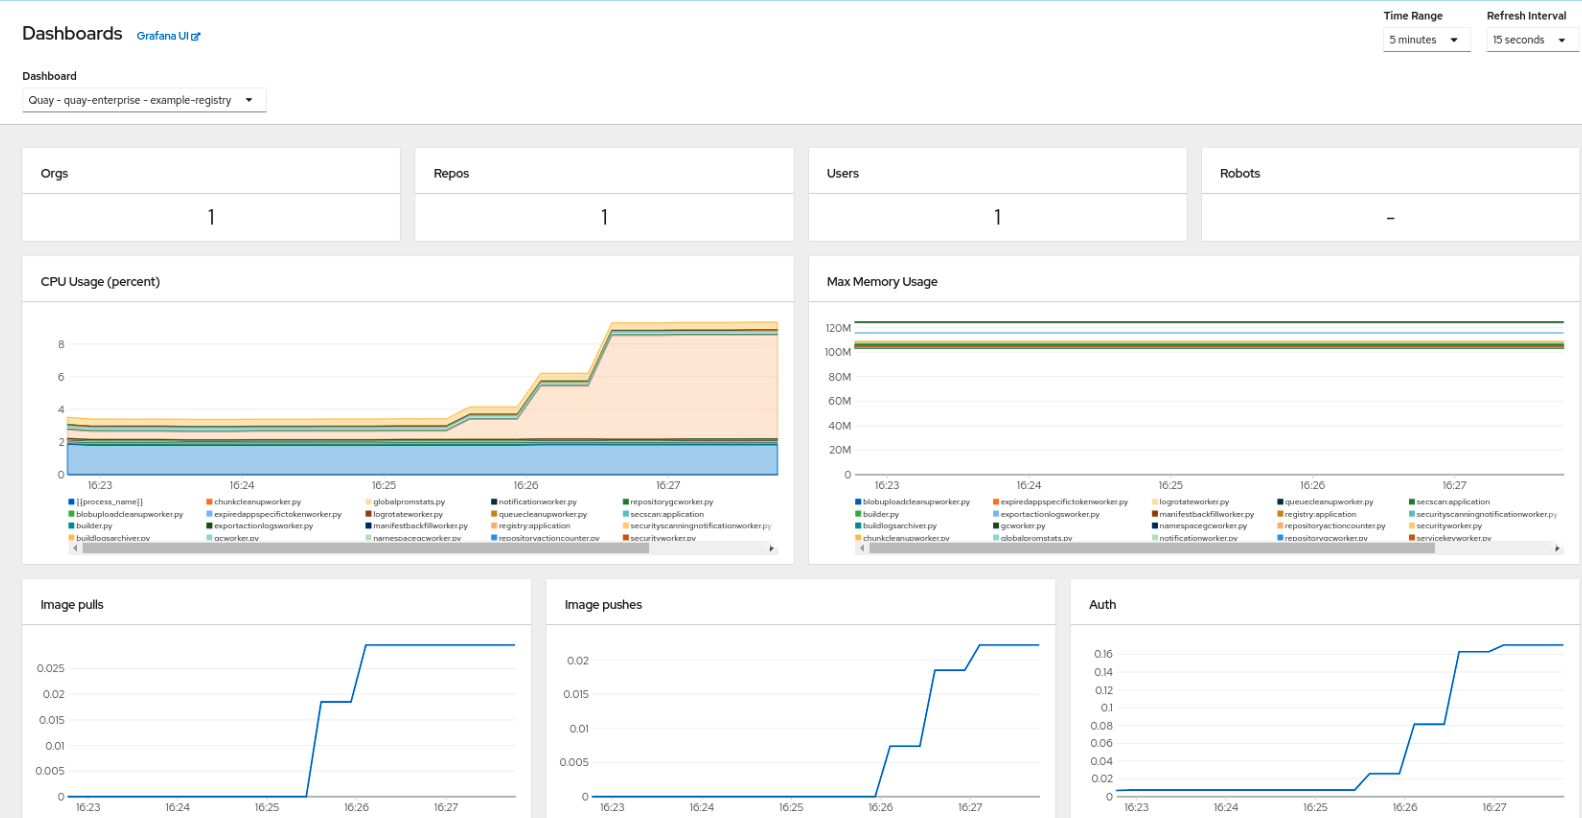
The dashboard shows various statistics including the following:
-
The number of Organizations, Repositories, Users, and Robot accounts
-
CPU Usage
-
Max memory usage
-
Rates of pulls and pushes, and authentication requests
-
API request rate
-
Latencies
Metrics
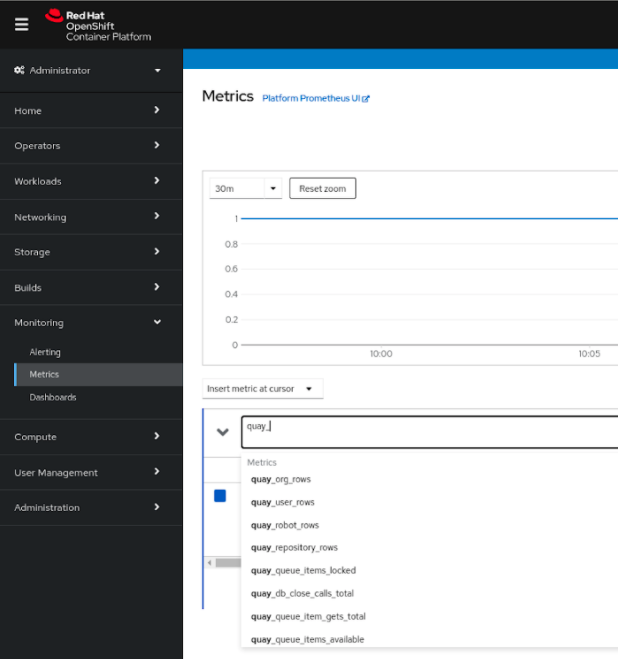
You can see the underlying metrics behind the Project Quay dashboard by accessing Monitoring → Metrics in the UI. In the Expression field, enter the text quay_ to see the list of metrics available:
Select a sample metric, for example, quay_org_rows:
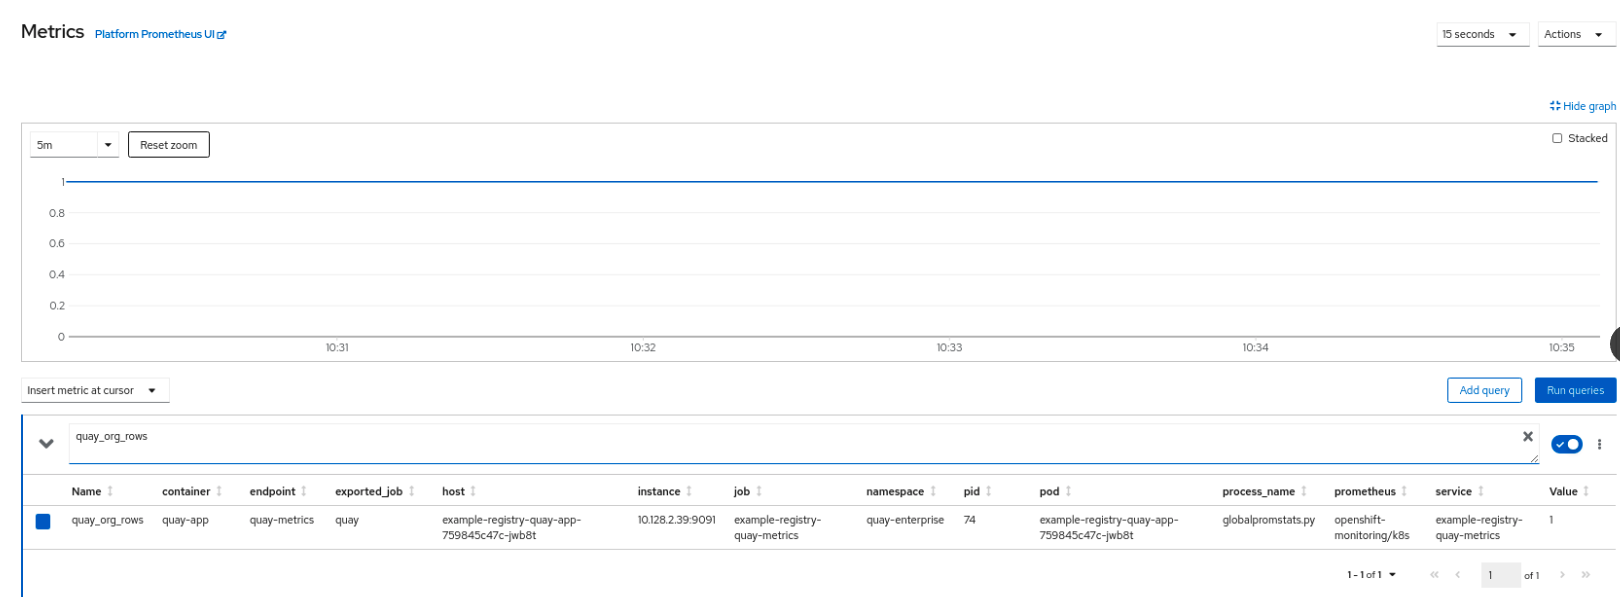
This metric shows the number of organizations in the registry. It is also directly surfaced in the dashboard.
Alerting
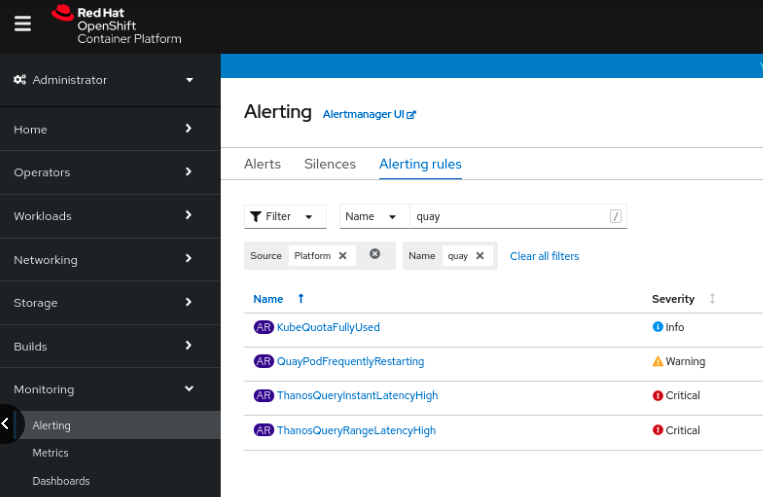
An alert is raised if the Quay pods restart too often. The alert can be configured by accessing the Alerting rules tab from Monitoring → Alerting in the console UI and searching for the Quay-specific alert:
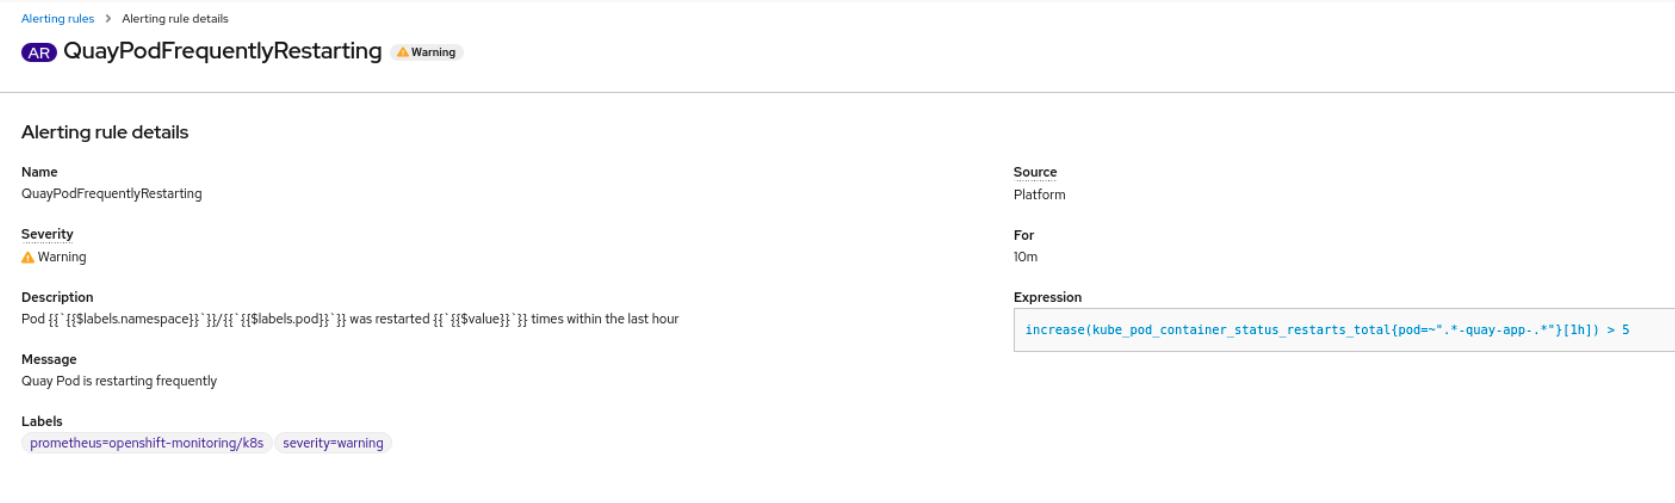
Select the QuayPodFrequentlyRestarting rule detail to configure the alert:
Clair security scanner
Clair is a vulnerability scanner that analyzes container image layers and reports security issues from upstream CVE databases in Project Quay. You can use these reports to identify vulnerabilities that affect image content.
Clair on OpenShift Container Platform
The Project Quay Operator installs and configures Clair automatically when you deploy Project Quay on OpenShift Container Platform. You can increase Clair scratch storage for large images by configuring ephemeral volume overrides on the clair component.
Testing Clair
To confirm that Clair is scanning images on Project Quay, you can push a sample image to your registry and open the vulnerability report in the UI.
-
You have deployed the Clair container image.
-
Pull a sample image by entering the following command:
$ podman pull ubuntu:20.04 -
Tag the image to your registry by entering the following command:
$ sudo podman tag docker.io/library/ubuntu:20.04 <quay-server.example.com>/<user-name>/ubuntu:20.04 -
Push the image to your Project Quay registry by entering the following command:
$ sudo podman push --tls-verify=false quay-server.example.com/quayadmin/ubuntu:20.04 -
Log in to your Project Quay deployment through the UI.
-
Click the repository name, for example, quayadmin/ubuntu.
-
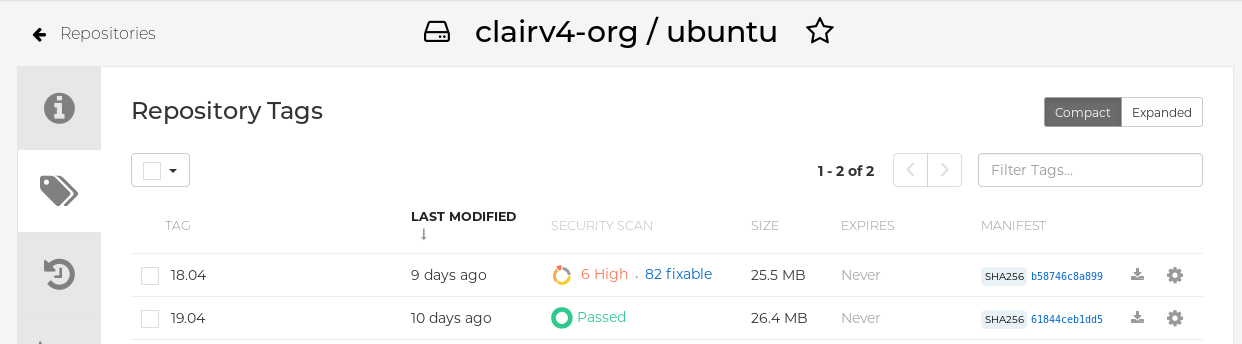
In the navigation pane, click Tags.
-
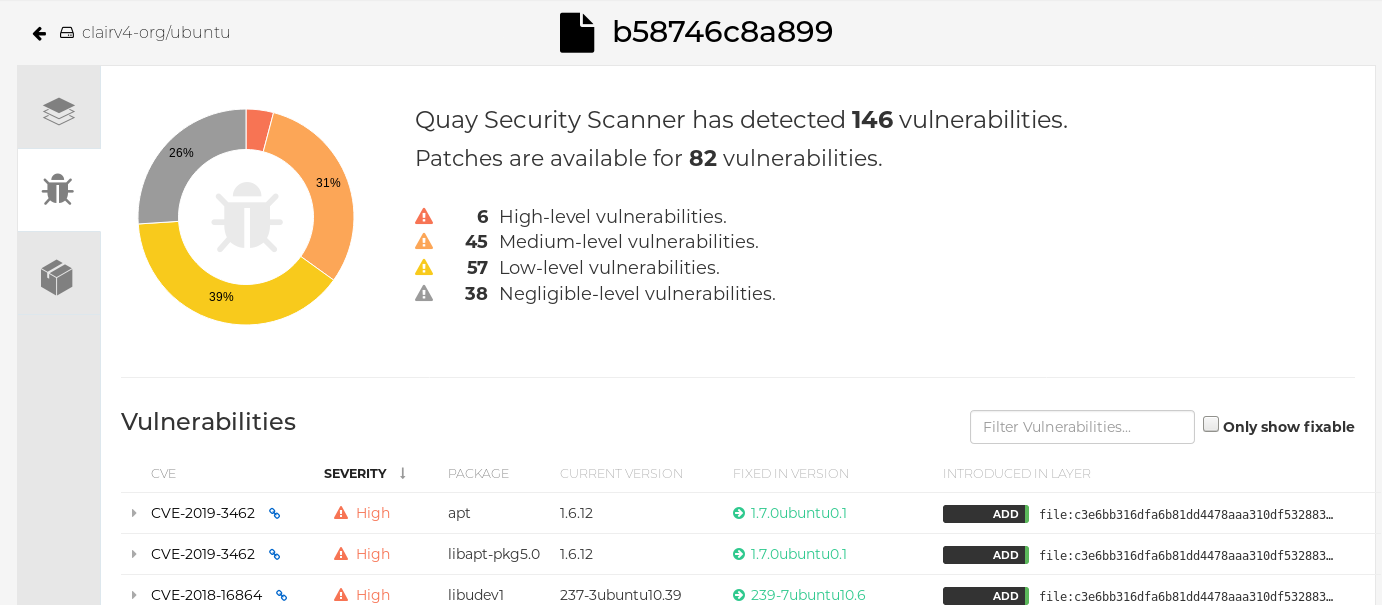
Click the image report, for example, 45 medium, to show a more detailed report:
 Note
NoteIn some cases, Clair shows duplicate reports on images, for example,
ubi8/nodejs-12orubi8/nodejs-16. This occurs because vulnerabilities with the same name are for different packages. You can expect this behavior with Clair vulnerability reporting. Duplicate reports are not a bug.
Advanced Clair configuration
Advanced Clair configuration lets you customize Clair settings beyond the default installation. You can use these options to adjust scanning behavior, database connections, and other advanced features to meet specific security and performance requirements.
Unmanaged Clair configuration
Unmanaged Clair configuration lets you run a custom Clair deployment or use an external Clair database with the Project Quay Operator. You can use this option for geo-replicated environments or highly available databases outside your cluster.
Running a custom Clair configuration with an unmanaged Clair database
To use an external Clair database with the Project Quay Operator, you can set the clairpostgres component to unmanaged in your QuayRegistry custom resource.
|
Important
|
You must not use the same externally managed PostgreSQL database for both Project Quay and Clair deployments. Your PostgreSQL database must also not be shared with other workloads, as it might exhaust the natural connection limit on the PostgreSQL side when connection-intensive workloads, like Project Quay or Clair, contend for resources. Additionally, pgBouncer is not supported with Project Quay or Clair, so pgBouncer is not an option to resolve this issue. |
-
In the Quay Operator, set the
clairpostgrescomponent of theQuayRegistrycustom resource tomanaged: false:apiVersion: quay.redhat.com/v1 kind: QuayRegistry metadata: name: quay370 spec: configBundleSecret: config-bundle-secret components: - kind: objectstorage managed: false - kind: route managed: true - kind: tls managed: false - kind: clairpostgres managed: false
Configuring a custom Clair database with an unmanaged Clair database
To configure a custom Clair database with SSL/TLS certificates on Project Quay, you can create a Quay configuration bundle secret that includes the clair-config.yaml file.
|
Note
|
The following procedure configures Clair with SSL/TLS certificates. |
-
Create a Quay configuration bundle secret that includes the
clair-config.yamlby entering the following command:$ oc create secret generic --from-file config.yaml=./config.yaml --from-file extra_ca_cert_rds-ca-2019-root.pem=./rds-ca-2019-root.pem --from-file clair-config.yaml=./clair-config.yaml --from-file ssl.cert=./ssl.cert --from-file ssl.key=./ssl.key config-bundle-secretExample Clairconfig.yamlfileindexer: connstring: host=quay-server.example.com port=5432 dbname=quay user=quayrdsdb password=quayrdsdb sslrootcert=/run/certs/rds-ca-2019-root.pem sslmode=verify-ca layer_scan_concurrency: 6 migrations: true scanlock_retry: 11 log_level: debug matcher: connstring: host=quay-server.example.com port=5432 dbname=quay user=quayrdsdb password=quayrdsdb sslrootcert=/run/certs/rds-ca-2019-root.pem sslmode=verify-ca migrations: true metrics: name: prometheus notifier: connstring: host=quay-server.example.com port=5432 dbname=quay user=quayrdsdb password=quayrdsdb sslrootcert=/run/certs/rds-ca-2019-root.pem sslmode=verify-ca migrations: trueNote-
The database certificate is mounted under
/run/certs/rds-ca-2019-root.pemon the Clair application pod in theclair-config.yaml. It must be specified when configuring yourclair-config.yaml.
-
-
Add the
clair-config.yamlfile to your bundle secret, for example:apiVersion: v1 kind: Secret metadata: name: config-bundle-secret namespace: quay-enterprise data: config.yaml: <base64 encoded Quay config> clair-config.yaml: <base64 encoded Clair config> extra_ca_cert_<name>: <base64 encoded ca cert> ssl.crt: <base64 encoded SSL certificate> ssl.key: <base64 encoded SSL private key>NoteWhen updated, the provided
clair-config.yamlfile is mounted into the Clair pod. Any fields not provided are automatically populated with defaults using the Clair configuration module. -
You can check the status of your Clair pod by clicking the commit in the Build History page, or by running
oc get pods -n <namespace>. For example:$ oc get pods -n <namespace>Example outputNAME READY STATUS RESTARTS AGE f192fe4a-c802-4275-bcce-d2031e635126-9l2b5-25lg2 1/1 Running 0 7s
Running a custom Clair configuration with a managed Clair database
You can customize Clair settings while the Project Quay Operator manages the Clair database. Use this approach to disable updater resources or configure Clair for disconnected environments.
|
Note
|
|
Setting a Clair database to managed
To have the Project Quay Operator manage your Clair database, you can set the clairpostgres component to managed in your QuayRegistry custom resource.
-
In the Quay Operator, set the
clairpostgrescomponent of theQuayRegistrycustom resource tomanaged: true:apiVersion: quay.redhat.com/v1 kind: QuayRegistry metadata: name: quay370 spec: configBundleSecret: config-bundle-secret components: - kind: objectstorage managed: false - kind: route managed: true - kind: tls managed: false - kind: clairpostgres managed: true
Configuring a custom Clair database with a managed Clair configuration
To supply a custom clair-config.yaml while the Operator manages Clair on Project Quay, you can create a Quay configuration bundle secret that includes your Clair configuration file.
-
Create a Quay configuration bundle secret that includes the
clair-config.yamlby entering the following command:$ oc create secret generic --from-file config.yaml=./config.yaml --from-file extra_ca_cert_rds-ca-2019-root.pem=./rds-ca-2019-root.pem --from-file clair-config.yaml=./clair-config.yaml config-bundle-secretExample Clairconfig.yamlfileindexer: connstring: host=quay-server.example.com port=5432 dbname=quay user=quayrdsdb password=quayrdsdb sslmode=disable layer_scan_concurrency: 6 migrations: true scanlock_retry: 11 log_level: debug matcher: connstring: host=quay-server.example.com port=5432 dbname=quay user=quayrdsdb password=quayrdsdb sslmode=disable migrations: true metrics: name: prometheus notifier: connstring: host=quay-server.example.com port=5432 dbname=quay user=quayrdsdb password=quayrdsdb sslmode=disable migrations: trueNoteThe database certificate is mounted under
/run/certs/rds-ca-2019-root.pemon the Clair application pod in theclair-config.yaml. It must be specified when configuring yourclair-config.yaml. -
Add the
clair-config.yamlfile to your bundle secret, for example:apiVersion: v1 kind: Secret metadata: name: config-bundle-secret namespace: quay-enterprise data: config.yaml: <base64 encoded Quay config> clair-config.yaml: <base64 encoded Clair config>NoteWhen updated, the provided
clair-config.yamlfile is mounted into the Clair pod. Any fields not provided are automatically populated with defaults using the Clair configuration module. -
You can check the status of your Clair pod by clicking the commit in the Build History page, or by running
oc get pods -n <namespace>. For example:$ oc get pods -n <namespace>Example outputNAME READY STATUS RESTARTS AGE f192fe4a-c802-4275-bcce-d2031e635126-9l2b5-25lg2 1/1 Running 0 7s
Clair in disconnected environments
Clair supports disconnected Project Quay deployments that have no direct internet access. You can use the clairctl tool to transfer vulnerability database updates from an open host so Clair can scan images offline.
Clair uses a set of components called updaters to handle the fetching and parsing of data from various vulnerability databases. By default, updaters pull vulnerability data directly from the internet and work for immediate use.
|
Note
|
Currently, Clair enrichment data is CVSS data. Enrichment data is currently unsupported in disconnected environments. |
Setting up Clair in a disconnected OpenShift Container Platform cluster
To install the clairctl command-line utility on a disconnected OpenShift Container Platform cluster, you can copy the binary from a running Clair pod and make it executable.
-
Install the
clairctlprogram for a Clair deployment in an OpenShift Container Platform cluster by entering the following command:$ oc -n quay-enterprise exec example-registry-clair-app-64dd48f866-6ptgw -- cat /usr/bin/clairctl > clairctl -
Set the permissions of the
clairctlfile so that it can be executed and run by the user, for example:$ chmod u+x ./clairctl
Retrieving and decoding the Clair configuration secret for Clair deployments on OpenShift Container Platform
To prepare Clair for a disconnected OpenShift Container Platform environment, you can retrieve and decode the Clair configuration secret, then set disable_updaters and airgap to true in clair-config.yaml.
-
You have installed the
clairctlcommand line utility tool.
-
Enter the following command to retrieve and decode the configuration secret, and then save it to a Clair configuration YAML:
$ oc get secret -n quay-enterprise example-registry-clair-config-secret -o "jsonpath={$.data['config\.yaml']}" | base64 -d > clair-config.yaml -
Update the
clair-config.yamlfile so that thedisable_updatersandairgapparameters are set toTrue, for example:# ... indexer: airgap: true # ... matcher: disable_updaters: true # ...
Exporting the updaters bundle from a connected Clair instance
To export vulnerability database updates from a connected Clair instance, you can run clairctl export-updaters with your configuration file.
-
You have installed the
clairctlcommand line utility tool. -
You have retrieved and decoded the Clair configuration secret, and saved it to a Clair
config.yamlfile. -
The
disable_updatersandairgapparameters are set toTruein your Clairconfig.yamlfile.
-
From a Clair instance that has access to the internet, use the
clairctlCLI tool with your configuration file to export the updaters bundle. For example:$ ./clairctl --config ./config.yaml export-updaters updates.gz
Configuring access to the Clair database in the disconnected OpenShift Container Platform cluster
To access the Clair database in a disconnected OpenShift Container Platform cluster, you can identify the database service, forward its port, and point your Clair configuration at localhost.
-
You have installed the
clairctlcommand line utility tool. -
You have retrieved and decoded the Clair configuration secret, and saved it to a Clair
config.yamlfile. -
The
disable_updatersandairgapparameters are set toTruein your Clairconfig.yamlfile. -
You have exported the updaters bundle from a Clair instance that has access to the internet.
-
Determine your Clair database service by using the
ocCLI tool, for example:$ oc get svc -n quay-enterpriseExample outputNAME TYPE CLUSTER-IP EXTERNAL-IP PORT(S) AGE example-registry-clair-app ClusterIP 172.30.224.93 <none> 80/TCP,8089/TCP 4d21h example-registry-clair-postgres ClusterIP 172.30.246.88 <none> 5432/TCP 4d21h ... -
Forward the Clair database port so that the local machine can access it. For example:
$ oc port-forward -n quay-enterprise service/example-registry-clair-postgres 5432:5432 -
Update your Clair
config.yamlfile, for example:indexer: connstring: host=localhost port=5432 dbname=postgres user=postgres password=postgres sslmode=disable layer_scan_concurrency: 5 migrations: true scanlock_retry: 10 airgap: true scanner: repo: rhel-repository-scanner: repo2cpe_mapping_file: /data/repository-to-cpe.json package: rhel_containerscanner: name2repos_mapping_file: /data/container-name-repos-map.jsonwhere:
indexer.connstring-
Specifies the connection string for the database.
indexer.scanner.repo.rhel-repository-scanner-
Specifies the repository scanner configuration.
indexer.scanner.package.rhel_containerscanner-
Specifies the container scanner configuration.
Importing the updaters bundle into the disconnected OpenShift Container Platform cluster
To load vulnerability data into Clair on a disconnected OpenShift Container Platform cluster, you can run clairctl import-updaters with your configuration file and updaters bundle.
-
You have installed the
clairctlcommand line utility tool. -
You have retrieved and decoded the Clair configuration secret, and saved it to a Clair
config.yamlfile. -
The
disable_updatersandairgapparameters are set toTruein your Clairconfig.yamlfile. -
You have exported the updaters bundle from a Clair instance that has access to the internet.
-
You have transferred the updaters bundle into your disconnected environment.
-
Use the
clairctlCLI tool to import the updaters bundle into the Clair database on OpenShift Container Platform. For example:$ ./clairctl --config ./clair-config.yaml import-updaters updates.gz
Setting up a self-managed deployment of Clair for a disconnected OpenShift Container Platform cluster
To install the clairctl command-line utility for a self-managed Clair deployment on OpenShift Container Platform, you can copy the binary from a Clair container with Podman and make it executable.
-
Install the
clairctlprogram for a self-managed Clair deployment by using thepodman cpcommand, for example:$ sudo podman cp clairv4:/usr/bin/clairctl ./clairctl -
Set the permissions of the
clairctlfile so that it can be executed and run by the user, for example:$ chmod u+x ./clairctl
Deploying a self-managed Clair container for disconnected OpenShift Container Platform clusters
To deploy a self-managed Clair container for disconnected OpenShift Container Platform clusters, you can create a configuration directory, set disable_updaters and airgap in the Clair configuration file, and start the container with Podman.
-
You have installed the
clairctlcommand line utility tool.
-
Create a folder for your Clair configuration file, for example:
$ mkdir /etc/clairv4/config/ -
Create a Clair configuration file with the
disable_updatersparameter set toTrue, for example:--- indexer: airgap: true --- matcher: disable_updaters: true --- -
Start Clair by using the container image, mounting in the configuration from the file you created:
$ sudo podman run -it --rm --name clairv4 \
-p 8081:8081 -p 8088:8088 \
-e CLAIR_CONF=/clair/config.yaml \
-e CLAIR_MODE=combo \
-v /etc/clairv4/config:/clair:Z \
quay.io/projectquay/clair:v3.18.0
Exporting the updaters bundle from a connected Clair instance
To export vulnerability database updates from a connected self-managed Clair instance, you can run clairctl export-updaters with your configuration file.
-
You have installed the
clairctlcommand line utility tool. -
You have deployed Clair.
-
The
disable_updatersandairgapparameters are set toTruein your Clairconfig.yamlfile.
-
From a Clair instance that has access to the internet, use the
clairctlCLI tool with your configuration file to export the updaters bundle. For example:$ ./clairctl --config ./config.yaml export-updaters updates.gz
Configuring access to the Clair database in the disconnected OpenShift Container Platform cluster
To access the Clair database in a disconnected OpenShift Container Platform cluster for a self-managed deployment, you can identify the database service, forward its port, and point your Clair configuration at localhost.
-
You have installed the
clairctlcommand line utility tool. -
You have deployed Clair.
-
The
disable_updatersandairgapparameters are set toTruein your Clairconfig.yamlfile. -
You have exported the updaters bundle from a Clair instance that has access to the internet.
-
Determine your Clair database service by using the
ocCLI tool, for example:$ oc get svc -n quay-enterpriseExample outputNAME TYPE CLUSTER-IP EXTERNAL-IP PORT(S) AGE example-registry-clair-app ClusterIP 172.30.224.93 <none> 80/TCP,8089/TCP 4d21h example-registry-clair-postgres ClusterIP 172.30.246.88 <none> 5432/TCP 4d21h ... -
Forward the Clair database port so that the local machine can access it. For example:
$ oc port-forward -n quay-enterprise service/example-registry-clair-postgres 5432:5432 -
Update your Clair
config.yamlfile, for example:indexer: connstring: host=localhost port=5432 dbname=postgres user=postgres password=postgres sslmode=disable layer_scan_concurrency: 5 migrations: true scanlock_retry: 10 airgap: true scanner: repo: rhel-repository-scanner: repo2cpe_mapping_file: /data/repository-to-cpe.json package: rhel_containerscanner: name2repos_mapping_file: /data/container-name-repos-map.jsonwhere:
indexer.connstring-
Specifies the connection string for the database.
indexer.scanner.repo.rhel-repository-scannerindexer.scanner.package.rhel_containerscanner-
Specifies the container scanner configuration.
Importing the updaters bundle into the disconnected OpenShift Container Platform cluster
To load vulnerability data into a self-managed Clair deployment on a disconnected OpenShift Container Platform cluster, you can run clairctl import-updaters with your configuration file and updaters bundle.
-
You have installed the
clairctlcommand line utility tool. -
You have deployed Clair.
-
The
disable_updatersandairgapparameters are set toTruein your Clairconfig.yamlfile. -
You have exported the updaters bundle from a Clair instance that has access to the internet.
-
You have transferred the updaters bundle into your disconnected environment.
-
Use the
clairctlCLI tool to import the updaters bundle into the Clair database on OpenShift Container Platform:$ ./clairctl --config ./clair-config.yaml import-updaters updates.gz
Common Product Enumeration mapping in Clair
Clair uses Common Product Enumeration (CPE) mapping files to map RPM packages to security data for Red Hat Enterprise Linux (RHEL) container images. Accurate vulnerability reports depend on these mapping files being available to the Clair scanner.
The scanner requires the CPE file to be present and accessible to process RPM packages properly. If these files are missing or inaccessible, RPM packages installed in the container image are skipped during the scanning process.
By default, the Clair indexer includes the repos2cpe and names2repos data files within the Clair container. This allows you to reference local paths such as /data/repository-to-cpe.json without additional external configuration.
|
Important
|
While Red Hat Product Security updates CPE files regularly, the versions bundled within the Clair container are only updated during Project Quay releases. This can lead to temporary discrepancies between the latest security data and the versions bundled with your current installation. |
CPE mapping configuration reference
Common Product Enumeration (CPE) mapping configuration defines the fields and file paths used by Clair to associate packages with standardized product identifiers.
| CPE Type | Link to JSON mapping file |
|---|---|
|
|
|
indexer:
  scanner:
    repo:
      rhel-repository-scanner:
        repo2cpe_mapping_file: /data/repository-to-cpe.json
    package:
      rhel_containerscanner:
        name2repos_mapping_file: /data/container-name-repos-map.json
where:
repo2cpe_mapping_file-
Specifies the path to the JSON file mapping Red Hat repositories to CPEs.
name2repos_mapping_file-
Specifies the path to the JSON file mapping container names to repositories.
Resizing Managed Storage
To expand storage capacity for your Red Hat Quay on OpenShift Container Platform deployment, you can use the OpenShift Container Platform console to resize the PostgreSQL and Clair PostgreSQL persistent volume claims. This lets you increase storage beyond the default 50 GiB allocation when your registry needs more space.
When deploying Red Hat Quay on OpenShift Container Platform, three distinct persistent volume claims (PVCs) are deployed:
-
One for the PostgreSQL 15 registry.
-
One for the Clair PostgreSQL 15 registry.
-
One that uses NooBaa as a backend storage.
|
Note
|
The connection between Project Quay and NooBaa is done through the S3 API and ObjectBucketClaim API in OpenShift Container Platform. Project Quay leverages that API group to create a bucket in NooBaa, obtain access keys, and automatically set everything up. On the backend, or NooBaa, side, that bucket is creating inside of the backing store. As a result, NooBaa PVCs are not mounted or connected to Project Quay pods. |
-
You have cluster admin privileges on OpenShift Container Platform.
-
Log into the OpenShift Container Platform console and select Storage → Persistent Volume Claims.
-
Select the desired
PersistentVolumeClaimfor either PostgreSQL 13 or Clair PostgreSQL 13, for example,example-registry-quay-postgres-13. -
From the Action menu, select Expand PVC.
-
Enter the new size of the Persistent Volume Claim and select Expand.
After a few minutes, the expanded size should reflect in the PVC’s Capacity field.
Customizing Default Operator Images
|
Note
|
Currently, customizing default Operator images is not supported on IBM Power and IBM Z. |
Customizing default Operator images lets you override the default container images used by the Project Quay Operator by setting environment variables in the ClusterServiceVersion object.
|
Important
|
Customizing default Operator images is not supported for production Project Quay environments and is only recommended for development or testing purposes. There is no guarantee your deployment will work correctly when using non-default images with the Project Quay Operator. |
Environment Variables
The Project Quay Operator uses environment variables to override default container images for components such as base, clair, postgres, and redis. You can set these variables in the ClusterServiceVersion object to customize which images the Operator uses for each component.
Environment Variable |
Component |
|
|
|
|
|
|
|
|
|
Note
|
Overridden images must be referenced by manifest (@sha256:) and not by tag (:latest). |
Applying overrides to a running Operator
To override container images for a running Project Quay Operator, you can modify the ClusterServiceVersion object to add environment variables that point to your custom images. This applies the overrides at the Operator level, so all QuayRegistry instances use the same custom images.
-
The
ClusterServiceVersionobject is Operator Lifecycle Manager’s representation of a running Operator in the cluster. Find the Project Quay Operator’sClusterServiceVersionby using a Kubernetes UI or thekubectl/ocCLI tool. For example:$ oc get clusterserviceversions -n <namespace> -
Using the UI,
oc edit, or another method, modify theClusterServiceVersionobject to include the environment variables outlined above to point to the override images:JSONPath:
spec.install.spec.deployments[0].spec.template.spec.containers[0].env- name: RELATED_IMAGE_COMPONENT_QUAY value: quay.io/projectquay/quay@sha256:c35f5af964431673f4ff5c9e90bdf45f19e38b8742b5903d41c10cc7f6339a6d - name: RELATED_IMAGE_COMPONENT_CLAIR value: quay.io/projectquay/clair@sha256:70c99feceb4c0973540d22e740659cd8d616775d3ad1c1698ddf71d0221f3ce6 - name: RELATED_IMAGE_COMPONENT_POSTGRES value: centos/postgresql-10-centos7@sha256:de1560cb35e5ec643e7b3a772ebaac8e3a7a2a8e8271d9e91ff023539b4dfb33 - name: RELATED_IMAGE_COMPONENT_REDIS value: centos/redis-32-centos7@sha256:06dbb609484330ec6be6090109f1fa16e936afcf975d1cbc5fff3e6c7cae7542
AWS S3 CloudFront
To configure AWS S3 CloudFront for your Project Quay backend registry storage, you can create a secret that includes your config.yaml file and the CloudFront signing key. This enables CloudFront content delivery for your registry storage.
-
Create a secret that includes your
config.yamlfile and the CloudFront signing key by entering the following command:$ oc create secret generic --from-file config.yaml=./config_awss3cloudfront.yaml --from-file default-cloudfront-signing-key.pem=./default-cloudfront-signing-key.pem test-config-bundle
Geo-replication
Geo-replication connects multiple geographically distributed Project Quay deployments so that clients use them as a single registry. Standalone and Operator-based deployments support geo-replication.
Geo-replication features
With geo-replication in Project Quay, image pushes go to the nearest storage backend and data replicates in the background so that pulls can use the closest available engine.
The following are the key features of geo-replication:
-
When geo-replication is configured, container image pushes are written to the preferred storage engine for that Project Quay instance. This is typically the nearest storage backend within the region.
-
After the initial push, image data is replicated in the background to other storage engines.
-
The list of replication locations is configurable and those can be different storage backends.
-
An image pull always uses the closest available storage engine to maximize pull performance.
-
If replication has not been completed yet, the pull uses the source storage backend instead.
Geo-replication requirements and constraints
Project Quay geo-replication requires shared storage, database, Redis, network access between regions, and a global load balancer. Review these constraints before you deploy.
The following are the requirements and constraints for geo-replication:
-
In geo-replicated setups, Project Quay requires that all regions are able to read and write to all other regions' object storage. Object storage must be geographically accessible by all other regions.
-
In case of an object storage system failure of one geo-replicating site, that site’s Project Quay deployment must be shut down so that clients are redirected to the remaining site with intact storage systems by a global load balancer. Otherwise, clients experience pull and push failures.
-
Project Quay has no internal awareness of the health or availability of the connected object storage system. Users must configure a global load balancer (LB) to monitor the health of your distributed system and to route traffic to different sites based on their storage status.
-
To check the status of your geo-replication deployment, you must use the
/health/endtoendcheckpoint, which is used for global health monitoring. You must configure the redirect manually using the/health/endtoendendpoint. The/health/instanceendpoint only checks local instance health. -
If the object storage system of one site becomes unavailable, geo-replication does not automatically redirect to the remaining storage system, or systems, of the remaining site, or sites.
-
Geo-replication is asynchronous. The permanent loss of a site incurs the loss of the data that has been saved in that site’s object storage system but has not yet been replicated to the remaining sites at the time of failure.
-
A single database, and therefore all metadata and Project Quay configuration, is shared across all regions.
Geo-replication does not replicate the database. In the event of an outage, Project Quay with geo-replication enabled does not fail over to another database.
-
A single Redis cache is shared across the entire Project Quay setup and needs to be accessible by all Project Quay pods.
-
The exact same configuration should be used across all regions, with exception of the storage backend, which can be configured explicitly using the
QUAY_DISTRIBUTED_STORAGE_PREFERENCEenvironment variable. -
Geo-replication requires object storage in each region. It does not work with local storage.
-
Each region must be able to access every storage engine in each region, which requires a network path.
-
Alternatively, the storage proxy option can be used.
-
The entire storage backend, for example, all blobs, is replicated. Repository mirroring, by contrast, can be limited to a repository, or an image.
-
All Project Quay instances must share the same entrypoint, typically through a load balancer.
-
All Project Quay instances must have the same set of superusers, as they are defined inside the common configuration file.
-
In geo-replication environments, your Clair configuration can be set to
unmanaged. An unmanaged Clair database allows the Project Quay Operator to work in a geo-replicated environment where multiple instances of the Operator must communicate with the same database.If you keep your Clair configuration
managed, you must retrieve the configuration file for the deployed Clair instance that the Operator deploys. -
Geo-replication requires SSL/TLS certificates and keys.
If the above requirements cannot be met, you should instead use two or more distinct Project Quay deployments and take advantage of repository mirroring functions.
Preparing your OpenShift Container Platform environment for geo-replication
To prepare your OpenShift Container Platform environment for Project Quay geo-replication, you can deploy shared PostgreSQL and Redis instances, create object storage backends, and configure a load balancer.
-
Deploy a PostgreSQL instance for Project Quay.
-
Log in to the database by entering the following command:
psql -U <username> -h <hostname> -p <port> -d <database_name> -
Create a database for Project Quay named
quay. For example:CREATE DATABASE quay; -
Enable the
pg_trgmextension inside the database:\c quay; CREATE EXTENSION IF NOT EXISTS pg_trgm; -
Deploy a Redis instance:
Note-
Deploying a Redis instance might be unnecessary if your cloud provider has its own service.
-
Deploying a Redis instance is required if you are leveraging Builders.
-
Deploy a VM for Redis.
-
Verify that the Redis instance is accessible from the clusters where Project Quay is running.
-
Port 6379/TCP must be open.
-
Run Redis inside the instance:
sudo dnf install -y podman
podman run -d --name redis -p 6379:6379 redis
-
-
Create two object storage backends, one for each cluster. Ideally, one object storage bucket is close to the first, or primary, cluster, and the other runs closer to the second, or secondary, cluster.
-
Deploy the clusters with the same config bundle, using environment variable overrides to select the appropriate storage backend for an individual cluster.
-
Configure a load balancer to provide a single entry point to the clusters.
Configuring geo-replication for Project Quay on OpenShift Container Platform
To configure geo-replication for Project Quay on OpenShift Container Platform, you can create a shared config.yaml file with PostgreSQL, Redis, and storage backend details, create a configBundleSecret, and deploy QuayRegistry resources in each cluster with storage preference overrides. This enables multiple Project Quay deployments to work as a single registry with improved performance across geographic regions.
-
You have prepared your OpenShift Container Platform environment for geo-replication by following the "Preparing your OpenShift Container Platform environment for geo-replication" procedure.
-
Create a
config.yamlfile that is shared between clusters. Thisconfig.yamlfile contains the details for the common PostgreSQL, Redis and storage backends:Geo-replicationconfig.yamlfileSERVER_HOSTNAME: <georep.quayteam.org or any other name> DB_CONNECTION_ARGS: autorollback: true threadlocals: true DB_URI: postgresql://postgres:password@10.19.0.1:5432/quay BUILDLOGS_REDIS: host: 10.19.0.2 port: 6379 USER_EVENTS_REDIS: host: 10.19.0.2 port: 6379 DATABASE_SECRET_KEY: 0ce4f796-c295-415b-bf9d-b315114704b8 DISTRIBUTED_STORAGE_CONFIG: usstorage: - GoogleCloudStorage - access_key: GOOGQGPGVMASAAMQABCDEFG bucket_name: georep-test-bucket-0 secret_key: AYWfEaxX/u84XRA2vUX5C987654321 storage_path: /quaygcp eustorage: - GoogleCloudStorage - access_key: GOOGQGPGVMASAAMQWERTYUIOP bucket_name: georep-test-bucket-1 secret_key: AYWfEaxX/u84XRA2vUX5Cuj12345678 storage_path: /quaygcp DISTRIBUTED_STORAGE_DEFAULT_LOCATIONS: - usstorage - eustorage DISTRIBUTED_STORAGE_PREFERENCE: - usstorage - eustorage FEATURE_STORAGE_REPLICATION: truewhere:
SERVER_HOSTNAME-
Specifies the hostname of the global load balancer. Must match the hostname of the global load balancer.
-
Create the
configBundleSecretcustom resource (CR) by entering the following command:$ oc create secret generic --from-file config.yaml=./config.yaml georep-config-bundle -
In each of the clusters, set the
configBundleSecretand use theQUAY_DISTRIBUTED_STORAGE_PREFERENCEenvironmental variable override to configure the appropriate storage for that cluster. For example:NoteThe
config.yamlfile between both deployments must match. If making a change to one cluster, it must also be changed in the other.US clusterQuayRegistryexampleapiVersion: quay.redhat.com/v1 kind: QuayRegistry metadata: name: example-registry namespace: quay-enterprise spec: configBundleSecret: georep-config-bundle components: - kind: objectstorage managed: false - kind: route managed: true - kind: tls managed: false - kind: postgres managed: false - kind: clairpostgres managed: false - kind: redis managed: false - kind: quay managed: true overrides: env: - name: QUAY_DISTRIBUTED_STORAGE_PREFERENCE value: usstorage - kind: mirror managed: true overrides: env: - name: QUAY_DISTRIBUTED_STORAGE_PREFERENCE value: usstorageNoteBecause SSL/TLS is unmanaged, and the route is managed, you must supply the certificates directly in the config bundle. For more information, see Configuring SSL/TLS and Routes.
European clusterapiVersion: quay.redhat.com/v1 kind: QuayRegistry metadata: name: example-registry namespace: quay-enterprise spec: configBundleSecret: georep-config-bundle components: - kind: objectstorage managed: false - kind: route managed: true - kind: tls managed: false - kind: postgres managed: false - kind: clairpostgres managed: false - kind: redis managed: false - kind: quay managed: true overrides: env: - name: QUAY_DISTRIBUTED_STORAGE_PREFERENCE value: eustorage - kind: mirror managed: true overrides: env: - name: QUAY_DISTRIBUTED_STORAGE_PREFERENCE value: eustorageNoteBecause SSL/TLS is unmanaged, and the route is managed, you must supply the certificates directly in the config bundle. For more information, see Configuring SSL and TLS for Project Quay.
Mixed storage for geo-replication
Geo-replication in Project Quay can use mixed storage backends, such as public-cloud object storage and on-premise Ceph, when you secure cross-site access appropriately.
Because geo-replication supports multiple replication targets, Red Hat recommends that you use a VPN or token pair with bucket-specific access to meet security requirements. This results in the public cloud instance of Project Quay having access to on-premise storage, but the network is encrypted, protected, and uses ACLs, thereby meeting security requirements. If you cannot implement these security measures, it might be preferable to deploy two distinct Project Quay registries and to use repository mirroring as an alternative to geo-replication.
Upgrading a geo-replication deployment of Red Hat Quay on OpenShift Container Platform
To upgrade your geo-replicated Red Hat Quay on OpenShift Container Platform deployment, you must stop operations, scale down secondary systems, upgrade the primary system, then upgrade secondary systems. This ensures a safe upgrade process with minimal downtime across your geo-replicated registry.
|
Important
|
|
The following procedure assumes that you are running the Project Quay registry on three or more systems. For this procedure, three systems named System A, System B, and System C are used. System A serves as the primary system in which the Project Quay Operator is deployed.
-
On System B and System C, scale down your Project Quay registry. This is done by disabling auto scaling and overriding the replica county for Project Quay, mirror workers, and Clair if it is managed. Note that you must keep the Project Quay registry running on System A. Do not update the
quayregistry.yamlfile on System A.Use the following
quayregistry.yamlfile as a reference:apiVersion: quay.redhat.com/v1 kind: QuayRegistry metadata: name: registry namespace: ns spec: components: … - kind: horizontalpodautoscaler managed: false - kind: quay managed: true overrides: replicas: 0 - kind: clair managed: true overrides: replicas: 0 - kind: mirror managed: true overrides: replicas: 0 …where:
managed: false-
Disables auto scaling of
Quay,ClairandMirroringworkers overrides-
Sets the replica count to 0 for components accessing the database and objectstorage
-
Wait for the
registry-quay-app,registry-quay-mirror, andregistry-clair-apppods to disappear. Enter the following command to check their status:oc get pods -n <quay-namespace>Example outputquay-operator.v3.7.1-6f9d859bd-p5ftc 1/1 Running 0 12m quayregistry-clair-postgres-7487f5bd86-xnxpr 1/1 Running 1 (12m ago) 12m quayregistry-quay-app-upgrade-xq2v6 0/1 Completed 0 12m quayregistry-quay-redis-84f888776f-hhgms 1/1 Running 0 12m -
On System A, initiate a Project Quay upgrade to the latest y-stream version. This is a manual process. For more information about upgrading installed Operators, see Upgrading installed Operators. For more information about Project Quay upgrade paths, see Upgrading the Project Quay Operator.
-
After the new Project Quay registry is installed, the necessary upgrades on the cluster are automatically completed. Afterwards, new Project Quay pods are started with the latest y-stream version. Additionally, new
Quaypods are scheduled and started. -
Confirm that the update has properly worked by navigating to the Project Quay UI:
-
In the OpenShift console, navigate to Operators → Installed Operators, and click the Registry Endpoint link.
ImportantDo not execute the following step until the Project Quay UI is available. Do not upgrade the Project Quay registry on System B and on System C until the UI is available on System A.
-
-
Confirm that the update has properly worked on System A, initiate the Project Quay upgrade on System B and on System C. The Operator upgrade results in an upgraded Project Quay installation, and the pods are restarted.
NoteBecause the database schema is correct for the new y-stream installation, the new pods on System B and on System C should quickly start.
-
After updating, revert the changes made in step 1 of this procedure by removing
overridesfor the components. For example:apiVersion: quay.redhat.com/v1 kind: QuayRegistry metadata: name: registry namespace: ns spec: components: … - kind: horizontalpodautoscaler managed: true - kind: quay managed: true - kind: clair managed: true - kind: mirror managed: true …where:
kind: horizontalpodautoscaler::Set this resource toTrueif thehorizontalpodautoscalerresource was set toTruebefore the upgrade procedure, or if you want Project Quay to scale in case of a resource shortage.
Removing a geo-replicated site from your Red Hat Quay on OpenShift Container Platform deployment
To remove a geo-replicated site from a Red Hat Quay on OpenShift Container Platform deployment, you can sync blobs between sites, update storage configuration, and run the removelocation utility.
-
You are logged into OpenShift Container Platform.
-
You have configured Project Quay geo-replication with at least two sites, for example,
usstorageandeustorage. -
Each site has its own Organization, Repository, and image tags.
-
Sync the blobs between all of your defined sites by running the following command:
$ python -m util.backfillreplicationWarningPrior to removing storage engines from your Project Quay
config.yamlfile, you must ensure that all blobs are synced between all defined sites.When running this command, replication jobs are created which are picked up by the replication worker. If blobs need to be replicated, the script returns UUIDs of blobs that are replicated. If you run this command multiple times, and the output from the return script is empty, it does not mean that the replication process is done; it means that no more blobs remain to be queued for replication. Customers should use appropriate judgement before proceeding, as the allotted time replication takes depends on the number of blobs detected.
Alternatively, you could use a third party cloud tool, such as Microsoft Azure, to check the synchronization status.
This step must be completed before proceeding.
-
In your Project Quay
config.yamlfile for siteusstorage, remove theDISTRIBUTED_STORAGE_CONFIGentry for theeustoragesite. -
Identify your Project Quay application pods by entering the following command:
$ oc get pod -n <quay_namespace>Example output:quay390usstorage-quay-app-5779ddc886-2drh2 quay390eustorage-quay-app-66969cd859-n2ssm -
Open an interactive shell session in the
usstoragepod by entering the following command:$ oc rsh quay390usstorage-quay-app-5779ddc886-2drh2 -
Permanently remove the
eustoragesite by entering the following command:ImportantThe following action cannot be undone. Use with caution.
sh-4.4$ python -m util.removelocation eustorageExample output:WARNING: This is a destructive operation. Are you sure you want to remove eustorage from your storage locations? [y/n] y Deleted placement 30 Deleted placement 31 Deleted placement 32 Deleted placement 33 Deleted location eustorage
Backing up and restoring Project Quay managed by the Project Quay Operator
To protect Project Quay data and enable recovery from failures, you can back up and restore Project Quay instances managed by the Project Quay Operator on OpenShift Container Platform.
Enabling read-only mode for Red Hat Quay on OpenShift Container Platform
Read-only mode keeps your Red Hat Quay on OpenShift Container Platform registry online during backup and restore by blocking write operations. You can use this mode when scaling down the deployment is unacceptable.
When backing up and restoring, you are required to scale down your Red Hat Quay on OpenShift Container Platform deployment. This results in service unavailability during the backup period which, in some cases, might be unacceptable. Enabling read-only mode ensures service availability during the backup and restore procedure for Red Hat Quay on OpenShift Container Platform deployments.
|
Note
|
In some cases, you cannot enable read-only mode for Project Quay because it requires inserting a service key and other manual configuration changes. As an alternative to read-only mode, Project Quay administrators might consider enabling the This field might be useful in some situations such as when Project Quay administrators want to calculate their registry’s quota and disable image pushing until after calculation has completed. With this method, administrators can avoid putting the whole registry in |
Prerequisites for enabling read-only mode
You must meet the following prerequisites to enable read-only mode for Red Hat Quay on OpenShift Container Platform:
-
If you are using Red Hat Enterprise Linux (RHEL) 7.x:
-
You have enabled the Red Hat Software Collections List (RHSCL).
-
You have installed Python 3.6.
-
You have downloaded the
virtualenvpackage. -
You have installed the
gitCLI.
-
-
If you are using Red Hat Enterprise Linux (RHEL) 8:
-
You have installed Python 3 on your machine.
-
You have downloaded the
python3-virtualenvpackage. -
You have installed the
gitCLI.
-
-
You have cloned the quay/quay repository.
-
You have installed the
ocCLI. -
You have access to the cluster with
cluster-adminprivileges.
Creating service keys for Red Hat Quay on OpenShift Container Platform
To enable Project Quay to communicate with components and sign completed requests such as image scanning and login, you can create service keys. Access the Quay container pod and run the keypair generation script to create the necessary keys.
-
Enter the following command to obtain a list of Project Quay pods:
$ oc get pods -n <namespace>Example outputexample-registry-clair-app-7dc7ff5844-4skw5 0/1 Error 0 70d example-registry-clair-app-7dc7ff5844-nvn4f 1/1 Running 0 31d example-registry-clair-app-7dc7ff5844-x4smw 0/1 ContainerStatusUnknown 6 (70d ago) 70d example-registry-clair-app-7dc7ff5844-xjnvt 1/1 Running 0 60d example-registry-clair-postgres-547d75759-75c49 1/1 Running 0 70d example-registry-quay-app-76c8f55467-52wjz 1/1 Running 0 70d example-registry-quay-app-76c8f55467-hwz4c 1/1 Running 0 70d example-registry-quay-app-upgrade-57ghs 0/1 Completed 1 70d example-registry-quay-database-7c55899f89-hmnm6 1/1 Running 0 70d example-registry-quay-mirror-6cccbd76d-btsnb 1/1 Running 0 70d example-registry-quay-mirror-6cccbd76d-x8g42 1/1 Running 0 70d example-registry-quay-redis-85cbdf96bf-4vk5m 1/1 Running 0 70d -
Open a remote shell session to the
Quaycontainer by entering the following command:$ oc rsh example-registry-quay-app-76c8f55467-52wjz -
Create the necessary service keys by entering the following command:
sh-4.4$ python3 tools/generatekeypair.py quay-readonlyExample outputWriting public key to quay-readonly.jwk Writing key ID to quay-readonly.kid Writing private key to quay-readonly.pem
Adding keys to the PostgreSQL database
To register read-only service keys with Project Quay, you can insert the key and approval records into the PostgreSQL database.
-
You have created the service keys.
-
Enter the following command to enter your Project Quay database environment:
$ podman exec -it postgresql-quay psql -U postgres -d quay -
Display the approval types and associated notes of the
servicekeyapprovalby entering the following command:quay=# select * from servicekeyapproval;Example output:id | approver_id | approval_type | approved_date | notes ----+-------------+----------------------------------+----------------------------+------- 1 | | ServiceKeyApprovalType.AUTOMATIC | 2024-05-07 03:47:48.181347 | 2 | | ServiceKeyApprovalType.AUTOMATIC | 2024-05-07 03:47:55.808087 | 3 | | ServiceKeyApprovalType.AUTOMATIC | 2024-05-07 03:49:04.27095 | 4 | | ServiceKeyApprovalType.AUTOMATIC | 2024-05-07 03:49:05.46235 | 5 | 1 | ServiceKeyApprovalType.SUPERUSER | 2024-05-07 04:05:10.296796 | ... -
Add the service key to your Project Quay database by entering the following query:
quay=# INSERT INTO servicekey (name, service, metadata, kid, jwk, created_date, expiration_date) VALUES ('quay-readonly', 'quay', '{}', '<contents_of_.kid_file>', '<contents_of_.jwk_file>', '<created_date_of_read-only>', '<expiration_date_of_read-only>');Example output:INSERT 0 1 -
Next, add the key approval with the following query:
quay=# INSERT INTO servicekeyapproval ('approval_type', 'approved_date', 'notes') VALUES ("ServiceKeyApprovalType.SUPERUSER", "CURRENT_DATE", <include_notes_here_on_why_this_is_being_added>);Example output:INSERT 0 1 -
Set the
approval_idfield on the created service key row to theidfield from the created service key approval. You can use the followingSELECTstatements to get the necessary IDs:UPDATE servicekey SET approval_id = (SELECT id FROM servicekeyapproval WHERE approval_type = 'ServiceKeyApprovalType.SUPERUSER') WHERE name = 'quay-readonly';UPDATE 1
Configuring read-only mode Red Hat Quay on OpenShift Container Platform
To enable read-only mode in Project Quay and safely manage registry operations such as backup and restore, you can modify the configuration secret and restart the Quay container.
|
Important
|
Deploying Red Hat Quay on OpenShift Container Platform in read-only mode requires you to modify the secrets stored inside of your OpenShift Container Platform cluster. It is highly recommended that you create a backup of the secret prior to making changes to it. |
-
You have created the service keys and added them to your PostgreSQL database.
-
Read the secret name of your Red Hat Quay on OpenShift Container Platform deployment by entering the following command:
$ oc get deployment -o yaml <quay_main_app_deployment_name> -
Use the
base64command to encode thequay-readonly.kidandquay-readonly.pemfiles by entering the following commands:$ base64 -w0 quay-readonly.kidExample outputZjUyNDFm...$ base64 -w0 quay-readonly.pemExample output<example_secret>... -
Obtain the current configuration bundle and secret by entering the following command. Save the output to a file called
config.yaml:$ oc get secret quay-config-secret-name -o json | jq '.data."config.yaml"' | cut -d '"' -f2 | base64 -d -w0 > config.yaml -
Edit the
config.yamlfile and add the following information to enable read-only mode:# ... REGISTRY_STATE: readonly INSTANCE_SERVICE_KEY_KID_LOCATION: 'conf/stack/quay-readonly.kid' INSTANCE_SERVICE_KEY_LOCATION: 'conf/stack/quay-readonly.pem' # ... -
Save the file and
base64encode it by entering the following command:$ base64 -w0 quay-config.yaml -
Scale down the Project Quay Operator pods to
0by entering the following command. This ensures that the Operator does not reconcile the secret after editing it.$ oc scale --replicas=0 deployment quay-operator -n openshift-operators -
Edit the secret to include the new content by entering the following command:
$ oc edit secret quay-config-secret-name -n quay-namespace# ... data: "quay-readonly.kid": "ZjUyNDFm..." "quay-readonly.pem": "<example_secret>..." "config.yaml": "QUNUSU9OX0xPR19..." # ...With your Red Hat Quay on OpenShift Container Platform deployment on read-only mode, you can safely manage your registry’s operations and perform such actions as backup and restore.
Scaling up the Project Quay from a read-only deployment
To exit read-only mode and restore normal operations in Project Quay, you can remove the read-only settings from the config.yaml file and scale the Operator deployment back up.
|
Note
|
Depending on your needs, you might wait to scale up the Project Quay deployment after backing up and restoring your regisry. |
-
Edit the
config.yamlfile and remove the following information:# ... REGISTRY_STATE: readonly INSTANCE_SERVICE_KEY_KID_LOCATION: 'conf/stack/quay-readonly.kid' INSTANCE_SERVICE_KEY_LOCATION: 'conf/stack/quay-readonly.pem' # ... -
Scale the Project Quay Operator back up by entering the following command:
$ oc scale --replicas=1 deployment quay-operator -n openshift-operators
Backing up Red Hat Quay on OpenShift Container Platform
To create backups of your Red Hat Quay on OpenShift Container Platform deployment for disaster recovery, you can back up the configuration, PostgreSQL database, and object storage. Regular backups ensure you can restore your registry to a previous state if needed.
Database backups should be performed regularly using either the supplied tools on the PostgreSQL image or your own backup infrastructure. The Project Quay Operator does not ensure that the PostgreSQL database is backed up.
|
Important
|
PostgreSQL and S3 object storage backups must be taken at the same time to avoid desynchronization. If backups are taken at different times, the database might contain references to storage blobs that are not present in the storage backup, which can cause data inconsistency and restore failures. |
|
Note
|
This procedure covers backing up your Project Quay PostgreSQL database. It does not cover backing up the Clair PostgreSQL database. Backing up the Clair PostgreSQL database is not needed because it can be recreated. If you opt to recreate it from scratch, you wait for the information to be repopulated after all images inside of your Project Quay deployment are scanned. During this downtime, security reports are unavailable. If you are considering backing up the Clair PostgreSQL database, you must consider that its size is dependent upon the number of images stored inside of Project Quay. As a result, the database can be extremely large. |
Prerequisites for backing up Red Hat Quay on OpenShift Container Platform
-
A healthy Project Quay deployment on OpenShift Container Platform using the Project Quay Operator. The status condition
Availableis set toTrue. -
The components
quay,postgresandobjectstorageare set tomanaged: true -
If the component
clairis set tomanaged: truethe componentclairpostgresis also set tomanaged: true(starting with Project Quay v3.7 or later)
|
Note
|
If your deployment contains partially unmanaged database or storage components and you are using external services for PostgreSQL or S3-compatible object storage to run your Project Quay deployment, you must refer to the service provider or vendor documentation to create a backup of the data. You can refer to the tools described in this guide as a starting point on how to backup your external PostgreSQL database or object storage. |
Project Quay configuration backup
To back up your Project Quay configuration for disaster recovery, you can export the QuayRegistry custom resource, back up the managed secret keys, and save the config bundle and config.yaml files. This procedure creates backup files that you can use to restore your registry configuration.
-
To back the
QuayRegistrycustom resource by exporting it, enter the following command:$ oc get quayregistry <quay_registry_name> -n <quay_namespace> -o yaml > quay-registry.yaml -
Edit the resulting
quayregistry.yamland remove the status section and the following metadata fields:metadata.creationTimestamp metadata.finalizers metadata.generation metadata.resourceVersion metadata.uid -
Backup the managed keys secret by entering the following command:
NoteIf you are running a version older than Project Quay 3.7.0, this step can be skipped. Some secrets are automatically generated while deploying Project Quay for the first time. These are stored in a secret called
<quay_registry_name>-quay-registry-managed-secret-keysin the namespace of theQuayRegistryresource.$ oc get secret -n <quay_namespace> <quay_registry_name>-quay-registry-managed-secret-keys -o yaml > managed_secret_keys.yaml -
Edit the resulting
managed_secret_keys.yamlfile and remove the entrymetadata.ownerReferences. Yourmanaged_secret_keys.yamlfile should look similar to the following:apiVersion: v1 kind: Secret type: Opaque metadata: name: <quay_registry_name>-quay-registry-managed-secret-keys namespace: <quay_namespace> data: CONFIG_EDITOR_PW: <redacted> DATABASE_SECRET_KEY: <redacted> DB_ROOT_PW: <redacted> DB_URI: <redacted> SECRET_KEY: <redacted> SECURITY_SCANNER_V4_PSK: <redacted>All information under the
dataproperty should remain the same. -
Redirect the current
Quayconfiguration file by entering the following command:$ oc get secret -n <quay-namespace> $(oc get quayregistry <quay_registry_name> -n <quay_namespace> -o jsonpath='{.spec.configBundleSecret}') -o yaml > config-bundle.yaml -
Backup the
/conf/stack/config.yamlfile mounted inside of theQuaypods:$ oc exec -it quay_pod_name -- cat /conf/stack/config.yaml > quay_config.yaml -
Obtain the
Quaydatabase name:$ oc -n <quay_namespace> rsh $(oc get pod -l app=quay -o NAME -n <quay_namespace> |head -n 1) cat /conf/stack/config.yaml|awk -F"/" '/^DB_URI/ {print $4}'Example outputquayregistry-quay-database
Scaling down the Project Quay deployment
To create a consistent backup of your Project Quay deployment, you must scale down the deployment by disabling auto scaling and setting replica counts to zero. This ensures the registry is in a quiescent state before backing up.
|
Important
|
This step is needed to create a consistent backup of the state of your Project Quay deployment. Do not omit this step, including in setups where PostgreSQL databases and/or S3-compatible object storage are provided by external services (unmanaged by the Project Quay Operator). |
-
Scale down the Project Quay deployment by disabling auto scaling and overriding the replica count for Project Quay, mirror workers, and Clair (if managed). For example:
apiVersion: quay.redhat.com/v1
kind: QuayRegistry
metadata:
  name: registry
  namespace: ns
spec:
  components:
    …
    - kind: horizontalpodautoscaler
      managed: false
    - kind: quay
      managed: true
      overrides:
        replicas: 0
    - kind: clair
      managed: true
      overrides:
        replicas: 0
    - kind: mirror
      managed: true
      overrides:
        replicas: 0
    …
where:
managed: false-
Disables auto scaling of Quay, Clair and Mirroring workers.
overrides-
Sets the replica count to 0 for components accessing the database and objectstorage.
-
Wait for the
registry-quay-app,registry-quay-mirrorandregistry-clair-apppods (depending on which components you set to be managed by the Project Quay Operator) to disappear. You can check their status by entering the following command:$ oc get pods -n <quay_namespace>Example output:$ oc get podExample outputquay-operator.v3.7.1-6f9d859bd-p5ftc 1/1 Running 0 12m quayregistry-clair-postgres-7487f5bd86-xnxpr 1/1 Running 1 (12m ago) 12m quayregistry-quay-app-upgrade-xq2v6 0/1 Completed 0 12m quayregistry-quay-database-859d5445ff-cqthr 1/1 Running 0 12m quayregistry-quay-redis-84f888776f-hhgms 1/1 Running 0 12m
Backing up the Project Quay managed database
To back up your Project Quay managed database for disaster recovery, you can identify the PostgreSQL pod and use pg_dump to create a backup SQL file. This procedure creates a backup that you can use to restore your database.
|
Note
|
If your Project Quay deployment is configured with external, or unmanged, PostgreSQL database(s), refer to your vendor’s documentation on how to create a consistent backup of these databases. |
-
Identify the Project Quay PostgreSQL pod name by entering the following command:
$ oc get pod -l quay-component=postgres -n <quay_namespace> -o jsonpath='{.items[0].metadata.name}'Example output:quayregistry-quay-database-59f54bb7-58xs7 -
Download a backup database by entering the following command:
$ oc -n <quay_namespace> exec quayregistry-quay-database-59f54bb7-58xs7 -- /usr/bin/pg_dump -C quayregistry-quay-database > backup.sql
Backing up the Project Quay managed object storage
To back up your Project Quay managed object storage for disaster recovery, you can export AWS credentials from secrets and use the aws s3 sync command to copy all blobs to a local directory. This procedure creates a backup of your registry’s object storage data.
The instructions in this section apply to the following configurations:
-
Standalone, multi-cloud object gateway configurations
-
OpenShift Data Foundations storage requires that the Project Quay Operator provisioned an S3 object storage bucket from, through the
ObjectStorageBucketClaimAPI.
-
Decode and export the
AWS_ACCESS_KEY_IDby entering the following command:$ export AWS_ACCESS_KEY_ID=$(oc get secret -l app=noobaa -n <quay-namespace> -o jsonpath='{.items[0].data.AWS_ACCESS_KEY_ID}' |base64 -d) -
Decode and export the
AWS_SECRET_ACCESS_KEY_IDby entering the following command:$ export AWS_SECRET_ACCESS_KEY=$(oc get secret -l app=noobaa -n <quay-namespace> -o jsonpath='{.items[0].data.AWS_SECRET_ACCESS_KEY}' |base64 -d) -
Create a new directory by entering the following command:
$ mkdir blobs -
Copy all blobs to the directory by entering the following command:
$ aws s3 sync --no-verify-ssl --endpoint https://$(oc get route s3 -n openshift-storage -o jsonpath='{.spec.host}') s3://$(oc get cm -l app=noobaa -n <quay-namespace> -o jsonpath='{.items[0].data.BUCKET_NAME}') ./blobs
Scaling up the Project Quay deployment
To restore your Project Quay deployment to normal operation after scaling down, you can re-enable auto scaling and remove replica overrides for quay, mirror workers, and Clair. This restores your registry to full capacity after completing backup or maintenance tasks.
-
Scale up the Project Quay deployment by re-enabling auto scaling, if desired, and removing the replica overrides for Quay, mirror workers and Clair as applicable. For example:
apiVersion: quay.redhat.com/v1
kind: QuayRegistry
metadata:
  name: registry
  namespace: ns
spec:
  components:
    …
    - kind: horizontalpodautoscaler
      managed: true
    - kind: quay
      managed: true
    - kind: clair
      managed: true
    - kind: mirror
      managed: true
    …
where:
spec.components.horizontalpodautoscaler.managed-
Specifies re-enabling auto scaling of Quay, Clair and Mirroring workers again.
spec.components.quay-
Specifies that replica overrides are removed again to scale the Quay components back up.
-
Check the status of the Project Quay deployment by entering the following command:
$ oc wait quayregistry registry --for=condition=Available=true -n <quay_namespace>Example output:apiVersion: quay.redhat.com/v1 kind: QuayRegistry metadata: ... name: registry namespace: <quay-namespace> ... spec: ... status: - lastTransitionTime: '2022-06-20T05:31:17Z' lastUpdateTime: '2022-06-20T17:31:13Z' message: All components reporting as healthy reason: HealthChecksPassing status: 'True' type: Available
Restoring Project Quay
To restore your Project Quay registry when the Operator manages the database, you can restore the configuration, database, and object storage from backups. This procedure restores your registry to a previous state after performing the backup process.
Prerequisites for restoring Project Quay
The following prerequisites are required to restore Project Quay:
-
Project Quay is deployed on OpenShift Container Platform using the Project Quay Operator.
-
A backup of the Project Quay configuration managed by the Project Quay Operator has been created following the instructions in the Backing up Project Quay section.
-
The object storage bucket used by Project Quay has been backed up.
-
The components
quay,postgresandobjectstorageare set tomanaged: true -
If the component
clairis set tomanaged: true, the componentclairpostgresis also set tomanaged: true. -
There is no running Project Quay deployment managed by the Project Quay Operator in the target namespace on your OpenShift Container Platform cluster
|
Note
|
If your deployment contains partially unmanaged database or storage components and you are using external services for PostgreSQL or S3-compatible object storage to run your Project Quay deployment, you must refer to the service provider or vendor documentation to restore their data from a backup prior to restore Project Quay |
Restoring Project Quay from a backup
To restore your Project Quay registry and configuration from a backup, you can restore the configuration bundle, managed secret keys, and QuayRegistry custom resource. This procedure restores your registry to a previous state using backup files created with the backup process.
-
You have backed up your Project Quay registry and configuration.
-
You have the backup files
config-bundle.yaml,managed-secret-keys.yaml, andquay-registry.yaml.
-
Restore the backed up Project Quay configuration by entering the following command:
$ oc create -f ./config-bundle.yamlImportantIf you receive the error
Error from server (AlreadyExists): error when creating "./config-bundle.yaml": secrets "config-bundle-secret" already exists, you must delete your existing resource with$ oc delete Secret config-bundle-secret -n <quay-namespace>and recreate it with$ oc create -f ./config-bundle.yaml. -
Restore the generated keys from the backup by entering the following command:
$ oc create -f ./managed-secret-keys.yaml -
Restore the
QuayRegistrycustom resource by entering the following command:$ oc create -f ./quay-registry.yaml -
Check the status of the Project Quay deployment by entering the following command. Wait for it to be available:
$ oc wait quayregistry registry --for=condition=Available=true -n <quay-namespace>
Scaling down the Project Quay deployment
To scale down your Project Quay deployment, you can disable auto scaling and set replica counts to zero. This reduces resource consumption and stops registry operations temporarily.
-
Scale down the Project Quay deployment by disabling auto scaling and overriding the replica count for Quay, mirror workers and Clair (if managed). For example:
apiVersion: quay.redhat.com/v1
kind: QuayRegistry
metadata:
  name: registry
  namespace: ns
spec:
  components:
    …
    - kind: horizontalpodautoscaler
      managed: false
    - kind: quay
      managed: true
      overrides:
        replicas: 0
    - kind: clair
      managed: true
      overrides:
        replicas: 0
    - kind: mirror
      managed: true
      overrides:
        replicas: 0
    …
where:
spec.components.horizontalpodautoscaler.managed-
Specifies that the component is not managed by the Project Quay Operator.
spec.components.quay.overrides-
Specifies the replica count for the component.
-
Wait for the
registry-quay-app,registry-quay-mirrorandregistry-clair-apppods (depending on which components you set to be managed by Project Quay Operator) to disappear. You can check their status by running the following command:$ oc get pods -n <quay-namespace>Example output:
registry-quay-config-editor-77847fc4f5-nsbbv 1/1 Running 0 9m1s registry-quay-database-66969cd859-n2ssm 1/1 Running 0 6d1h registry-quay-redis-7cc5f6c977-956g8 1/1 Running 0 5d21h
Restoring your Project Quay database
To restore your Project Quay database from a backup, you can identify the database pod, upload the backup file, drop the existing database, and restore from the backup using psql. This procedure restores your database to a previous state using a backup SQL file.
-
Identify your
Quaydatabase pod by entering the following command:$ oc get pod -l quay-component=postgres -n <quay_namespace> -o jsonpath='{.items[0].metadata.name}'Example output:quayregistry-quay-database-59f54bb7-58xs7
-
Upload the backup by copying it from the local environment and into the pod by entering the following command:
$ oc cp ./backup.sql -n <quay_namespace> registry-quay-database-66969cd859-n2ssm:/tmp/backup.sql
-
Open a remote terminal to the database by entering the following command:
$ oc rsh -n <quay_namespace> registry-quay-database-66969cd859-n2ssm -
Enter psql by entering the following command:
bash-4.4$ psql -
You can list the database by entering the following command:
postgres=# \lExample outputList of databases Name | Owner | Encoding | Collate | Ctype | Access privileges ----------------------------+----------------------------+----------+------------+------------+----------------------- postgres | postgres | UTF8 | en_US.utf8 | en_US.utf8 | quayregistry-quay-database | quayregistry-quay-database | UTF8 | en_US.utf8 | en_US.utf8 | -
Drop the existing database by entering the following command:
postgres=# DROP DATABASE "quayregistry-quay-database";Example outputDROP DATABASE -
Exit the postgres CLI by entering the following command:
\q -
Redirect your PostgreSQL database to your backup database by entering the following command:
sh-4.4$ psql < /tmp/backup.sql -
Exit bash by entering the following command:
sh-4.4$ exit
Restoring the Project Quay object storage data
To restore your Project Quay object storage data from a backup, you can export AWS credentials from secrets and use the aws s3 sync command to upload blobs to your storage bucket. This procedure restores your registry’s object storage data using backup files.
-
Export the
AWS_ACCESS_KEY_IDby entering the following command:$ export AWS_ACCESS_KEY_ID=$(oc get secret -l app=noobaa -n <quay-namespace> -o jsonpath='{.items[0].data.AWS_ACCESS_KEY_ID}' |base64 -d) -
Export the
AWS_SECRET_ACCESS_KEYby entering the following command:$ export AWS_SECRET_ACCESS_KEY=$(oc get secret -l app=noobaa -n <quay-namespace> -o jsonpath='{.items[0].data.AWS_SECRET_ACCESS_KEY}' |base64 -d) -
Upload all blobs to the bucket by running the following command:
$ aws s3 sync --no-verify-ssl --endpoint https://$(oc get route s3 -n openshift-storage -o jsonpath='{.spec.host}') ./blobs s3://$(oc get cm -l app=noobaa -n <quay-namespace> -o jsonpath='{.items[0].data.BUCKET_NAME}')
Scaling up the Project Quay deployment
To scale up your Project Quay deployment, you can re-enable auto scaling and remove replica overrides. This restores your registry to normal operation after scaling down.
-
Scale up the Project Quay deployment by re-enabling auto scaling, if desired, and removing the replica overrides for Quay, mirror workers and Clair as applicable. For example:
apiVersion: quay.redhat.com/v1
kind: QuayRegistry
metadata:
  name: registry
  namespace: ns
spec:
  components:
    …
    - kind: horizontalpodautoscaler
      managed: true
    - kind: quay
      managed: true
    - kind: clair
      managed: true
    - kind: mirror
      managed: true
    …
where:
spec.components.horizontalpodautoscaler.managed-
Specifies re-enabling auto scaling of Project Quay, Clair and mirroring workers again.
spec.components.quay-
Specifies that replica overrides are removed again to scale the Project Quay components back up.
Volume size overrides
Volume size overrides let you specify the desired capacity and storage class for managed components that use persistent or ephemeral volumes in your Project Quay deployment. You can set larger volumes upfront for performance reasons or when your storage backend does not support resizing.
The default size for the managed postgres and clairpostgres persistent volumes is 50Gi. The default size for the managed clair ephemeral scratch volume is 20Gi.
Use overrides.volumeSize and overrides.storageClassName on the postgres, clairpostgres, and clair components in the QuayRegistry custom resource. For postgres and clairpostgres, set these overrides during initial installation of the component. Changing storageClassName after a database PVC is created is not supported.
|
Note
|
To expand database storage on an existing deployment, see Resizing managed storage. |
In the following example, storage overrides are applied to three managed components:
-
On
clair,volumeSizeandstorageClassNameconfigure ephemeral scratch storage for image layer extraction at/var/tmp. -
On
postgresandclairpostgres,volumeSizeandstorageClassNameconfigure the managed PostgreSQL database persistent volumes.
apiVersion: quay.redhat.com/v1
kind: QuayRegistry
metadata:
  name: quay-example
  namespace: quay-enterprise
spec:
  configBundleSecret: config-bundle-secret
  components:
    - kind: objectstorage
      managed: false
    - kind: route
      managed: true
    - kind: tls
      managed: false
    - kind: clair
      managed: true
      overrides:
        volumeSize: 50Gi
        storageClassName: fast-ssd
    - kind: postgres
      managed: true
      overrides:
        volumeSize: 70Gi
        storageClassName: local-path
    - kind: clairpostgres
      managed: true
      overrides:
        volumeSize: 70Gi
        storageClassName: local-path
where:
spec.components.clair.overrides.volumeSize-
Specifies the desired capacity for the ephemeral scratch volume.
spec.components.clair.overrides.storageClassName-
Specifies the storage class to use for the ephemeral scratch volume.
spec.components.postgres.overrides.volumeSize-
Specifies the desired capacity for the database persistent volume.
spec.components.postgres.overrides.storageClassName-
Specifies the storage class to use for the database persistent volume.
spec.components.clairpostgres.overrides.volumeSize-
Specifies the desired capacity for the database persistent volume.
spec.components.clairpostgres.overrides.storageClassName-
Specifies the storage class to use for the database persistent volume.
Configuring ephemeral storage for managed Clair
To increase Clair scratch space for image layer extraction on Project Quay, you can set volumeSize and storageClassName overrides on the managed clair component in the QuayRegistry custom resource.
When you deploy managed Clair, the Operator provisions an ephemeral volume named indexer-layer-storage for temporary image layer extraction during vulnerability scanning. If your registry scans large images, this scratch space can fill and cause Clair pods to fail.
By default, the ephemeral volume requests 20Gi of storage and uses the cluster default storage class. You can override the capacity and storage class without adding new fields to the QuayRegistry CR. The Operator applies these values to the ephemeral volume mounted at /var/tmp.
|
Note
|
These overrides apply to Clair scratch storage at |
-
Edit your
QuayRegistrycustom resource. For example:$ oc edit quayregistry <registry_name> -n <namespace> -
Under
spec.components, addoverrides.volumeSizeand, optionally,overrides.storageClassNameto the managedclaircomponent. For example:spec: components: - kind: clair managed: true overrides: volumeSize: 50Gi storageClassName: fast-ssdWhen no overrides are specified, the Operator preserves the default
20Girequest and does not set a storage class. -
Save the changes and wait for the Operator to reconcile the Clair deployment.
-
Verify that the Clair deployment includes the updated ephemeral volume claim template. Confirm that the
storageandstorageClassNamevalues match your overrides:$ oc get deploy -n <namespace> <registry_name>-clair-app \ -o jsonpath='{.spec.template.spec.volumes[?(@.name=="indexer-layer-storage")].ephemeral.volumeClaimTemplate.spec}{"\n"}'Example output{"accessModes":["ReadWriteOnce"],"resources":{"requests":{"storage":"50Gi"}},"storageClassName":"fast-ssd","volumeMode":"Filesystem"}
TLS encryption for Operator-managed PostgreSQL
You can enable TLS encryption for Operator-managed PostgreSQL databases used by Project Quay and Clair. Configure TLS through the overrides.tls fields on the postgres and clairpostgres components in the QuayRegistry custom resource.
|
Important
|
This feature configures transport encryption for Operator-managed PostgreSQL connections. It is distinct from the managed |
When TLS is enabled, the Operator configures PostgreSQL to accept encrypted connections and mounts the TLS certificates on the database pod. TLS is opt-in. Existing deployments continue to use unencrypted database connections until you explicitly enable it.
|
Note
|
After you enable TLS, confirm that PostgreSQL reports |
You can enable TLS independently for the postgres and clairpostgres components.
Certificate options
| Option | Description |
|---|---|
OpenShift Container Platform Service CA (default on OpenShift Container Platform) |
When you set |
Operator-generated self-signed certificates |
On Kubernetes clusters without the OpenShift Container Platform Service CA, the Operator generates ECDSA P-256 certificates with a 10-year validity period when no |
User-provided or cert-manager certificates |
Reference a Secret containing |
|
Note
|
This feature does not provide mutual TLS (mTLS) or automatic certificate rotation. To integrate with enterprise PKI or automate rotation, use |
Enabling TLS for Operator-managed PostgreSQL
To encrypt database traffic for Operator-managed PostgreSQL used by Project Quay and Clair, you can set overrides.tls.enabled: true on the postgres and clairpostgres components in the QuayRegistry custom resource.
-
The
postgresand/orclairpostgrescomponents that you want to protect are set tomanaged: true. -
You have access to edit the
QuayRegistrycustom resource in your registry namespace.
-
Edit your
QuayRegistrycustom resource. For example:$ oc edit quayregistry <registry_name> -n <namespace> -
Under
spec.components, addoverrides.tls.enabled: trueto the managed PostgreSQL components. For example:spec: components: - kind: postgres managed: true overrides: tls: enabled: true - kind: clairpostgres managed: true overrides: tls: enabled: true -
Save the changes and wait for the Operator to reconcile the registry.
NoteOn OpenShift Container Platform, the Operator might briefly report
RolloutBlockedwhile it waits for the Service CA to create the serving certificate Secret. Reconciliation retries until the Secret is available. -
Verify that PostgreSQL has SSL enabled:
$ oc exec -n <namespace> deploy/<registry_name>-quay-database -c postgres -- \
  bash -lc 'psql -U "$POSTGRESQL_USER" -d "$POSTGRESQL_DATABASE" -tAc "SHOW ssl;"'
The command should return
on. For Clair, run the same check against the Clair PostgreSQL deployment when that component is managed. -
Verify that the
QuayRegistrystatus shows a healthy deployment and thatRolloutBlockedis not stuck in an error state. -
Optional: Confirm client TLS sessions with the following command:
$ oc exec -n <namespace> deploy/<registry_name>-quay-database -c postgres -- \
  bash -lc 'psql -U "$POSTGRESQL_USER" -d "$POSTGRESQL_DATABASE" -tAc "SELECT count(*) FROM pg_stat_ssl s JOIN pg_stat_activity a ON s.pid = a.pid WHERE s.ssl = true AND a.client_addr IS NOT NULL;"'
A count greater than
0indicates active TLS client connections. If the count remains0, PostgreSQL still has TLS enabled on the server, but clients might not yet be connecting with SSL. Check the registry database URI or connection arguments for ansslmodevalue such asverify-full, and review Operator Events for certificate or CA errors.
Providing custom TLS certificates
To use your own certificates instead of Operator-generated or Service CA certificates, create a Secret and reference it from the component override.
-
TLS is enabled on the target component (
overrides.tls.enabled: true). -
You have a Secret containing PEM-encoded
ca.crt,tls.crt, andtls.keyentries. -
Your TLS certificate includes Subject Alternative Name (SAN) entries that match the PostgreSQL Service DNS names. For the
postgrescomponent, include the following names:<registry_name>-quay-database <registry_name>-quay-database.<namespace> <registry_name>-quay-database.<namespace>.svc <registry_name>-quay-database.<namespace>.svc.cluster.local localhostFor the
clairpostgrescomponent, include the following names:<registry_name>-clair-postgres <registry_name>-clair-postgres.<namespace> <registry_name>-clair-postgres.<namespace>.svc <registry_name>-clair-postgres.<namespace>.svc.cluster.local localhost
-
Create a Secret in the same namespace as your
QuayRegistrycustom resource. For example:apiVersion: v1 kind: Secret metadata: name: <postgres_or_clairpostgres_name>-tls namespace: <namespace> type: Opaque stringData: ca.crt: | -----BEGIN CERTIFICATE----- ... -----END CERTIFICATE----- tls.crt: | -----BEGIN CERTIFICATE----- ... -----END CERTIFICATE----- tls.key: | -----BEGIN EC PRIVATE KEY----- ... -----END EC PRIVATE KEY----- -
Reference the Secret from the PostgreSQL component override:
- kind: postgres managed: true overrides: tls: enabled: true secretRef: name: <postgres_or_clairpostgres_name>-tls -
Save the
QuayRegistryand wait for reconciliation.
-
Connect to the Project Quay PostgreSQL pod and check that SSL is enabled:
$ oc exec -n <namespace> deploy/<registry>-quay-database -c postgres -- bash -lc 'psql -U "$POSTGRESQL_USER" -d "$POSTGRESQL_DATABASE" -tAc "SHOW ssl;"'The command should return
on. -
Optional: Confirm that client connections use SSL:
$ oc exec -n <namespace> deploy/<registry_name>-quay-database -c postgres -- \
  bash -lc 'psql -U "$POSTGRESQL_USER" -d "$POSTGRESQL_DATABASE" -tAc "SELECT count(*) FROM pg_stat_ssl s JOIN pg_stat_activity a ON s.pid = a.pid WHERE s.ssl = true AND a.client_addr IS NOT NULL;"'
A count greater than
0indicates active TLS client connections. If the count remains0, PostgreSQL still has TLS enabled on the server, but clients might not yet be connecting with SSL. Check the registry database URI or connection arguments for ansslmodevalue such asverify-full, and review Operator Events for certificate or CA errors.
Disabling TLS
You can disable TLS on an existing deployment without data loss by removing or setting overrides.tls.enabled to false on the affected components. The Operator removes TLS configuration from PostgreSQL and restores unencrypted connection strings.
-
Edit the
QuayRegistrycustom resource. -
Set
overrides.tls.enabled: falseor remove theoverrides.tlsblock from thepostgresand/orclairpostgrescomponents. -
Save the changes and wait for the Operator to reconcile the registry.
Troubleshooting Operator-managed PostgreSQL TLS configurations
If TLS configuration is invalid, the Operator sets a RolloutBlocked condition on the QuayRegistry and emits Kubernetes Events with details.
Common causes include:
-
A referenced TLS Secret does not exist
-
The Secret is missing
ca.crt,tls.crt, ortls.key -
The certificate and private key do not match
-
The certificate has expired
On OpenShift Container Platform, if the Service CA serving certificate Secret has not yet been created, the Operator emits Events such as a PostgreSQL service CA error and retries until the Secret is available. A brief RolloutBlocked condition during that wait is expected.
If SHOW ssl; returns on but pg_stat_ssl shows no TLS client sessions, PostgreSQL is accepting encrypted connections, but Project Quay or Clair might still be connecting without SSL. Check the registry configuration for an sslmode value on the database URI or connection arguments, and review Operator Events for certificate or CA problems.
For external PostgreSQL databases, continue to configure TLS through DB_URI and related configuration fields in the config bundle. For more information, see Database configuration fields.
Container Security Operator
The Container Security Operator (CSO) scans images for active pods and reports vulnerabilities through the Kubernetes API. You can use CSO with Project Quay and Clair to monitor security issues in running workloads.
|
Important
|
The Container Security Operator has been deprecated and planned for removal in a future release of Project Quay and OpenShift Container Platform. The official replacement product of the Container Security Operator is Red Hat Advanced Cluster Security for Kubernetes. |
|
Note
|
The CSO does not work without Project Quay and Clair. |
The Container Security Operator (CSO) includes the following features:
-
Watches containers associated with pods on either specified or all namespaces.
-
Queries the container registry where the containers came from for vulnerability information, provided that an image’s registry supports image scanning, such as a Project Quay registry with Clair scanning.
-
Exposes vulnerabilities through the
ImageManifestVulnobject in the Kubernetes API.
|
Note
|
To see instructions on installing the CSO on Kubernetes, select the Install button on the Container Security Operator OperatorHub page. |
Downloading and running the Container Security Operator in OpenShift Container Platform
To scan container images for vulnerabilities in your OpenShift Container Platform cluster, you can install the Container Security Operator from the OpenShift Container Platform OperatorHub and view vulnerability information in the dashboard. This procedure sets up the CSO to monitor pods and expose vulnerability data through the Kubernetes API.
|
Note
|
In the following procedure, the CSO is installed in the |
After executing this procedure, you are made aware of what images are vulnerable, what you must do to fix those vulnerabilities, and every namespace that the image was run in. Knowing this, you can perform the following actions:
-
Alert users who are running the image that they need to correct the vulnerability.
-
Stop the images from running by deleting the deployment or the object that started the pod that the image is in.
-
On the OpenShift Container Platform console page, select Operators → OperatorHub and search for Container Security Operator.
-
Select the Container Security Operator, then select Install to go to the Create Operator Subscription page.
-
Check the settings (all namespaces and automatic approval strategy, by default), and select Subscribe. The Container Security appears after a few moments on the Installed Operators screen.
-
Optional: you can add custom certificates to the CSO. In this example, create a certificate named
quay.crtin the current directory. Then, run the following command to add the certificate to the CSO:$ oc create secret generic container-security-operator-extra-certs --from-file=quay.crt -n openshift-operatorsNoteYou must restart the Operator pod for the new certificates to take effect.
-
Navigate to Home → Overview. A link to Image Vulnerabilities appears under the status section, with a listing of the number of vulnerabilities found so far. Select the link to see a security breakdown, as shown in the following image:
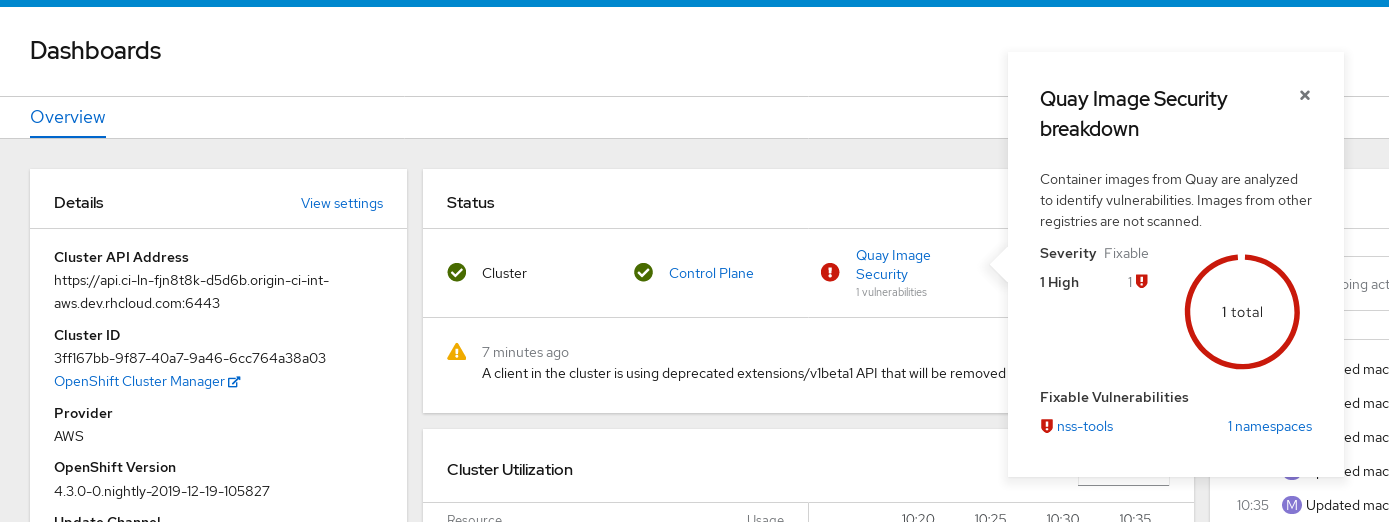 Important
The Container Security Operator currently provides broken links for Red Hat Security advisories. For example, the following link might be provided:
https://access.redhat.com/errata/RHSA-2023:1842%20https://access.redhat.com/security/cve/CVE-2023-23916. The%20in the URL represents a space character, however it currently results in the combination of the two URLs into one incomplete URL, for example,https://access.redhat.com/errata/RHSA-2023:1842andhttps://access.redhat.com/security/cve/CVE-2023-23916. As a temporary workaround, you can copy each URL into your browser to navigate to the proper page. This is a known issue and will be fixed in a future version of Project Quay. -
You can do one of two things at this point to follow up on any detected vulnerabilities:
-
Select the link to the vulnerability. You are taken to the container registry, Project Quay or other registry where the container came from, where you can see information about the vulnerability. The following figure shows an example of detected vulnerabilities from a Quay.io registry:
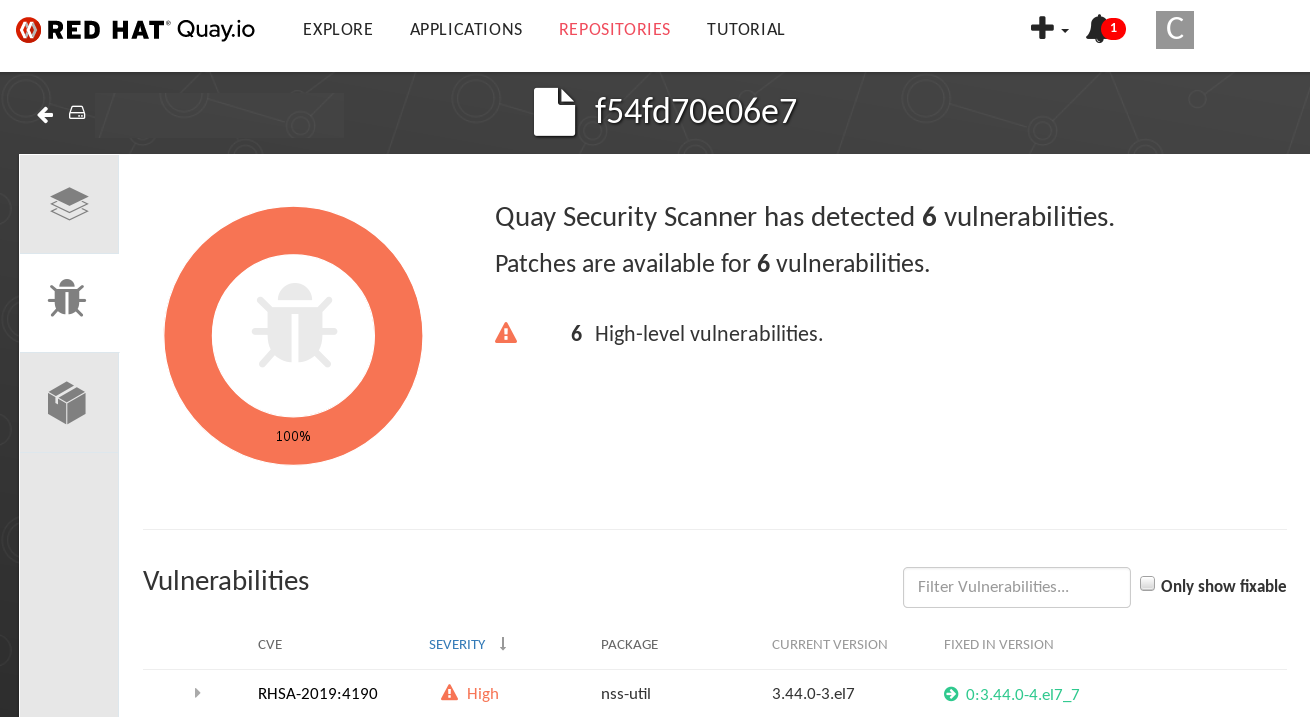
-
Select the namespaces link to go to the Image Manifest Vulnerabilities page, where you can see the name of the selected image and all namespaces where that image is running. The following figure indicates that a particular vulnerable image is running in two namespaces:
-
Querying image vulnerabilities from the CLI
To check for security vulnerabilities in your Project Quay container images, you can query vulnerability information from the command line using the oc get vuln command. You can also view detailed information about specific vulnerabilities by using the oc describe vuln command.
-
Enter the following command to query for detected vulnerabilities:
$ oc get vuln --all-namespacesExample outputNAMESPACE NAME AGE default sha256.ca90... 6m56s skynet sha256.ca90... 9m37s -
Optional. To display details for a particular vulnerability, identify a specific vulnerability and its namespace, and use the
oc describecommand. The following example shows an active container whose image includes an RPM package with a vulnerability:$ oc describe vuln --namespace <namespace> sha256.ac50e3752...
Name:         sha256.ac50e3752...
Namespace:    quay-enterprise
...
Spec:
  Features:
    Name:            nss-util
    Namespace Name:  centos:7
    Version:         3.44.0-3.el7
    Versionformat:   rpm
    Vulnerabilities:
      Description: Network Security Services (NSS) is a set of libraries...
Uninstalling the Container Security Operator
To uninstall the Container Security Operator from your OpenShift Container Platform deployment, you must uninstall the Operator and delete the imagemanifestvulns.secscan.quay.redhat.com custom resource definition (CRD). Without removing the CRD, image vulnerabilities are still reported on the OpenShift Container Platform Overview page.
-
On the OpenShift Container Platform web console, click Operators → Installed Operators.
-
Click the menu kebab of the Container Security Operator.
-
Click Uninstall Operator. Confirm your decision by clicking Uninstall in the popup window.
-
Remove the
imagemanifestvulns.secscan.quay.redhat.comcustom resource definition by entering the following command:$ oc delete customresourcedefinition imagemanifestvulns.secscan.quay.redhat.comExample outputcustomresourcedefinition.apiextensions.k8s.io "imagemanifestvulns.secscan.quay.redhat.com" deleted
Configuring AWS STS for Project Quay
You can configure AWS Security Token Service (STS) with Project Quay to authenticate to Amazon S3 by using temporary credentials. STS is available for standalone deployments, Red Hat Quay on OpenShift Container Platform, and Project Quay on Red Hat OpenShift Service on AWS (ROSA).
AWS STS provides temporary, limited-privilege credentials for AWS Identity and Access Management (IAM) users. When Project Quay uses Amazon S3 as object storage, STS protocols can authenticate access so that sensitive data remains properly authenticated and authorized.
Configuring AWS STS for OpenShift Container Platform or ROSA requires creating an AWS IAM user, creating an S3 role, and configuring your Project Quay config.yaml file to include the proper resources.
Creating an IAM user
To configure AWS STS authentication for your Project Quay deployment, you can create an IAM user in the AWS console, copy the user ARN, and create access keys. This procedure sets up the IAM user that Project Quay uses to authenticate with Amazon S3 using temporary credentials.
-
Log in to the Amazon Web Services (AWS) console and navigate to the Identity and Access Management (IAM) console.
-
In the navigation pane, under Access management click Users.
-
Click Create User and enter the following information:
-
Enter a valid username, for example,
quay-user. -
For Permissions options, click Add user to group.
-
-
On the review and create page, click Create user. You are redirected to the Users page.
-
Click the username, for example, quay-user.
-
Copy the ARN of the user, for example,
arn:aws:iam::123456:user/quay-user. -
On the same page, click the Security credentials tab.
-
Navigate to Access keys.
-
Click Create access key.
-
On the Access key best practices & alternatives page, click Command Line Interface (CLI), then, check the confirmation box. Then click Next.
-
Optional. On the Set description tag - optional page, enter a description.
-
Click Create access key.
-
Copy and store the access key and the secret access key.
ImportantThis is the only time that the secret access key can be viewed or downloaded. You cannot recover it later. However, you can create a new access key any time.
-
Click Done.
Creating an S3 role
To enable AWS STS authentication for your Project Quay deployment, you can create an S3 role in the AWS IAM console with a custom trust policy that allows your IAM user to assume the role. This procedure sets up the role that grants S3 access permissions for temporary credential authentication.
-
You have created an IAM user and stored the access key and the secret access key.
-
Navigate to the IAM dashboard.
-
In the navigation pane, click Roles under Access management.
-
Click Create role → Custom Trust Policy.
-
Under the
Principalconfiguration field, add your AWS ARN information. For example:{ "Version": "2012-10-17", "Statement": [ { "Sid": "Statement1", "Effect": "Allow", "Principal": { "AWS": "arn:aws:iam::123456:user/quay-user" }, "Action": "sts:AssumeRole" } ] } -
Click Next.
-
On the Add permissions page, type
AmazonS3FullAccessin the search box. Check the box to add that policy to the S3 role, then click Next. -
On the Name, review, and create page, enter the following information:
-
Enter a role name, for example,
example-role. -
Optional. Add a description.
-
-
Click the Create role button. You are navigated to the Roles page. Under Role name, the newly created S3 should be available.
Configuring Red Hat Quay on OpenShift Container Platform to use AWS STS
To configure your Red Hat Quay on OpenShift Container Platform deployment to use AWS STS for S3 authentication, you can edit the config.yaml file through the OpenShift Container Platform UI and update the DISTRIBUTED_STORAGE_CONFIG fields with your role ARN, bucket name, and access keys.
This procedure enables temporary credential authentication for object storage access.
|
Note
|
You can also edit and re-deploy your Red Hat Quay on OpenShift Container Platform |
-
You have configured a Role ARN.
-
You have generated a User Access Key.
-
You have generated a User Secret Key.
-
On the Home page of your OpenShift Container Platform deployment, click Operators → Installed Operators.
-
Click Red Hat Quay.
-
Click Quay Registry and then the name of your Project Quay registry.
-
Under Config Bundle Secret, click the name of your registry configuration bundle, for example, quay-registry-config-bundle-qet56.
-
On the configuration bundle page, click Actions to reveal a drop-down menu. Then click Edit Secret.
-
Update your the
DISTRIBUTED_STORAGE_CONFIGfields of yourconfig.yamlfile with the following information:# ... DISTRIBUTED_STORAGE_CONFIG: default: - STSS3Storage - sts_role_arn: <role_arn> s3_bucket: <s3_bucket_name> storage_path: <storage_path> s3_region: <region> sts_user_access_key: <s3_user_access_key> sts_user_secret_key: <s3_user_secret_key> # ...where:
DISTRIBUTED_STORAGE_CONFIG.default.sts_role_arn-
Specifies the unique Amazon Resource Name (ARN) required when configuring AWS STS.
DISTRIBUTED_STORAGE_CONFIG.default.s3_bucket-
Specifies the name of your s3 bucket.
DISTRIBUTED_STORAGE_CONFIG.default.storage_path-
Specifies the storage path for data. Usually
/datastorage. DISTRIBUTED_STORAGE_CONFIG.default.s3_region-
Specifies the Amazon Web Services region. Defaults to
us-east-1. DISTRIBUTED_STORAGE_CONFIG.default.sts_user_access_key-
Specifies the generated AWS S3 user access key required when configuring AWS STS.
DISTRIBUTED_STORAGE_CONFIG.default.sts_user_secret_key-
Specifies the generated AWS S3 user secret key required when configuring AWS STS.
-
Click Save.
-
Tag a sample image, for example,
busybox, that will be pushed to the repository. For example:$ podman tag docker.io/library/busybox <quay-server.example.com>/<organization_name>/busybox:test -
Push the sample image by running the following command:
$ podman push <quay-server.example.com>/<organization_name>/busybox:test -
Verify that the push was successful by navigating to the Organization that you pushed the image to in your Project Quay registry → Tags.
-
Navigate to the Amazon Web Services (AWS) console and locate your s3 bucket.
-
Click the name of your s3 bucket.
-
On the Objects page, click datastorage/.
-
On the datastorage/ page, the following resources should seen:
-
sha256/
-
uploads/
These resources indicate that the push was successful, and that AWS STS is properly configured.
-
Configuring Project Quay on Red Hat OpenShift Service on AWS to use AWS STS
To configure your Project Quay deployment on Red Hat OpenShift Service on AWS to use AWS STS for S3 authentication, you can update the IAM role trust policy to use federated identity, configure the config.yaml file, and annotate the service account with the role ARN.
This procedure enables web identity federation for temporary credential authentication.
-
You have created an IAM user.
-
You have created an s3 Role ARN.
-
You have created a Custom Trust Policy that uses the Role ARN.
-
Get the
serviceAccountIssuerresource by entering the following command:$ oc get authentication.config.openshift.io cluster -o json | jq -r .spec.serviceAccountIssuer | sed -e "s/^https:\/\///"Example outputoidc.op1.openshiftapps.com/123456 -
On the Identity and Access Management (IAM) console of the Amazon Web Services (AWS) console:
-
Click Roles.
-
Click the name of the Role to be used with AWS STS, for example,
example-role. -
Click the Trust relationships tab, which shows the JSON policy created during "Creating an S3 role". Update the JSON policy as follows:
{
	"Version": "2012-10-17",
	"Statement": [
    	{
        	"Sid": "Statement1",
        	"Effect": "Allow",
        	"Principal": {
            	"Federated": "arn:aws:iam::123456:oidc-provider/oidc.op1.openshiftapps.com/123456"
        	},
        	"Action": "sts:AssumeRoleWithWebIdentity",
        	"Condition": {
            	"StringEquals": {
                	"oidc.op1.openshiftapps.com/123456:sub": "system:serviceaccount:quay:registry-quay-app"
            	}
        	}
    	}
	]
}
where:
Statement.Principal.Federated-
Specifies that the
Principalparameter of the JSON policy is updated toFederated:<your_user_ARN>:<serviceAccountIssuer_domain_path>. Statement.Action-
Specifies that the
Actionparameter of the JSON policy is updated tosts:AssumeRoleWithWebIdentity. Statement.Condition-
Specifies that the
Conditionparameter of the JSON policy is updated toStringEquals”: “<serviceAccountIssuer>:sub”: “system:serviceAccount:<quay_namespace>:<quay_registry_using_serviceAccount>.
-
Verify that your User ARN is configured correct, then click Next.
-
On the Add permissions page, select AmazonS3FullAccess, then click Next.
-
On the Name, review, and create page, provide your role a name, a description, verify your configuration, add any optional tags. Then, click Create Role.
-
-
On the Roles page, click the new role and store the
Role ARNresource. For example:arn:aws:iam::123456:role/test_s3_access -
On the Project Quay web console:
-
Click Operators → Installed Operators.
-
Click Red Hat Quay.
-
Click Quay Registry and then the name of your Project Quay registry.
-
Under Config Bundle Secret, click the name of your registry configuration bundle, for example, quay-registry-config-bundle-12345.
-
On the configuration bundle page, click Actions to reveal a drop-down menu. Then click Edit Secret.
-
Update your the
DISTRIBUTED_STORAGE_CONFIGfields of yourconfig.yamlfile with the following information:# ... DISTRIBUTED_STORAGE_CONFIG: default: - STSS3Storage s3_bucket: <s3_bucket_name> storage_path: <storage_path> s3_region: <region> # ...where:
DISTRIBUTED_STORAGE_CONFIG.default.s3_bucket-
Specifies the name of your s3 bucket.
DISTRIBUTED_STORAGE_CONFIG.default.storage_path-
Specifies the storage path for data. Usually
/datastorage. DISTRIBUTED_STORAGE_CONFIG.default.s3_region-
Specifies the Amazon Web Services region. Defaults to
us-east-1.
-
-
Click Save. Your
QuayRegistrycustom resource (CR) automatically restarts. -
Annotate the Service Account (SA) that executes pods with the EKS configuration values. For example:
$ oc annotate sa registry-quay-app "eks.amazonaws.com/role-arn"="arn:aws:iam::123456:role/test_s3_access" "eks.amazonaws.com/audience"="sts.amazonaws.com" "eks.amazonaws.com/sts-regional-endpoints"="true"
-
Tag a sample image, for example,
busybox, that will be pushed to the repository. For example:$ podman tag docker.io/library/busybox <quay-server.example.com>/<organization_name>/busybox:test -
Push the sample image by running the following command:
$ podman push <quay-server.example.com>/<organization_name>/busybox:test -
Verify that the push was successful by navigating to the Organization that you pushed the image to in your Project Quay registry → Tags.
-
Navigate to the Amazon Web Services (AWS) console and locate your s3 bucket.
-
Click the name of your s3 bucket.
-
On the Objects page, click datastorage/.
-
On the datastorage/ page, the following resources should seen:
-
sha256/
-
uploads/
These resources indicate that the push was successful, and that AWS STS is properly configured.
-
Deploying IPv6 on Red Hat Quay on OpenShift Container Platform
IPv6 support lets you deploy Red Hat Quay on OpenShift Container Platform in IPv6-only environments such as Telco and Edge deployments. You can enable IPv6 by setting the FEATURE_LISTEN_IP_VERSION parameter to IPv6 in your config.yaml file.
For a list of known limitations, see IPv6 limitations.
|
Note
|
Currently, deploying IPv6 on the Red Hat Quay on OpenShift Container Platform is not supported on IBM Power and IBM Z. |
Enabling the IPv6 protocol family
To enable IPv6 support on your standalone Project Quay deployment, you can set FEATURE_LISTEN_IP_VERSION to IPv6 in your config.yaml file and restart the registry.
|
Warning
|
If your environment is configured for IPv4, but the |
-
Your host and container software platform (Docker, Podman) must be configured to support IPv6.
-
In your deployment’s
config.yamlfile, add theFEATURE_LISTEN_IP_VERSIONparameter and set it toIPv6, for example:FEATURE_GOOGLE_LOGIN: false FEATURE_INVITE_ONLY_USER_CREATION: false FEATURE_LISTEN_IP_VERSION: IPv6 FEATURE_MAILING: false FEATURE_NONSUPERUSER_TEAM_SYNCING_SETUP: false -
Start, or restart, your Project Quay deployment.
-
Check that your deployment is listening to IPv6 by entering the following command:
$ curl <quay_endpoint>/health/instanceExample output{"data":{"services":{"auth":true,"database":true,"disk_space":true,"registry_gunicorn":true,"service_key":true,"web_gunicorn":true}},"status_code":200}
-
After you enable IPv6 in your deployment’s
config.yamlfile, you can use all Project Quay features as usual when your environment is configured for IPv6 and is not affected by known IPv6 limitations.
IPv6 limitations
IPv6-only deployments cannot use certain Project Quay storage backends because those services lack IPv6 endpoints. Microsoft Azure Blob Storage and Amazon S3 CloudFront are not supported in IPv6 single-stack environments.
-
Currently, configuring your Project Quay deployment with the common Microsoft Azure Blob Storage configuration does not work on IPv6 single-stack environments. Because the endpoint of Microsoft Azure Blob Storage does not support IPv6, no workaround exists for this issue.
-
Currently, configuring your Project Quay deployment with Amazon S3 CloudFront does not work on IPv6 single-stack environments. Because the endpoint of Amazon S3 CloudFront does not support IPv6, no workaround exists for this issue.
Adding custom SSL/TLS certificates when Project Quay is deployed on Kubernetes
To add custom SSL/TLS certificates to your Project Quay deployment on Kubernetes, you can base64 encode the certificate, add it to the config secret, and restart the pods. This procedure works around the limitation where the superuser panel certificate upload function does not work with Kubernetes deployments.
-
Project Quay has been deployed.
-
You have a custom
ca.crtfile.
-
Base64 encode the contents of an SSL/TLS certificate by entering the following command:
$ cat ca.crt | base64 -w 0Example output...c1psWGpqeGlPQmNEWkJPMjJ5d0pDemVnR2QNCnRsbW9JdEF4YnFSdVd3PT0KLS0tLS1FTkQgQ0VSVElGSUNBVEUtLS0tLQo= -
Enter the following
kubectlcommand to edit thequay-enterprise-config-secretfile:$ kubectl --namespace quay-enterprise edit secret/quay-enterprise-config-secret -
Add an entry for the certificate and paste the full
base64encoded stringer under the entry. For example:custom-cert.crt: c1psWGpqeGlPQmNEWkJPMjJ5d0pDemVnR2QNCnRsbW9JdEF4YnFSdVd3PT0KLS0tLS1FTkQgQ0VSVElGSUNBVEUtLS0tLQo= -
Use the
kubectl deletecommand to remove all Project Quay pods. For example:$ kubectl delete pod quay-operator.v3.7.1-6f9d859bd-p5ftc quayregistry-clair-postgres-7487f5bd86-xnxpr quayregistry-quay-app-upgrade-xq2v6 quayregistry-quay-database-859d5445ff-cqthr quayregistry-quay-redis-84f888776f-hhgmsAfterwards, the Project Quay deployment automatically schedules replace pods with the new certificate data.