You can use Project Quay to store container images in repositories and manage access with read and write permissions. This guide explains users, organizations, the tenancy model, and common UI and API operations.
Project Quay container image registries serve as centralized hubs for storing container images. Users of Project Quay can create repositories to effectively manage images and grant specific read (pull) and write (push) permissions to the repositories as deemed necessary. Administrative privileges expand these capabilities, allowing users to perform a broader set of tasks, like the ability to add users and control default settings.
|
Note
|
API endpoints in this guide are associated with entries in the Project Quay API guide. That guide provides more information about each endpoint, such as response codes and optional query parameters. |
Project Quay tenancy model
The Project Quay tenancy model defines how users, organizations, and repositories relate. You can use this model to organize access and ownership in the registry.
Tenancy model
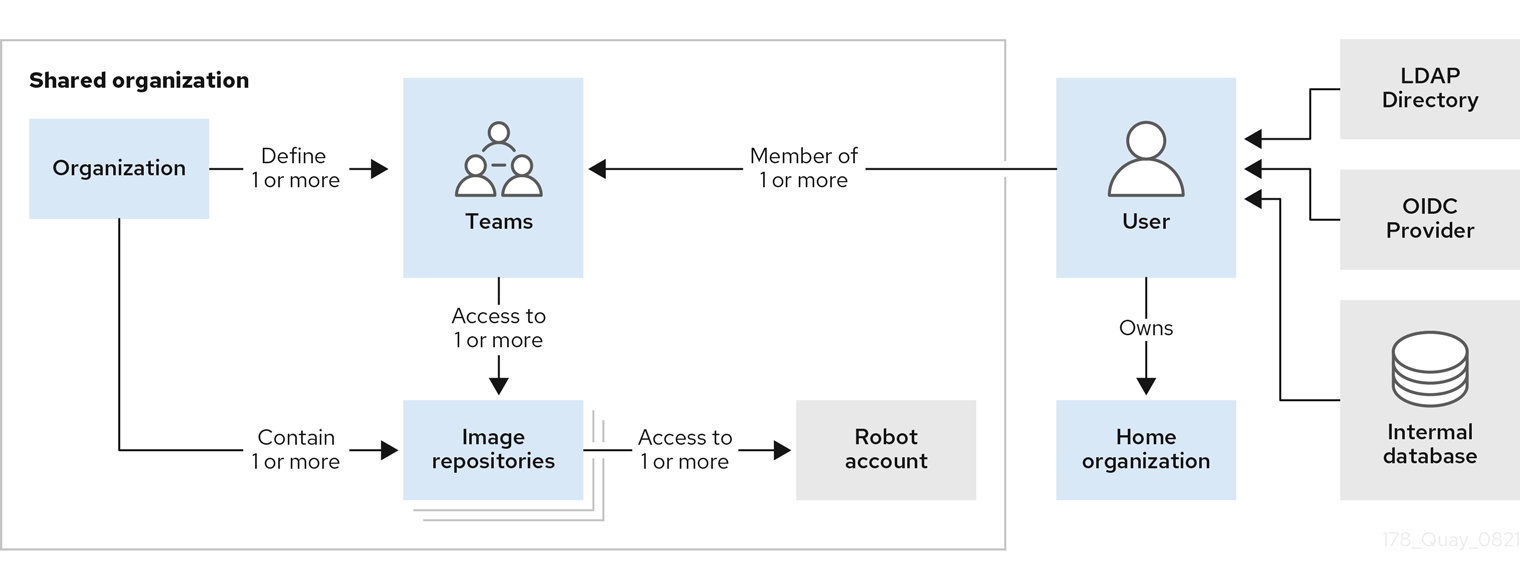
The tenancy model describes users, organizations, teams, and robot accounts in Project Quay. You can use these entities to control repository access and collaboration.
-
Organizations provide a way of sharing repositories under a common namespace that does not belong to a single user. Instead, these repositories belong to several users in a shared setting, such as a company.
-
Teams provide a way for an Organization to delegate permissions. Permissions can be set at the global level (for example, across all repositories), or on specific repositories. They can also be set for specific sets, or groups, of users.
-
Users can log in to a registry through the web UI or a by using a client like Podman and using their respective login commands, for example,
$ podman login. Each user automatically gets a user namespace, for example,<quay-server.example.com>/<user>/<username>, orquay.io/<username>if you are using Quay.io. -
Superusers have enhanced access and privileges through the Super User Admin Panel in the user interface. Superuser API calls are also available, which are not visible or accessible to normal users.
-
Robot accounts provide automated access to repositories for non-human users like pipeline tools. Robot accounts are similar to OpenShift Container Platform Service Accounts. Permissions can be granted to a robot account in a repository by adding that account like you would another user or team.
Enabling and using the Project Quay API
The Project Quay API provides endpoints to automate registry tasks such as repository, user, and image management. You can integrate these endpoints into your existing workflows.
Detailed instructions for how to use the Project Quay API are available in the Project Quay API guide. That guide covers the following topics:
-
Project Quay token types, including OAuth 2 access tokens, robot account tokens, and OCI referrers tokens, and how to generate these tokens.
-
Enabling the Project Quay API by configuring your
config.yamlfile. -
How to use the Project Quay API by passing in your OAuth 2 account token into the desired endpoint.
-
API examples, including one generic example of how an administrator might automate certain tasks.
User accounts overview
A user account is an authenticated identity on Project Quay that can create repositories, push and pull images, and manage access. You can create and delete users in the UI or by using the API.
Creating a user account by using the UI
To create a new user account in Project Quay, you can use the Super User Admin Panel in the UI.
-
You are logged into your Project Quay deployment as a superuser.
-
Log in to your Project Quay repository as the superuser.
-
In the navigation pane, select your account name, and then click Super User Admin Panel.
-
Click the Users icon in the column.
-
Click the Create User button.
-
Enter the new user’s Username and Email address, and then click the Create User button.
-
You are redirected to the Users page, where there is now another Project Quay user.
NoteYou might need to refresh the Users page to show the additional user.
-
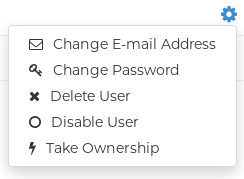
On the Users page, click the Options cogwheel associated with the new user. A drop-down menu appears, as shown in the following figure:
-
Click Change Password.
-
Add the new password, and then click Change User Password.
The new user can now use that username and password to log in using the web UI or through their preferred container client, like Podman.
Creating a user account by using the Project Quay API
To create a user account in Project Quay as a superuser, you can use the Project Quay API.
-
You are logged into your Project Quay deployment as a superuser.
-
You have created an OAuth access token.
-
Enter the following command to create a new user by using the
POST /api/v1/superuser/users/endpoint:$ curl -X POST -H "Authorization: Bearer <bearer_token>" -H "Content-Type: application/json" -d '{ "username": "newuser", "email": "newuser@example.com" }' "https://<quay-server.example.com>/api/v1/superuser/users/"Example output{"username": "newuser", "email": "newuser@example.com", "password": "123456789", "encrypted_password": "<example_encrypted_password>/JKY9pnDcsw="} -
Navigate to your Project Quay registry endpoint, for example,
quay-server.example.comand log in with the username and password generated from the API call. In this scenario, the username isnewuserand the password is123456789. Alternatively, you can log in to the registry with the CLI. For example:$ podman login <quay-server.example.com>Example outputusername: newuser password: 123456789 -
Optional. You can obtain a list of all users, including superusers, by using the
GET /api/v1/superuser/users/endpoint:$ curl -X GET -H "Authorization: Bearer <bearer_token>" "https://<quay-server.example.com>/api/v1/superuser/users/"NoteThe
GET /api/v1/superuser/users/endpoint only returns users and superusers ifAUTHENTICATION_TYPE: Databaseis set in yourconfig.yamlfile. It does not work forLDAPauthentication types.Example output{"users": [{"kind": "user", "name": "quayadmin", "username": "quayadmin", "email": "quay@quay.com", "verified": true, "avatar": {"name": "quayadmin", "hash": "b28d563a6dc76b4431fc7b0524bbff6b810387dac86d9303874871839859c7cc", "color": "#17becf", "kind": "user"}, "super_user": true, "enabled": true}, {"kind": "user", "name": "newuser", "username": "newuser", "email": "newuser@example.com", "verified": true, "avatar": {"name": "newuser", "hash": "f338a2c83bfdde84abe2d3348994d70c34185a234cfbf32f9e323e3578e7e771", "color": "#9edae5", "kind": "user"}, "super_user": false, "enabled": true}]}
Deleting a user by using the UI
To delete a user account from Project Quay, you can use the Super User Admin Panel in the UI.
After you delete the user, any repositories that the user had in their private account become unavailable.
|
Note
|
In some cases, when accessing the Users tab in the Superuser Admin Panel of the Project Quay UI, you might encounter a situation where no users are listed. Instead, a message appears, indicating that Project Quay is configured to use external authentication, and users can only be created in that system. This error occurs for one of two reasons:
When this happens, you must delete the user using the Project Quay API. |
-
You are logged into your Project Quay deployment as a superuser.
-
Log in to your Project Quay repository as the superuser.
-
In the navigation pane, select your account name, and then click Super User Admin Panel.
-
Click the Users icon in the navigation pane.
-
Click the Options cogwheel beside the user to be deleted.
-
Click Delete User, and then confirm deletion by clicking Delete User.
Deleting a user by using the Project Quay API
To delete a user account from Project Quay as a superuser, you can use the Project Quay API.
|
Important
|
After deleting the user, any repositories that this user had in their private account become unavailable. |
-
You are logged into your Project Quay deployment as a superuser.
-
You have created an OAuth access token.
-
Enter the following
DELETE /api/v1/superuser/users/{username}command to delete a user from the command line:$ curl -X DELETE -H "Authorization: Bearer <insert token here>" https://<quay-server.example.com>/api/v1/superuser/users/<username> -
The CLI does not return information when deleting a user from the CLI. To confirm deletion, you can check the Project Quay UI by navigating to Superuser Admin Panel → Users, or by entering the following
GET /api/v1/superuser/users/command. You can then check to see if they are present.NoteThe
GET /api/v1/superuser/users/endpoint only returns users and superusers ifAUTHENTICATION_TYPE: Databaseis set in yourconfig.yamlfile. It does not work forLDAPauthentication types.$ curl -X GET -H "Authorization: Bearer <bearer_token>" "https://<quay-server.example.com>/api/v1/superuser/users/"
Organizations overview
Organizations in Quay group users, repositories, and teams under a shared namespace for centralized access control. Administrators can assign roles and permissions to teams and users within an organization.
Other useful information about organizations includes the following:
-
You cannot have an organization embedded within another organization. To subdivide an organization, you use teams.
-
Organizations cannot contain users directly. You must first add a team, and then add one or more users to each team.
NoteIndividual users can be added to specific repositories inside of an organization. Consequently, those users are not members of any team on the Repository Settings page. The Collaborators View on the Teams and Memberships page shows users who have direct access to specific repositories within the organization without needing to be part of that organization specifically.
-
Teams can be set up in organizations as just members who use the repositories and associated images, or as administrators with special privileges for managing the Organization.
Users can create their own organization to share repositories of container images. This can be done through the Project Quay UI, or by the Project Quay API if you have an OAuth token.
Creating an organization by using the UI
To create an organization in Quay, you can use the UI. You set an organization name and then manage repositories and teams under that namespace.
In context of organizations, the contact email is used for the following purposes:
-
Quota warnings notifications
-
Quota errors notifications
-
Organization account recovery
-
Billing notifications
Use the following procedure to create a new organization by using the UI.
-
Log in to your Project Quay registry.
-
Click Organization in the navigation pane.
-
Click Create Organization.
-
Enter an Organization Name, for example,
testorg. -
Optional: Enter an Email for the organization. If not specified, notifications default to the organization owners.
NoteMultiple organizations can share the same organization email address, such as a team distribution list. By default, the address cannot match a user account email unless
FEATURE_ORG_SHARED_EMAILis enabled. -
Click Create.
Now, your example organization should populate under the Organizations page.
Creating an organization by using the Project Quay API
To create an organization in Project Quay, you can call the organization API endpoint with an OAuth access token.
-
You have created an OAuth access token.
-
Enter the following command to create a new organization by using the
POST /api/v1/organization/endpoint:$ curl -X POST -H "Authorization: Bearer <bearer_token>" -H "Content-Type: application/json" -d '{ "name": "<new_organization_name>" }' "https://<quay-server.example.com>/api/v1/organization/"Example output"Created" -
After creation, you can change organization details, such as adding an email address, with the
PUT /api/v1/organization/{orgname}command. For example:$ curl -X PUT "https://<quay-server.example.com>/api/v1/organization/<orgname>" \ -H "Authorization: Bearer <access_token>" \ -H "Content-Type: application/json" \ -d '{ "email": "<org_email>", "invoice_email": <true/false>, "invoice_email_address": "<billing_email>" }'Example output{"name": "test", "email": "new-contact@test-org.com", "avatar": {"name": "test", "hash": "a15d479002b20f211568fd4419e76686d2b88a4980a5b4c4bc10420776c5f6fe", "color": "#aec7e8", "kind": "user"}, "is_admin": true, "is_member": true, "teams": {"owners": {"name": "owners", "description": "", "role": "admin", "avatar": {"name": "owners", "hash": "6f0e3a8c0eb46e8834b43b03374ece43a030621d92a7437beb48f871e90f8d90", "color": "#c7c7c7", "kind": "team"}, "can_view": true, "repo_count": 0, "member_count": 1, "is_synced": false}}, "ordered_teams": ["owners"], "invoice_email": true, "invoice_email_address": "billing@test-org.com", "tag_expiration_s": 1209600, "is_free_account": true, "quotas": [{"id": 2, "limit_bytes": 10737418240, "limits": [{"id": 1, "type": "Reject", "limit_percent": 90}]}], "quota_report": {"quota_bytes": 0, "configured_quota": 10737418240, "running_backfill": "complete", "backfill_status": "complete"}}
Organization settings
To manage organization settings in Quay, you can use the v2 UI. You can update organization details and related configuration options.
With Quay, some basic organization settings can be adjusted by using the UI. This includes adjusting general settings, such as the e-mail address associated with the organization, and time machine settings, which allows administrators to adjust when a tag is garbage collected after it is permanently deleted.
Use the following procedure to alter your organization settings by using the v2 UI.
-
On the v2 UI, click Organizations.
-
Click the name of the organization that you will create the robot account for, for example,
test-org. -
Click the Settings tab.
-
Optional. Enter or update the organization Email for the organization in the Email field. This email receives automated system alerts including quota warnings, security notifications, and build failures.
NoteMultiple organizations can share the same organization email address. By default, the address cannot match a user account email unless
FEATURE_ORG_SHARED_EMAILis enabled. -
Optional. Set the allotted time for the Time Machine feature to one of the following:
-
A few seconds
-
A day
-
7 days
-
14 days
-
A month
-
-
Click Save.
Deleting an organization by using the UI
To permanently delete an organization in Quay, you can use the v2 UI.
-
On the Organizations page, select the name of the organization you want to delete, for example,
testorg. -
Click the More Actions drop down menu.
-
Click Delete.
NoteOn the Delete page, there is a Search input box. With this box, users can search for specific organizations to ensure that they are properly scheduled for deletion. For example, if a user is deleting 10 organizations and they want to ensure that a specific organization was deleted, they can use the Search input box to confirm said organization is marked for deletion.
-
Confirm that you want to permanently delete the organization by typing confirm in the box.
-
Click Delete.
After deletion, you are returned to the Organizations page.
NoteYou can delete more than one organization at a time by selecting multiple organizations, and then clicking More Actions → Delete.
Deleting an organization by using the Project Quay API
To delete an organization in Project Quay, you can call the organization API endpoint with an OAuth access token.
-
You have created an OAuth access token.
-
Enter the following command to delete an organization by using the
DELETE /api/v1/organization/{orgname}endpoint:$ curl -X DELETE \ -H "Authorization: Bearer <bearer_token>" \ "https://<quay-server.example.com>/api/v1/organization/<organization_name>" -
The CLI does not return information when you delete an organization. To confirm deletion, you can check the Project Quay UI, or you can enter the
GET /api/v1/organization/{orgname}command to see if details are returned for the deleted organization:$ curl -X GET \ -H "Authorization: Bearer <bearer_token>" \ "<quay-server.example.com>/api/v1/organization/<organization_name>"Example output{"detail": "Not Found", "error_message": "Not Found", "error_type": "not_found", "title": "not_found", "type": "http://<quay-server.example.com>/api/v1/error/not_found", "status": 404}
Project Quay repository overview
A repository provides a central location for storing a related set of container images that share a namespace in Quay. You can group repositories under namespaces for individual users, teams, or organizations.
For example, you might have a namespace for your personal projects, one for your company, or one for a specific team within your organization.
Project Quay provides users with access controls for their repositories. Users can make a repository public, meaning that anyone can pull, or download, the images from it, or users can make it private, restricting access to authorized users or teams.
You can create a repository in Project Quay in several ways, depending on your use case:
-
You can push an image with the relevant
podmanordockercommand. -
You can use the Project Quay UI.
-
You can use the Project Quay API.
-
For OCI artifacts, for example, a large-language model (LLM) or machine learning application, you can use
skopeoororasto copy the artifact to your repository.
Creating a repository by using the UI
To create an image repository in Quay, you can use the UI. You select a namespace and set a repository name and visibility.
Use the following procedure to create a repository using the Quay UI.
-
Click Repositories on the navigation pane.
-
Click Create Repository.
-
Select a namespace, for example, quayadmin, and then enter a Repository name, for example,
testrepo.ImportantDo not use the following words in your repository name: *
build*trigger*tag*notificationWhen these words are used for repository names, users are unable access the repository, and are unable to permanently delete the repository. Attempting to delete these repositories returns the following error:
Failed to delete repository <repository_name>, HTTP404 - Not Found. -
Click Create.
Now, your example repository should populate under the Repositories page.
-
Optional. Click Settings → Repository visibility → Make private to set the repository to private.
Creating a repository by using Podman
To create a repository in Project Quay, you can push an image with Podman. The push creates the repository if it does not already exist.
If you push an image through the command-line interface (CLI) without first creating a repository on the UI, the created repository is set to Private.
-
You have download and installed the
podmanCLI. -
You have logged into your registry.
-
You have pulled an image, for example, busybox.
-
Pull a sample page from an example registry. For example:
$ sudo podman pull busyboxExample outputTrying to pull docker.io/library/busybox... Getting image source signatures Copying blob 4c892f00285e done Copying config 22667f5368 done Writing manifest to image destination Storing signatures 22667f53682a2920948d19c7133ab1c9c3f745805c14125859d20cede07f11f9 -
Tag the image on your local system with the new repository and image name. For example:
$ sudo podman tag docker.io/library/busybox quay-server.example.com/quayadmin/busybox:test -
Push the image to the registry. Following this step, you can use your browser to see the tagged image in your repository.
$ sudo podman push --tls-verify=false quay-server.example.com/quayadmin/busybox:testExample outputGetting image source signatures Copying blob 6b245f040973 done Copying config 22667f5368 done Writing manifest to image destination Storing signatures
Creating a repository by using Skopeo
To create a repository in Project Quay when Podman cannot pull an artifact type, you can use the skopeo copy command to copy the artifact from a source registry.
In some cases, the podman CLI tool is unable to pull certain artifact types, for example, application/x-mlmodel, or other AI/ML artifacts. Attempting to use podman pull with this artifact type results in the following error:
Error: parsing image configuration: unsupported image-specific operation on artifact with type "application/x-mlmodel"As an alternative, you can use skopeo copy to copy an artifact from one location to your Project Quay repository.
-
You have installed the
skopeoCLI. -
You have logged in to a source registry (in this example,
\registry.redhat.io) and have a valid authentication file (~/.docker/config.json). Alternatively, you can provide credentials by using the--src-usernameand--src-passwordparameters when running a command with theskopeoCLI. -
You have logged in to your Project Quay repository.
-
Depending on the size of your AI/ML artifact, you might have to prepare your registry to accept large artifacts.
-
Use the
skopeo copycommand on an artifact to copy the artifact to your Project Quay repository. For example:$ sudo skopeo copy --dest-tls-verify=false --all \ --src-username <source_username> --src-password <source_password> \ --src-authfile ~/.docker/config.json \ --dest-username <username> --dest-password <password> \ docker://registry.redhat.io/rhelai1/granite-8b-code-instruct:1.4-1739210683 \ docker://quay-server.example.com/<namespace>/granite-8b-code-instruct:latestwhere:
--dest-tls-verify=false-
Specifies that SSL/TLS verification for the destination registry is disabled. This parameter is optional.
--all-
Specifies that all image manifests are copied, including multi-architecture images. This parameter is optional.
--src-username/--src-password-
Specifies the source registry credentials. This parameter is optional. If you are not logged into a registry, you can pass in the source registry credentials with these parameters.
--src-authfile-
Specifies the path to your Docker authentication file. Typically located at
~/.docker/config.json. This parameter is optional. --dest-username/--dest-password-
Specifies your Project Quay registry username and password.
docker://registry.redhat.io/…-
Specifies the source image or artifact from the Red Hat container registry. Ensure that you are logged in to the registry and that you can pull the image.
docker://quay-server.example.com/…-
Specifies the URL of your Project Quay repository appended with a namespace and the name of the image.
Example outputGetting image source signatures Checking if image destination supports signatures Copying blob 9538fa2b8ad9 done | Copying blob 491ae95f59a2 done | Copying blob 01196d075d77 done | Copying blob e53a4633c992 done | Copying blob c266e9cfa731 done | Copying blob dae0e701d9b2 done | Copying blob 1e227a2c78d8 done | Copying blob 94ff9338861b done | Copying blob 2f2bba45146f done | Copying blob d3b4df07a0ce done | Copying blob f533a8dbb852 done | Copying config 44136fa355 done | Writing manifest to image destination Storing signatures
-
After you have pushed a machine learning artifact to your Project Quay repository, you can view tag information by using the UI or view model card information by using the UI.
Creating a repository by using the API
To create an image repository in Project Quay, you can use the API.
-
You have Created an OAuth access token.
-
Enter the following command to create a repository using the
POST /api/v1/repositoryendpoint:$ curl -X POST \ -H "Authorization: Bearer <bearer_token>" \ -H "Content-Type: application/json" \ -d '{ "repository": "<new_repository_name>", "visibility": "<private>", "description": "<This is a description of the new repository>." }' \ "https://quay-server.example.com/api/v1/repository"Example output{"namespace": "quayadmin", "name": "<new_repository_name>", "kind": "image"}
Deleting a repository by using the UI
To delete an image repository in Quay, you can use the UI. You remove the repository and its tags from the selected namespace.
-
You have created a repository.
-
On the Repositories page of the v2 UI, check the box of the repository that you want to delete, for example,
quayadmin/busybox. -
Click the Actions drop-down menu.
-
Click Delete.
-
Type confirm in the box, and then click Delete.
After deletion, you are returned to the Repositories page.
Deleting a repository by using the Project Quay API
To delete a repository from Project Quay, you can use the API.
-
You have Created an OAuth access token.
-
Enter the following command to delete a repository using the
DELETE /api/v1/repository/{repository}endpoint:$ curl -X DELETE -H "Authorization: Bearer <bearer_token>" "<quay-server.example.com>/api/v1/repository/<namespace>/<repository_name>" -
The CLI does not return information when deleting a repository from the CLI. To confirm deletion, you can check the Project Quay UI, or you can enter the following
GET /api/v1/repository/{repository}command to see if details are returned for the deleted repository:$ curl -X GET -H "Authorization: Bearer <bearer_token>" "<quay-server.example.com>/api/v1/repository/<namespace>/<repository_name>"Example output
{"detail": "Not Found", "error_message": "Not Found", "error_type": "not_found", "title": "not_found", "type": "http://quay-server.example.com/api/v1/error/not_found", "status": 404}
Project Quay Robot Account overview
A robot account provides automated, credential-based access to repositories in your registry, similar to OpenShift Container Platform service accounts. You can use robot accounts to grant container clients push and pull permissions without sharing personal credentials.
Setting up a Robot Account results in the following:
-
Credentials are generated for the Robot Account.
-
Repositories and images that the Robot Account can push and pull images from are identified.
-
Generated credentials can be copied and pasted to use with different container clients, such as Docker, Podman, Kubernetes, Mesos, and so on, to access each defined repository.
Each Robot Account is limited to a single user namespace or Organization. For example, the Robot Account could provide access to all repositories for the user quayadmin. However, it cannot provide access to repositories that are not in the user’s list of repositories.
Robot Accounts can be created using the Project Quay UI, or through the CLI using the Project Quay API. After creation, Project Quay administrators can leverage more advanced features with Robot Accounts, such as keyless authentication.
Creating a robot account by using the UI
To automate access to your repositories, you can create a robot account by using the UI. Robot accounts generate credentials that container clients can use to push and pull images without a personal login.
-
On the v2 UI, click Organizations.
-
Click the name of the organization that you create the robot account for, for example,
test-org. -
Click the Robot accounts tab → Create robot account.
-
In the Provide a name for your robot account box, enter a name, for example,
robot1. The name of your Robot Account becomes a combination of your username plus the name of the robot, for example,quayadmin+robot1 -
Optional. The following options are available if desired:
-
Add the robot account to a team.
-
Add the robot account to a repository.
-
Adjust the robot account’s permissions.
-
-
On the Review and finish page, review the information you have provided, then click Review and finish. The following alert appears: Successfully created robot account with robot name: <organization_name> + <robot_name>.
Alternatively, if you tried to create a robot account with the same name as another robot account, you might receive the following error message: Error creating robot account.
-
Optional. You can click Expand or Collapse to reveal descriptive information about the robot account.
-
Optional. You can change permissions of the robot account by clicking the kebab menu → Set repository permissions. The following message appears: Successfully updated repository permission.
-
Optional. You can click the name of your robot account to obtain the following information:
-
Robot Account: Select this obtain the robot account token. You can regenerate the token by clicking Regenerate token now.
-
Kubernetes Secret: Select this to download credentials in the form of a Kubernetes pull secret YAML file.
-
Podman: Select this to copy a full
podman logincommand line that includes the credentials. -
Docker Configuration: Select this to copy a full
docker logincommand line that includes the credentials.
-
Creating a robot account by using the Project Quay API
To automate access to your repositories, you can create a robot account by using the Project Quay API. You can create robot accounts for an organization or for your own user account.
-
You have created an OAuth access token.
-
Enter the following command to create a new robot account for an organization by using the
PUT /api/v1/organization/{orgname}/robots/{robot_shortname}endpoint:$ curl -X PUT -H "Authorization: Bearer <bearer_token>" "https://<quay-server.example.com>/api/v1/organization/<organization_name>/robots/<robot_name>"Example output{"name": "orgname+robot-name", "created": "Fri, 10 May 2024 15:11:00 -0000", "last_accessed": null, "description": "", "token": "<example_secret>", "unstructured_metadata": null} -
Enter the following command to create a new robot account for the current user with the
PUT /api/v1/user/robots/{robot_shortname}endpoint:$ curl -X PUT -H "Authorization: Bearer <bearer_token>" "https://<quay-server.example.com>/api/v1/user/robots/<robot_name>"Example output{"name": "quayadmin+robot-name", "created": "Fri, 10 May 2024 15:24:57 -0000", "last_accessed": null, "description": "", "token": "<example_secret>", "unstructured_metadata": null}
Bulk managing robot account repository access
To grant a robot account access to several repositories at once, you can set its permissions in bulk by using the UI.
-
You have created a robot account.
-
You have created multiple repositories under a single organization.
-
On the Project Quay v2 UI landing page, click Organizations in the navigation pane.
-
On the Organizations page, select the name of the organization that has multiple repositories. The number of repositories under a single organization can be found under the Repo Count column.
-
On your organization’s page, click Robot accounts.
-
For the robot account that you want to add to multiple repositories, click the kebab icon → Set repository permissions.
-
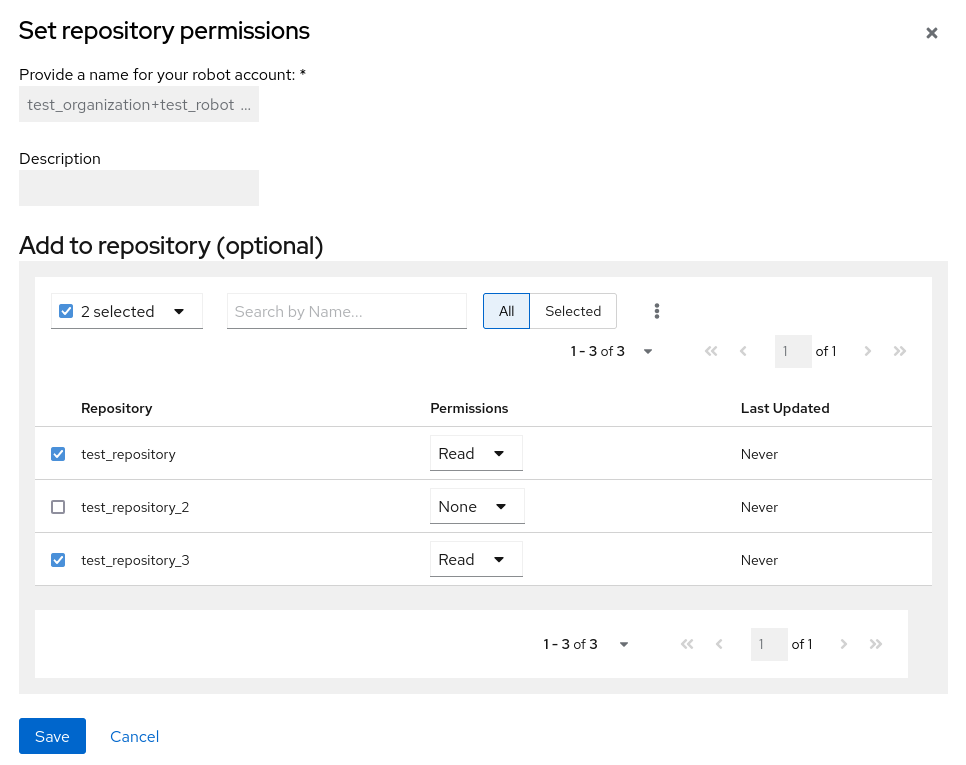
On the Set repository permissions page, check the boxes of the repositories that you want to add the robot account to. For example:
-
Set the permissions for the robot account, for example, None, Read, Write, Admin.
-
Click save. An alert that says Success alert: Successfully updated repository permission appears on the Set repository permissions page, confirming the changes.
-
Return to the Organizations → Robot accounts page. Now, the Repositories column of your robot account shows the number of repositories that the robot account has been added to.
Disabling robot accounts
To prevent users from creating new robot accounts, you can disable robot account creation in your Project Quay configuration file. This setting also blocks robot accounts required for repository mirroring, so review your mirroring setup first.
|
Important
|
Robot accounts are mandatory for repository mirroring. Setting the |
-
You have created multiple robot accounts.
-
Update your
config.yamlfield to add theROBOTS_DISALLOWvariable, for example:ROBOTS_DISALLOW: true -
Restart your Project Quay deployment.
-
Navigate to your Project Quay repository.
-
Click the name of a repository.
-
In the navigation pane, click Robot Accounts.
-
Click Create Robot Account.
-
Enter a name for the robot account, for example,
<organization-name/username>+<robot-name>. -
Click Create robot account to confirm creation. The following message appears:
Cannot create robot account. Robot accounts have been disabled. Please contact your administrator.
-
On the command-line interface (CLI), attempt to log in as one of the robot accounts by entering the following command:
$ podman login -u="<organization-name/username>+<robot-name>" -p="KETJ6VN0WT8YLLNXUJJ4454ZI6TZJ98NV41OE02PC2IQXVXRFQ1EJ36V12345678" <quay-server.example.com>The following error message is returned:
Error: logging into "<quay-server.example.com>": invalid username/password -
You can pass in the
log-level=debugflag to confirm that robot accounts have been deactivated:$ podman login -u="<organization-name/username>+<robot-name>" -p="KETJ6VN0WT8YLLNXUJJ4454ZI6TZJ98NV41OE02PC2IQXVXRFQ1EJ36V12345678" --log-level=debug <quay-server.example.com>... DEBU[0000] error logging into "quay-server.example.com": unable to retrieve auth token: invalid username/password: unauthorized: Robot accounts have been disabled. Please contact your administrator.
Regenerating a robot account token by using the Project Quay API
To replace a compromised or outdated robot account credential, you can regenerate a robot account token by using the Project Quay API for organization or user robots.
-
You have created an OAuth access token.
-
Enter the following command to regenerate a robot account token for an organization by using the
POST /api/v1/organization/{orgname}/robots/{robot_shortname}/regenerateendpoint:$ curl -X POST \ -H "Authorization: Bearer <bearer_token>" \ "<quay-server.example.com>/api/v1/organization/<orgname>/robots/<robot_shortname>/regenerate"Example output{"name": "test-org+test", "created": "Fri, 10 May 2024 17:46:02 -0000", "last_accessed": null, "description": "", "token": "<example_secret>"} -
Enter the following command to regenerate a robot account token for the current user by using the
POST /api/v1/user/robots/{robot_shortname}/regenerateendpoint:$ curl -X POST \ -H "Authorization: Bearer <bearer_token>" \ "<quay-server.example.com>/api/v1/user/robots/<robot_shortname>/regenerate"Example output{"name": "quayadmin+test", "created": "Fri, 10 May 2024 14:12:11 -0000", "last_accessed": null, "description": "", "token": "<example_secret>"}
Deleting a robot account by using the UI
To remove a robot account that you no longer need, you can delete it by using the Project Quay UI.
-
Log into your Project Quay registry:
-
Click the name of the Organization that has the robot account.
-
Click Robot accounts.
-
Check the box of the robot account to be deleted.
-
Click the kebab menu.
-
Click Delete.
-
Type
confirminto the textbox, then click Delete.
Deleting a robot account by using the Project Quay API
To remove a robot account that you no longer need, you can delete it by using the Project Quay API. You can delete robot accounts that belong to an organization or to your own user account.
-
You have created an OAuth access token.
-
Enter the following command to delete a robot account for an organization by using the
DELETE /api/v1/organization/{orgname}/robots/{robot_shortname}endpoint:$ curl -X DELETE \ -H "Authorization: Bearer <bearer_token>" \ "<quay-server.example.com>/api/v1/organization/<organization_name>/robots/<robot_shortname>" -
The CLI does not return information when deleting a robot account with the API. To confirm deletion, you can check the Project Quay UI, or you can enter the following
GET /api/v1/organization/{orgname}/robotscommand to see if details are returned for the robot account:$ curl -X GET -H "Authorization: Bearer <bearer_token>" "https://<quay-server.example.com>/api/v1/organization/<organization_name>/robots"Example output{"robots": []} -
Enter the following command to delete a robot account for the current user with the
DELETE /api/v1/user/robots/{robot_shortname}endpoint:$ curl -X DELETE \ -H "Authorization: Bearer <bearer_token>" \ "<quay-server.example.com>/api/v1/user/robots/<robot_shortname>" -
The CLI does not return information when deleting a robot account for the current user with the API. To confirm deletion, you can check the Project Quay UI, or you can enter the following
GET /api/v1/user/robots/{robot_shortname}command to see if details are returned for the robot account:$ curl -X GET \ -H "Authorization: Bearer <bearer_token>" \ "<quay-server.example.com>/api/v1/user/robots/<robot_shortname>"Example output{"message":"Could not find robot with specified username"}
Keyless authentication with robot accounts
With keyless authentication in Project Quay, you can exchange an OIDC token for a short-lived robot account token that expires after one hour.
In previous versions of Project Quay, robot account tokens were valid for the lifetime of the token unless deleted or regenerated. Tokens that do not expire have security implications for users who do not want to store long-term passwords or manage the deletion or regeneration of authentication tokens.
Keyless authentication reduces the risk of robot token exposure by removing exchanged tokens after one hour.
Configuring keyless authentication with robot accounts is a multi-step procedure that requires setting a robot federation, generating an OAuth2 token from your OIDC provider, and exchanging the OAuth2 token for a robot account access token.
Generating an OAuth2 token with Red Hat Single Sign-On
To exchange an external OIDC token for a Project Quay robot account token, you can first generate an OAuth2 token by using Red Hat Single Sign-On.
-
On the Red Hat Single Sign-On UI:
-
Click Clients and then the name of the application or service that can request authentication of a user.
-
On the Settings page of your client, ensure that the following options are set or enabled:
-
Client ID
-
Valid redirect URI
-
Client authentication
-
Authorization
-
Standard flow
-
Direct access grants
NoteSettings can differ depending on your setup.
-
-
On the Credentials page, store the Client Secret for future use.
-
On the Users page, click Add user and enter a username, for example,
service-account-quaydev. Then, click Create. -
Click the name of the user, for example service-account-quaydev on the Users page.
-
Click the Credentials tab → Set password → and provide a password for the user. If warranted, you can make this password temporary by selecting the Temporary option.
-
Click the Realm settings tab → OpenID Endpoint Configuration. Store the
/protocol/openid-connect/tokenendpoint. For example:http://localhost:8080/realms/master/protocol/openid-connect/token
-
-
On a web browser, navigate to the following URL:
http://<keycloak_url>/realms/<realm_name>/protocol/openid-connect/auth?response_type=code&client_id=<client_id> -
When prompted, log in with the service-account-quaydev user and the temporary password you set. Complete the login by providing the required information and setting a permanent password if necessary.
-
You are redirected to the URI address provided for your client. For example:
https://localhost:3000/cb?session_state=5c9bce22-6b85-4654-b716-e9bbb3e755bc&iss=http%3A%2F%2Flocalhost%3A8080%2Frealms%2Fmaster&code=ea5b76eb-47a5-4e5d-8f71-0892178250db.5c9bce22-6b85-4654-b716-e9bbb3e755bc.cdffafbc-20fb-42b9-b254-866017057f43Take note of the
codeprovided in the address. For example:code=ea5b76eb-47a5-4e5d-8f71-0892178250db.5c9bce22-6b85-4654-b716-e9bbb3e755bc.cdffafbc-20fb-42b9-b254-866017057f43NoteThis is a temporary code that can only be used one time. If necessary, you can refresh the page or revisit the URL to obtain another code.
-
On your terminal, use the following
curl -X POSTcommand to generate a temporary OAuth2 access token:$ curl -X POST "http://localhost:8080/realms/master/protocol/openid-connect/token" \ -H "Content-Type: application/x-www-form-urlencoded" \ -d "client_id=quaydev" \ -d "client_secret=<client_secret>" \ -d "grant_type=authorization_code" \ -d "code=ea5b76eb-47a5-4e5d-8f71-0892178250db.5c9bce22-6b85-4654-b716-e9bbb3e755bc.cdffafbc-20fb-42b9-b254-866017057f43"where:
http://localhost:8080/realms/master/protocol/openid-connect/token-
Specifies the
protocol/openid-connect/tokenendpoint found on the Realm settings page of the Red Hat Single Sign-On UI. quaydev-
Specifies the Client ID used for this procedure.
<client_secret>-
Specifies the Client Secret for the Client ID.
ea5b76eb-47a5-4e5d-8f71-0892178250db.5c9bce22-6b85-4654-b716-e9bbb3e755bc.cdffafbc-20fb-42b9-b254-866017057f43-
Specifies the code returned from the redirect URI.
Example output{"access_token":"<access_token>...", "expires_in":60,"refresh_expires_in":1800,"refresh_token":"<refresh_token>","token_type":"Bearer","not-before-policy":0,"session_state":"5c9bce22-6b85-4654-b716-e9bbb3e755bc","scope":"profile email"}
-
Store the
access_tokenfrom the previous step so that you can exchange it for a Project Quay robot account token in the following procedure.
Setting up a robot account federation by using the UI
To configure robot account federation in Project Quay, you can map an OIDC issuer and subject to a robot account in the v2 UI.
This procedure uses Red Hat Single Sign-On, which is based on the Keycloak project. The steps, and the information used to configure a robot account federation, vary depending on your OIDC provider.
-
You have created an organization. The following example uses
fed_test. -
You have created a robot account. The following example uses
fest_test+robot1. -
You have configured OIDC for your Project Quay deployment. The following example uses Red Hat Single Sign-On.
-
On the Red Hat Single Sign-On main page:
-
Select the appropriate realm that is authenticated for use with Project Quay. Store the issuer URL, for example,
https://keycloak-auth-realm.quayadmin.org/realms/quayrealm. -
Click Users → the name of the user to be linked with the robot account for authentication. You must use the same user account that you used when generating the OAuth2 access token.
-
On the Details page, store the ID of the user, for example,
449e14f8-9eb5-4d59-a63e-b7a77c75f770.NoteThe information collected in this step varies depending on your OIDC provider. For example, with Red Hat Single Sign-On, the ID of a user is used as the Subject to configure the robot account federation in a subsequent step. For a different OIDC provider, like Microsoft Entra ID, this information is stored as the Subject.
-
-
On your Project Quay registry:
-
Navigate to Organizations and click the name of your organization, for example, fed_test.
-
Click Robot Accounts.
-
Click the menu kebab → Set robot federation.
-
Click the + symbol.
-
In the popup window, include the following information:
-
Issuer URL:
https://keycloak-auth-realm.quayadmin.org/realms/quayrealm. For Red Hat Single Sign-On, this is the URL of your Red Hat Single Sign-On realm. This might vary depending on your OIDC provider. -
Subject:
449e14f8-9eb5-4d59-a63e-b7a77c75f770. For Red Hat Single Sign-On, the Subject is the ID of your Red Hat Single Sign-On user. This varies depending on your OIDC provider. For example, if you are using Microsoft Entra ID, the Subject is the Subject of your Entra ID user.
-
-
Click Save.
NoteThe Project Quay v2 UI federation modal accepts Issuer URL and Subject only.
-
Configuring federation audiences
To manage robot federation entries in Project Quay, you can use the robot federation API to set the issuer and subject that map an OIDC identity to a robot account.
Each robot federation entry maps an external OIDC identity (issuer and subject) to a Project Quay robot account. Starting in Project Quay {producty}, robot federation supports an optional audiences array on each entry for token audience validation during federated robot token exchange (GET /oauth2/federation/robot/token).
|
Important
|
In Project Quay 3.18, create and update requests persist |
When audiences is present in stored federation configuration, configure it to match the aud claim values your OIDC provider issues—for example, a custom API audience such as api://quay-api for Microsoft Entra ID v2.0 tokens, or your OIDC client ID for standard flows. For Microsoft Entra ID v2.0, use an application-specific audience rather than the Microsoft Graph audience.
-
You have created an organization and robot account.
-
You have configured OIDC for your Project Quay deployment.
-
You have the issuer URL and subject identifier from your OIDC provider.
-
Create or update the robot federation configuration by using
POST /api/v1/organization/{orgname}/robots/{robot_shortname}/federation. Includeissuerandsubjectin each federation entry. For example:$ curl -X POST "https://<quay-server.example.com>/api/v1/organization/fed_test/robots/robot1/federation" \ -H "Authorization: Bearer <your_access_token>" \ -H "Content-Type: application/json" \ -d '[ { "issuer": "https://login.microsoftonline.com/<tenant-id>/v2.0", "subject": "<user-object-id>" } ]' -
After you configure federation, exchange an external OIDC access token for a Project Quay robot token.
Exchanging an OAuth2 access token for a Project Quay robot account token
To authenticate with a federated robot account in Project Quay, you can exchange an OAuth2 access token for a short-lived robot token by using a Python script.
|
Note
|
The following example uses a Python script to exchange the OAuth2 access token for a Project Quay robot account token. |
-
You have the
python3CLI tool installed.
-
Save the following Python script in a
.pyfile, for example,robot_fed_token_auth.py:import requests import os TOKEN=os.environ.get('TOKEN') robot_user = "fed-test+robot1" def get_quay_robot_token(fed_token): URL = "https://<quay-server.example.com>/oauth2/federation/robot/token" response = requests.get(URL, auth=(robot_user,fed_token)) print(response) print(response.text) if __name__ == "__main__": get_quay_robot_token(TOKEN)where:
response = requests.get(URL, auth=(robot_user,fed_token))-
Specifies the request that retrieves the robot token. If your Project Quay deployment is using custom SSL/TLS certificates, the response must be
response = requests.get(URL,auth=(robot_user,fed_token),verify=False), which includes theverify=Falseflag.
-
Export the OAuth2 access token as
TOKEN. For example:$ export TOKEN=<export_token>... -
Run the
robot_fed_token_auth.pyscript by entering the following command:$ python3 robot_fed_token_auth.pyExample output<Response [200]> {"token": "string..."}ImportantThis token expires after one hour. After one hour, you must generate a new token.
-
Export the robot account access token as
QUAY_TOKEN. For example:$ export QUAY_TOKEN=<quay_token>
Pushing and pulling images
To verify federated robot account access in Project Quay, you can log in with the robot token and pull images that the robot is allowed to access.
-
You have exported the OAuth2 access token into a new robot account access token.
-
Log in to your Project Quay registry by using the
fed_test+robot1robot account and theQUAY_TOKENaccess token. For example:$ podman login <quay-server.example.com> -u fed_test+robot1 -p $QUAY_TOKEN -
Pull an image from a Project Quay repository for which the robot account has the proper permissions. For example:
$ podman pull <quay-server.example.com>/<repository_name>/<image_name>Example outputGetting image source signatures Copying blob 900e6061671b done Copying config 8135583d97 done Writing manifest to image destination Storing signatures 8135583d97feb82398909c9c97607159e6db2c4ca2c885c0b8f590ee0f9fe90d 0.57user 0.11system 0:00.99elapsed 68%CPU (0avgtext+0avgdata 78716maxresident)k 800inputs+15424outputs (18major+6528minor)pagefaults 0swaps -
Attempt to pull an image from a Project Quay repository for which the robot account does not have the proper permissions. For example:
$ podman pull <quay-server.example.com>/<different_repository_name>/<image_name>Example outputError: initializing source docker://quay-server.example.com/example_repository/busybox:latest: reading manifest in quay-server.example.com/example_repository/busybox: unauthorized: access to the requested resource is not authorizedAfter one hour, the credentials for this robot account expire. Afterwards, you must generate a new access token for this robot account.
Access management for Project Quay
Access management in Project Quay controls who can use repositories through users, teams, and robot accounts. You can set roles and permissions for collaborative registry workflows.
As a Quay user, you can create your own repositories and make them accessible to other users that are part of your instance. Alternatively, you can create an organization and associate a set of repositories directly to that organization, referred to as an organization repository.
Organization repositories differ from basic repositories in that the organization is intended to set up shared repositories through groups of users. In Quay, groups of users can be either Teams, or sets of users with the same permissions, or individual users. You can also allow access to user repositories and organization repositories by creating credentials associated with Robot Accounts. Robot Accounts make it easy for a variety of container clients, such as Docker or Podman, to access your repositories without requiring that the client have a user account.
Project Quay teams overview
A team in Quay is a group of users that share permissions, which simplifies access control and collaboration across organizations and repositories. You can assign a team specific permissions so that its members have appropriate access based on their roles.
Creating a team by using the UI
To create a team in Project Quay, you can use the UI. You add a team under an organization and then assign members and roles.
When you create a team for your organization you can select the team name, choose which repositories to make available to the team, and decide the level of access to the team.
Use the following procedure to create a team for your organization repository.
-
You have created an organization.
-
On the Project Quay v2 UI, click the name of an organization.
-
On your organization’s page, click Teams and membership.
-
Click the Create new team box.
-
In the Create team popup window, provide a name for your new team.
-
Optional. Provide a description for your new team.
-
Click Proceed. A new popup window appears.
-
Optional. Add this team to a repository, and set the permissions to one of the following:
-
None. Team members have no permission to the repository.
-
Read. Team members can view and pull from the repository.
-
Write. Team members can read (pull) from and write (push) to the repository.
-
Admin. Full access to pull from, and push to, the repository, plus the ability to do administrative tasks associated with the repository.
-
-
Optional. Add a team member or robot account. To add a team member, enter the name of their Project Quay account.
-
Review and finish the information, then click Review and Finish. The new team appears under the Teams and membership page.
Creating a team by using the API
To create a team for an organization in Project Quay, you can use the API. You can set the team name, repository access, and permission level.
-
You have created an organization.
-
You have Created an OAuth access token.
-
Enter the following
PUT /api/v1/organization/{orgname}/team/{teamname}command to create a team for your organization:$ curl -k -X PUT -H 'Accept: application/json' -H 'Content-Type: application/json' -H "Authorization: Bearer <bearer_token>" --data '{"role": "creator"}' https://<quay-server.example.com>/api/v1/organization/<organization_name>/team/<team_name>Example output{"name": "example_team", "description": "", "can_view": true, "role": "creator", "avatar": {"name": "example_team", "hash": "dec209fd7312a2284b689d4db3135e2846f27e0f40fa126776a0ce17366bc989", "color": "#e7ba52", "kind": "team"}, "new_team": true}
Managing a team by using the UI
After you create a team in Quay, you can manage members, repository permissions, and team details in the UI. You can also delete a team that you no longer need.
Adding users to a team by using the UI
To add users to a team in Quay, you can use the UI. You invite members so they inherit the team’s repository permissions.
With administrative privileges to an Organization, you can add users and robot accounts to a team. When you add a user, Quay sends an email to that user. The user remains pending until they accept the invitation.
Use the following procedure to add users or robot accounts to a team.
-
On the Project Quay landing page, click the name of your Organization.
-
In the navigation pane, click Teams and Membership.
-
Select the menu kebab of the team that you want to add users or robot accounts to. Then, click Manage team members.
-
Click Add new member.
-
In the textbox, enter information for one of the following:
-
A username from an account on the registry.
-
The email address for a user account on the registry.
-
The name of a robot account. The name must be in the form of <organization_name>+<robot_name>.
NoteRobot Accounts are immediately added to the team. For user accounts, an invitation to join is mailed to the user. Until the user accepts that invitation, the user remains in the INVITED TO JOIN state. After the user accepts the email invitation to join the team, they move from the INVITED TO JOIN list to the MEMBERS list for the Organization.
-
-
Click Add member.
Setting a team role by using the UI
To assign a role to a team within a Quay organization, you can use the UI. Team roles determine a member’s permissions, such as administrative or contributor access.
-
You have created a team.
-
On the Project Quay landing page, click the name of your Organization.
-
In the navigation pane, click Teams and Membership.
-
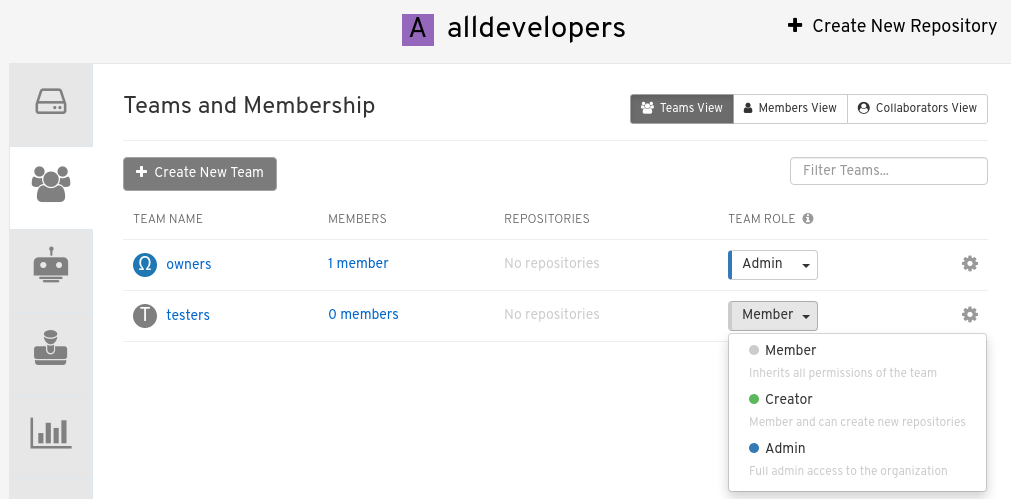
Select the TEAM ROLE drop-down menu, as shown in the following figure:
-
For the selected team, choose one of the following roles:
-
Admin. Full administrative access to the organization, including the ability to create teams, add members, and set permissions.
-
Member. Inherits all permissions set for the team.
-
Creator. All member permissions, plus the ability to create new repositories.
-
Managing team members and repository permissions
To manage team members and set repository permissions for a team, you can use the Quay UI. You can add or remove members, and adjust access levels for each repository.
-
On the Teams and membership page of your organization, you can also manage team members and set repository permissions.
-
Click the kebab menu, and select one of the following options:
-
Manage Team Members. On this page, you can view all members, team members, robot accounts, or users who have been invited. You can also add a new team member by clicking Add new member.
-
Set repository permissions. On this page, you can set the repository permissions to one of the following:
-
None. Team members have no permission to the repository.
-
Read. Team members can view and pull from the repository.
-
Write. Team members can read (pull) from and write (push) to the repository.
-
Admin. Full access to pull from, and push to, the repository, plus the ability to do administrative tasks associated with the repository.
-
-
Delete. This popup window allows you to delete the team by clicking Delete.
-
Viewing additional information about a team
To review team details in Quay, you can use the Teams and membership page. You can switch among team, members, and collaborators views.
Use the following procedure to view general information about the team.
-
On the Teams and membership page of your organization, you can click the one of the following options to reveal more information about teams, members, and collaborators:
-
Team View. This menu shows all team names, the number of members, the number of repositories, and the role for each team.
-
Members View. This menu shows all usernames of team members, the teams that they are part of, the repository permissions of the user.
-
Collaborators View. This menu shows repository collaborators. Collaborators are users that do not belong to any team in the organization, but who have direct permissions on one or more repositories belonging to the organization.
-
Managing a team by using the Project Quay API
You can manage teams in Project Quay by using the API. You can view permissions, add or remove members, and delete organization teams.
The following modules show you how to manage a team by using the Project Quay API.
Managing team members and repository permissions by using the API
To add, invite, or remove members of an organization team in Project Quay, you can use the team member API endpoints with an OAuth access token.
-
You have created an OAuth access token.
-
Enter the
PUT /api/v1/organization/{orgname}/team/{teamname}/members/{membername}command to add or invite a member to an existing team:$ curl -X PUT \ -H "Authorization: Bearer <your_access_token>" \ "<quay-server.example.com>/api/v1/organization/<organization_name>/team/<team_name>/members/<member_name>"Example output{"name": "testuser", "kind": "user", "is_robot": false, "avatar": {"name": "testuser", "hash": "d51d17303dc3271ac3266fb332d7df919bab882bbfc7199d2017a4daac8979f0", "color": "#5254a3", "kind": "user"}, "invited": false} -
Enter the
DELETE /api/v1/organization/{orgname}/team/{teamname}/members/{membername}command to remove a member of a team:$ curl -X DELETE \ -H "Authorization: Bearer <your_access_token>" \ "<quay-server.example.com>/api/v1/organization/<organization_name>/team/<team_name>/members/<member_name>"This command does not return output in the CLI. To ensure that a member has been deleted, you can enter the
GET /api/v1/organization/{orgname}/team/{teamname}/memberscommand and ensure that the member is not returned in the output.$ curl -X GET \ -H "Authorization: Bearer <your_access_token>" \ "<quay-server.example.com>/api/v1/organization/<organization_name>/team/<team_name>/members"Example output{"name": "owners", "members": [{"name": "quayadmin", "kind": "user", "is_robot": false, "avatar": {"name": "quayadmin", "hash": "b28d563a6dc76b4431fc7b0524bbff6b810387dac86d9303874871839859c7cc", "color": "#17becf", "kind": "user"}, "invited": false}, {"name": "test-org+test", "kind": "user", "is_robot": true, "avatar": {"name": "test-org+test", "hash": "aa85264436fe9839e7160bf349100a9b71403a5e9ec684d5b5e9571f6c821370", "color": "#8c564b", "kind": "robot"}, "invited": false}], "can_edit": true} -
You can enter the
PUT /api/v1/organization/{orgname}/team/{teamname}/invite/{email}command to invite a user, by email address, to an existing team:$ curl -X PUT \ -H "Authorization: Bearer <your_access_token>" \ "<quay-server.example.com>/api/v1/organization/<organization_name>/team/<team_name>/invite/<email>" -
You can enter the
DELETE /api/v1/organization/{orgname}/team/{teamname}/invite/{email}command to delete the invite of an email address to join a team. For example:$ curl -X DELETE \ -H "Authorization: Bearer <your_access_token>" \ "<quay-server.example.com>/api/v1/organization/<organization_name>/team/<team_name>/invite/<email>"
Setting the role of a team within an organization by using the API
To view repository permissions for a team or set a team’s role in an Project Quay organization, you can use the organization team API endpoints with an OAuth access token.
-
You have created an OAuth access token.
-
Enter the following
GET /api/v1/organization/{orgname}/team/{teamname}/permissionscommand to return a list of repository permissions for the organization’s team. Note that your team must have been added to a repository for this command to return information.$ curl -X GET \ -H "Authorization: Bearer <your_access_token>" \ "<quay-server.example.com>/api/v1/organization/<organization_name>/team/<team_name>/permissions"Example output{"permissions": [{"repository": {"name": "api-repo", "is_public": true}, "role": "admin"}]} -
You can create or update a team within an organization to have a specified role of admin, member, or creator using the
PUT /api/v1/organization/{orgname}/team/{teamname}command. For example:$ curl -X PUT \ -H "Authorization: Bearer <your_access_token>" \ -H "Content-Type: application/json" \ -d '{ "role": "<role>" }' \ "<quay-server.example.com>/api/v1/organization/<organization_name>/team/<team_name>"Example output{"name": "testteam", "description": "", "can_view": true, "role": "creator", "avatar": {"name": "testteam", "hash": "827f8c5762148d7e85402495b126e0a18b9b168170416ed04b49aae551099dc8", "color": "#ff7f0e", "kind": "team"}, "new_team": false}
Deleting a team within an organization by using the API
To delete a team from an organization in Project Quay, you can use the organization team API endpoint with an OAuth access token.
-
You have created an OAuth access token.
-
You can delete a team within an organization by entering the
DELETE /api/v1/organization/{orgname}/team/{teamname}command:$ curl -X DELETE \ -H "Authorization: Bearer <your_access_token>" \ "<quay-server.example.com>/api/v1/organization/<organization_name>/team/<team_name>"This command does not return output in the CLI.
Creating and managing default permissions by using the UI
To grant access automatically when users create repositories in Project Quay, you can configure default permissions in the UI. Default permissions apply to a selected user, robot, or team in addition to the repository creator.
-
Click the name of an organization.
-
Click Default permissions.
-
Click Create default permissions. A toggle drawer appears.
-
Select either Anyone or Specific user to create a default permission when a repository is created.
-
If selecting Anyone, the following information must be provided:
-
Applied to. Search, invite, or add a user/robot/team.
-
Permission. Set the permission to one of Read, Write, or Admin.
-
-
If selecting Specific user, the following information must be provided:
-
Repository creator. Provide either a user or robot account.
-
Applied to. Provide a username, robot account, or team name.
-
Permission. Set the permission to one of Read, Write, or Admin.
-
-
-
Click Create default permission. A confirmation box appears, returning the following alert: Successfully created default permission for creator.
Creating and managing default permissions by using the API
To create, update, or delete default permissions for an Project Quay organization, you can use the API. Default permissions grant access when a repository is created.
-
You have Created an OAuth access token.
-
Enter the following command to create a default permission with the
POST /api/v1/organization/{orgname}/prototypesendpoint:$ curl -X POST -H "Authorization: Bearer <bearer_token>" -H "Content-Type: application/json" --data '{ "role": "<admin_read_or_write>", "delegate": { "name": "<username>", "kind": "user" }, "activating_user": { "name": "<robot_name>" } }' https://<quay-server.example.com>/api/v1/organization/<organization_name>/prototypesExample output{"activating_user": {"name": "test-org+test", "is_robot": true, "kind": "user", "is_org_member": true, "avatar": {"name": "test-org+test", "hash": "aa85264436fe9839e7160bf349100a9b71403a5e9ec684d5b5e9571f6c821370", "color": "#8c564b", "kind": "robot"}}, "delegate": {"name": "testuser", "is_robot": false, "kind": "user", "is_org_member": false, "avatar": {"name": "testuser", "hash": "f660ab912ec121d1b1e928a0bb4bc61b15f5ad44d5efdc4e1c92a25e99b8e44a", "color": "#6b6ecf", "kind": "user"}}, "role": "admin", "id": "977dc2bc-bc75-411d-82b3-604e5b79a493"} -
Enter the following command to update a default permission using the
PUT /api/v1/organization/{orgname}/prototypes/{prototypeid}endpoint, for example, if you want to change the permission type. You must include the ID that was returned when you created the policy.$ curl -X PUT \ -H "Authorization: Bearer <bearer_token>" \ -H "Content-Type: application/json" \ --data '{ "role": "write" }' \ https://<quay-server.example.com>/api/v1/organization/<organization_name>/prototypes/<prototypeid>Example output{"activating_user": {"name": "test-org+test", "is_robot": true, "kind": "user", "is_org_member": true, "avatar": {"name": "test-org+test", "hash": "aa85264436fe9839e7160bf349100a9b71403a5e9ec684d5b5e9571f6c821370", "color": "#8c564b", "kind": "robot"}}, "delegate": {"name": "testuser", "is_robot": false, "kind": "user", "is_org_member": false, "avatar": {"name": "testuser", "hash": "f660ab912ec121d1b1e928a0bb4bc61b15f5ad44d5efdc4e1c92a25e99b8e44a", "color": "#6b6ecf", "kind": "user"}}, "role": "write", "id": "977dc2bc-bc75-411d-82b3-604e5b79a493"} -
You can delete the permission by entering the
DELETE /api/v1/organization/{orgname}/prototypes/{prototypeid}command:curl -X DELETE \ -H "Authorization: Bearer <bearer_token>" \ -H "Accept: application/json" \ https://<quay-server.example.com>/api/v1/organization/<organization_name>/prototypes/<prototype_id>This command does not return an output. Instead, you can obtain a list of all permissions by entering the
GET /api/v1/organization/{orgname}/prototypescommand:$ curl -X GET \ -H "Authorization: Bearer <bearer_token>" \ -H "Accept: application/json" \ https://<quay-server.example.com>/api/v1/organization/<organization_name>/prototypesExample output{"prototypes": []}
Adjusting access settings for a repository by using the UI
To change access for a user or robot account on a repository, you can use the Quay UI. You can set Read, Write, or Admin permissions.
-
You have created a user account or robot account.
-
Log into Quay.
-
On the v2 UI, click Repositories.
-
Click the name of a repository, for example,
quayadmin/busybox. -
Click the Settings tab.
-
Optional. Click User and robot permissions. You can adjust the settings for a user or robot account by clicking the dropdown menu option under Permissions. You can change the settings to Read, Write, or Admin.
-
Read. The User or Robot Account can view and pull from the repository.
-
Write. The User or Robot Account can read (pull) from and write (push) to the repository.
-
Admin. The User or Robot account has access to pull from, and push to, the repository, plus the ability to do administrative tasks associated with the repository.
-
Adjusting access settings for a repository by using the API
To change or remove access for a user or robot account on a repository, you can use the Project Quay API. You can grant Read, Write, or Admin permissions, or delete an existing permission.
-
You have created a user account or robot account.
-
You have Created an OAuth access token.
-
Enter the following
PUT /api/v1/repository/{repository}/permissions/user/{username}command to change the permissions of a user:$ curl -X PUT \ -H "Authorization: Bearer <bearer_token>" \ -H "Content-Type: application/json" \ -d '{"role": "admin"}' \ https://<quay-server.example.com>/api/v1/repository/<namespace>/<repository>/permissions/user/<username>Example output{"role": "admin", "name": "quayadmin+test", "is_robot": true, "avatar": {"name": "quayadmin+test", "hash": "ca9afae0a9d3ca322fc8a7a866e8476dd6c98de543decd186ae090e420a88feb", "color": "#8c564b", "kind": "robot"}} -
To delete the current permission, you can enter the
DELETE /api/v1/repository/{repository}/permissions/user/{username}command:$ curl -X DELETE \ -H "Authorization: Bearer <bearer_token>" \ -H "Accept: application/json" \ https://<quay-server.example.com>/api/v1/repository/<namespace>/<repository>/permissions/user/<username>This command does not return any output in the CLI. Instead, you can confirm deletion by entering the
GET /api/v1/repository/{repository}/permissions/user/command:$ curl -X GET \ -H "Authorization: Bearer <bearer_token>" \ -H "Accept: application/json" \ https://<quay-server.example.com>/api/v1/repository/<namespace>/<repository>/permissions/user/<username>/Example output{"message":"User does not have permission for repo."}
Image tags overview
An image tag identifies a specific version or variant of a container image in Project Quay. You can use tags to manage versioning, rollbacks, environment-specific builds, and CI/CD workflows for your images.
Container images are typically composed of multiple layers that represent different parts of the image. Image tags have the following benefits:
-
Versioning and Releases: Image tags allow you to denote different versions or releases of an application or software. For example, you might have an image tagged as v1.0 to represent the initial release and v1.1 for an updated version. This helps in maintaining a clear record of image versions.
-
Rollbacks and Testing: If you encounter issues with a new image version, you can easily revert to a previous version by specifying its tag. This is helpful during debugging and testing phases.
-
Development Environments: Image tags are beneficial when working with different environments. You might use a dev tag for a development version, qa for quality assurance testing, and prod for production, each with their respective features and configurations.
-
Continuous Integration/Continuous Deployment (CI/CD): CI/CD pipelines often utilize image tags to automate the deployment process. New code changes can trigger the creation of a new image with a specific tag, enabling seamless updates.
-
Feature Branches: When multiple developers are working on different features or bug fixes, they can create distinct image tags for their changes. This helps in isolating and testing individual features.
-
Customization: You can use image tags to customize images with different configurations, dependencies, or optimizations, while keeping track of each variant.
-
Security and Patching: When security vulnerabilities are discovered, you can create patched versions of images with updated tags, ensuring that your systems are using the latest secure versions.
-
Dockerfile Changes: If you modify the Dockerfile or build process, you can use image tags to differentiate between images built from the previous and updated Dockerfiles.
Overall, image tags provide a structured way to manage and organize container images, enabling efficient development, deployment, and maintenance workflows.
Viewing image tag information by using the UI
To review details about an image tag, such as its digest, size, and vulnerabilities, you can open the tag’s Details page in the Project Quay v2 UI. You can also view the tag’s security report and package list from the same page.
-
You have pushed an image tag to a repository.
-
On the v2 UI, click Repositories.
-
Click the name of a repository.
-
Click the name of a tag. You are taken to the Details page of that tag. The page reveals the following information:
-
Name
-
Repository
-
Digest
-
Vulnerabilities
-
Creation
-
Modified
-
Size
-
Labels
-
How to fetch the image tag
-
-
Click Security Report to view the tag’s vulnerabilities. You can expand an advisory column to open up CVE data.
-
Click Packages to view the tag’s packages.
-
Click the name of the repository to return to the Tags page.
Viewing model card information by using the UI
To view model card information for a machine learning artifact in Project Quay, you can open the Model Card tab on the tag Details page in the UI.
Model cards are essentially markdown (.md) files with additional metadata that provide information about a machine learning application. To view model card information, a manifest must have an annotation that is defined in your config.yaml file (for example, application/x-mlmodel) and include a model card stored as a layer in the manifest. When these conditions are met, a Model Card tab appears on the Details page of a tag.
-
You have pushed an artifact of that annotation type, and it includes a model card (
.md) file.
-
Update your
config.yamlfile to include the following information:Example model card YAMLFEATURE_UI_MODELCARD: true UI_MODELCARD_ARTIFACT_TYPE: application/x-mlmodel UI_MODELCARD_ANNOTATION: org.opencontainers.image.description: "Model card metadata" UI_MODELCARD_LAYER_ANNOTATION: org.opencontainers.image.title: README.mdwhere:
FEATURE_UI_MODELCARD-
Specifies that the Model Card image tab in the UI is enabled.
UI_MODELCARD_ARTIFACT_TYPE-
Specifies the model card artifact type. In this example, the artifact type is
application/x-mlmodel. UI_MODELCARD_ANNOTATION-
Specifies that if an image does not have an
artifactTypedefined, this field is checked at the manifest level. If a matching annotation is found, the system then searches for a layer with an annotation matchingUI_MODELCARD_LAYER_ANNOTATION. This field is optional. UI_MODELCARD_LAYER_ANNOTATION-
Specifies that if an image has an
artifactTypedefined and multiple layers, this field is used to locate the specific layer containing the model card. This field is optional.
-
Push an artifact of that annotation type, and one that includes a model card (
.md) file, to your repository. -
On the v2 UI, click Repositories.
-
Click the name of a repository.
-
Click the name of a tag. You are taken to the Details page of that tag.
-
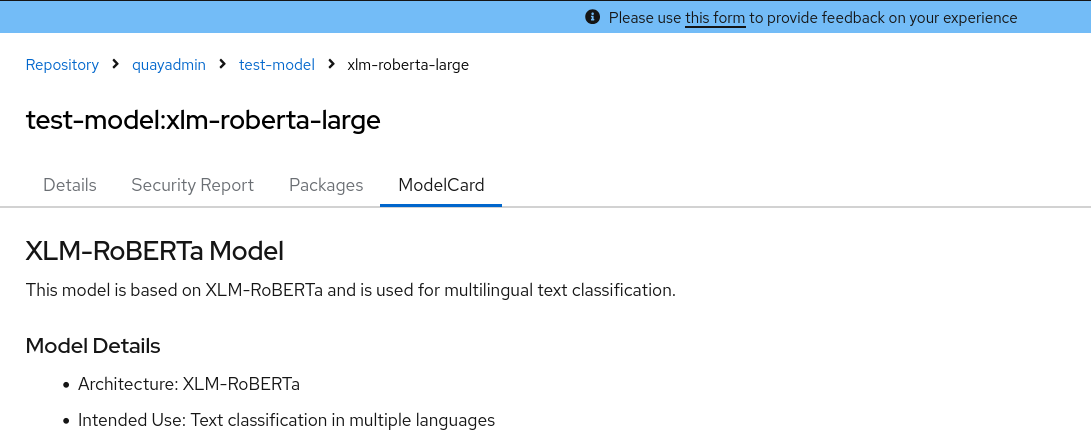
Click ModelCard to view information about the image. For example:
Viewing image tag information by using the API
To view image tag details for a repository in Project Quay, you can use the API.
-
You have pushed an image tag to a Project Quay repository.
-
You have Created an OAuth access token.
-
To obtain tag information, you must use the
GET /api/v1/repository/{repository}API endpoint and pass in theincludeTagsparameter. For example:$ curl -X GET \ -H "Authorization: Bearer <bearer_token>" \ -H "Accept: application/json" \ https://<quay-server.example.com>/api/v1/repository/<namespace>/<repository_name>?includeTags=trueExample output{"namespace": "quayadmin", "name": "busybox", "kind": "image", "description": null, "is_public": false, "is_organization": false, "is_starred": false, "status_token": "d8f5e074-690a-46d7-83c8-8d4e3d3d0715", "trust_enabled": false, "tag_expiration_s": 1209600, "is_free_account": true, "state": "NORMAL", "tags": {"example": {"name": "example", "size": 2275314, "last_modified": "Tue, 14 May 2024 14:48:51 -0000", "manifest_digest": "sha256:57583a1b9c0a7509d3417387b4f43acf80d08cdcf5266ac87987be3f8f919d5d"}, "test": {"name": "test", "size": 2275314, "last_modified": "Tue, 14 May 2024 14:04:48 -0000", "manifest_digest": "sha256:57583a1b9c0a7509d3417387b4f43acf80d08cdcf5266ac87987be3f8f919d5d"}}, "can_write": true, "can_admin": true} -
Alternatively, you can use the
GET /api/v1/repository/{repository}/tag/endpoint. For example:$ curl -X GET \ -H "Authorization: Bearer <bearer_token>" \ -H "Accept: application/json" \ https://<quay-server.example.com>/api/v1/repository/<namespace>/<repository_name>/tag/Example output{"tags": [{"name": "test-two", "reversion": true, "start_ts": 1718737153, "manifest_digest": "sha256:57583a1b9c0a7509d3417387b4f43acf80d08cdcf5266ac87987be3f8f919d5d", "is_manifest_list": false, "size": 2275314, "last_modified": "Tue, 18 Jun 2024 18:59:13 -0000"}, {"name": "test-two", "reversion": false, "start_ts": 1718737029, "end_ts": 1718737153, "manifest_digest": "sha256:0cd3dd6236e246b349e63f76ce5f150e7cd5dbf2f2f1f88dbd734430418dbaea", "is_manifest_list": false, "size": 2275317, "last_modified": "Tue, 18 Jun 2024 18:57:09 -0000", "expiration": "Tue, 18 Jun 2024 18:59:13 -0000"}, {"name": "test-two", "reversion": false, "start_ts": 1718737018, "end_ts": 1718737029, "manifest_digest": "sha256:0cd3dd6236e246b349e63f76ce5f150e7cd5dbf2f2f1f88dbd734430418dbaea", "is_manifest_list": false, "size": 2275317, "last_modified": "Tue, 18 Jun 2024 18:56:58 -0000", "expiration": "Tue, 18 Jun 2024 18:57:09 -0000"}, {"name": "sample_tag", "reversion": false, "start_ts": 1718736147, "manifest_digest": "sha256:57583a1b9c0a7509d3417387b4f43acf80d08cdcf5266ac87987be3f8f919d5d", "is_manifest_list": false, "size": 2275314, "last_modified": "Tue, 18 Jun 2024 18:42:27 -0000"}, {"name": "test-two", "reversion": false, "start_ts": 1717680780, "end_ts": 1718737018, "manifest_digest": "sha256:57583a1b9c0a7509d3417387b4f43acf80d08cdcf5266ac87987be3f8f919d5d", "is_manifest_list": false, "size": 2275314, "last_modified": "Thu, 06 Jun 2024 13:33:00 -0000", "expiration": "Tue, 18 Jun 2024 18:56:58 -0000"}, {"name": "tag-test", "reversion": false, "start_ts": 1717680378, "manifest_digest": "sha256:57583a1b9c0a7509d3417387b4f43acf80d08cdcf5266ac87987be3f8f919d5d", "is_manifest_list": false, "size": 2275314, "last_modified": "Thu, 06 Jun 2024 13:26:18 -0000"}, {"name": "example", "reversion": false, "start_ts": 1715698131, "manifest_digest": "sha256:57583a1b9c0a7509d3417387b4f43acf80d08cdcf5266ac87987be3f8f919d5d", "is_manifest_list": false, "size": 2275314, "last_modified": "Tue, 14 May 2024 14:48:51 -0000"}], "page": 1, "has_additional": false}
Adding a new image tag to an image by using the UI
To create an alias for an existing image, you can add a new tag to it from the Repositories page of the Project Quay v2 UI. The new tag points to the same image and appears immediately in the repository’s tag list.
-
On the Project Quay v2 UI dashboard, click Repositories in the navigation pane.
-
Click the name of a repository that has image tags.
-
Click the menu kebab, then click Add new tag.
-
Enter a name for the tag, then, click Create tag.
The new tag is now listed on the Repository Tags page.
Adding a new tag to an image tag to an image by using the API
To add a new tag or restore an older tag on an image in Project Quay, you can use the API.
-
You have Created an OAuth access token.
-
You can change which image a tag points to or create a new tag by using the
PUT /api/v1/repository/{repository}/tag/{tag}command:$ curl -X PUT \ -H "Authorization: Bearer <bearer_token>" \ -H "Content-Type: application/json" \ --data '{ "manifest_digest": "<manifest_digest>" }' \ https://<quay-server.example.com>/api/v1/repository/<namespace>/<repository_name>/tag/<tag>Example output"Updated" -
You can restore a repository tag to its previous image by using the
POST /api/v1/repository/{repository}/tag/{tag}/restorecommand. For example:$ curl -X POST \ -H "Authorization: Bearer <bearer_token>" \ -H "Content-Type: application/json" \ --data '{ "manifest_digest": <manifest_digest> }' \ quay-server.example.com/api/v1/repository/quayadmin/busybox/tag/test/restoreExample output{} -
To see a list of tags after creating a new tag you can use the
GET /api/v1/repository/{repository}/tag/command. For example:$ curl -X GET \ -H "Authorization: Bearer <bearer_token>" \ -H "Accept: application/json" \ https://<quay-server.example.com>/api/v1/repository/<namespace>/<repository_name>/tagExample output{"tags": [{"name": "test", "reversion": false, "start_ts": 1716324069, "manifest_digest": "sha256:57583a1b9c0a7509d3417387b4f43acf80d08cdcf5266ac87987be3f8f919d5d", "is_manifest_list": false, "size": 2275314, "last_modified": "Tue, 21 May 2024 20:41:09 -0000"}, {"name": "example", "reversion": false, "start_ts": 1715698131, "manifest_digest": "sha256:57583a1b9c0a7509d3417387b4f43acf80d08cdcf5266ac87987be3f8f919d5d", "is_manifest_list": false, "size": 2275314, "last_modified": "Tue, 14 May 2024 14:48:51 -0000"}, {"name": "example", "reversion": false, "start_ts": 1715697708, "end_ts": 1715698131, "manifest_digest": "sha256:57583a1b9c0a7509d3417387b4f43acf80d08cdcf5266ac87987be3f8f919d5d", "is_manifest_list": false, "size": 2275314, "last_modified": "Tue, 14 May 2024 14:41:48 -0000", "expiration": "Tue, 14 May 2024 14:48:51 -0000"}, {"name": "test", "reversion": false, "start_ts": 1715695488, "end_ts": 1716324069, "manifest_digest": "sha256:57583a1b9c0a7509d3417387b4f43acf80d08cdcf5266ac87987be3f8f919d5d", "is_manifest_list": false, "size": 2275314, "last_modified": "Tue, 14 May 2024 14:04:48 -0000", "expiration": "Tue, 21 May 2024 20:41:09 -0000"}, {"name": "test", "reversion": false, "start_ts": 1715631517, "end_ts": 1715695488, "manifest_digest": "sha256:57583a1b9c0a7509d3417387b4f43acf80d08cdcf5266ac87987be3f8f919d5d", "is_manifest_list": false, "size": 2275314, "last_modified": "Mon, 13 May 2024 20:18:37 -0000", "expiration": "Tue, 14 May 2024 14:04:48 -0000"}], "page": 1, "has_additional": false}
Adding and managing labels by using the UI
You can add key-value labels to an image tag in the Project Quay v2 UI to record metadata such as a release date or build source. Administrators can add, edit, or remove labels for any tag in a repository.
-
On the v2 UI dashboard, click Repositories in the navigation pane.
-
Click the name of a repository that has image tags.
-
Click the menu kebab for an image and select Edit labels.
-
In the Edit labels window, click Add new label.
-
Enter a label for the image tag using the
key=valueformat, for example,com.example.release-date=2023-11-14.NoteThe following error is returned when failing to use the
key=valueformat:Invalid label format, must be key value separated by =. -
Click the whitespace of the box to add the label.
-
Optional. Add a second label.
-
Click Save labels to save the label to the image tag. The following notification is returned:
Created labels successfully. -
Optional. Click the same image tag’s menu kebab → Edit labels → X on the label to remove it; alternatively, you can edit the text. Click Save labels. The label is now removed or edited.
Adding and managing labels by using the API
To add, list, retrieve, or delete labels on image manifests in Project Quay, you can use the repository manifest labels API endpoints with an OAuth 2 access token.
-
You have created an OAuth access token.
-
Use the
GET /api/v1/repository/{repository}/manifest/{manifestref}command to retrieve the details of a specific manifest in a repository:$ curl -X GET \ -H "Authorization: Bearer <bearer_token>" \ -H "Accept: application/json" \ https://<quay-server.example.com>/api/v1/repository/<repository>/manifest/<manifestref> -
Use the
GET /api/v1/repository/{repository}/manifest/{manifestref}/labelscommand to retrieve a list of labels for a specific manifest:$ curl -X GET \ -H "Authorization: Bearer <bearer_token>" \ -H "Accept: application/json" \ https://<quay-server.example.com>/api/v1/repository/<repository>/manifest/<manifestref>/labelsExample output{"labels": [{"id": "e9f717d2-c1dd-4626-802d-733a029d17ad", "key": "org.opencontainers.image.url", "value": "https://github.com/docker-library/busybox", "source_type": "manifest", "media_type": "text/plain"}, {"id": "2d34ec64-4051-43ad-ae06-d5f81003576a", "key": "org.opencontainers.image.version", "value": "1.36.1-glibc", "source_type": "manifest", "media_type": "text/plain"}]} -
Use the
GET /api/v1/repository/{repository}/manifest/{manifestref}/labels/{labelid}command to obtain information about a specific manifest:$ curl -X GET \ -H "Authorization: Bearer <bearer_token>" \ -H "Accept: application/json" \ https://<quay-server.example.com>/api/v1/repository/<repository>/manifest/<manifestref>/labels/<label_id>Example output{"id": "e9f717d2-c1dd-4626-802d-733a029d17ad", "key": "org.opencontainers.image.url", "value": "https://github.com/docker-library/busybox", "source_type": "manifest", "media_type": "text/plain"} -
Add an additional label to a manifest in a given repository with the
POST /api/v1/repository/{repository}/manifest/{manifestref}/labelscommand. For example:$ curl -X POST \ -H "Authorization: Bearer <bearer_token>" \ -H "Content-Type: application/json" \ --data '{ "key": "<key>", "value": "<value>", "media_type": "<media_type>" }' \ https://<quay-server.example.com>/api/v1/repository/<repository>/manifest/<manifestref>/labelsExample output{"label": {"id": "346593fd-18c8-49db-854f-4cb1fb76ff9c", "key": "example-key", "value": "example-value", "source_type": "api", "media_type": "text/plain"}} -
Delete a label by using the
DELETE /api/v1/repository/{repository}/manifest/{manifestref}/labels/{labelid}command:$ curl -X DELETE \ -H "Authorization: Bearer <bearer_token>" \ https://<quay-server.example.com>/api/v1/repository/<repository>/manifest/<manifestref>/labels/<labelid>This command does not return output in the CLI. You can list labels again to confirm that the label was removed.
Setting tag expirations
You can set image tags in Project Quay to expire at a chosen date and time. Expired tags are deleted from the repository according to your time machine retention settings.
This feature includes the following characteristics:
-
When an image tag expires, it is deleted from the repository. If it is the last tag for a specific image, the image is also set to be deleted.
-
Expiration is set on a per-tag basis. It is not set for a repository as a whole.
-
After a tag is expired or deleted, it is not immediately removed from the registry. This is contingent upon the allotted time designed in the time machine feature, which defines when the tag is permanently deleted, or garbage collected. By default, this value is set at 14 days, however the administrator can adjust this time to one of multiple options. Up until the point that garbage collection occurs, tags changes can be reverted.
The Project Quay superuser has no special privilege related to deleting expired images from user repositories. There is no central mechanism for the superuser to gather information and act on user repositories. It is up to the owners of each repository to manage expiration and the deletion of their images.
Tag expiration can be set up in one of three ways:
-
By setting the
quay.expires-after=label in the Dockerfile when the image is created. This sets a time to expire from when the image is built. This label only works for image manifests. -
By setting the
quay.expires-after=annotation label in the Dockerfile when the image is created.--annotationcan be passed in for both image manifests and image indexes. -
By selecting an expiration date on the Project Quay UI. For example:
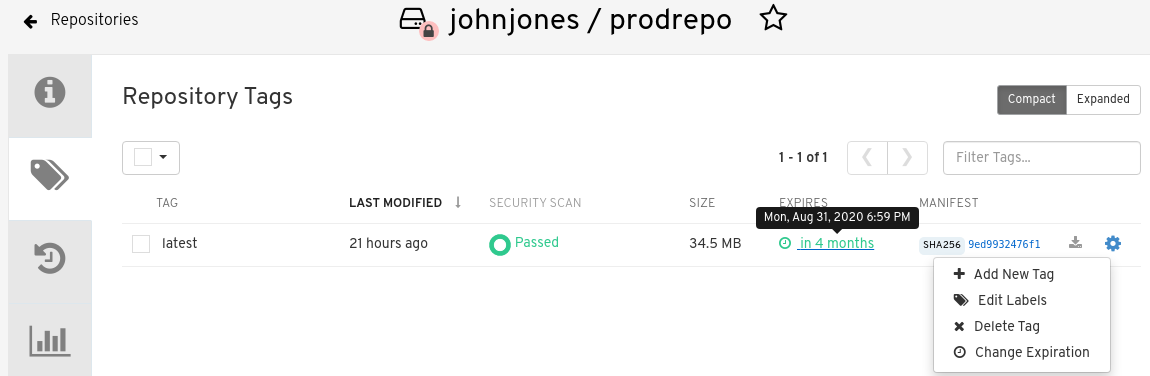
Setting tag expirations can help automate the cleanup of older or unused tags, helping to reduce storage space.
|
Note
|
Immutable tags are excluded from auto-pruning, but they can still expire. To retire a locked production tag, use per-tag expiration instead of an auto-prune policy. |
Setting tag expiration from a repository
To set a tag expiration date in Project Quay, you can use the repository Tags page. You can change expiration for one tag or for multiple tags at once.
-
On the Project Quay v2 UI dashboard, click Repositories in the navigation pane.
-
Click the name of a repository that has image tags.
-
Click the menu kebab for an image and select Change expiration.
-
Optional. Alternatively, you can bulk add expiration dates by clicking the box of multiple tags, and then select Actions → Set expiration.
-
In the Change Tags Expiration window, set an expiration date, specifying the day of the week, month, day of the month, and year. For example,
Wednesday, November 15, 2023. Alternatively, you can click the calendar button and manually select the date. -
Set the time, for example,
2:30 PM. -
Click Change Expiration to confirm the date and time. The following notification is returned:
Successfully set expiration for tag test to Nov 15, 2023, 2:26 PM. -
On the Project Quay v2 UI Tags page, you can see when the tag is set to expire. For example:
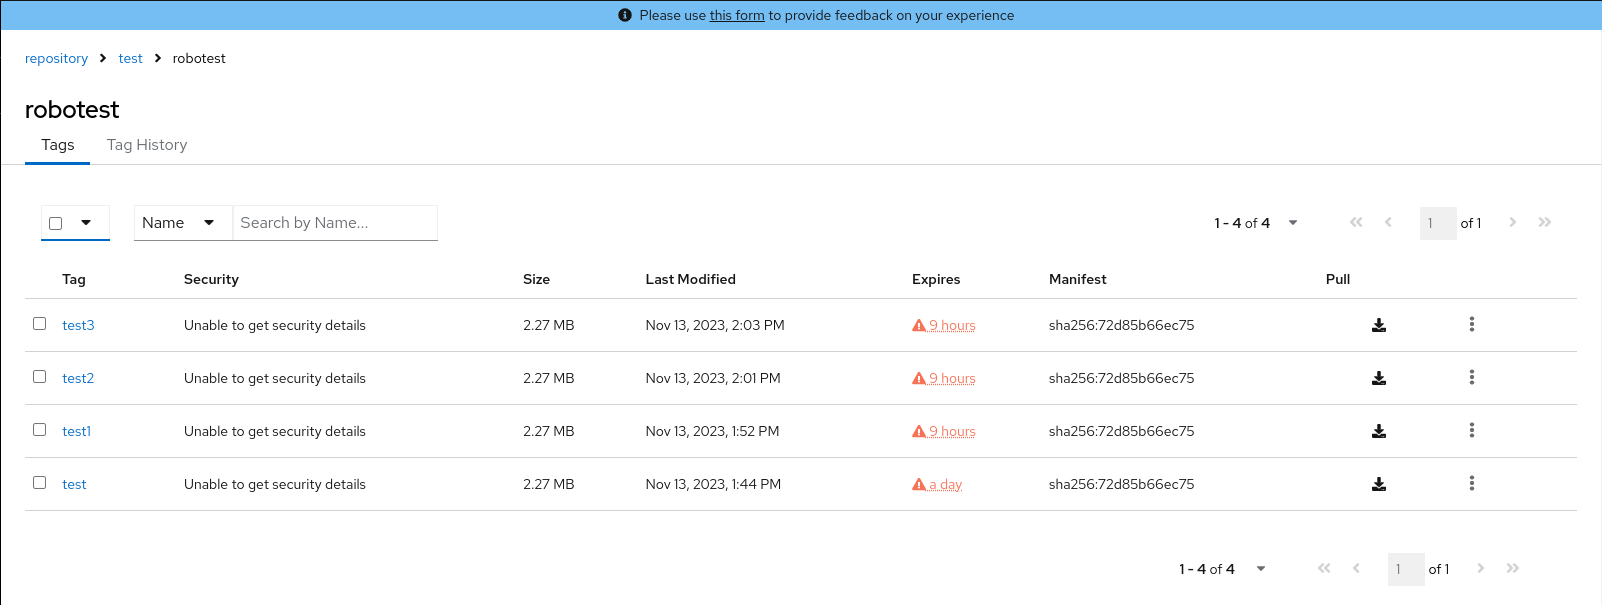
Setting tag expiration from a Dockerfile
To expire an image tag automatically in Project Quay, you can add a quay.expires-after label in a Dockerfile. Expiration starts when you push the image to the registry.
You can add a label, for example, quay.expires-after=20h to an image tag by using the docker label command to cause the tag to automatically expire after the time that is indicated. The following values for hours, days, or weeks are accepted:
-
1h -
2d -
3w
Expiration begins from the time that the image is pushed to the registry.
-
Enter the following
docker labelcommand to add a label to the desired image tag. The label should be in the formatquay.expires-after=20hto indicate that the tag should expire after 20 hours. Replace20hwith the desired expiration time. For example:$ docker label quay.expires-after=20h quay-server.example.com/quayadmin/<image>:<tag>
Setting tag expiration using annotations
To expire an image tag automatically in Project Quay, you can push an image with a quay.expires-after annotation. You can apply the annotation to manifests and indexes.
You can add an annotation, for example, quay.expires-after=20h, by using the --annotation flag when you push an image. The following values for hours, days, or weeks are accepted:
-
1h -
2d -
3w
Expiration begins from the time that the image is pushed to the registry.
|
Note
|
Using the |
-
You have downloaded the
orasCLI.
-
Enter the following
oras push --annotationcommand to add an annotation to the desired image tag. The annotation should be in the formatquay.expires-after=<value>to indicate that the tag should expire the set time. For example:$ oras push --annotation quay.expires-after=<value> \ <quay-server.example.com>/<organization>/<repository>:<tag> \ <file_path>:<media_type>Example output✓ Uploaded hello.txt 12/12 B 100.00% 321ms └─ sha256:74b9e308133afb3bceae961097cb2aa481483869d695ce1414cd2bc7f046027c ✓ Uploaded application/vnd.oci.empty.v1+json 2/2 B 100.00% 328ms └─ sha256:44136fa355b3678a1146ad16f7e8649e94fb4fc21fe77e8310c060f61caaff8a ✓ Uploaded application/vnd.oci.image.manifest.v1+json 620/620 B 100.00% 0s └─ sha256:c370e931b5eca44fd753bd92e6991ed3be70008e8df15078083359409111f8c3 Pushed [registry] quay-server.example.com/fortestuser/busybox:test2 ArtifactType: application/vnd.unknown.artifact.v1 -
Confirm that the expiration date has been applied by checking the Project Quay UI, or by entering the following command:
$ curl -X GET \ -H "Authorization: Bearer <bearer_token>" \ -H "Accept: application/json" \ https://<quay-server.example.com>/api/v1/repository/<namespace>/<repository_name>/tag/?specificTag=<tag>" \Example output{"tags": [{"name": "test2", "reversion": false, "start_ts": 1743706344, "end_ts": 1743778344, "manifest_digest": "sha256:c370e931b5eca44fd753bd92e6991ed3be70008e8df15078083359409111f8c3", "is_manifest_list": false, "size": 12, "last_modified": "Thu, 03 Apr 2025 18:52:24 -0000", "expiration": "Fri, 04 Apr 2025 14:52:24 -0000"}, {"name": "test2", "reversion": false, "start_ts": 1742493776, "end_ts": 1743706344, "manifest_digest": "sha256:d80aa3d7f5f5388cfae543b990d3cd3d47ff51c48ef29ff66102427bf7bc0a88", "is_manifest_list": false, "size": 2266046, "last_modified": "Thu, 20 Mar 2025 18:02:56 -0000", "expiration": "Thu, 03 Apr 2025 18:52:24 -0000"}], "page": 1, "has_additional": false}
Removing tag expiration using annotations
To clear a tag expiration annotation in Project Quay, you can push the image again with quay.expires-after set to never. The latest manifest no longer carries an expiration time.
With the oras CLI tool, you can unset previously established expiration times.
-
You have downloaded the
orasCLI. -
You have pushed an image with the
quay.expires-after=<value>annotation.
-
Enter the following
oras push --annotationcommand to remove an annotation to the desired image tag. The annotation should be in the formatquay.expires-after=never. For example:$ oras push --annotation quay.expires-after=never \ <quay-server.example.com>/<organization>/<repository>:<tag> \ <file_path>:<media_type>Example output✓ Uploaded hello.txt 12/12 B 100.00% 321ms └─ sha256:74b9e308133afb3bceae961097cb2aa481483869d695ce1414cd2bc7f046027c ✓ Uploaded application/vnd.oci.empty.v1+json 2/2 B 100.00% 328ms └─ sha256:44136fa355b3678a1146ad16f7e8649e94fb4fc21fe77e8310c060f61caaff8a ✓ Uploaded application/vnd.oci.image.manifest.v1+json 620/620 B 100.00% 0s └─ sha256:c370e931b5eca44fd753bd92e6991ed3be70008e8df15078083359409111f8c3 Pushed [registry] quay-server.example.com/fortestuser/busybox:test2 ArtifactType: application/vnd.unknown.artifact.v1 -
The latest manifest will no longer have an expiration time. Confirm that the expiration date has been removed by checking the Project Quay UI, or by entering the following command:
{"tags": [{"name": "test2", "reversion": false, "start_ts": 1743708135, "manifest_digest": "sha256:19e3a3501b4125cce9cb6bb26ac9207c325259bef94dc66490b999f93c4c83a9", "is_manifest_list": false, "size": 12, "last_modified": "Thu, 03 Apr 2025 19:22:15 -0000"}, {"name": "test2", "reversion": false, "start_ts": 1743706344, "end_ts": 1743708135}]}Note that no expiration time is listed.
Setting tag expirations by using the API
To set when an image tag expires in Project Quay, you can use the API.
-
You have Created an OAuth access token.
-
You can set when an image a tag expires by using the
PUT /api/v1/repository/{repository}/tag/{tag}command and passing in the expiration field:$ curl -X PUT \ -H "Authorization: Bearer <bearer_token>" \ -H "Content-Type: application/json" \ --data '{ "expiration": "<seconds since epoch>" }' \ https://<quay-server.example.com>/api/v1/repository/<namespace>/<repository_name>/tag/<tag>Example output"Updated"
Fetching an image by tag or digest
To fetch an image from Project Quay, you can pull by tag or by digest. Digests provide an immutable reference to a specific image manifest.
-
Navigate to the Tags page of a repository.
-
Under Manifest, click the Fetch Tag icon.
-
When the popup box appears, users are presented with the following options:
-
Podman Pull (by tag)
-
Docker Pull (by tag)
-
Podman Pull (by digest)
-
Docker Pull (by digest)
Selecting any one of the four options returns a command for the respective client that allows users to pull the image.
-
-
Click Copy Command to copy the command, which can be used on the command-line interface (CLI). For example:
$ podman pull quay-server.example.com/quayadmin/busybox:test2
Viewing Project Quay tag history by using the UI
To review changes made to an image over time, you can open its Tag History page in the Project Quay v2 UI. You can search by tag name, filter by date range, and see when each tag was modified.
-
On the Project Quay v2 UI dashboard, click Repositories in the navigation pane.
-
Click the name of a repository that has image tags.
-
Click Tag History. On this page, you can perform the following actions:
-
Search by tag name
-
Select a date range
-
View tag changes
-
View tag modification dates and the time at which they were changed
-
Viewing Project Quay tag history by using the API
To review the history of image tags in a Project Quay repository, you can use the API.
-
You have Created an OAuth access token.
-
Enter the following command to view tag history by using the
GET /api/v1/repository/{repository}/tag/command and passing in one of the following queries:-
onlyActiveTags=<true/false>: Filters to only include active tags.
-
page=<number>: Specifies the page number of results to retrieve.
-
limit=<number>: Limits the number of results per page.
-
specificTag=<tag_name>: Filters the tags to include only the tag with the specified name.
$ curl -X GET \
  -H "Authorization: Bearer <bearer_token>" \
  -H "Accept: application/json" \
  "https://<quay-server.example.com>/api/v1/repository/<namespace>/<repository>/tag/?onlyActiveTags=true&page=1&limit=10"
Example output{"tags": [{"name": "test-two", "reversion": false, "start_ts": 1717680780, "manifest_digest": "sha256:57583a1b9c0a7509d3417387b4f43acf80d08cdcf5266ac87987be3f8f919d5d", "is_manifest_list": false, "size": 2275314, "last_modified": "Thu, 06 Jun 2024 13:33:00 -0000"}, {"name": "tag-test", "reversion": false, "start_ts": 1717680378, "manifest_digest": "sha256:57583a1b9c0a7509d3417387b4f43acf80d08cdcf5266ac87987be3f8f919d5d", "is_manifest_list": false, "size": 2275314, "last_modified": "Thu, 06 Jun 2024 13:26:18 -0000"}, {"name": "example", "reversion": false, "start_ts": 1715698131, "manifest_digest": "sha256:57583a1b9c0a7509d3417387b4f43acf80d08cdcf5266ac87987be3f8f919d5d", "is_manifest_list": false, "size": 2275314, "last_modified": "Tue, 14 May 2024 14:48:51 -0000"}], "page": 1, "has_additional": false}
-
-
By using the
specificTag=<tag_name>query, you can filter results for a specific tag. For example:$ curl -X GET -H "Authorization: Bearer <bearer_token>" -H "Accept: application/json" "<quay-server.example.com>/api/v1/repository/quayadmin/busybox/tag/?onlyActiveTags=true&page=1&limit=20&specificTag=test-two"Example output{"tags": [{"name": "test-two", "reversion": true, "start_ts": 1718737153, "manifest_digest": "sha256:57583a1b9c0a7509d3417387b4f43acf80d08cdcf5266ac87987be3f8f919d5d", "is_manifest_list": false, "size": 2275314, "last_modified": "Tue, 18 Jun 2024 18:59:13 -0000"}], "page": 1, "has_additional": false}
Immutable tags overview
Immutable tags allow users to lock specific image tags to prevent them from being overwritten, modified, manually deleted, or auto-pruned. Per-tag expiration can still retire an immutable tag.
Immutable tabs help ensure a stable, trusted reference for builds and releases, meeting strict regulatory and compliance requirements. When a tag is marked as immutable, the system blocks tag overwrites, manual or API deletions, and auto-pruning by background workers. Auto-prune exclusion is permanent and is not configurable. Per-tag expiration still applies: an immutable tag can expire and be deleted by expiration, including the quay.expires-after label or annotation, even though auto-prune will never remove it. Manifest labels associated with an immutable tag cannot be changed.
Immutability can be applied to tags in organizations and organization-owned repositories through three methods:
-
Individual Tag Settings: Users with write access can manually toggle the immutable status of a specific tag via the Project Quay v2 UI or the API.
-
Immutability Policies: Administrators can define regex patterns (for example,
release-*) at the organization or repository level. Any tag pushed that matches the pattern is automatically marked as immutable. -
Manifest Labels: Developers can trigger immutability during the build process by including the
quay.immutable=truelabel in their Dockerfile or Containerfile.
|
Note
|
Immutable tags are not available for personal user namespaces. |
Managing tag immutability by using the UI
To prevent a tag from being changed or deleted, you can manage its immutability by using the UI. Use the Tag menu to set or remove immutability for a tag.
-
You have logged into Project Quay.
-
You have set
FEATURE_IMMUTABLE_TAGStoTruein yourconfig.yamlfile.
-
On the Project Quay v2 UI, click Organizations and then the name of the organization where the tag is located.
-
Click the name of the repository where the tag is located.
-
Click Tags in the navigation pane.
-
For the tag that you want to make immutable, click the menu kebab icon and then click Make immutable.
-
Optional: To remove the immutability policy, click the menu kebab icon and then click Remove immutability.
Managing tag immutability by using the Project Quay API
To prevent a tag from being changed or deleted, you can manage its immutability by using the Project Quay API. Use the PUT /api/v1/repository/{repository}/tag/{tag} endpoint to set or remove immutability for a tag.
-
You have logged into Project Quay.
-
You have set
FEATURE_IMMUTABLE_TAGStoTruein yourconfig.yamlfile.
-
Use the
PUT /api/v1/repository/{repository}/tag/{tag}endpoint to set immutability for a tag. For example:$ curl -X PUT \ -H "Authorization: Bearer <bearer_token>" \ -H "Content-Type: application/json" \ --data '{ "immutable": true }' \ https://<quay-server.example.com>/api/v1/repository/<namespace>/<repository_name>/tag/<tag>Example output"Updated" -
Use the
PUT /api/v1/repository/{repository}/tag/{tag}endpoint to remove immutability for a tag. For example:$ curl -X PUT \ -H "Authorization: Bearer <bearer_token>" \ -H "Content-Type: application/json" \ --data '{ "immutable": false }' \ https://<quay-server.example.com>/api/v1/repository/<namespace>/<repository_name>/tag/<tag>Example output"Updated"
Setting immutability policy by using the UI
To protect image tags from overwrite or deletion, you can set an immutability policy for an organization or a repository in {product-title} by using the v2 UI.
-
You have logged into Project Quay.
-
You have set
FEATURE_IMMUTABLE_TAGStoTruein yourconfig.yamlfile.
-
On the Project Quay v2 UI, click Repositories or Organization.
-
Click the name of the repository or organization.
-
Click Settings → Immutability Policies.
-
Click Add policy.
-
Add a tag pattern, for example,
release-*. -
Select a pattern behavior. The following options are available:
-
Tags matching pattern are immutable - With this option, tags that match the pattern will be immutable and cannot be modified or deleted.
-
Tags NOT matching pattern are immutable - With this option, tags that do NOT match the pattern will be immutable and cannot be modified or deleted.
-
-
Click Save.
-
Optional. Update the policy by clicking the Edit (pencil icon) icon.
-
Optional. Delete the policy by clicking the Delete (trash icon) icon.
-
Optional. Add an additional policy by clicking Add policy.
Creating an immutability policy by using the Project Quay API
To protect image tags from overwrite or deletion, you can create an immutability policy for an organization or a repository in Project Quay by using the API. Send a POST request with your bearer token and a JSON body that includes the tag pattern and match rule.
-
You have created an OAuth access token.
-
You have set
FEATURE_IMMUTABLE_TAGStoTruein yourconfig.yamlfile.
-
Create an immutability policy for an organization by using the
POST /api/v1/organization/{orgname}/immutabilitypolicy/endpoint. For example:$ curl -X POST -H "Authorization: Bearer <access_token>" -H "Content-Type: application/json" -d '{"tagPattern": ".*", "tagPatternMatches": true}' http://<quay-server.example.com>/api/v1/organization/<organization_name>/immutabilitypolicy/ -
Create an immutability policy for an organization repository by using the
POST /api/v1/repository/{repository}/immutabilitypolicy/endpoint. For example:$ curl -X POST -H "Authorization: Bearer <access_token>" -H "Content-Type: application/json" -d '{"tagPattern": ".*", "tagPatternMatches": true}' http://<quay-server.example.com>/api/v1/repository/<namespace>/<repository_name>/immutabilitypolicy/Example output{"uuid": "ce2bdcc0-ced2-4a1a-ac36-78a9c1bed8c7"}
Listing an immutability policy by using the Project Quay API
To view or audit which tags are protected, you can list immutability policies for an organization or a repository in Project Quay by using the API. Send GET requests with your bearer token to retrieve all policies or a single policy by UUID.
-
You have created an OAuth access token.
-
You have set
FEATURE_IMMUTABLE_TAGStoTruein yourconfig.yamlfile.
-
Retrieve all immutability policies for an organization by using the
GET /api/v1/organization/{orgname}/immutabilitypolicy/endpoint. For example:$ curl -X GET -H "Authorization: Bearer <access_token>" http://<quay-server.example.com>/api/v1/organization/<organization_name>/immutabilitypolicy/Example output{"policies": [{"uuid": "3aae3390-de53-4b82-a2b7-4da8fe5dbe11", "tagPattern": ".*", "tagPatternMatches": true}]} -
Retrieve all immutability policies for a repository by using the
GET /api/v1/repository/{repository}/immutabilitypolicy/endpoint. For example:$ curl -X GET -H "Authorization: Bearer <access_token>" http://<quay-server.example.com>/api/v1/repository/<namespace>/<repository_name>/immutabilitypolicy/Example output{"policies": [{"uuid": "87f75fb5-d023-4054-87b4-469f37a59638", "tagPattern": ".*", "tagPatternMatches": true}]} -
List information about a specific immutability policy for an organization by using the
GET /api/v1/organization/{orgname}/immutabilitypolicy/{policy_uuid}/endpoint. For example:$ curl -X GET -H "Authorization: Bearer <access_token>" http://<quay-server.example.com>/api/v1/organization/<organization_name>/immutabilitypolicy/<policy_uuid>/Example output{"policies": [{"uuid": "87f75fb5-d023-4054-87b4-469f37a59638", "tagPattern": ".*", "tagPatternMatches": true}]} -
List information about a specific immutability policy for a repository by using the
GET /api/v1/repository/{repository}/immutabilitypolicy/{policy_uuid}/endpoint. For example:$ curl -X GET -H "Authorization: Bearer <access_token>" http://<quay-server.example.com>/api/v1/repository/<namespace>/<repository_name>/immutabilitypolicy/<policy_uuid>/Example output{"uuid": "87f75fb5-d023-4054-87b4-469f37a59638", "tagPattern": ".*", "tagPatternMatches": true}
Updating an immutability policy by using the Project Quay API
To change the tag pattern or match rule of an existing policy, you can update an immutability policy for an organization or a repository in {product-title} by using the API. Send a PUT request with your bearer token and the policy UUID, and a JSON body with the new tag pattern and match rule.
-
You have created an OAuth access token.
-
You have set
FEATURE_IMMUTABLE_TAGStoTruein yourconfig.yamlfile.
-
Update an immutability policy for an organization by using the
PUT /api/v1/organization/{orgname}/immutabilitypolicy/{policy_uuid}/endpoint. For example:curl -X PUT \ -H "Authorization: Bearer <bearer_token>" \ -H "Content-Type: application/json" \ -d '{"tagPattern": ".*", "tagPatternMatches": true}' \ "https://<quay-server.example.com>/api/v1/organization/test/immutabilitypolicy/3aae3390-de53-4b82-a2b7-4da8fe5dbe11" -
Update an immutability policy for a repository by using the
PUT /api/v1/repository/{repository}/immutabilitypolicy/{policy_uuid}/endpoint. For example:$ curl -X PUT -H "Authorization: Bearer <access_token>" -H "Content-Type: application/json" -d '{"tagPattern": ".*", "tagPatternMatches": true}' http://<quay-server.example.com>/api/v1/repository/<repository_name>/<namespace>/immutabilitypolicy/<policy_uuid>/
Deleting an immutability policy by using the Project Quay API
To remove an immutability policy so that tags can be modified or deleted again, you can delete the policy for an organization or a repository in Project Quay by using the API. Send a DELETE request with your bearer token and the policy UUID.
-
You have created an OAuth access token.
-
You have set
FEATURE_IMMUTABLE_TAGStoTruein yourconfig.yamlfile.
-
Delete an immutability policy for an organization by using the
DELETE /api/v1/organization/{orgname}/immutabilitypolicy/{policy_uuid}/endpoint. For example:$ curl -X DELETE -H "Authorization: Bearer <access_token>" http://<quay-server.example.com>/api/v1/organization/<organization_name>/immutabilitypolicy/<policy_uuid>/Example output{"uuid": "3aae3390-de53-4b82-a2b7-4da8fe5dbe11"} -
Delete an immutability policy for a repository by using the
DELETE /api/v1/repository/{repository}/immutabilitypolicy/{policy_uuid}/endpoint. For example:$ curl -X DELETE -H "Authorization: Bearer <access_token>" http://<quay-server.example.com>/api/v1/repository/<namespace>/<repository_name>/immutabilitypolicy/<policy_uuid>/Example output{"uuid": "87f75fb5-d023-4054-87b4-469f37a59638"}
Deleting an image tag
To remove a specific version of a container image from a repository, you can delete its tag from the Project Quay v2 UI. Depending on your time machine retention settings, you might be able to revert a deleted tag later.
-
On the Repositories page of the v2 UI, click the name of the image you want to delete, for example,
quay/admin/busybox. -
Click the More Actions drop-down menu.
-
Click Delete.
NoteIf desired, you could click Make Public or Make Private.
-
Type confirm in the box, and then click Delete.
-
After deletion, you are returned to the Repositories page.
NoteDeleting an image tag can be reverted based on the amount of time allotted assigned to the time machine feature. For more information, see "Reverting tag changes".
Deleting an image by using the API
To remove an image tag from a Project Quay repository, you can use the API.
-
You have Created an OAuth access token.
-
You can delete an image tag by using the
DELETE /api/v1/repository/{repository}/tag/{tag}command:$ curl -X DELETE \ -H "Authorization: Bearer <bearer_token>" \ https://<quay-server.example.com>/api/v1/repository/<namespace>/<repository_name>/tag/<tag>This command does not return output in the CLI. Continue on to the next step to return a list of tags.
-
To see a list of tags after deleting a tag, you can use the
GET /api/v1/repository/{repository}/tag/command. For example:$ curl -X GET \ -H "Authorization: Bearer <bearer_token>" \ -H "Accept: application/json" \ https://<quay-server.example.com>/api/v1/repository/<namespace>/<repository_name>/tagExample output{"tags": [{"name": "test", "reversion": false, "start_ts": 1716324069, "manifest_digest": "sha256:57583a1b9c0a7509d3417387b4f43acf80d08cdcf5266ac87987be3f8f919d5d", "is_manifest_list": false, "size": 2275314, "last_modified": "Tue, 21 May 2024 20:41:09 -0000"}, {"name": "example", "reversion": false, "start_ts": 1715698131, "manifest_digest": "sha256:57583a1b9c0a7509d3417387b4f43acf80d08cdcf5266ac87987be3f8f919d5d", "is_manifest_list": false, "size": 2275314, "last_modified": "Tue, 14 May 2024 14:48:51 -0000"}, {"name": "example", "reversion": false, "start_ts": 1715697708, "end_ts": 1715698131, "manifest_digest": "sha256:57583a1b9c0a7509d3417387b4f43acf80d08cdcf5266ac87987be3f8f919d5d", "is_manifest_list": false, "size": 2275314, "last_modified": "Tue, 14 May 2024 14:41:48 -0000", "expiration": "Tue, 14 May 2024 14:48:51 -0000"}, {"name": "test", "reversion": false, "start_ts": 1715695488, "end_ts": 1716324069, "manifest_digest": "sha256:57583a1b9c0a7509d3417387b4f43acf80d08cdcf5266ac87987be3f8f919d5d", "is_manifest_list": false, "size": 2275314, "last_modified": "Tue, 14 May 2024 14:04:48 -0000", "expiration": "Tue, 21 May 2024 20:41:09 -0000"}, {"name": "test", "reversion": false, "start_ts": 1715631517, "end_ts": 1715695488, "manifest_digest": "sha256:57583a1b9c0a7509d3417387b4f43acf80d08cdcf5266ac87987be3f8f919d5d", "is_manifest_list": false, "size": 2275314, "last_modified": "Mon, 13 May 2024 20:18:37 -0000", "expiration": "Tue, 14 May 2024 14:04:48 -0000"}], "page": 1, "has_additional": false}
Reverting tag changes by using the UI
To revert tag changes in Project Quay, you can use the UI within the time machine window. You restore a previous tag state before permanent deletion.
-
On the Repositories page of the v2 UI, click the name of the image you want to revert.
-
Click the Tag History tab.
-
Find the point in the timeline at which image tags were changed or removed. Next, click the option under Revert to restore a tag to its image.
Reverting tag changes by using the API
To restore a previous image for a tag in Project Quay, you can use the API.
Project Quay offers a comprehensive time machine feature that allows older images tags to remain in the repository for set periods of time so that they can revert changes made to tags. This feature allows users to revert tag changes, like tag deletions.
-
You have Created an OAuth access token.
-
You can restore a repository tag to its previous image by using the
POST /api/v1/repository/{repository}/tag/{tag}/restorecommand. For example:$ curl -X POST \ -H "Authorization: Bearer <bearer_token>" \ -H "Content-Type: application/json" \ --data '{ "manifest_digest": <manifest_digest> }' \ quay-server.example.com/api/v1/repository/quayadmin/busybox/tag/test/restoreExample output{} -
To see a list of tags after restoring an old tag you can use the
GET /api/v1/repository/{repository}/tag/command. For example:$ curl -X GET \ -H "Authorization: Bearer <bearer_token>" \ -H "Accept: application/json" \ https://<quay-server.example.com>/api/v1/repository/<namespace>/<repository_name>/tagExample output{"tags": [{"name": "test", "reversion": false, "start_ts": 1716324069, "manifest_digest": "sha256:57583a1b9c0a7509d3417387b4f43acf80d08cdcf5266ac87987be3f8f919d5d", "is_manifest_list": false, "size": 2275314, "last_modified": "Tue, 21 May 2024 20:41:09 -0000"}, {"name": "example", "reversion": false, "start_ts": 1715698131, "manifest_digest": "sha256:57583a1b9c0a7509d3417387b4f43acf80d08cdcf5266ac87987be3f8f919d5d", "is_manifest_list": false, "size": 2275314, "last_modified": "Tue, 14 May 2024 14:48:51 -0000"}, {"name": "example", "reversion": false, "start_ts": 1715697708, "end_ts": 1715698131, "manifest_digest": "sha256:57583a1b9c0a7509d3417387b4f43acf80d08cdcf5266ac87987be3f8f919d5d", "is_manifest_list": false, "size": 2275314, "last_modified": "Tue, 14 May 2024 14:41:48 -0000", "expiration": "Tue, 14 May 2024 14:48:51 -0000"}, {"name": "test", "reversion": false, "start_ts": 1715695488, "end_ts": 1716324069, "manifest_digest": "sha256:57583a1b9c0a7509d3417387b4f43acf80d08cdcf5266ac87987be3f8f919d5d", "is_manifest_list": false, "size": 2275314, "last_modified": "Tue, 14 May 2024 14:04:48 -0000", "expiration": "Tue, 21 May 2024 20:41:09 -0000"}, {"name": "test", "reversion": false, "start_ts": 1715631517, "end_ts": 1715695488, "manifest_digest": "sha256:57583a1b9c0a7509d3417387b4f43acf80d08cdcf5266ac87987be3f8f919d5d", "is_manifest_list": false, "size": 2275314, "last_modified": "Mon, 13 May 2024 20:18:37 -0000", "expiration": "Tue, 14 May 2024 14:04:48 -0000"}], "page": 1, "has_additional": false}
Viewing and exporting logs
Activity logs in Project Quay record repository and namespace events for operations and security review. You can view usage patterns and export logs for longer-term retention.
Usage logs might reveal the following information:
-
Resource Planning: Usage logs can provide data on the number of image pulls, pushes, and overall traffic to your registry.
-
User Activity: Logs can help you track user activity, showing which users are accessing and interacting with images in the registry. This can be useful for auditing, understanding user behavior, and managing access controls.
-
Usage Patterns: By studying usage patterns, you can gain insights into which images are popular, which versions are frequently used, and which images are rarely accessed. This information can help prioritize image maintenance and cleanup efforts.
-
Security Auditing: Usage logs enable you to track who is accessing images and when. This is crucial for security auditing, compliance, and investigating any unauthorized or suspicious activity.
-
Image Lifecycle Management: Logs can reveal which images are being pulled, pushed, and deleted. This information is essential for managing image lifecycles, including deprecating old images and ensuring that only authorized images are used.
-
Compliance and Regulatory Requirements: Many industries have compliance requirements that mandate tracking and auditing of access to sensitive resources. Usage logs can help you demonstrate compliance with such regulations.
-
Identifying Abnormal Behavior: Unusual or abnormal patterns in usage logs can indicate potential security breaches or malicious activity. Monitoring these logs can help you detect and respond to security incidents more effectively.
-
Trend Analysis: Over time, usage logs can provide trends and insights into how your registry is being used. This can help you make informed decisions about resource allocation, access controls, and image management strategies.
There are multiple ways of accessing log files:
-
Viewing logs through the web UI.
-
Exporting logs so that they can be saved externally.
-
Accessing log entries using the API.
To access logs, you must have administrative privileges for the selected repository or namespace.
|
Note
|
A maximum of 100 log results are available at a time via the API. To gather more results that that, you must use the log exporter feature described in this chapter. |
Viewing usage logs
To review how your registry is being used, you can view usage logs for an organization, repository, or namespace in the Project Quay v2 UI. You can filter by date range and export the logs for later use.
-
Log in to your Project Quay registry.
-
Navigate to an Organization, repository, or namespace for which you are an administrator of.
-
Click Logs.
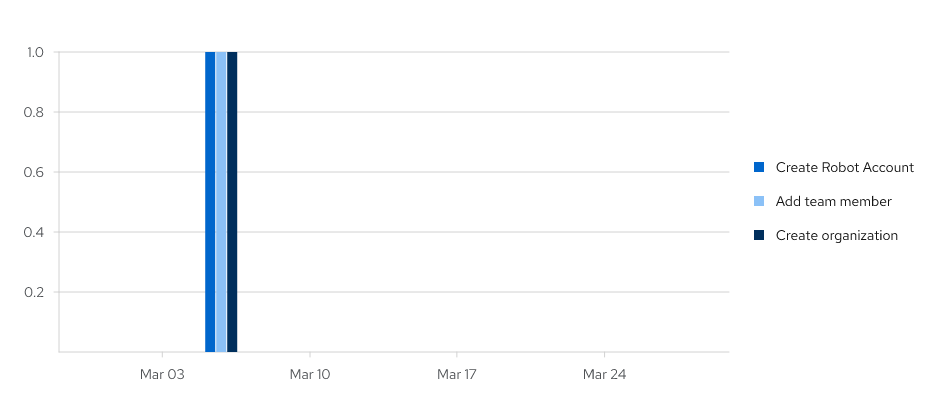
-
Optional. Set the date range for viewing log entries by adding dates to the From and To boxes.
-
Optional. Export the logs by clicking Export. You must enter an email address or a valid callback URL that uses the HTTP or HTTPS scheme. This process can take an hour depending on how many logs there are.
Viewing usage logs by using the API
To review registry activity, you can view usage logs by organization or repository through the Project Quay API. You can aggregate logs, list detailed entries, filter by user or date range, and page through results.
Viewing aggregated logs
To review grouped activity for a user, organization, or repository in Project Quay, you can retrieve aggregated logs through the API. You can filter results by performer and date range.
-
You have created an OAuth access token.
-
Use the
GET /api/v1/user/aggregatelogsAPI endpoint to return the aggregated (or grouped) logs for the current user:$ curl -X GET \ -H "Authorization: Bearer <bearer_token>" \ -H "Accept: application/json" \ "https://<quay-server.example.com>/api/v1/user/aggregatelogs"The following example shows aggregated log output:
{"aggregated": [{"kind": "create_tag", "count": 1, "datetime": "Tue, 18 Jun 2024 00:00:00 -0000"}, {"kind": "manifest_label_add", "count": 1, "datetime": "Tue, 18 Jun 2024 00:00:00 -0000"}, {"kind": "push_repo", "count": 2, "datetime": "Tue, 18 Jun 2024 00:00:00 -0000"}, {"kind": "revert_tag", "count": 1, "datetime": "Tue, 18 Jun 2024 00:00:00 -0000"}]}You can also pass in the
performerandstarttime/endtimequeries to obtain aggregated logs for a specific user between a specific time period. For example:$ curl -X GET \ -H "Authorization: Bearer <bearer_token>" \ -H "Accept: application/json" \ "<quay-server.example.com>/api/v1/user/aggregatelogs?performer=<username>&starttime=<MM/DD/YYYY>&endtime=<MM/DD/YYYY>" -
View aggregated logs by organization by using the
GET /api/v1/organization/{orgname}/aggregatelogsendpoint. For example:$ curl -X GET \ -H "Authorization: Bearer <bearer_token>" \ -H "Accept: application/json" \ "<quay-server.example.com>/api/v1/organization/{orgname}/aggregatelogs" -
View aggregated logs by repository by using the
GET /api/v1/repository/{repository}/aggregatelogsendpoint. The following example includes thestarttime/endtimefields:$ curl -X GET \ -H "Authorization: Bearer <bearer_token>" \ -H "Accept: application/json" \ "<quay-server.example.com>/api/v1/repository/<repository_name>/<namespace>/aggregatelogs?starttime=2024-01-01&endtime=2024-06-18""
Viewing detailed logs
To inspect individual registry events for a user, organization, or repository in Project Quay, you can retrieve detailed logs through the API. You can filter results by performer and date range.
-
Use the
GET /api/v1/user/logsAPI endpoint to return a list of log entries for a user. For example:$ curl -X GET -H "Authorization: Bearer <bearer_token>" -H "Accept: application/json" "<quay-server.example.com>/api/v1/user/logs"You can also pass in the
performerandstarttime/endtimequeries to obtain logs for a specific user between a specific time period. For example:$ curl -X GET -H "Authorization: Bearer <bearer_token>" -H "Accept: application/json" "http://quay-server.example.com/api/v1/user/logs?performer=quayuser&starttime=01/01/2024&endtime=06/18/2024"The following example shows detailed log output:
--- {"start_time": "Mon, 01 Jan 2024 00:00:00 -0000", "end_time": "Wed, 19 Jun 2024 00:00:00 -0000", "logs": [{"kind": "revert_tag", "metadata": {"username": "quayuser", "repo": "busybox", "tag": "test-two", "manifest_digest": "sha256:57583a1b9c0a7509d3417387b4f43acf80d08cdcf5266ac87987be3f8f919d5d"}, "ip": "192.168.1.131", "datetime": "Tue, 18 Jun 2024 18:59:13 -0000", "performer": {"kind": "user", "name": "quayuser", "is_robot": false, "avatar": {"name": "quayuser", "hash": "b28d563a6dc76b4431fc7b0524bbff6b810387dac86d9303874871839859c7cc", "color": "#17becf", "kind": "user"}}}, {"kind": "push_repo", "metadata": {"repo": "busybox", "namespace": "quayuser", "user-agent": "containers/5.30.1 (github.com/containers/image)", "tag": "test-two", "username": "quayuser", } --- -
Use the
GET /api/v1/organization/{orgname}/logsendpoint to return logs for a specified organization:$ curl -X GET \ -H "Authorization: Bearer <bearer_token>" \ -H "Accept: application/json" \ "http://<quay-server.example.com>/api/v1/organization/{orgname}/logs" -
Use the
GET /api/v1/repository/{repository}/logsendpoint to return logs for a specified repository:$ curl -X GET \ -H "Authorization: Bearer <bearer_token>" \ -H "Accept: application/json" \ "http://<quay-server.example.com>/api/v1/repository/{repository}/logs"
Exporting repository logs by using the UI
To export repository logs from Project Quay, you can use the Export Logs feature in the UI. You receive the exported data by email or callback URL, and it expires after a set time.
This feature has the following benefits and constraints:
-
You can choose a range of dates for the logs you want to gather from a repository.
-
You can request that the logs be sent to you by an email attachment or directed to a callback URL.
-
To export logs, you must be an administrator of the repository or namespace.
-
30 days worth of logs are retained for all users.
-
Export logs only gathers log data that was previously produced. It does not stream logging data.
-
Your Project Quay instance must be configured for external storage for this feature. Local storage does not work for exporting logs.
-
When logs are gathered and made available to you, you should immediately copy that data if you want to save it. By default, the data expires after one hour.
Use the following procedure to export logs.
-
Select a repository for which you have administrator privileges.
-
Click the Logs tab.
-
Optional. If you want to specify specific dates, enter the range in the From and to boxes.
-
Click the Export Logs button. An Export Usage Logs pop-up appears, as shown
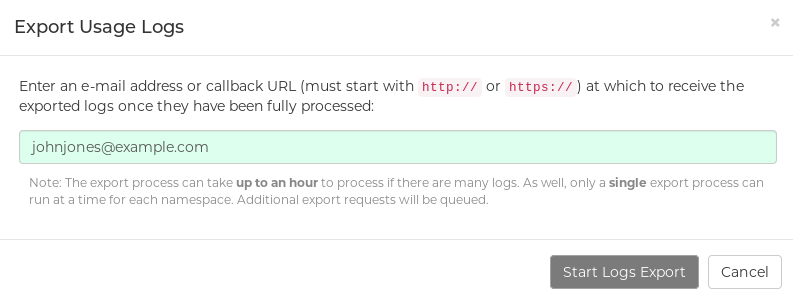
-
Enter an email address or callback URL to receive the exported log. For the callback URL, you can use a URL to a specified domain, for example, <webhook.site>.
-
Select Confirm to start the process for gather the selected log entries. Depending on the amount of logging data being gathered, this can take anywhere from a few minutes to several hours to complete.
-
When the log export is completed, the one of following two events happens:
-
An email is received, alerting you to the available of your requested exported log entries.
-
A successful status of your log export request from the webhook URL is returned. Additionally, a link to the exported data is made available for you to delete to download the logs.
NoteThe URL points to a location in your Project Quay external storage and is set to expire within one hour. Make sure that you copy the exported logs before the expiration time if you intend to keep your logs.
-
Exporting logs by using the API
To export detailed Project Quay logs for a user, organization, or repository, you can call the export logs API endpoints and deliver the results to a callback URL or email address.
-
You have created an OAuth access token.
-
Use the
POST /api/v1/user/exportlogsendpoint to export logs for the current user:$ curl -X POST \ -H "Authorization: Bearer <bearer_token>" \ -H "Content-Type: application/json" \ -H "Accept: application/json" \ -d '{ "starttime": "<MM/DD/YYYY>", "endtime": "<MM/DD/YYYY>", "callback_email": "your.email@example.com" }' \ "http://<quay-server.example.com>/api/v1/user/exportlogs"Example output{"export_id": "6a0b9ea9-444c-4a19-9db8-113201c38cd4"} -
Use the
POST /api/v1/organization/{orgname}/exportlogsendpoint to export logs for an organization:$ curl -X POST \ -H "Authorization: Bearer <bearer_token>" \ -H "Content-Type: application/json" \ -H "Accept: application/json" \ -d '{ "starttime": "<MM/DD/YYYY>", "endtime": "<MM/DD/YYYY>", "callback_email": "org.logs@example.com" }' \ "http://<quay-server.example.com>/api/v1/organization/{orgname}/exportlogs" -
Use the
POST /api/v1/repository/{repository}/exportlogsendpoint to export logs for a repository:$ curl -X POST \ -H "Authorization: Bearer <bearer_token>" \ -H "Content-Type: application/json" \ -H "Accept: application/json" \ -d '{ "starttime": "2024-01-01", "endtime": "2024-06-18", "callback_url": "http://your-callback-url.example.com" }' \ "http://<quay-server.example.com>/api/v1/repository/{repository}/exportlogs"
Clair security scans
Clair security scans report vulnerabilities in container images stored in Project Quay. You can review scan results in the UI to identify CVEs and available remediation options.
Clair security scanner is not enabled for Project Quay by default.
|
Note
|
Image scanning only lists vulnerabilities found by Clair security scanner. What users do about the vulnerabilities are uncovered is up to said user. Project Quay superusers do not act on found vulnerabilities. |
-
Navigate to a repository and click Tags in the navigation pane. This page shows the results of the security scan.
-
To reveal more information about multi-architecture images, click See Child Manifests to see the list of manifests in extended view.
-
Click a relevant link under See Child Manifests, for example, 1 Unknown to be redirected to the Security Scanner page.
-
The Security Scanner page provides information for the tag, such as which CVEs the image is susceptible to, and what remediation options you might have available.
Viewing Clair security scans by using the UI
To review the results of a Clair security scan, you can open the Security Scanner page for a tag in the Project Quay UI. You can inspect detected CVEs and check available remediation options.
-
For standalone Project Quay deployments, you have deployed Clair. For more information, see "Setting up Clair on standalone Project Quay deployments"
-
Navigate to a repository and click Tags in the navigation pane. This page shows the results of the security scan.
-
To reveal more information about multi-architecture images, click See Child Manifests to see the list of manifests in extended view.
-
Click a relevant link under See Child Manifests, for example, 1 Unknown to be redirected to the Security Scanner page.
-
The Security Scanner page provides information for the tag, such as which CVEs the image is susceptible to, and what remediation options you might have available.
NoteImage scanning only lists vulnerabilities found by Clair security scanner. What users do about the vulnerabilities are uncovered is up to said user.
Viewing Clair security scans by using the API
To view Clair security scan results for a repository manifest in Project Quay, you can call the manifest security API endpoint with an OAuth access token.
-
You have created an OAuth access token.
-
Use the
GET /api/v1/repository/{repository}/manifest/{manifestref}/securityendpoint to retrieve security information about a specific manifest in a repository. For example:$ curl -X GET \ -H "Authorization: Bearer <bearer_token>" \ -H "Accept: application/json" \ "https://quay-server.example.com/api/v1/repository/<namespace>/<repository>/manifest/<manifest_digest>/security?vulnerabilities=<true_or_false>"Example output{"status": "queued", "data": null}
Notifications overview
Notifications in Project Quay alert you about repository events such as pushes, builds, and image expiry. You can configure delivery methods for users, teams, or organizations.
Notification entries appear on the repository Events and Notifications page and in the global Notifications panel. Delivery methods include email, webhook POST, Flowdock, HipChat, and Slack.
Notification actions
Notification actions in Project Quay define how event alerts are delivered. You can send notices by email, webhook, Flowdock, HipChat, or Slack.
Notifications are added to the Events and Notifications section of the Repository Settings page. They are also added to the Notifications window, which can be found by clicking the bell icon in the navigation pane of Project Quay.
Project Quay notifications can be setup to be sent to a User, Team, or the entire organization.
Notifications can be delivered by one of the following methods.
E-mail notifications
E-mails are sent to specified addresses that describe the specified event. E-mail addresses must be verified on a per-repository basis.
Webhook POST notifications
An HTTP POST call is made to the specified URL with the event’s data. For more information about event data, see "Repository events description".
When the URL is HTTPS, the call has an SSL client certificate set from
Project Quay.
Verification of this certificate proves that the call originated from
Project Quay.
Responses with the status code in the 2xx range are considered successful. Responses with any other status code are considered failures and result in a retry of the webhook notification.
Flowdock notifications
Posts a message to Flowdock.
Hipchat notifications
Posts a message to HipChat.
Slack notifications
Posts a message to Slack.
Creating notifications by using the UI
To alert users to repository events such as pushes or build failures, you can create a notification from the Settings page in the Project Quay v2 UI. You select an event trigger and a delivery method, such as email or Slack.
-
You have created a repository.
-
You have administrative privileges for the repository.
-
Navigate to a repository on Project Quay.
-
In the navigation pane, click Settings.
-
In the Events and Notifications category, click Create Notification to add a new notification for a repository event. The Create notification popup box appears.
-
On the Create repository popup box, click the When this event occurs box to select an event. You can select a notification for the following types of events:
-
Push to Repository
-
Image build failed
-
Image build queued
-
Image build started
-
Image build success
-
Image build cancelled
-
Image expiry trigger
-
-
After you have selected the event type, select the notification method. The following methods are supported:
-
Quay Notification
-
E-mail Notification
-
Webhook POST
-
Flowdock Team Notification
-
HipChat Room Notification
-
Slack Notification
Depending on the method that you choose, you must include additional information. For example, if you select E-mail, you are required to include an e-mail address and an optional notification title.
-
-
After selecting an event and notification method, click Create Notification.
Creating an image expiration notification
To create an image expiration notification in Project Quay, you can use the v2 UI or the API. You set how many days before expiry to send the alert.
Triggers can work in conjunction with the auto-pruning feature. You can also create this notification by using the createRepoNotification API endpoint.
-
FEATURE_GARBAGE_COLLECTION: trueis set in yourconfig.yamlfile. -
Optional.
FEATURE_AUTO_PRUNE: trueis set in yourconfig.yamlfile.
-
On the Project Quay v2 UI, click Repositories.
-
Select the name of a repository.
-
Click Settings → Events and notifications.
-
Click Create notification. The Create notification popup box appears.
-
Click the Select event… box, then click Image expiry trigger.
-
In the When the image is due to expiry in days box, enter the number of days before the image’s expiration when you want to receive an alert. For example, use
1for 1 day. -
In the Select method… box, click one of the following:
-
E-mail
-
Webhook POST
-
Flowdock Team Notification
-
HipChat Room Notification
-
Slack Notification
-
-
Depending on which method you chose, include the necessary data. For example, if you chose Webhook POST, include the
Webhook URL. -
Optional. Provide a POST JSON body template.
-
Optional. Provide a Title for your notification.
-
Click Submit. You are returned to the Events and notifications page, and the notification now appears.
-
Optional. You can set the
NOTIFICATION_TASK_RUN_MINIMUM_INTERVAL_MINUTESvariable in your config.yaml file. with this field set, if there are any expiring images notifications will be sent automatically. By default, this is set to300, or 5 hours, however it can be adjusted as warranted.NOTIFICATION_TASK_RUN_MINIMUM_INTERVAL_MINUTES: 300where:
NOTIFICATION_TASK_RUN_MINIMUM_INTERVAL_MINUTES-
Specifies that by default, this field is set to
300, or 5 hours.
-
Click the menu kebab → Test Notification. The following message is returned:
Test Notification Queued A test version of this notification has been queued and should appear shortly -
Depending on which method you chose, check your e-mail, webhook address, Slack channel, and so on. The information sent should look similar to the following example:
{
  "repository": "sample_org/busybox",
  "namespace": "sample_org",
  "name": "busybox",
  "docker_url": "quay-server.example.com/sample_org/busybox",
  "homepage": "http://quay-server.example.com/repository/sample_org/busybox",
  "tags": [
    "latest",
    "v1"
  ],
  "expiring_in": "1 days"
}
Creating notifications by using the API
To create, test, reset, or delete repository notifications in Project Quay, you can use the repository notification API endpoints.
-
You have created a repository.
-
You have administrative privileges for the repository.
-
You have created an OAuth access token.
-
Enter the following
POST /api/v1/repository/{repository}/notificationcommand to create a notification on your repository:$ curl -X POST \ -H "Authorization: Bearer <bearer_token>" \ -H "Content-Type: application/json" \ --data '{ "event": "<event>", "method": "<method>", "config": { "<config_key>": "<config_value>" }, "eventConfig": { "<eventConfig_key>": "<eventConfig_value>" } }' \ https://<quay-server.example.com>/api/v1/repository/<namespace>/<repository_name>/notification/This command does not return output in the CLI. Instead, you can enter the following
GET /api/v1/repository/{repository}/notification/{uuid}command to obtain information about the repository notification:{"uuid": "240662ea-597b-499d-98bb-2b57e73408d6", "title": null, "event": "repo_push", "method": "quay_notification", "config": {"target": {"name": "quayadmin", "kind": "user", "is_robot": false, "avatar": {"name": "quayadmin", "hash": "b28d563a6dc76b4431fc7b0524bbff6b810387dac86d9303874871839859c7cc", "color": "#17becf", "kind": "user"}}}, "event_config": {}, "number_of_failures": 0} -
You can test your repository notification by entering the following
POST /api/v1/repository/{repository}/notification/{uuid}/testcommand:$ curl -X POST \ -H "Authorization: Bearer <bearer_token>" \ https://<quay-server.example.com>/api/v1/repository/<repository>/notification/<uuid>/testExample output{} -
You can reset repository notification failures to 0 by entering the following
POST /api/v1/repository/{repository}/notification/{uuid}command:$ curl -X POST \ -H "Authorization: Bearer <bearer_token>" \ https://<quay-server.example.com>/api/v1/repository/<repository>/notification/<uuid> -
Enter the following
DELETE /api/v1/repository/{repository}/notification/{uuid}command to delete a repository notification:$ curl -X DELETE \ -H "Authorization: Bearer <bearer_token>" \ https://<quay-server.example.com>/api/v1/repository/<namespace>/<repository_name>/notification/<uuid>This command does not return output in the CLI. Instead, you can enter the following
GET /api/v1/repository/{repository}/notification/command to retrieve a list of all notifications:$ curl -X GET -H "Authorization: Bearer <bearer_token>" -H "Accept: application/json" https://<quay-server.example.com>/api/v1/repository/<namespace>/<repository_name>/notificationExample output{"notifications": []}
Creating quota notifications by using the API
To create quota warning or error notifications for organization and user namespaces in Project Quay, you can use the API. Warning limits trigger quota_warning events and reject limits trigger quota_error events.
Warning-type quota limits trigger quota_warning notifications. Reject-type quota limits trigger quota_error notifications. For organization email notifications, "config": {} is valid because recipients are resolved server-side (organization contact email, or organization administrators if unset). User email notifications are sent to the user account email address.
Project Quay throttles repeated alerts for the same namespace and threshold by using QUOTA_NOTIFICATION_COOLDOWN_SECONDS (default: 86400 / 24 hours). If usage drops below a threshold and later crosses it again, the notification can re-fire. Deleting a quota also removes associated quota_warning and quota_error notification rules for that namespace.
-
You have created an OAuth access token.
-
FEATURE_QUOTA_MANAGEMENTis enabled in your Project Quay configuration. -
FEATURE_QUOTA_NOTIFICATIONSis enabled in your Project Quay configuration. -
Optional: You have established quota limits for your organization or user namespace. You can create notification rules before setting quota limits. Notifications trigger automatically after quotas are configured and thresholds are crossed.
-
You have administrative privileges for the namespace.
-
To create an organization quota notification, enter a command similar to the following example:
$ curl -X POST \
-H "Authorization: Bearer <bearer_token>" \
-H "Content-Type: application/json" \
--data '{
    "event": "quota_warning",
    "method": "email",
    "config": {},
    "eventConfig": {}
}' \
https://<quay-server.example.com>/api/v1/organization/<orgname>/notifications
Example output{ "uuid": "a1b2c3d4-e5f6-7890-abcd-ef1234567890", "title": null, "event": "quota_warning", "method": "email", "config": {}, "event_config": {}, "number_of_failures": 0 } -
Optional: You can create a quota error notification by changing the event type. To complete this task, run a command similar to the following example:
$ curl -X POST \ -H "Authorization: Bearer <bearer_token>" \ -H "Content-Type: application/json" \ --data '{ "event": "quota_error", "method": "slack", "config": { "url": "https://hooks.slack.com/services/YOUR/SLACK/WEBHOOK" }, "eventConfig": {} }' \ https://<quay-server.example.com>/api/v1/organization/<orgname>/notifications -
To create a user namespace quota notification, enter a command similar to the following example:
$ curl -X POST \
-H "Authorization: Bearer <bearer_token>" \
-H "Content-Type: application/json" \
--data '{
    "event": "quota_warning",
    "method": "email",
    "config": {},
    "eventConfig": {}
}' \
https://<quay-server.example.com>/api/v1/user/namespacenotifications
Configuring email routing with organization contact email
To route quota notification emails to a shared organization contact address in Project Quay, you can set the organization contact email with the API. You can list and test notifications for organizations and user namespaces.
-
Set the organization contact email by entering a command similar to the following example:
$ curl -X PUT \ -H "Authorization: Bearer <bearer_token>" \ -H "Content-Type: application/json" \ --data '{ "email": "ops-team@example.com" }' \ https://<quay-server.example.com>/api/v1/organization/<orgname>NoteSetting the organization contact email requires organization administrator permissions (
org:adminscope). If a contact email is not set, quota notifications default to sending to organization administrator email addresses. -
List all notifications for an organization by entering a command similar to the following example:
$ curl -X GET \
-H "Authorization: Bearer <bearer_token>" \
-H "Accept: application/json" \
https://<quay-server.example.com>/api/v1/organization/<orgname>/notifications
Example output{ "notifications": [ { "uuid": "a1b2c3d4-e5f6-7890-abcd-ef1234567890", "title": null, "event": "quota_warning", "method": "email", "config": {}, "event_config": {}, "number_of_failures": 0 } ] } -
List all notifications for your user namespace by entering a command similar to the following example:
$ curl -X GET \ -H "Authorization: Bearer <bearer_token>" \ -H "Accept: application/json" \ https://<quay-server.example.com>/api/v1/user/namespacenotifications -
To test a notification, enter a command similar to the following example:
$ curl -X POST \
-H "Authorization: Bearer <bearer_token>" \
https://<quay-server.example.com>/api/v1/organization/<orgname>/notifications/<uuid>/test
Example output{}NoteFor email notifications, if an organization contact email is set, the test notification is routed to that address. Otherwise, email notifications default to organization administrators. For Slack, webhook, and other methods, routing follows the notification
config.
Resetting notification failures
You can resume delivery on a notification channel that has been automatically suspended because of repeated endpoint failures. To do this, reset the failure counter to zero after resolving the underlying connectivity issue.
-
To reset an organization notification failure count to
0, enter a command similar to the following example:$ curl -X POST \ -H "Authorization: Bearer <bearer_token>" \ https://<quay-server.example.com>/api/v1/organization/<orgname>/notifications/<uuid>A successful request returns HTTP
204with an empty body. -
To reset a user namespace notification failure count to
0, enter a command similar to the following example:$ curl -X POST \ -H "Authorization: Bearer <bearer_token>" \ https://<quay-server.example.com>/api/v1/user/namespacenotifications/<uuid>A successful request returns HTTP
204with an empty body.
Deleting quota notifications
To stop tracking storage thresholds or remove an inactive alerting endpoint in Project Quay, you can delete quota notifications from organization or user namespaces.
|
Note
|
Deleting a namespace quota also automatically deletes associated |
-
Delete an organization notification by entering a command similar to the following example:
$ curl -X DELETE \ -H "Authorization: Bearer <bearer_token>" \ https://<quay-server.example.com>/api/v1/organization/<orgname>/notifications/<uuid> -
Delete a user notification by entering a command similar to the following example:
$ curl -X DELETE \
-H "Authorization: Bearer <bearer_token>" \
https://<quay-server.example.com>/api/v1/user/namespacenotifications/<uuid>
-
Verify that the notification was deleted. List notifications with the following command:
$ curl -X GET \
-H "Authorization: Bearer <bearer_token>" \
-H "Accept: application/json" \
https://<quay-server.example.com>/api/v1/organization/<orgname>/notifications
Example output{"notifications": []}
Repository events description
Repository events in Project Quay describe the triggers that can generate notifications. You can use these event types when you configure alerts.
Repository Push
A successful push of one or more images was made to the repository:
{
  "name": "repository",
  "repository": "dgangaia/test",
  "namespace": "dgangaia",
  "docker_url": "quay.io/dgangaia/test",
  "homepage": "https://quay.io/repository/dgangaia/repository",
  "updated_tags": [
    "latest"
  ]
}
Dockerfile Build Queued
The following example is a response from a Dockerfile Build that has been queued into the Build system.
|
Note
|
Responses can differ based on the use of optional attributes. |
{
  "build_id": "296ec063-5f86-4706-a469-f0a400bf9df2",
  "trigger_kind": "github",                                                       //Optional
  "name": "test",
  "repository": "dgangaia/test",
  "namespace": "dgangaia",
  "docker_url": "quay.io/dgangaia/test",
  "trigger_id": "38b6e180-9521-4ff7-9844-acf371340b9e",                           //Optional
  "docker_tags": [
    "master",
    "latest"
  ],
  "repo": "test",
  "trigger_metadata": {
    "default_branch": "master",
    "commit": "b7f7d2b948aacbe844ee465122a85a9368b2b735",
    "ref": "refs/heads/master",
    "git_url": "git@github.com:dgangaia/test.git",
    "commit_info": {                                                             //Optional
      "url": "https://github.com/dgangaia/test/commit/b7f7d2b948aacbe844ee465122a85a9368b2b735",
      "date": "2019-03-06T12:48:24+11:00",
      "message": "adding 5",
      "author": {                                                                //Optional
        "username": "dgangaia",
        "url": "https://github.com/dgangaia",                                    //Optional
        "avatar_url": "https://avatars1.githubusercontent.com/u/43594254?v=4"    //Optional
      },
      "committer": {
        "username": "web-flow",
        "url": "https://github.com/web-flow",
        "avatar_url": "https://avatars3.githubusercontent.com/u/19864447?v=4"
      }
    }
  },
  "is_manual": false,
  "manual_user": null,
  "homepage": "https://quay.io/repository/dgangaia/test/build/296ec063-5f86-4706-a469-f0a400bf9df2"
}
Dockerfile Build started
The following example is a response from a Dockerfile Build that has been queued into the Build system.
|
Note
|
Responses can differ based on the use of optional attributes. |
{
  "build_id": "a8cc247a-a662-4fee-8dcb-7d7e822b71ba",
  "trigger_kind": "github",                                                     //Optional
  "name": "test",
  "repository": "dgangaia/test",
  "namespace": "dgangaia",
  "docker_url": "quay.io/dgangaia/test",
  "trigger_id": "38b6e180-9521-4ff7-9844-acf371340b9e",                         //Optional
  "docker_tags": [
    "master",
    "latest"
  ],
  "build_name": "50bc599",
  "trigger_metadata": {                                                         //Optional
    "commit": "50bc5996d4587fd4b2d8edc4af652d4cec293c42",
    "ref": "refs/heads/master",
    "default_branch": "master",
    "git_url": "git@github.com:dgangaia/test.git",
    "commit_info": {                                                            //Optional
      "url": "https://github.com/dgangaia/test/commit/50bc5996d4587fd4b2d8edc4af652d4cec293c42",
      "date": "2019-03-06T14:10:14+11:00",
      "message": "test build",
      "committer": {                                                            //Optional
        "username": "web-flow",
        "url": "https://github.com/web-flow",                                   //Optional
        "avatar_url": "https://avatars3.githubusercontent.com/u/19864447?v=4"   //Optional
      },
      "author": {                                                               //Optional
        "username": "dgangaia",
        "url": "https://github.com/dgangaia",                                   //Optional
        "avatar_url": "https://avatars1.githubusercontent.com/u/43594254?v=4"   //Optional
      }
    }
  },
  "homepage": "https://quay.io/repository/dgangaia/test/build/a8cc247a-a662-4fee-8dcb-7d7e822b71ba"
}
Dockerfile Build successfully completed
The following example is a response from a Dockerfile Build that has been successfully completed by the Build system.
|
Note
|
This event occurs simultaneously with a Repository Push event for the built image or images. |
{
  "build_id": "296ec063-5f86-4706-a469-f0a400bf9df2",
  "trigger_kind": "github",                                                       //Optional
  "name": "test",
  "repository": "dgangaia/test",
  "namespace": "dgangaia",
  "docker_url": "quay.io/dgangaia/test",
  "trigger_id": "38b6e180-9521-4ff7-9844-acf371340b9e",                           //Optional
  "docker_tags": [
    "master",
    "latest"
  ],
  "build_name": "b7f7d2b",
  "image_id": "sha256:0339f178f26ae24930e9ad32751d6839015109eabdf1c25b3b0f2abf8934f6cb",
  "trigger_metadata": {
    "commit": "b7f7d2b948aacbe844ee465122a85a9368b2b735",
    "ref": "refs/heads/master",
    "default_branch": "master",
    "git_url": "git@github.com:dgangaia/test.git",
    "commit_info": {                                                              //Optional
      "url": "https://github.com/dgangaia/test/commit/b7f7d2b948aacbe844ee465122a85a9368b2b735",
      "date": "2019-03-06T12:48:24+11:00",
      "message": "adding 5",
      "committer": {                                                              //Optional
        "username": "web-flow",
        "url": "https://github.com/web-flow",                                     //Optional
        "avatar_url": "https://avatars3.githubusercontent.com/u/19864447?v=4"                                                        //Optional
      },
      "author": {                                                                 //Optional
        "username": "dgangaia",
        "url": "https://github.com/dgangaia",                                     //Optional
        "avatar_url": "https://avatars1.githubusercontent.com/u/43594254?v=4"     //Optional
      }
    }
  },
  "homepage": "https://quay.io/repository/dgangaia/test/build/296ec063-5f86-4706-a469-f0a400bf9df2",
  "manifest_digests": [
    "quay.io/dgangaia/test@sha256:2a7af5265344cc3704d5d47c4604b1efcbd227a7a6a6ff73d6e4e08a27fd7d99",
    "quay.io/dgangaia/test@sha256:569e7db1a867069835e8e97d50c96eccafde65f08ea3e0d5debaf16e2545d9d1"
  ]
}
Dockerfile Build failed
The following example is a response from a Dockerfile Build that has failed.
{
  "build_id": "5346a21d-3434-4764-85be-5be1296f293c",
  "trigger_kind": "github",                                                       //Optional
  "name": "test",
  "repository": "dgangaia/test",
  "docker_url": "quay.io/dgangaia/test",
  "error_message": "Could not find or parse Dockerfile: unknown instruction: GIT",
  "namespace": "dgangaia",
  "trigger_id": "38b6e180-9521-4ff7-9844-acf371340b9e",                           //Optional
  "docker_tags": [
    "master",
    "latest"
  ],
  "build_name": "6ae9a86",
  "trigger_metadata": {                                                           //Optional
    "commit": "6ae9a86930fc73dd07b02e4c5bf63ee60be180ad",
    "ref": "refs/heads/master",
    "default_branch": "master",
    "git_url": "git@github.com:dgangaia/test.git",
    "commit_info": {                                                              //Optional
      "url": "https://github.com/dgangaia/test/commit/6ae9a86930fc73dd07b02e4c5bf63ee60be180ad",
      "date": "2019-03-06T14:18:16+11:00",
      "message": "failed build test",
      "committer": {                                                              //Optional
        "username": "web-flow",
        "url": "https://github.com/web-flow",                                     //Optional
        "avatar_url": "https://avatars3.githubusercontent.com/u/19864447?v=4"     //Optional
      },
      "author": {                                                                 //Optional
        "username": "dgangaia",
        "url": "https://github.com/dgangaia",                                     //Optional
        "avatar_url": "https://avatars1.githubusercontent.com/u/43594254?v=4"     //Optional
      }
    }
  },
  "homepage": "https://quay.io/repository/dgangaia/test/build/5346a21d-3434-4764-85be-5be1296f293c"
}
Dockerfile Build cancelled
The following example is a response from a Dockerfile Build that has been cancelled.
{
  "build_id": "cbd534c5-f1c0-4816-b4e3-55446b851e70",
  "trigger_kind": "github",
  "name": "test",
  "repository": "dgangaia/test",
  "namespace": "dgangaia",
  "docker_url": "quay.io/dgangaia/test",
  "trigger_id": "38b6e180-9521-4ff7-9844-acf371340b9e",
  "docker_tags": [
    "master",
    "latest"
  ],
  "build_name": "cbce83c",
  "trigger_metadata": {
    "commit": "cbce83c04bfb59734fc42a83aab738704ba7ec41",
    "ref": "refs/heads/master",
    "default_branch": "master",
    "git_url": "git@github.com:dgangaia/test.git",
    "commit_info": {
      "url": "https://github.com/dgangaia/test/commit/cbce83c04bfb59734fc42a83aab738704ba7ec41",
      "date": "2019-03-06T14:27:53+11:00",
      "message": "testing cancel build",
      "committer": {
        "username": "web-flow",
        "url": "https://github.com/web-flow",
        "avatar_url": "https://avatars3.githubusercontent.com/u/19864447?v=4"
      },
      "author": {
        "username": "dgangaia",
        "url": "https://github.com/dgangaia",
        "avatar_url": "https://avatars1.githubusercontent.com/u/43594254?v=4"
      }
    }
  },
  "homepage": "https://quay.io/repository/dgangaia/test/build/cbd534c5-f1c0-4816-b4e3-55446b851e70"
}
Vulnerability detected
The following example is a response from a Dockerfile Build has detected a vulnerability in the repository.
{
  "repository": "dgangaia/repository",
  "namespace": "dgangaia",
  "name": "repository",
  "docker_url": "quay.io/dgangaia/repository",
  "homepage": "https://quay.io/repository/dgangaia/repository",

  "tags": ["latest", "othertag"],

  "vulnerability": {
    "id": "CVE-1234-5678",
    "description": "This is a bad vulnerability",
    "link": "http://url/to/vuln/info",
    "priority": "Critical",
    "has_fix": true
  }
}
Project Quay quota management and enforcement overview
With Project Quay quota management, superusers can track storage consumption and set soft or hard limits for organizations, repositories, or the entire registry.
Project Quay superusers can manage capacity limits in the following ways:
-
Quota reporting: An administrator can track the storage consumption of all organizations. Users can track the storage consumption of their assigned organization.
-
Quota management: An administrator can define soft and hard checks for Project Quay users. Soft checks tell users if the storage consumption of an organization reaches their configured threshold. Hard checks prevent users from pushing to the registry when storage consumption reaches the configured limit.
These features help service owners of a Project Quay registry define service level agreements and support a healthy resource budget.
Quota management architecture
Project Quay quota management sums blob sizes at the repository and namespace level without double-counting shared blobs. You can enforce storage limits and reject pushes when quotas are exceeded.
|
Important
|
Because manifest list totals are counted toward the repository total, the total quota consumed when upgrading from a previous version of Project Quay might be reportedly differently in Project Quay 3.9. In some cases, the new total might go over a repository’s previously-set limit. Project Quay administrators might have to adjust the allotted quota of a repository to account for these changes. |
The quota management feature works by calculating the size of existing repositories and namespace with a backfill worker, and then adding or subtracting from the total for every image that is pushed or garbage collected afterwords. Additionally, the subtraction from the total happens when the manifest is garbage collected.
|
Note
|
Because subtraction occurs from the total when the manifest is garbage collected, there is a delay in the size calculation until it is able to be garbage collected. |
The following database tables hold the quota repository size, quota namespace size, and quota registry size, in bytes, of a Project Quay repository within an organization:
-
QuotaRepositorySize -
QuotaNameSpaceSize -
QuotaRegistrySize
The organization size is calculated by the backfill worker to ensure that it is not duplicated. When an image push is initialized, the user’s organization storage is validated to check if it is beyond the configured quota limits. If an image push exceeds defined quota limitations, a soft or hard check occurs:
-
For a soft check, users are notified.
-
For a hard check, the push is stopped.
If storage consumption is within configured quota limits, the push is allowed to proceed.
Image manifest deletion follows a similar flow, whereby the links between associated image tags and the manifest are deleted. Additionally, after the image manifest is deleted, the repository size is recalculated and updated in the QuotaRepositorySize, QuotaNameSpaceSize, and QuotaRegistrySize tables.
Quota management limitations
Quota management in Project Quay has limits related to push-time calculation and database-backed maximum sizes. Review these constraints before you set organization quotas.
One limitation of the quota management feature is that calculating resource consumption on the push of an artifact results in the calculation becoming part of the push’s critical path. Without this, usage data might drift.
The maximum storage quota size depends on the selected database:
| Database | Maximum quota size |
|---|---|
Postgres |
8388608 TB |
MySQL |
8388608 TB |
SQL Server |
16777216 TB |
Quota management configuration fields
The following configuration fields enable and customize quota management functionality in Project Quay. Quota management helps administrators enforce storage usage policies at the organization level by allowing them to set usage limits, calculate blob sizes, and control tag deletion behavior.
| Field | Type | Description |
|---|---|---|
FEATURE_QUOTA_MANAGEMENT |
Boolean |
Enables configuration, caching, and validation for quota management feature. Default: |
FEATURE_QUOTA_NOTIFICATIONS |
Boolean |
Enables external notification channels, such as email, for quota threshold alerts. When enabled, namespace owners receive proactive notifications when storage consumption crosses configured warning or critical thresholds. Default: |
FEATURE_MAILING |
Boolean |
Enables email delivery features across Project Quay. Must be Default: |
QUOTA_NOTIFICATION_COOLDOWN_SECONDS |
Integer |
Cooldown period in seconds before re-sending a quota notification for the same threshold (default: 86400 / 24 hours). The system prevents repeated notifications for the same namespace and threshold combination within this window. If storage usage drops below a threshold and later crosses the threshold again, the notification state is cleared and the notification will re-fire upon the new crossing. Notification claims ( Default: |
QUOTA_NOTIFICATION_WORKER_POLL_PERIOD |
Integer |
How often, in seconds, the quota notification background worker polls for threshold crossings that occur between image pushes—for example, when an administrator lowers a quota limit. Default: Default: |
DEFAULT_SYSTEM_REJECT_QUOTA_BYTES |
Integer |
Enables system default quota reject byte allowance for all organizations. By default, no limit is set. |
QUOTA_BACKFILL |
Boolean |
Enables the quota backfill worker to calculate the size of pre-existing blobs. Default: |
QUOTA_TOTAL_DELAY_SECONDS |
String |
The time delay for starting the quota backfill. Rolling deployments can cause incorrect totals. This field must be set to a time longer than it takes for the rolling deployment to complete. Default: |
PERMANENTLY_DELETE_TAGS |
Boolean |
Enables functionality related to the removal of tags from the time machine window. Default: |
RESET_CHILD_MANIFEST_EXPIRATION |
Boolean |
Resets the expirations of temporary tags targeting the child manifests. With this feature set to Default: |
# ...
FEATURE_QUOTA_MANAGEMENT: true
FEATURE_QUOTA_NOTIFICATIONS: true
DEFAULT_SYSTEM_REJECT_QUOTA_BYTES: 107374182400
QUOTA_BACKFILL: true
QUOTA_TOTAL_DELAY_SECONDS: 3600
QUOTA_NOTIFICATION_COOLDOWN_SECONDS: 86400
QUOTA_NOTIFICATION_WORKER_POLL_PERIOD: 300
PERMANENTLY_DELETE_TAGS: true
RESET_CHILD_MANIFEST_EXPIRATION: true
# ...
Managing quota limits by using the API
You can use the Project Quay API to check, create, change, or delete organization quota limits when an organization does not yet have a quota configured.
Before you begin, you must have generated an OAuth access token.
Setting quota by using the API
To create, view, or update an organization storage quota in Project Quay, you can call the organization quota API endpoints with an OAuth access token.
-
To set a quota for an organization, you can use the
POST /api/v1/organization/{orgname}/quotaendpoint:$ curl -X POST "https://<quay-server.example.com>/api/v1/organization/<orgname>/quota" \ -H "Authorization: Bearer <access_token>" \ -H "Content-Type: application/json" \ -d '{ "limit_bytes": 10737418240, "limits": "10 Gi" }'Example output:"Created" -
Use the
GET /api/v1/organization/{orgname}/quotacommand to see if your organization already has an established quota:$ curl -k -X GET -H "Authorization: Bearer <token>" -H 'Content-Type: application/json' https://<quay-server.example.com>/api/v1/organization/<organization_name>/quota | jqExample output:[{"id": 1, "limit_bytes": 10737418240, "limit": "10.0 GiB", "default_config": false, "limits": [], "default_config_exists": false}] -
You can use the
PUT /api/v1/organization/{orgname}/quota/{quota_id}command to modify the existing quota limitation. For example:$ curl -X PUT "https://<quay-server.example.com>/api/v1/organization/<orgname>/quota/<quota_id>" \ -H "Authorization: Bearer <access_token>" \ -H "Content-Type: application/json" \ -d '{ "limit_bytes": <limit_in_bytes> }'Example output:{"id": 1, "limit_bytes": 21474836480, "limit": "20.0 GiB", "default_config": false, "limits": [], "default_config_exists": false}
Viewing quota usage by using the API
To view organization and repository storage consumption in Project Quay, you can query the repository list and organization API endpoints.
-
To view storage consumed by repositories in an organization, send a
GETrequest to the/api/v1/repositoryendpoint:$ curl -k -X GET -H "Authorization: Bearer <token>" -H 'Content-Type: application/json' 'https://<quay-server.example.com>/api/v1/repository?last_modified=true&namespace=<organization_name>&popularity=true&public=true' | jqExample output:
{ "repositories": [ { "namespace": "testorg", "name": "ubuntu", "description": null, "is_public": false, "kind": "image", "state": "NORMAL", "quota_report": { "quota_bytes": 27959066, "configured_quota": 104857600 }, "last_modified": 1651225630, "popularity": 0, "is_starred": false } ] } -
To view the quota report for multiple repositories in the organization, send a
GETrequest to the/api/v1/repositoryendpoint:$ curl -k -X GET -H "Authorization: Bearer <token>" -H 'Content-Type: application/json' 'https://<quay-server.example.com>/api/v1/repository?last_modified=true&namespace=<organization_name>&popularity=true&public=true'Example output:
{ "repositories": [ { "namespace": "testorg", "name": "ubuntu", "description": null, "is_public": false, "kind": "image", "state": "NORMAL", "quota_report": { "quota_bytes": 27959066, "configured_quota": 104857600 }, "last_modified": 1651225630, "popularity": 0, "is_starred": false }, { "namespace": "testorg", "name": "nginx", "description": null, "is_public": false, "kind": "image", "state": "NORMAL", "quota_report": { "quota_bytes": 59231659, "configured_quota": 104857600 }, "last_modified": 1651229507, "popularity": 0, "is_starred": false } ] } -
To view quota information in the organization details, send a
GETrequest to the/api/v1/organization/<organization_name>endpoint:$ curl -k -X GET -H "Authorization: Bearer <token>" -H 'Content-Type: application/json' 'https://<quay-server.example.com>/api/v1/organization/<organization_name>' | jqExample output:
{
  "name": "testorg",
  ...
  "quotas": [
    {
      "id": 1,
      "limit_bytes": 104857600,
      "limits": []
    }
  ],
  "quota_report": {
    "quota_bytes": 87190725,
    "configured_quota": 104857600
  }
}
Setting reject and warning limits by using the API
To configure reject and warning thresholds for an organization quota in Project Quay, you can post limit definitions to the organization quota limit API endpoint.
-
To set a reject limit, send a
POSTrequest to the/api/v1/organization/<organization_name>/quota/<quota_id>/limitendpoint. For example:$ curl -k -X POST -H "Authorization: Bearer <token>" -H 'Content-Type: application/json' -d '{"type":"Reject","threshold_percent":80}' https://<quay-server.example.com>/api/v1/organization/<organization_name>/quota/1/limit-
To set a warning limit, send a
POSTrequest to the same endpoint. For example:$ curl -k -X POST -H "Authorization: Bearer <token>" -H 'Content-Type: application/json' -d '{"type":"Warning","threshold_percent":50}' https://<quay-server.example.com>/api/v1/organization/<organization_name>/quota/1/limit
-
Viewing reject and warning limits by using the API
To view reject and warning thresholds configured for an organization quota in Project Quay, you can send a GET request to the organization quota API endpoint.
-
View the reject and warning limits by using the
/api/v1/organization/<organization_name>/quotaendpoint. For example:$ curl -k -X GET -H "Authorization: Bearer <token>" -H 'Content-Type: application/json' https://<quay-server.example.com>/api/v1/organization/<organization_name>/quota | jqExample output:[ { "id": 1, "limit_bytes": 104857600, "default_config": false, "limits": [ { "id": 2, "type": "Warning", "limit_percent": 50 }, { "id": 1, "type": "Reject", "limit_percent": 80 } ], "default_config_exists": false } ]
Project Quay as a proxy cache for upstream registries
You can use Project Quay as a proxy cache for upstream registries to avoid pull-rate limits and speed up image pulls. Cached images update only when the upstream digest changes.
With Project Quay cache proxy, the following features are available:
-
Specific organizations can be defined as a cache for upstream registries.
-
Configuration of a Quay organization that acts as a cache for a specific upstream registry. This repository can be defined by using the Quay UI, and offers the following configurations:
-
Upstream registry credentials for private repositories or increased rate limiting.
-
Expiration timer to avoid surpassing cache organization size.
-
-
Global on/off configurable via the configuration application.
-
Caching of entire upstream registries or just a single namespace, for example, all of
docker.ioor justdocker.io/library. -
Logging of all cache pulls.
-
Cached images scannability by Clair.
-
Caching of all layers when an image is pulled from a proxied repository, which helps ensure that Clair can scan all images and that images remain pullable even if the upstream registry becomes unavailable.
Proxy cache architecture
The Project Quay proxy cache architecture shows how image pulls are served from cache or fetched from an upstream registry. Cache behavior depends on whether the image exists, is stale, or differs from upstream.
The following image shows the expected design flow and architecture of the proxy cache feature.
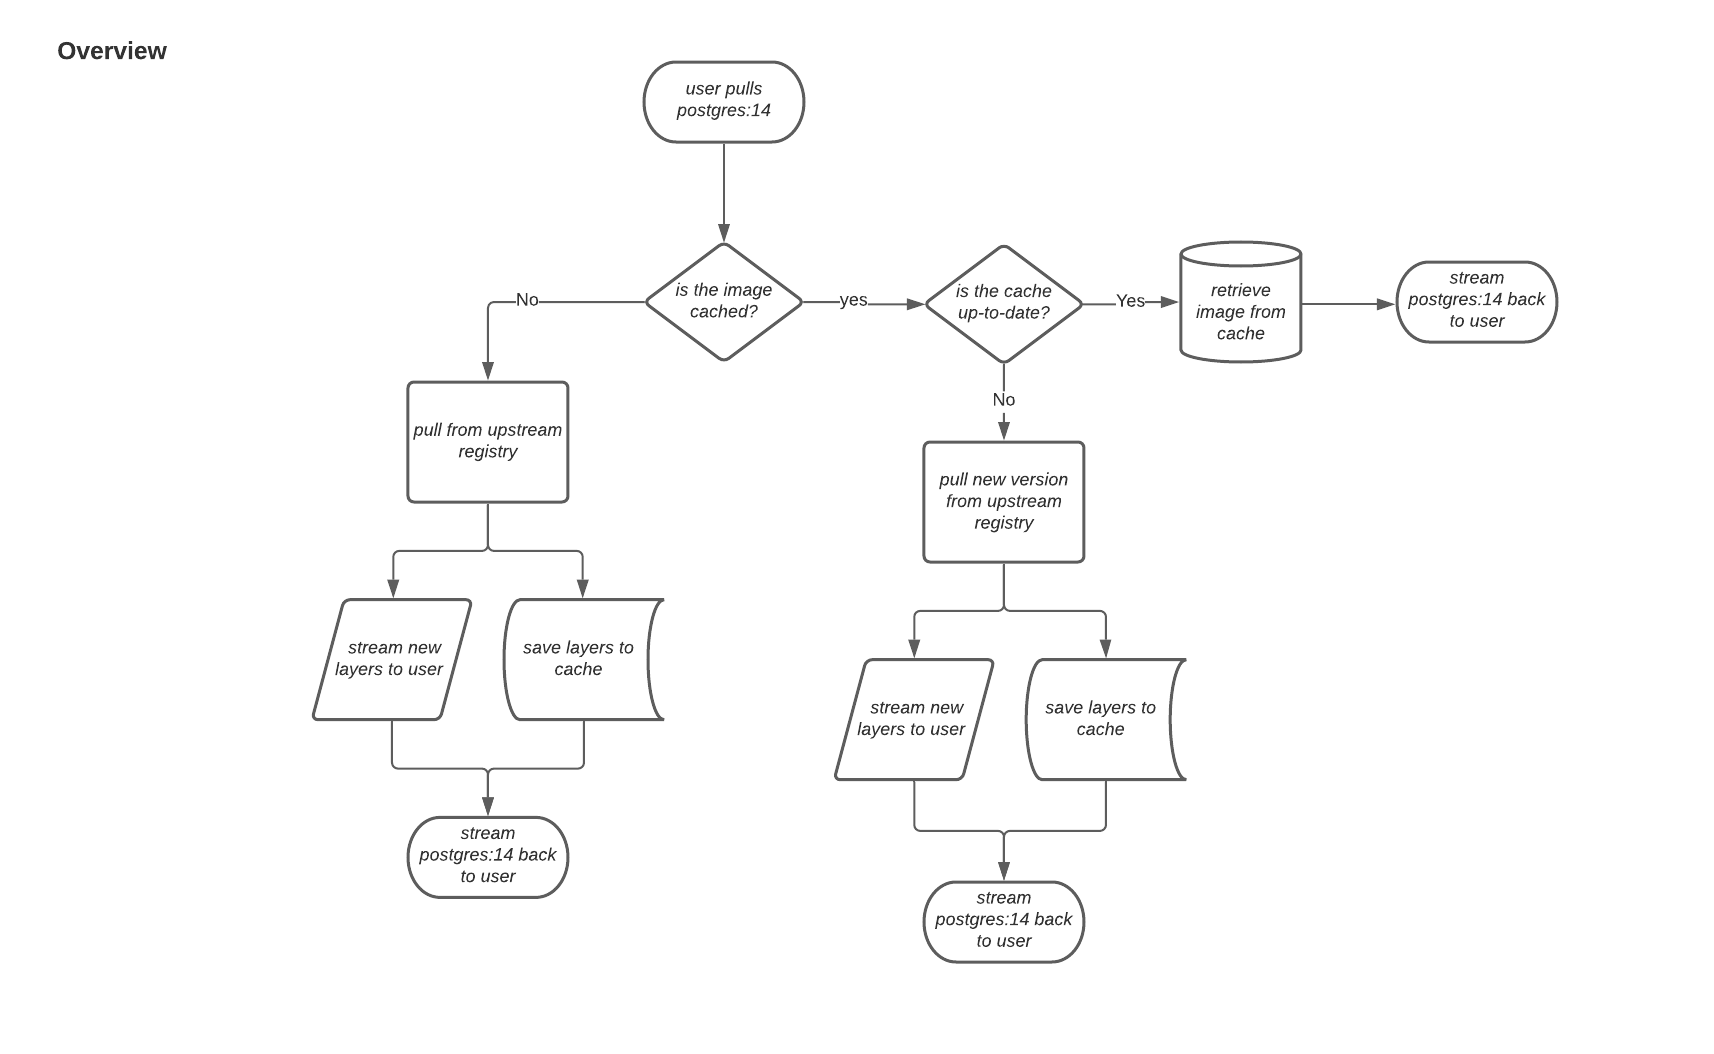
When a user pulls an image, for example, postgres:14, from an upstream repository on Project Quay, the repository checks to see if an image is present. If the image does not exist, a fresh pull is initiated. After being pulled, the image layers are saved to cache and server to the user in parallel. The following image depicts an architectural overview of this scenario:
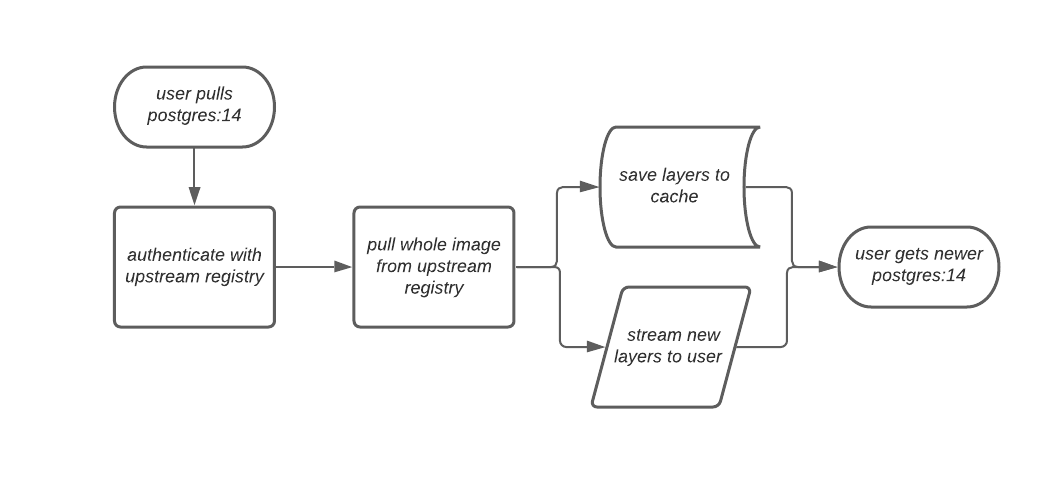
If the image in the cache exists, users can rely on Quay’s cache to stay up-to-date with the upstream source so that newer images from the cache are automatically pulled. This happens when tags of the original image have been overwritten in the upstream registry. The following image depicts an architectural overview of what happens when the upstream image and cached version of the image are different:
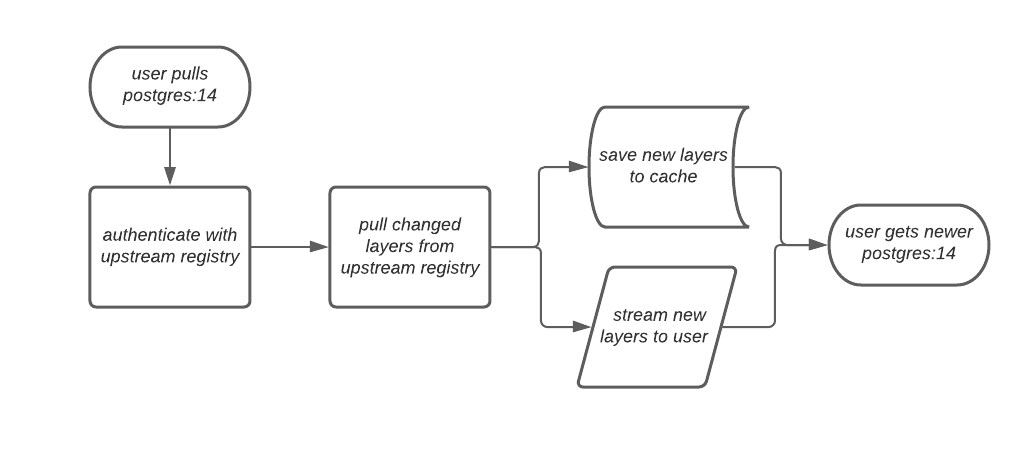
If the upstream image and cached version are the same, no layers are pulled and the cached image is delivered to the user.
In some cases, users initiate pulls when the upstream registry is down. If this happens with the configured staleness period, the image stored in cache is delivered. If the pull happens after the configured staleness period, the error is propagated to the user. The following image depicts an architectural overview when a pull happens after the configured staleness period:
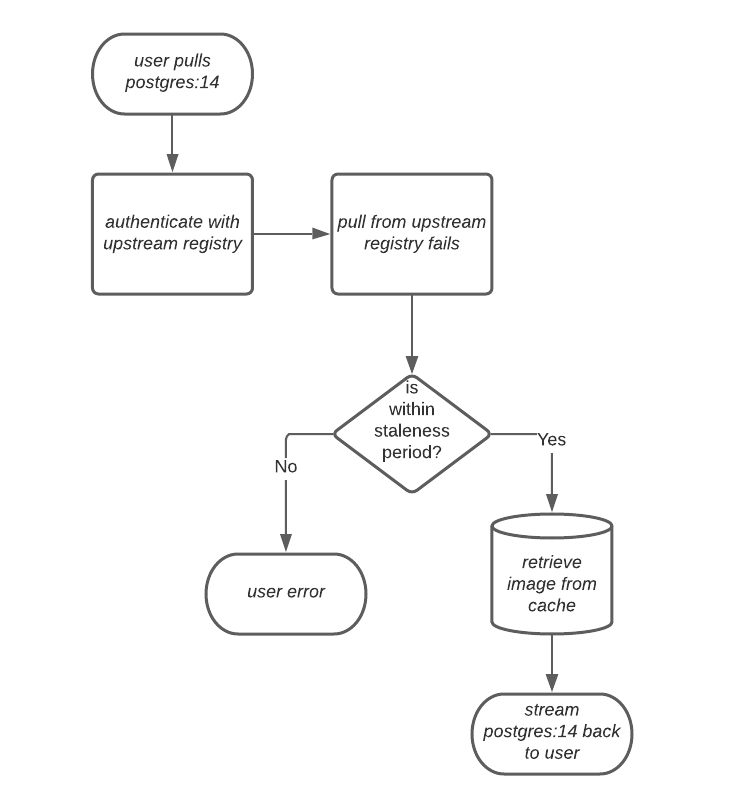
Quay administrators can leverage the configurable size limit of an organization to limit cache size so that backend storage consumption remains predictable. This is achieved by discarding images from the cache according to the frequency in which an image is used. The following image depicts an architectural overview of this scenario:
Proxy cache limitations
Proxy caching in Project Quay has size, property, and anonymous-user limitations. You can use these constraints to plan cache organization capacity and access.
The following limitations apply:
-
Your proxy cache must have a size limit of greater than, or equal to, the image you want to cache. For example, if your proxy cache organization has a maximum size of 500 MB, and the image a user wants to pull is 700 MB, the image will be cached and will overflow beyond the configured limit.
-
Cached images must have the same properties that images on a Quay repository must have.
-
Anonymous users cannot pull images through a proxy cache if the image has not been previously cached. This operation requires the creation of a new repository within the proxy organization to store the cached image, and anonymous users do not have the necessary permissions to create repositories.
Using Project Quay to proxy a remote registry
To proxy a remote registry with Project Quay, you can configure an organization as a cache and pull images through it. You set the remote registry, optional credentials, and expiration on the UI.
-
FEATURE_PROXY_CACHEin your config.yaml is set toTrue. -
Assigned the Member team role. For more information about team roles, see Setting a team role by using the UI.
-
On the Project Quay v2 UI, click the name of an organization, for example, cache-org.
-
In the navigation pane, click Settings.
-
In the Remote Registry box, enter the name of the remote registry to be cached, for example,
quay.io, and click Save.NoteBy adding a namespace to the Remote Registry, for example,
quay.io/<namespace>, users in your organization will only be able to proxy from that namespace. -
Optional. In the Remote Registry username box, enter the username for authenticating into the remote registry specified in the previous step. If you leave this empty, Quay will attempt to pull content anonymously from the upstream registry.
-
Optional. In the Remote registry password box, enter the password for authenticating into the remote registry. If you leave this empty, Quay will attempt to pull content anonymously from the upstream registry.
-
Optional. Set a time in the Expiration field.
Note-
The default tag Expiration field for cached images in a proxy organization is set to 86400 seconds. In the proxy organization, the tag expiration is refreshed to the value set in the UI’s Expiration field every time the tag is pulled. This feature is different than Quay’s default individual tag expiration feature. In a proxy organization, it is possible to override the individual tag feature. When this happens, the individual tag’s expiration is reset according to the Expiration field of the proxy organization.
-
Expired images will disappear after the allotted time, but are still stored in Project Quay. The time in which an image is completely deleted, or collected, depends on the Time Machine setting of your organization. The default time for garbage collection is 14 days unless otherwise specified.
-
-
Optional. Check the http box if you want an unsecure protocol used. If not checked, https is used to request the remote registry.
-
Click Save.
-
On the CLI, pull a public image from the remote registry that was specified, for example,
quay.io, acting as a proxy cache:$ podman pull <registry_url>/<organization_name>/<quayio_namespace>/<image_name>
ImportantIf your organization is set up to pull from a single namespace in the remote registry, the remote registry namespace must be omitted from the URL. For example,
podman pull <registry_url>/<organization_name>/<image_name>.
Leveraging storage quota limits in proxy organizations
When a proxied namespace has quota limits configured, Project Quay can auto-prune the least recently used image tags so that a new push that exceeds available storage is stored instead of being skipped.
|
Important
|
|
Testing the storage quota limits feature in proxy organizations
Confirm that auto-pruning works in a proxy organization with storage quota limits by pulling images until the quota is exceeded and verifying that the least recently used tag is removed.
-
Your organization is configured to serve as a proxy organization. The following example proxies from quay.io.
-
FEATURE_PROXY_CACHEis set toTruein yourconfig.yamlfile. -
FEATURE_QUOTA_MANAGEMENTis set toTruein yourconfig.yamlfile. -
Your organization is configured with a quota limit, for example,
150 MB.
-
Pull an image to your repository from your proxy organization, for example:
$ podman pull quay-server.example.com/proxytest/projectquay/quay:3.7.9
-
Depending on the space left in your repository, you might need to pull additional images from your proxy organization, for example:
$ podman pull quay-server.example.com/proxytest/projectquay/quay:3.6.2
-
In the Project Quay registry UI, click the name of your repository.
-
Click Tags in the navigation pane and ensure that
quay:3.7.9andquay:3.6.2are tagged.
-
-
Pull the last image that will result in your repository exceeding the allotted quota, for example:
$ podman pull quay-server.example.com/proxytest/projectquay/quay:3.5.1
-
Refresh the Tags page of your Project Quay registry. The first image that you pushed, for example,
quay:3.7.9should have been auto-pruned. The Tags page should now showquay:3.6.2andquay:3.5.1.
Open Container Initiative support
Project Quay supports Open Container Initiative image and distribution formats beyond Docker manifests. You can store Helm charts and other OCI media types in the registry.
In addition to container images, a variety of artifacts have emerged that support not just individual applications, but also the Kubernetes platform as a whole. These range from Open Policy Agent (OPA) policies for security and governance to Helm charts and Operators that aid in application deployment.
Project Quay is a private container registry that not only stores container images, but also supports an entire ecosystem of tooling to aid in the management of containers. Project Quay strives to be as compatible as possible with the OCI 1.1 Image and Distribution specifications, and supports common media types like Helm charts (as long as they pushed with a version of Helm that supports OCI) and a variety of arbitrary media types within the manifest or layer components of container images. Support for OCI media types differs from previous iterations of Project Quay, when the registry was more strict about accepted media types. Because Project Quay now works with a wider array of media types, including those that were previously outside the scope of its support, it is now more versatile accommodating not only standard container image formats but also emerging or unconventional types.
In addition to its expanded support for novel media types, Project Quay ensures compatibility with Docker images, including V2_2 and V2_1 formats. This compatibility with Docker V2_2 and V2_1 images demonstrates Project Quay’s' commitment to providing a seamless experience for Docker users. Moreover, Project Quay continues to extend its support for Docker V1 pulls, catering to users who might still rely on this earlier version of Docker images.
Support for OCI artifacts are enabled by default. The following examples show you how to use some media types, which can be used as examples for using other OCI media types.
Helm and OCI prerequisites
Before you use Helm charts with Project Quay, you can install a supported Helm client and trust registry certificates. OCI chart support requires a compatible Helm version.
Helm simplifies how applications are packaged and deployed. Helm uses a packaging format called Charts which contain the Kubernetes resources representing an application. Project Quay supports Helm charts so long as they are a version supported by OCI.
You can download the most recent version of Helm from the Helm releases page. After you have downloaded Helm, you must enable your system to trust SSL/TLS certificates used by Project Quay.
Communication between the Helm client and Project Quay is facilitated over HTTPS. As of Helm 3.5, support is only available for registries communicating over HTTPS with trusted certificates. In addition, the operating system must trust the certificates exposed by the registry. You must ensure that your operating system has been configured to trust the certificates used by Project Quay. Use the following procedure to enable your system to trust the custom certificates.
-
Enter the following command to copy the
rootCA.pemfile to the/etc/pki/ca-trust/source/anchors/folder:$ sudo cp rootCA.pem /etc/pki/ca-trust/source/anchors/ -
Enter the following command to update the CA trust store:
$ sudo update-ca-trust extract
Using Helm charts
To use Helm charts with Project Quay, you can push and pull OCI chart artifacts in the registry. You manage charts like other supported OCI media types.
Use the following example to download and push an etherpad chart from the Red Hat Community of Practice (CoP) repository.
-
You have logged into Quay.
-
Add a chart repository by entering the following command:
$ helm repo add redhat-cop https://redhat-cop.github.io/helm-charts -
Enter the following command to update the information of available charts locally from the chart repository:
$ helm repo update -
Enter the following command to pull a chart from a repository:
$ helm pull redhat-cop/etherpad --version=0.0.4 --untar -
Enter the following command to package the chart into a chart archive:
$ helm package ./etherpadExample output
Successfully packaged chart and saved it to: /home/user/linux-amd64/etherpad-0.0.4.tgz -
Log in to Project Quay using
helm registry login:$ helm registry login quay370.apps.quayperf370.perfscale.devcluster.openshift.com -
Push the chart to your repository using the
helm pushcommand:
Annotation parsing
Some OCI media types do not include labels for metadata such as expiration. You can use ORAS annotations with Project Quay to embed that metadata in artifacts.
Tools such as ORAS (OCI Registry as Storage) can now be used to embed information with artifact types to help ensure that images operate properly, for example, to expire.
The following procedure uses ORAS to add an expiration date to an OCI media artifact.
|
Important
|
If you pushed an image with |
-
You have downloaded the
orasCLI. -
You have pushed an OCI media artifact to your Project Quay repository.
-
By default, some OCI media types, like
application/vnd.oci.image.manifest.v1+json, do not use certain labels, like expiration timestamps. You can use a CLI tool like ORAS (oras) to add annotations to OCI media types. For example:$ oras push --annotation "quay.expires-after=2d" \ --annotation "expiration = 2d" \ quay.io/<organization_name>/<repository>/<image_name>:<tag>where:
--annotation "quay.expires-after=2d"-
Specifies that the expiration time is set for 2 days, indicated by
2d. --annotation "expiration = 2d"-
Specifies that the expiration label is added.
Example output✓ Exists application/vnd.oci.empty.v1+json 2/2 B 100.00% 0s └─ sha256:44136fa355b3678a1146ad16f7e8649e94fb4fc21fe77e8310c060f61caaff8a ✓ Uploaded application/vnd.oci.image.manifest.v1+json 561/561 B 100.00% 511ms └─ sha256:9b4f2d43b62534423894d077f0ff0e9e496540ec8b52b568ea8b757fc9e7996b Pushed [registry] quay.io/stevsmit/testorg3/oci-image:v1 ArtifactType: application/vnd.unknown.artifact.v1 Digest: sha256:9b4f2d43b62534423894d077f0ff0e9e496540ec8b52b568ea8b757fc9e7996b
-
Pull the image with
oras. For example:$ oras pull quay.io/<organization_name>/<repository>/<image_name>:<tag> -
Inspect the changes using
oras. For example:$ oras manifest fetch quay.io/<organization_name>/<repository>/<image_name>:<tag>Example output{"schemaVersion":2,"mediaType":"application/vnd.oci.image.manifest.v1+json","artifactType":"application/vnd.unknown.artifact.v1","config":{"mediaType":"application/vnd.oci.empty.v1+json","digest":"sha256:44136fa355b3678a1146ad16f7e8649e94fb4fc21fe77e8310c060f61caaff8a","size":2,"data":"e30="},"layers":[{"mediaType":"application/vnd.oci.empty.v1+json","digest":"sha256:44136fa355b3678a1146ad16f7e8649e94fb4fc21fe77e8310c060f61caaff8a","size":2,"data":"e30="}],"annotations":{"org.opencontainers.image.created":"2024-07-11T15:22:42Z","version ":" 8.11"}}
Attaching referrers to an image tag
To attach referrers to an image tag in Project Quay, you can use the oras CLI with OCI distribution spec 1.1 referrers schemas.
This procedure shows you how to attach referrers to an image tag using different schemas supported by the OCI distribution spec 1.1 using the oras CLI. This is useful for attaching and managing additional metadata like referrers to container images.
-
You have downloaded the
orasCLI. -
You have access to an OCI media artifact.
-
Tag an OCI media artifact by entering the following command:
$ podman tag <myartifact_image> <quay-server.example.com>/<organization_name>/<repository>/<image_name>:<tag> -
Push the artifact to your Project Quay registry. For example:
$ podman push <myartifact_image> <quay-server.example.com>/<organization_name>/<repository>/<image_name>:<tag> -
Enter the following command to attach a manifest using the OCI 1.1 referrers
APIschema withoras:$ oras attach --artifact-type <MIME_type> --distribution-spec v1.1-referrers-api <myartifact_image> \ <quay-server.example.com>/<organization_name>/<repository>/<image_name>:<tag> \ <example_file>.txtExample output-spec v1.1-referrers-api quay.io/testorg3/myartifact-image:v1.0 hi.txt ✓ Exists hi.txt 3/3 B 100.00% 0s └─ sha256:98ea6e4f216f2fb4b69fff9b3a44842c38686ca685f3f55dc48c5d3fb1107be4 ✓ Exists application/vnd.oci.empty.v1+json 2/2 B 100.00% 0s └─ sha256:44136fa355b3678a1146ad16f7e8649e94fb4fc21fe77e8310c060f61caaff8a ✓ Uploaded application/vnd.oci.image.manifest.v1+json 723/723 B 100.00% 677ms └─ sha256:31c38e6adcc59a3cfbd2ef971792aaf124cbde8118e25133e9f9c9c4cd1d00c6 Attached to [registry] quay.io/testorg3/myartifact-image@sha256:db440c57edfad40c682f9186ab1c1075707ce7a6fdda24a89cb8c10eaad424da Digest: sha256:31c38e6adcc59a3cfbd2ef971792aaf124cbde8118e25133e9f9c9c4cd1d00c6 -
Enter the following command to attach a manifest using the OCI 1.1 referrers
tagschema:$ oras attach --artifact-type <MIME_type> --distribution-spec v1.1-referrers-tag \ <myartifact_image> <quay-server.example.com>/<organization_name>/<repository>/<image_name>:<tag> \ <example_file>.txtExample output✓ Exists hi.txt 3/3 B 100.00% 0s └─ sha256:98ea6e4f216f2fb4b69fff9b3a44842c38686ca685f3f55dc48c5d3fb1107be4 ✓ Exists application/vnd.oci.empty.v1+json 2/2 B 100.00% 0s └─ sha256:44136fa355b3678a1146ad16f7e8649e94fb4fc21fe77e8310c060f61caaff8a ✓ Uploaded application/vnd.oci.image.manifest.v1+json 723/723 B 100.00% 465ms └─ sha256:2d4b54201c8b134711ab051389f5ba24c75c2e6b0f0ff157fce8ffdfe104f383 Attached to [registry] quay.io/testorg3/myartifact-image@sha256:db440c57edfad40c682f9186ab1c1075707ce7a6fdda24a89cb8c10eaad424da Digest: sha256:2d4b54201c8b134711ab051389f5ba24c75c2e6b0f0ff157fce8ffdfe104f383 -
Enter the following command to discoverer referrers of the artifact using the
tagschema:$ oras discover --insecure --distribution-spec v1.1-referrers-tag \ <quay-server.example.com>/<organization_name>/<repository>/<image_name>:<tag>Example outputquay.io/testorg3/myartifact-image@sha256:db440c57edfad40c682f9186ab1c1075707ce7a6fdda24a89cb8c10eaad424da └── doc/example └── sha256:2d4b54201c8b134711ab051389f5ba24c75c2e6b0f0ff157fce8ffdfe104f383 -
Enter the following command to discoverer referrers of the artifact using the
APIschema:$ oras discover --distribution-spec v1.1-referrers-api \ <quay-server.example.com>/<organization_name>/<repository>/<image_name>:<tag>Example outputDiscovered 3 artifacts referencing v1.0 Digest: sha256:db440c57edfad40c682f9186ab1c1075707ce7a6fdda24a89cb8c10eaad424da Artifact Type Digest sha256:2d4b54201c8b134711ab051389f5ba24c75c2e6b0f0ff157fce8ffdfe104f383 sha256:22b7e167793808f83db66f7d35fbe0088b34560f34f8ead36019a4cc48fd346b sha256:bb2b7e7c3a58fd9ba60349473b3a746f9fe78995a88cb329fc2fd1fd892ea4e4 -
Optional. You can also discover referrers by using the
/v2/<organization_name>/<repository_name>/referrers/<sha256_digest>endpoint. For this to work, you must generate a v2 API token and setFEATURE_REFERRERS_API: truein yourconfig.yamlfile.-
Update your
config.yamlfile to include theFEATURE_REFERRERS_APIfield. For example:# ... FEATURE_REFERRERS_API: true # ... -
Enter the following command to Base64 encode your credentials:
$ echo -n '<username>:<password>' | base64Example outputabcdeWFkbWluOjE5ODlraWROZXQxIQ== -
Enter the following command to use the base64 encoded token and modify the URL endpoint to your Project Quay server:
$ curl --location '<quay-server.example.com>/v2/auth?service=<quay-server.example.com>&scope=repository:quay/listocireferrs:pull,push' --header 'Authorization: Basic <base64_username:password_encode_token>' -k | jqExample output{ "token": "<example_token_output>..." }
-
-
Enter the following command, using the v2 API token, to list OCI referrers of a manifest under a repository:
$ GET https://<quay-server.example.com>/v2/<organization_name>/<repository_name>/referrers/sha256:0de63ba2d98ab328218a1b6373def69ec0d0e7535866f50589111285f2bf3fb8
--header 'Authorization: Bearer <v2_bearer_token> -k | jq
Example output{ "schemaVersion": 2, "mediaType": "application/vnd.oci.image.index.v1+json", "manifests": [ { "mediaType": "application/vnd.oci.image.manifest.v1+json", "digest": "sha256:2d4b54201c8b134711ab051389f5ba24c75c2e6b0f0ff157fce8ffdfe104f383", "size": 793 }, ] }