Connect OpenShift to Quay with the Quay Bridge Operator
Install and configure the Quay Bridge Operator, create OAuth secrets, and deploy a QuayIntegration custom resource on OpenShift.
Quay Bridge Operator features
The Quay Bridge Operator duplicates integrated OpenShift Container Platform registry features in Project Quay and synchronizes namespaces, image streams, and robot accounts between your clusters.
The features enabled with the Quay Bridge Operator include:
-
Synchronizing OpenShift Container Platform namespaces as Project Quay organizations.
-
Creating robot accounts for each default namespace service account.
-
Creating secrets for each created robot account, and associating each robot secret to a service account as
MountableandImage Pull Secret. -
Synchronizing OpenShift Container Platform image streams as Project Quay repositories.
-
Automatically rewriting new builds making use of image streams to output to Project Quay.
-
Automatically importing an image stream tag after a build completes.
Setting up Project Quay for the Quay Bridge Operator
To enable the Quay Bridge Operator to communicate with your Project Quay registry, you can create a dedicated organization and generate an OAuth token with the required permissions.
-
You are logged in to Project Quay as a user with administrative privileges.
-
Log in to Project Quay through the web UI.
-
Select the organization for which you configure the external application.
-
On the navigation pane, select Applications.
-
Select Create New Application and enter a name for the new application, for example,
openshift. -
On the OAuth Applications page, select your application, for example,
openshift. -
On the navigation pane, select Generate Token.
-
Select the following fields:
-
Administer Organization
-
Administer Repositories
-
Create Repositories
-
View all visible repositories
-
Read/Write to any accessible repositories
-
Super User Access
-
Administer User
-
Read User Information
-
-
Review the assigned permissions.
-
Select Authorize Application and then confirm the authorization by selecting Authorize Application.
-
Save the generated access token.
ImportantProject Quay does not offer token management. You cannot list tokens, delete tokens, or modify tokens. The generated access token is only shown once and cannot be re-obtained after closing the page.
Installing the Quay Bridge Operator on OpenShift Container Platform
To enable the Quay Bridge Operator to synchronize your OpenShift Container Platform registry with Project Quay, you can install the operator from OperatorHub in the OpenShift Container Platform web console.
|
Warning
|
The Quay Bridge Operator integrates OpenShift Container Platform resources, such as |
-
You have configured Project Quay and obtained an OAuth access token.
-
You are logged in to OpenShift Container Platform as a user with administrative privileges.
-
Open the Administrator perspective of the web console and navigate to Operators → OperatorHub on the navigation pane.
-
Search for
Quay Bridge Operator, click the Quay Bridge Operator title, and then click Install. -
Select the version to install, for example, stable-{producty}, and then click Install.
-
Click View Operator when the installation finishes to go to the Quay Bridge Operator’s Details page. Alternatively, you can click Installed Operators → Red Hat Quay Bridge Operator to go to the Details page.
Creating an OpenShift Container Platform secret for the OAuth token
To enable the Quay Bridge Operator to communicate with your Project Quay deployment, you can create a secret in OpenShift Container Platform that stores the OAuth access token.
-
You have configured Project Quay and obtained an access token.
-
You have deployed the Quay Bridge Operator on OpenShift Container Platform.
-
You have installed the OpenShift CLI (
oc).
-
Create a secret that contains the access token in the
openshift-operatorsnamespace:$ oc create secret -n openshift-operators generic <secret_name> --from-literal=token=<access_token><secret_name>specifies the name of the secret to create, for example,quay-bridge-operator-token.<access_token>specifies the access token generated during "Setting up Project Quay for the Quay Bridge Operator".
Creating the QuayIntegration custom resource
The QuayIntegration custom resource connects your OpenShift Container Platform cluster to a Project Quay registry and defines the configuration that the Quay Bridge Operator uses to synchronize projects, organizations, and robot accounts.
The QuayIntegration custom resource can be created by using the OpenShift Container Platform web console, or from the command-line interface.
Creating the QuayIntegration custom resource using the CLI
To create the QuayIntegration custom resource from the command line, you can define the configuration in a YAML file and apply it using the oc create command.
-
You have installed the Quay Bridge Operator on OpenShift Container Platform.
-
You have created a secret containing the OAuth access token in OpenShift Container Platform.
-
You have installed the OpenShift CLI (
oc).
-
Create a
quay-integration.yaml:$ touch quay-integration.yaml
-
Use the following configuration for a minimal deployment of the
QuayIntegrationcustom resource:apiVersion: quay.redhat.com/v1 kind: QuayIntegration metadata: name: example-quayintegration spec: clusterID: openshift credentialsSecret: namespace: openshift-operators name: quay-integration quayHostname: https://<QUAY_URL> insecureRegistry: falsewhere:
spec.clusterID-
Specifies the unique identifier for the OpenShift Container Platform cluster. This value is required and defaults to
openshift. spec.credentialsSecret-
Specifies the namespace and name of the secret containing the token that was previously created.
spec.quayHostname-
Specifies the hostname of your Project Quay instance.
spec.insecureRegistry-
Specifies whether Project Quay uses self signed certificates. When Project Quay uses self signed certificates, set the property to
insecureRegistry: true.
For a list of all configuration fields, see "`QuayIntegration` configuration fields".
-
Create the
QuayIntegrationcustom resource by entering the following command:$ oc create -f quay-integration.yaml
Creating the QuayIntegration custom resource using the web console
To create the QuayIntegration custom resource using the web console, you can use the Create Instance option from the Quay Bridge Operator operator details page and enter the required configuration fields.
After the QuayIntegration custom resource is created, your OpenShift Container Platform cluster is linked to your Project Quay instance. Organizations within your Project Quay registry should be created for the related namespace for the OpenShift Container Platform environment.
-
You have installed the Quay Bridge Operator on OpenShift Container Platform.
-
You have created a secret containing the OAuth access token in OpenShift Container Platform.
-
You are logged in to OpenShift Container Platform as a cluster administrator.
-
Open the Administrator perspective of the web console and navigate to Operators → Installed Operators.
-
Click Red Hat Quay Bridge Operator.
-
On the Details page of the Quay Bridge Operator, click Create Instance on the Quay Integration API card.
-
On the Create QuayIntegration page, enter the following required information in either Form view or YAML view:
-
Name: The name that refers to the
QuayIntegrationcustom resource object. -
Cluster ID: The ID associated with this cluster. This value should be unique across the entire ecosystem. Defaults to
openshiftif left unspecified. -
Credentials secret: Refers to the namespace and name of the secret containing the token that was previously created.
-
Quay hostname: The hostname of the Quay registry.
-
Using the Quay Bridge Operator
To verify that the Quay Bridge Operator synchronizes your OpenShift Container Platform projects with Project Quay, you can create a test project and confirm that organizations, robot accounts, and image repositories are created automatically.
-
You have installed the Project Quay Operator.
-
You have logged into OpenShift Container Platform as a cluster administrator.
-
You have logged into your Project Quay registry.
-
You have installed the Quay Bridge Operator.
-
You have configured the
QuayIntegrationcustom resource.
-
Enter the following command to create a new OpenShift Container Platform project called
e2e-demo:$ oc new-project e2e-demo -
After you have created a new project, a new Organization is created in Project Quay. Navigate to the Project Quay registry and confirm that you have created a new Organization named
openshift_e2e-demo.NoteThe
openshiftvalue of the Organization might be different if the clusterID in yourQuayIntegrationresource used a different value. -
On the Project Quay UI, click the name of the new Organization, for example, openshift_e2e-demo.
-
Click Robot Accounts in the navigation pane. As part of new project, the following Robot Accounts should have been created:
-
openshift_e2e-demo+deployer
-
openshift_e2e-demo+default
-
openshift_e2e-demo+builder
-
-
Enter the following command to confirm three secrets containing Docker configuration associated with the applicable Robot Accounts were created:
$ oc get secrets builder-quay-openshift deployer-quay-openshift default-quay-openshiftExample outputstevsmit@stevsmit ocp-quay $ oc get secrets builder-quay-openshift deployer-quay-openshift default-quay-openshift NAME TYPE DATA AGE builder-quay-openshift kubernetes.io/dockerconfigjson 1 77m deployer-quay-openshift kubernetes.io/dockerconfigjson 1 77m default-quay-openshift kubernetes.io/dockerconfigjson 1 77m -
Enter the following command to display detailed information about
builderServiceAccount (SA), including its secrets, token expiration, and associated roles and role bindings. This ensures that the project is integrated via the Quay Bridge Operator.$ oc describe sa builder default deployerExample output... Name: builder Namespace: e2e-demo Labels: <none> Annotations: <none> Image pull secrets: builder-dockercfg-12345 builder-quay-openshift Mountable secrets: builder-dockercfg-12345 builder-quay-openshift Tokens: builder-token-12345 Events: <none> ... -
Enter the following command to create and deploy a new application called
httpd-template:$ oc new-app --template=httpd-exampleExample output--> Deploying template "e2e-demo/httpd-example" to project e2e-demo ... --> Creating resources ... service "httpd-example" created route.route.openshift.io "httpd-example" created imagestream.image.openshift.io "httpd-example" created buildconfig.build.openshift.io "httpd-example" created deploymentconfig.apps.openshift.io "httpd-example" created --> Success Access your application via route 'httpd-example-e2e-demo.apps.quay-ocp.gcp.quaydev.org' Build scheduled, use 'oc logs -f buildconfig/httpd-example' to track its progress. Run 'oc status' to view your app.After running this command,
BuildConfig,ImageStream,Service,Route, andDeploymentConfigresources are created. When theImageStreamresource is created, an associated repository is created in Project Quay. -
The
ImageChangeTriggerfor theBuildConfigtriggers a new Build when the Apache HTTPD image, located in theopenshiftnamespace, is resolved. As the new Build is created, theMutatingWebhookConfigurationautomatically rewrites the output to point at Project Quay. You can confirm that the build is complete by querying the output field of the build by running the following command:$ oc get build httpd-example-1 --template='{{ .spec.output.to.name }}'Example outputexample-registry-quay-quay-enterprise.apps.quay-ocp.gcp.quaydev.org/openshift_e2e-demo/httpd-example:latest -
On the Project Quay UI, navigate to the
openshift_e2e-demoOrganization and select the httpd-example repository. -
Click Tags in the navigation pane and confirm that the
latesttag has been successfully pushed. -
Enter the following command to ensure that the latest tag has been resolved:
$ oc describe is httpd-exampleExample outputName: httpd-example Namespace: e2e-demo Created: 55 minutes ago Labels: app=httpd-example template=httpd-example Description: Keeps track of changes in the application image Annotations: openshift.io/generated-by=OpenShiftNewApp openshift.io/image.dockerRepositoryCheck=2023-10-02T17:56:45Z Image Repository: image-registry.openshift-image-registry.svc:5000/e2e-demo/httpd-example Image Lookup: local=false Unique Images: 0 Tags: 1 latest tagged from example-registry-quay-quay-enterprise.apps.quay-ocp.gcp.quaydev.org/openshift_e2e-demo/httpd-example:latest -
After the
ImageStreamis resolved, a new deployment should have been triggered. Enter the following command to generate a URL output:$ oc get route httpd-example --template='{{ .spec.host }}'Example outputhttpd-example-e2e-demo.apps.quay-ocp.gcp.quaydev.org -
Navigate to the URL. If a sample web page appears, the deployment was successful.
-
Enter the following command to delete the resources and clean up your Project Quay repository:
$ oc delete project e2e-demoNoteThe command waits until the project resources have been removed. This can be bypassed by adding the
--wait=falseto the above command -
After the command completes, navigate to your Project Quay repository and confirm that the
openshift_e2e-demoOrganization is no longer available.
Plan and enable image mirroring
To bring upstream images into Project Quay, you can review mirroring concepts and enable repository and organization mirroring. You can then create mirrors after mirroring is turned on.
Repository mirroring
With repository mirroring in Project Quay, you can copy images from an external registry into your cluster. You sync by repository or organization name and tag, set intervals, and filter architectures.
From a Project Quay registry with mirroring enabled, you can:
-
Choose a repository or organization from an external registry to mirror
-
Add credentials to access the external registry
-
Identify specific container image repository or organization names and tags to sync
-
Set intervals at which a repository or organization is synced
-
Check the current state of synchronization
-
Filter the architectures that are mirrored
Repository mirroring suits distinct registries that must share selected upstream content. You can configure mirroring in the Project Quay configuration file or by using the Project Quay API when you are ready to implement it.
Mirroring compared to geo-replication
Mirroring and geo-replication solve different distribution needs in Project Quay. Mirroring syncs selected repositories between separate registries; geo-replication shares one database and replicates blob storage across regions.
For example, a geo-replicated Project Quay registry can use two different blob storage endpoints.
The primary use cases for geo-replication include the following:
-
Speeding up access to the binary blobs for geographically dispersed setups
-
Guaranteeing that the image content is the same across regions
Mirroring synchronizes selected repositories, or subsets of repositories, from one registry to another. The registries are distinct, with each registry having a separate database and separate image storage.
The primary use cases for mirroring include the following:
-
Independent registry deployments in different data centers or regions, where a certain subset of the overall content is supposed to be shared across the data centers and regions
-
Automatic synchronization or mirroring of selected (allowlisted) upstream repositories from external registries into a local Project Quay deployment
|
Note
|
Mirroring and geo-replication can be used simultaneously. |
| Feature / Capability | Geo-replication | Mirroring |
|---|---|---|
What is the feature designed to do? |
A shared, global registry |
Distinct, different registries |
What happens if replication or mirroring has not been completed yet? |
The remote copy is used (slower) |
No image is served |
Is access to all storage backends in both regions required? |
Yes (all Project Quay nodes) |
No (distinct storage) |
Can users push images from both sites to the same repository or organization? |
Yes |
No |
Is all registry content and configuration identical across all regions (shared database)? |
Yes |
No |
Can users select individual namespaces or repositories to be mirrored? |
No |
Yes |
Can users apply filters to synchronization rules? |
No |
Yes |
Are individual / different role-based access control configurations allowed in each region |
No |
Yes |
Using mirroring
Repository mirroring in Project Quay syncs images for a repository or organization from an external registry. Filters, robot accounts, and sync intervals control what is copied and when.
The following list shows features and limitations of Project Quay mirroring for a repository or organization.
|
Note
|
The word entity is used in the mirroring documentation to refer to either a repository or organization. |
-
With mirroring, you can mirror an entire entity or selectively limit which images are synced. Filters can be based on a comma-separated list of tags, a range of tags, or other means of identifying tags through Unix shell-style wildcards.
-
After you set mirroring for an entity, you cannot manually add other images to that entity.
-
Because the mirrored entity is based on the entity and the tags that you set, the entity holds only the content represented by the entity and tag pair. For example, if you change the tag so that some images in the entity no longer match, those images are deleted.
-
Only the designated robot can push images to a mirrored entity, superseding any role-based access control permissions set on the entity.
-
Mirroring can be configured to roll back on failure, or to run on a best-effort basis.
-
With a mirrored entity, a user with read permissions can pull images from the entity but cannot push images to the entity.
-
Changing settings on your mirrored entity can be performed in the Project Quay user interface.
-
Images are synced at set intervals, but can also be synced on demand.
-
In the current implementation of organization-level repository mirroring, Project Quay does not replicate deletions from the source registry. If any of the following entities are removed or absent in the upstream source, they persist in the local Project Quay mirror:
-
Source namespaces or organizations and their repositories. If the entire upstream source namespace (for example, a Harbor project or Project Quay organization) is removed, all previously mirrored repositories and their content remain in the local mirror.
-
Individual repositories. Repositories previously discovered and synced continue to be tracked and served even if removed from the upstream source.
-
Image tags. Tags that existed at the time of the last sync persist in the mirror even if deleted upstream.
-
Referrers. OCI Referrers API artifacts, such as Cosign signatures and SBOMs, are not currently mirrored. When present locally, they are not cleaned up automatically.
-
-
The downstream mirror acts as a cumulative archive. If an upstream namespace is emptied or its repositories and tags are removed, the mirror continues to serve the last successfully synchronized versions of those objects. This might lead to higher storage consumption in the mirror than in the source.
NoteThis behavior differs from repository-level mirroring, which automatically removes local tags that are no longer present in the source registry.
Manual deletion by using the Project Quay UI or API is required to remove these entities from the mirror. A future release can introduce a configurable option to automatically delete absent items, including organizations, repositories, tags, referrers, and manifest list children from the local mirror.
Enabling repository mirroring for Project Quay
To enable repository mirroring in Project Quay, you can set FEATURE_REPO_MIRROR to true in your config.yaml file and restart the registry.
-
To enable mirroring for repositories, set
FEATURE_REPO_MIRROR: truein yourconfig.yamlfile:# ... FEATURE_REPO_MIRROR: true REPO_MIRROR_INTERVAL: 30 REPO_MIRROR_SERVER_HOSTNAME: "openshift-quay-service" REPO_MIRROR_TLS_VERIFY: true REPO_MIRROR_ROLLBACK: false FEATURE_SPARSE_INDEX: true REPO_MIRROR_MAX_MANIFEST_LIST_SIZE: 10485760 REPO_MIRROR_MAX_MANIFEST_ENTRIES: 1000 # ...where:
FEATURE_REPO_MIRROR-
Specifies whether to enable or disable repository-level mirroring.
REPO_MIRROR_INTERVAL-
Specifies the worker processing interval in seconds.
REPO_MIRROR_SERVER_HOSTNAME-
Specifies the hostname of the server hosting the mirrored repository.
REPO_MIRROR_TLS_VERIFY-
Specifies whether to verify the TLS certificate of the mirrored repository.
REPO_MIRROR_ROLLBACK-
Specifies whether to roll back the repository if a mirroring operation fails.
FEATURE_SPARSE_INDEX-
Specifies whether to allow sparse manifest indexes.
REPO_MIRROR_MAX_MANIFEST_LIST_SIZE-
Specifies the maximum size of the manifest list in bytes.
REPO_MIRROR_MAX_MANIFEST_ENTRIES-
Specifies the maximum number of manifest entries to process.
-
Restart your Project Quay registry.
Enabling organization mirroring for Project Quay
To enable organization mirroring in Project Quay, you can set FEATURE_ORG_MIRROR to true in your config.yaml file and restart the registry.
-
To enable organization mirroring, set the following configuration fields in your
config.yamlfile:# ... FEATURE_PROXY_CACHE: true FEATURE_REPO_MIRROR: true FEATURE_ORG_MIRROR: true ORG_MIRROR_INTERVAL: 60 ORG_MIRROR_BATCH_SIZE: 100 ORG_MIRROR_MAX_SYNC_DURATION: 3600 ORG_MIRROR_DEFAULT_SKOPEO_TIMEOUT: 600 ORG_MIRROR_DISCOVERY_TIMEOUT: 600 ORG_MIRROR_MAX_REPOS_PER_ORG: 5000 ORG_MIRROR_MAX_RETRIES: 3 SSRF_ALLOWED_HOSTS: - harbor.example.lab # ...where:
FEATURE_PROXY_CACHE-
Specifies whether to enable or disable proxy caching. This field must be set to
trueto use the organization mirroring feature. FEATURE_REPO_MIRROR-
Specifies whether to enable or disable repository-level mirroring. This field must be set to
trueto use the organization mirroring feature. FEATURE_ORG_MIRROR-
Specifies whether to enable or disable organization-level mirroring.
ORG_MIRROR_INTERVAL-
Specifies the worker processing interval in seconds.
ORG_MIRROR_BATCH_SIZE-
Specifies the number of organization mirrors to process for each iteration.
ORG_MIRROR_MAX_SYNC_DURATION-
Specifies the maximum sync duration in seconds.
ORG_MIRROR_DEFAULT_SKOPEO_TIMEOUT-
Specifies the default skopeo timeout in seconds.
ORG_MIRROR_DISCOVERY_TIMEOUT-
Specifies the discovery timeout in seconds.
ORG_MIRROR_MAX_REPOS_PER_ORG-
Specifies the maximum repositories to discover for each organization.
ORG_MIRROR_MAX_RETRIES-
Specifies the maximum sync retries for a failure operation.
SSRF_ALLOWED_HOSTS-
Specifies the allowed hosts for Server-Side Request Forgery (SSRF) protection. Use this optional field to allow specific hosts to be accessed by the registry.
-
Restart your Project Quay registry.
Creating a mirroring worker
To run repository mirroring in a standalone Project Quay deployment, you can start a Podman container with the repomirror option.
-
If you have not configured TLS communications by using a
/root/ca.crtcertificate, enter the following command to start a mirroring worker:$ sudo podman run -d --name mirroring-worker \ -v $QUAY/config:/conf/stack:Z \ {productrepo}/{quayimage}:{productminv} repomirror -
If you have configured TLS communications by using a
/root/ca.crtcertificate, enter the following command to start the repository mirroring worker:$ sudo podman run -d --name mirroring-worker \ -v $QUAY/config:/conf/stack:Z \ -v /root/ca.crt:/etc/pki/ca-trust/source/anchors/ca.crt:Z \ {productrepo}/{quayimage}:{productminv} repomirror
Create mirrors and monitor synchronization
Create mirrored organizations and repositories, start synchronizations, and monitor mirroring health, events, and capacity.
Creating a mirroring organization by using the UI
To automatically synchronize container images between registries, you can use the Project Quay UI to create a mirroring organization.
|
Note
|
Organization-level mirroring cannot be configured on an existing organization that already contains repositories. A dedicated organization must be created specifically to serve as a mirror target, with all repositories within the organization managed exclusively by the mirroring configuration. |
-
You have a Project Quay organization with sufficient permissions.
-
You have created a robot account.
-
You have access to a source Harbor instance.
-
You have Harbor credentials, such as a username and a password or an API token.
-
-
You have set
FEATURE_ORG_MIRROR: truein yourconfig.yamlfile. -
You have set
FEATURE_PROXY_CACHE: truein yourconfig.yamlfile. -
You have set
FEATURE_REPO_MIRROR: truein yourconfig.yamlfile. -
For standalone Project Quay deployments, you have created a mirroring worker.
-
If you are using an OAuth token to mirror from Quay to Quay, your token must have the following permissions:
-
Administer Repositories
-
View all visible repositories
-
Read/Write to any accessible repositories
-
Administer User
-
-
On the Project Quay v2 UI, click Organizations in the navigation pane.
-
Find your organization listed under the Name column and then click the name of the organization.
-
Click Settings → Organization state.
-
Click the Mirror radio button to set the organization state to mirroring.
-
Click Submit. Completion of this step takes you to the Mirroring tab.
-
Under the Source Registry section, complete the following settings:
-
For Source Registry Type, select Quay or Harbor.
-
In the Source Registry URL field, enter a valid URL, for example,
https://registry.example.com. -
For Source Namespace, enter the namespace or project name on the source registry. For example,
my-project. -
Select Private or Public for Repository Visibility.
-
For Start Date, set the date in
yyyy-mm-ddformat and set the time. -
Set the Sync interval. Set the integer in the box and select seconds, minutes, hours, days, or weeks from the drop-down menu.
-
Set the Skopeo Timeout value for Skopeo operations.
-
Select a Robot User from the drop-down menu.
-
Set any desired Filter Patterns.
-
-
In the Credentials section, do one of the following actions:
-
If you specified Harbor for Source Registry Type, enter your username and password for the source registry.
-
If you specified Quay for Source Registry Type, enter
$oauthtokenfor the Username field and your OAuth token for the Password field.
-
-
Optional: In Advanced Settings, complete any of the following options:
-
For Verify TLS, select the checkbox to verify certificates.
-
Set an HTTP Proxy URL.
-
Set an HTTPS Proxy URL.
-
Set a No Proxy URL.
-
-
When you have configured the desired settings, click Enable Organization Mirror.
-
On the Project Quay web console, click Organizations → the organization name → Mirroring.
-
Scroll to the Status section to view the status and verify the connection.
Creating a mirrored organization by using the API
To create a mirrored organization in Project Quay by using the API, you can send HTTP requests to the organization mirror endpoints with curl and an OAuth bearer token.
|
Note
|
Organization-level mirroring cannot be configured on an existing organization that already contains repositories. A dedicated organization must be created specifically to serve as a mirror target, with all repositories within the organization managed exclusively by the mirroring configuration. |
-
You have generated an OAuth access token.
-
Use the
POST /api/v1/organization/{orgname}/mirrorendpoint to create a new organization-level mirroring configuration:$ curl -X POST "https://<quay-server.example.com>/api/v1/organization/<orgname>/mirror" \ -H "Authorization: Bearer <access_token>" \ -H "Accept: application/json" \ -H "Content-Type: application/json" \ -d '{ "external_registry_type": "quay", "external_registry_url": "https://quay.io", "external_namespace": "<external_namespace>", "robot_username": "<orgname>+<robot_account>", "visibility": "private", "sync_interval": 3600, "sync_start_date": "2025-01-01T00:00:00Z", "is_enabled": true }' -
Use the
GET /api/v1/organization/{orgname}/mirrorendpoint to retrieve the organization-level mirroring configuration:$ curl -X GET \ -H "Authorization: Bearer <bearer_token>" \ -H "Accept: application/json" \ https://<quay-server.example.com>/api/v1/organization/<orgname>/mirrorExample output{"is_enabled": true, "external_registry_type": "quay", "external_registry_url": "http://quay.io", "external_namespace": "test", "external_registry_username": null, "external_registry_config": {}, "repository_filters": [], "robot_username": "example+test", "visibility": "private", "sync_interval": 3600, "sync_start_date": "2025-01-01T00:00:00Z", "sync_expiration_date": null, "sync_status": "NEVER_RUN", "sync_retries_remaining": 3, "skopeo_timeout": 300, "creation_date": "2026-03-09T18:39:21.993431Z"} -
Use the
GET /api/v1/organization/{orgname}/mirror/repositoriesendpoint to obtain a list of repositories that are being mirrored in the organization:$ curl -X GET \ -H "Authorization: Bearer <bearer_token>" \ -H "Accept: application/json" \ "https://<quay-server.example.com>/api/v1/organization/<orgname>/mirror/repositories?page=1&limit=100"Example output{"repositories": [], "page": 1, "limit": 100, "total": 0, "has_next": false} -
Use the
POST /api/v1/organization/{orgname}/mirror/sync-nowendpoint to trigger an immediate sync of all repositories in the organization:$ curl -X POST \ -H "Authorization: Bearer <bearer_token>" \ -H "Accept: application/json" \ https://<quay-server.example.com>/api/v1/organization/<orgname>/mirror/sync-nowThis command does not return output in the CLI.
-
Use the
POST /api/v1/organization/{orgname}/mirror/sync-cancelendpoint to cancel a pending sync of all repositories in the organization:$ curl -X POST \ -H "Authorization: Bearer <bearer_token>" \ -H "Accept: application/json" \ https://<quay-server.example.com>/api/v1/organization/<orgname>/mirror/sync-cancelThis command does not return output in the CLI.
-
Use the
PUT /api/v1/organization/{orgname}/mirrorendpoint to update the organization-level mirroring configuration:$ curl -X PUT \ -H "Authorization: Bearer <bearer_token>" \ -H "Accept: application/json" \ -H "Content-Type: application/json" \ -d '{"is_enabled": true, "sync_interval": 7200}' \ https://<quay-server.example.com>/api/v1/organization/<orgname>/mirrorExample output" " -
Use the
POST /api/v1/organization/{orgname}/mirror/verifyendpoint to verify the connection to the external registry for the organization-level mirroring configuration:$ curl -X POST \ -H "Authorization: Bearer <bearer_token>" \ -H "Accept: application/json" \ https://<quay-server.example.com>/api/v1/organization/<orgname>/mirror/verifyExample output{"success": false, "message": "Unexpected response: 301"} -
Use the
DELETE /api/v1/organization/{orgname}/mirrorendpoint to delete the organization-level mirroring configuration:$ curl -X DELETE \ -H "Authorization: Bearer <bearer_token>" \ -H "Accept: application/json" \ https://<quay-server.example.com>/api/v1/organization/<orgname>/mirrorThis command does not return output in the CLI.
Creating a mirrored repository by using the UI
To mirror a repository from an external registry into Project Quay, you can create a private repository and configure mirroring settings in the UI.
When mirroring a repository from an external container registry, you must create a new private repository. Typically, the same name is used as the target repository, for example, quay-rhel9.
-
You have set
FEATURE_REPO_MIRROR: truein yourconfig.yamlfile. -
For standalone Project Quay deployments, you have created a mirroring worker.
-
You have created a robot account.
-
Navigate to the Repositories page of your registry and click the name of a repository, for example, test-mirror.
-
Click Settings → Repository state.
-
Click Mirror.
-
Click the Mirroring tab and enter the details for connecting to the external registry, along with the tags, scheduling, and access information.
-
Enter the details as required in the following fields:
-
Registry Location: The external repository you want to mirror, for example,
registry.redhat.io/quay/quay-rhel8. -
Tags: Enter a comma-separated list of individual tags or tag patterns. You can use Unix shell-style wildcards.
-
Architecture Filter: Select the architectures that you want to mirror. For example, select
AMD64 (x86_64)to mirror only thex86_64architecture. By default, all architectures are mirrored. -
Start Date: The date on which mirroring begins. By default, the current date and time are used.
-
Sync Interval: Defaults to syncing every 24 hours. You can change that based on hours or days.
-
Skopeo timeout interval: Defaults to
300seconds (5 minutes). The maximum timeout length is43200seconds (12 hours). -
Robot User: Create a new robot account or choose an existing robot account to do the mirroring.
-
Username: The username for accessing the external registry holding the repository you are mirroring.
-
Password: The password associated with the username. Note that the password cannot include characters that require an escape character (
\).
-
-
In the Advanced Settings section, you can optionally configure SSL/TLS and proxy with the following options:
-
Verify TLS: Select this option if you want to require HTTPS and to verify certificates when communicating with the target remote registry.
-
Accept Unsigned Images: Selecting this option allows unsigned images to be mirrored.
-
HTTP Proxy: Identify the HTTP proxy server needed to access the remote site, if a proxy server is needed.
-
HTTPS Proxy: Identify the HTTPS proxy server needed to access the remote site, if a proxy server is needed.
-
No Proxy: List of locations that do not require a proxy.
-
-
After filling out all information, click Enable Mirror.
Starting a mirroring synchronization
To start a mirroring sync immediately in Project Quay, you can open the Mirroring tab for your repository or organization and click Sync Now.
-
Navigate to the Mirroring tab of your repository or organization.
-
Click Sync Now.
-
Click the Logs tab to view available logs.
-
When mirroring is complete, the images appear in the Tags tab.
Event notifications for mirroring
Project Quay repository mirroring supports three event notifications: Mirror Started, Mirror Success, and Mirror Unsuccessful. You can configure them per repository in the Settings tab and deliver them by email, Slack, the UI, or webhooks.
The events can be configured inside of the Settings tab for each repository, and all existing notification methods such as email, Slack, Quay UI, and webhooks are supported.
Monitoring repository mirroring
Project Quay exposes Prometheus metrics and a health API endpoint for repository mirroring. Use these tools to monitor synchronization progress, detect failures, and configure alerts in Prometheus or Grafana.
Metrics are published from the mirror worker process through the existing Prometheus push gateway (typically port 9091). The health API endpoint reads repository state from the database and, when available, worker metrics from the in-process Prometheus registry.
Repository mirror Prometheus metrics
The following table describes the primary repository mirroring metrics added in Project Quay 3.18.
| Metric | Type | Description |
|---|---|---|
|
Gauge |
Number of tags pending synchronization. Labels: |
|
Gauge |
Status of the last synchronization attempt. Labels: |
|
Gauge |
Whether all tags synchronized in the last run. Labels: |
|
Counter |
Cumulative synchronization failures. Labels: |
|
Gauge |
Set to |
|
Gauge |
Unix timestamp when the last sync attempt started. Labels: |
|
Histogram |
Sync operation duration aggregated by namespace. |
|
Gauge |
Number of repositories not yet mirrored. Maintained for backward compatibility. |
Example Prometheus queries
Use the following example queries to monitor repository mirroring:
quay_repository_mirror_last_sync_status{last_error_reason=""} == 0(time() - quay_repository_mirror_last_sync_timestamp) > 3600rate(quay_repository_mirror_sync_failures_total[5m])Repository mirror health endpoint
Project Quay exposes two health endpoints for repository mirroring:
-
GET /api/v1/repository/mirror/health— namespace-scoped or global health. Withoutnamespace, the caller must be a superuser with full access. Withnamespace, organization members can query their organization, and user-namespace owners or user administrators can query that namespace. -
GET /api/v1/superuser/mirror/health— global summary for superusers, without repository-identifying issue samples.
Both endpoints require a fresh login. A validated OAuth or SSO token satisfies the check. A password-based browser session must be within FRESH_LOGIN_TIMEOUT (default: 10m).
The responses include overall health, worker status, repository counts, pending tags, and any detected issues. HTTP 200 means healthy; HTTP 503 means unhealthy.
Optional query parameters for GET /api/v1/repository/mirror/health:
-
namespace— limit results to one namespace -
detailed— include per-repository details -
limitandoffset— paginate detailed results
$ curl -X GET "https://<quay-server.example.com>/api/v1/repository/mirror/health?namespace=<orgname>&detailed=true" \
-H "Authorization: Bearer <access_token>"$ curl -X GET "https://<quay-server.example.com>/api/v1/superuser/mirror/health" \
-H "Authorization: Bearer <access_token>"For endpoint parameters, response schema, and authorization requirements, see getRepositoryMirrorHealth and getSuperUserRepositoryMirrorHealth.
Working with mirrored repositories
After you create a mirrored repository in Project Quay, you can enable or disable mirroring, sync on demand, update credentials, and manage robot account permissions.
Select your mirrored repository from the Repositories page to do any of the following actions:
-
Enable or disable the repository: Select Mirroring in the left column, then toggle the Enabled check box to enable or disable the repository temporarily.
-
Check mirror logs: To make sure the mirrored repository is working properly, you can check the mirror logs. Select Usage Logs in the left column.
-
Sync mirror now: To immediately sync the images in your repository, select Sync Now.
-
Change credentials: To change the username and password, select DELETE from the Credentials line. Then select None and add the username and password needed to log into the external registry when prompted.
-
Cancel mirroring: To stop mirroring, which keeps the current images available but stops new ones from being synced, select CANCEL.
-
Set robot permissions: Project Quay robot accounts are named tokens that hold credentials for accessing external repositories. By assigning credentials to a robot, that robot can be used across multiple mirrored repositories that need to access the same external registry.
You can assign an existing robot to a repository by navigating to Organizations → Robot accounts. On this page, you can view the following information:
-
Check which repositories are assigned to that robot.
-
Assign
Read,Write, orAdminprivileges to that robot from the PERMISSION field.
-
-
Change robot credentials: Robots can hold credentials such as Kubernetes secrets, Docker login information, and Podman login information. To change robot credentials, select the Options gear on the robot account line on the Robot Accounts window and choose View Credentials. Add the appropriate credentials for the external repository the robot needs to access.
-
Check and change general settings: Select Settings (gear icon) from the left column on the mirrored repository page. On the resulting page, you can change settings associated with the mirrored repository. In particular, you can change user and robot permissions to specify exactly which users and robots can read from or write to the repository.
Repository mirroring capacity considerations
For Project Quay repository mirroring, you can run mirroring workers on any node and size the number of workers to how many repositories you want to sync in parallel.
When you plan mirroring capacity, consider the following:
-
Mirroring workers can run on nodes that already run Project Quay.
-
Mirroring runs in scheduled batches. More workers allow more repositories to sync at the same time. For example, 10 workers can run 10 mirroring operations in parallel.
-
Size workers based on how many repositories you need to mirror in parallel, how many images and tags those repositories contain, and how often content changes.
-
Multiple tags in the same repository cannot be mirrored in parallel.
Use Quay as a proxy cache for upstream registries
Configure Red Hat Quay as a proxy cache for upstream registries, including architecture, limitations, and storage quota settings.
Project Quay as a proxy cache for upstream registries
You can use Project Quay as a proxy cache for upstream registries to avoid pull-rate limits and speed up image pulls. Cached images update only when the upstream digest changes.
With Project Quay cache proxy, the following features are available:
-
Specific organizations can be defined as a cache for upstream registries.
-
Configuration of a Quay organization that acts as a cache for a specific upstream registry. This repository can be defined by using the Quay UI, and offers the following configurations:
-
Upstream registry credentials for private repositories or increased rate limiting.
-
Expiration timer to avoid surpassing cache organization size.
-
-
Global on/off configurable via the configuration application.
-
Caching of entire upstream registries or just a single namespace, for example, all of
docker.ioor justdocker.io/library. -
Logging of all cache pulls.
-
Cached images scannability by Clair.
-
Caching of all layers when an image is pulled from a proxied repository, which helps ensure that Clair can scan all images and that images remain pullable even if the upstream registry becomes unavailable.
Proxy cache architecture
The Project Quay proxy cache architecture shows how image pulls are served from cache or fetched from an upstream registry. Cache behavior depends on whether the image exists, is stale, or differs from upstream.
The following image shows the expected design flow and architecture of the proxy cache feature.
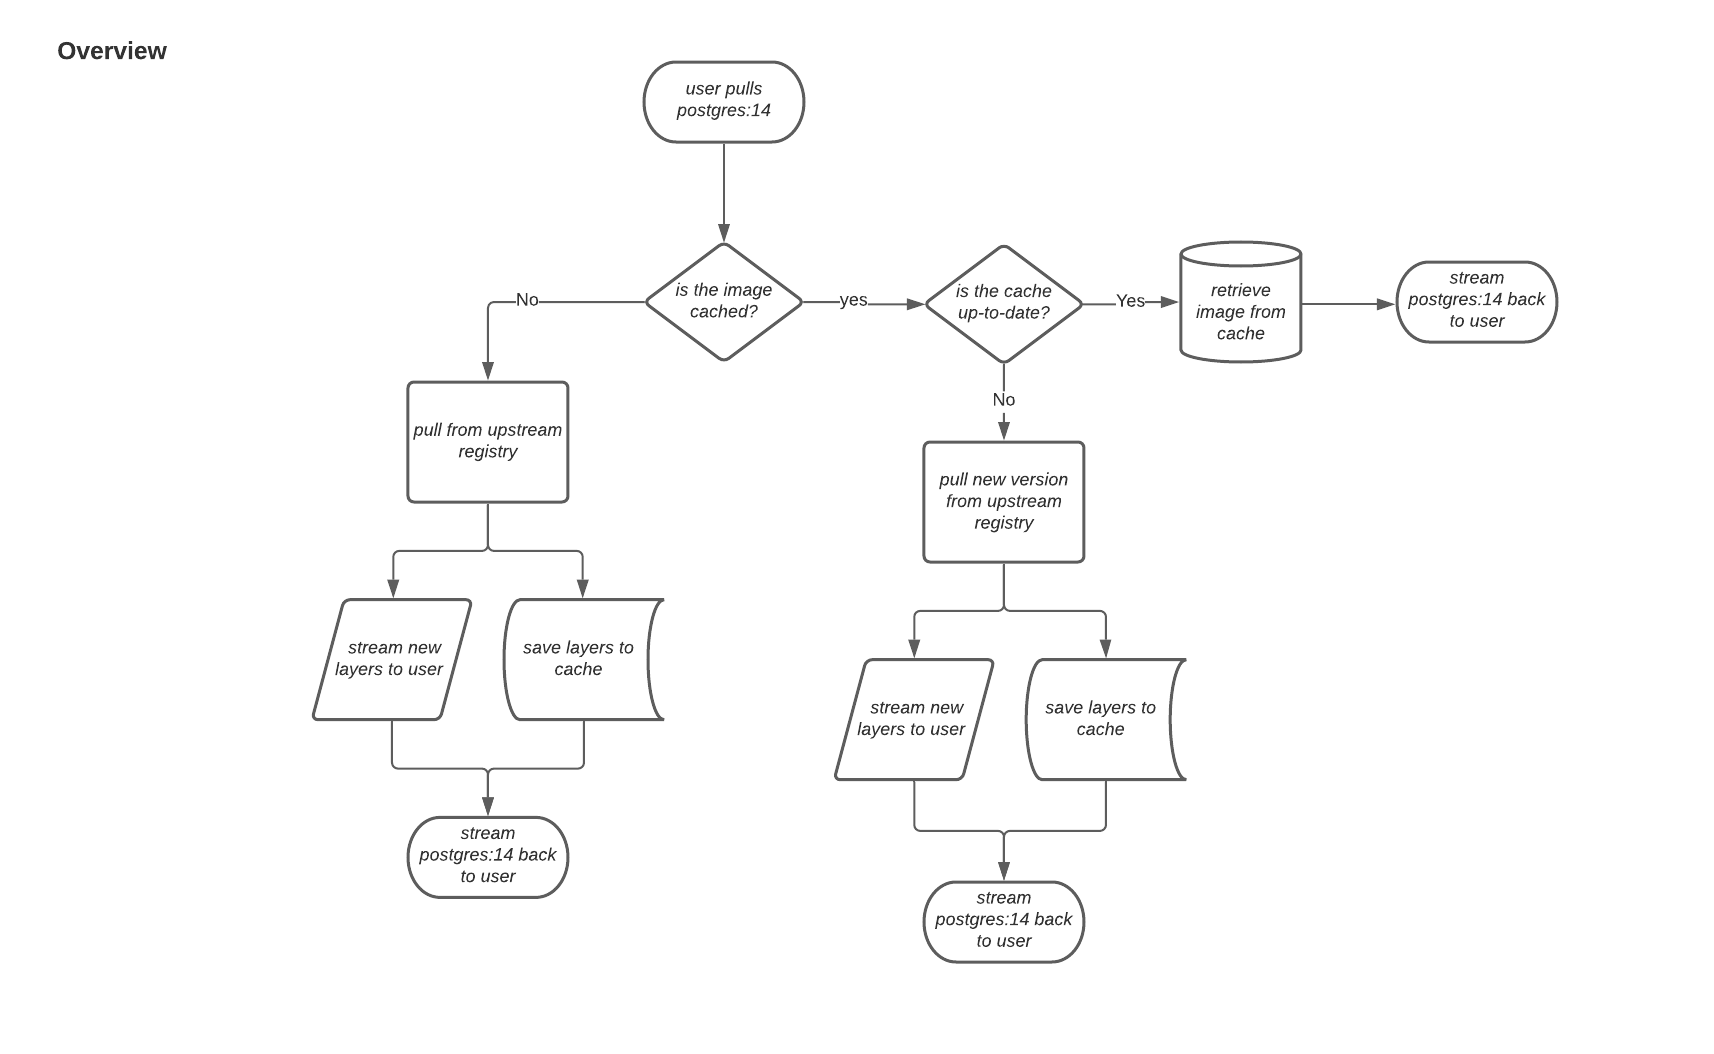
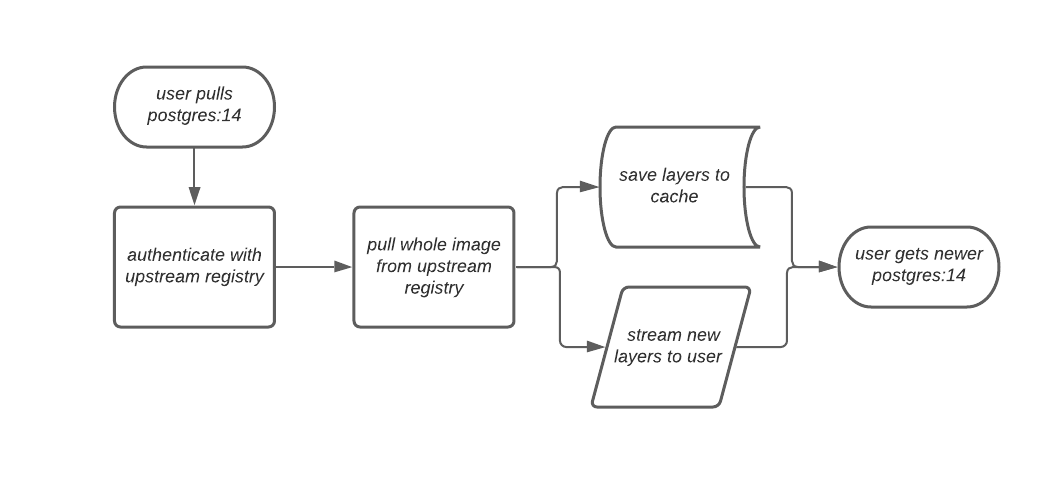
When a user pulls an image, for example, postgres:14, from an upstream repository on Project Quay, the repository checks to see if an image is present. If the image does not exist, a fresh pull is initiated. After being pulled, the image layers are saved to cache and server to the user in parallel. The following image depicts an architectural overview of this scenario:
If the image in the cache exists, users can rely on Quay’s cache to stay up-to-date with the upstream source so that newer images from the cache are automatically pulled. This happens when tags of the original image have been overwritten in the upstream registry. The following image depicts an architectural overview of what happens when the upstream image and cached version of the image are different:
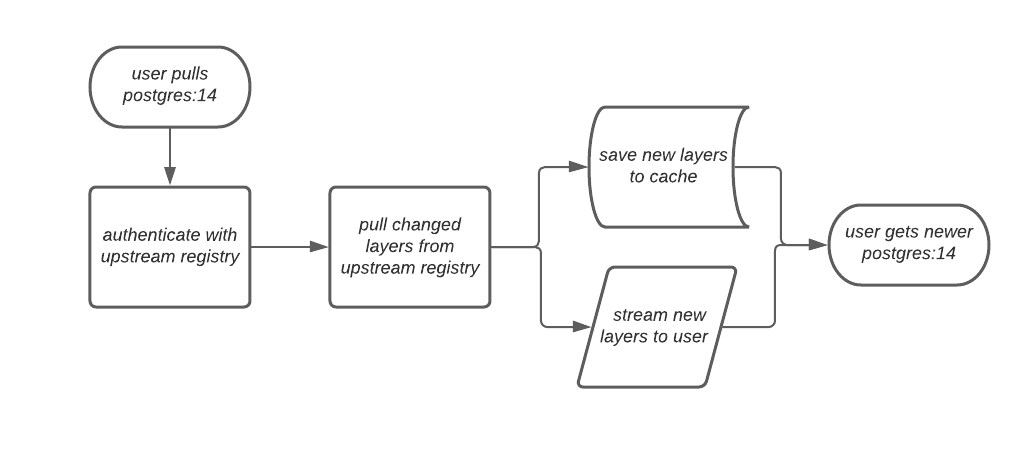
If the upstream image and cached version are the same, no layers are pulled and the cached image is delivered to the user.
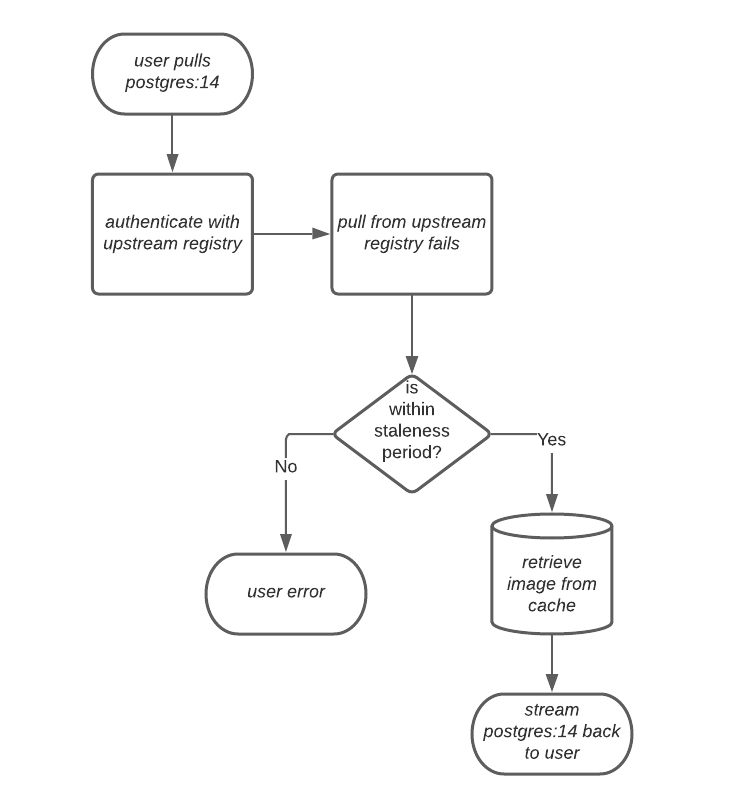
In some cases, users initiate pulls when the upstream registry is down. If this happens with the configured staleness period, the image stored in cache is delivered. If the pull happens after the configured staleness period, the error is propagated to the user. The following image depicts an architectural overview when a pull happens after the configured staleness period:
Quay administrators can leverage the configurable size limit of an organization to limit cache size so that backend storage consumption remains predictable. This is achieved by discarding images from the cache according to the frequency in which an image is used. The following image depicts an architectural overview of this scenario:
Proxy cache limitations
Proxy caching in Project Quay has size, property, and anonymous-user limitations. You can use these constraints to plan cache organization capacity and access.
The following limitations apply:
-
Your proxy cache must have a size limit of greater than, or equal to, the image you want to cache. For example, if your proxy cache organization has a maximum size of 500 MB, and the image a user wants to pull is 700 MB, the image will be cached and will overflow beyond the configured limit.
-
Cached images must have the same properties that images on a Quay repository must have.
-
Anonymous users cannot pull images through a proxy cache if the image has not been previously cached. This operation requires the creation of a new repository within the proxy organization to store the cached image, and anonymous users do not have the necessary permissions to create repositories.
Using Project Quay to proxy a remote registry
To proxy a remote registry with Project Quay, you can configure an organization as a cache and pull images through it. You set the remote registry, optional credentials, and expiration on the UI.
-
FEATURE_PROXY_CACHEin your config.yaml is set toTrue. -
Assigned the Member team role. For more information about team roles, see Setting a team role by using the UI.
-
On the Project Quay v2 UI, click the name of an organization, for example, cache-org.
-
In the navigation pane, click Settings.
-
In the Remote Registry box, enter the name of the remote registry to be cached, for example,
quay.io, and click Save.NoteBy adding a namespace to the Remote Registry, for example,
quay.io/<namespace>, users in your organization will only be able to proxy from that namespace. -
Optional. In the Remote Registry username box, enter the username for authenticating into the remote registry specified in the previous step. If you leave this empty, Quay will attempt to pull content anonymously from the upstream registry.
-
Optional. In the Remote registry password box, enter the password for authenticating into the remote registry. If you leave this empty, Quay will attempt to pull content anonymously from the upstream registry.
-
Optional. Set a time in the Expiration field.
Note-
The default tag Expiration field for cached images in a proxy organization is set to 86400 seconds. In the proxy organization, the tag expiration is refreshed to the value set in the UI’s Expiration field every time the tag is pulled. This feature is different than Quay’s default individual tag expiration feature. In a proxy organization, it is possible to override the individual tag feature. When this happens, the individual tag’s expiration is reset according to the Expiration field of the proxy organization.
-
Expired images will disappear after the allotted time, but are still stored in Project Quay. The time in which an image is completely deleted, or collected, depends on the Time Machine setting of your organization. The default time for garbage collection is 14 days unless otherwise specified.
-
-
Optional. Check the http box if you want an unsecure protocol used. If not checked, https is used to request the remote registry.
-
Click Save.
-
On the CLI, pull a public image from the remote registry that was specified, for example,
quay.io, acting as a proxy cache:$ podman pull <registry_url>/<organization_name>/<quayio_namespace>/<image_name>
ImportantIf your organization is set up to pull from a single namespace in the remote registry, the remote registry namespace must be omitted from the URL. For example,
podman pull <registry_url>/<organization_name>/<image_name>.
Leveraging storage quota limits in proxy organizations
When a proxied namespace has quota limits configured, Project Quay can auto-prune the least recently used image tags so that a new push that exceeds available storage is stored instead of being skipped.
|
Important
|
|
Testing the storage quota limits feature in proxy organizations
Confirm that auto-pruning works in a proxy organization with storage quota limits by pulling images until the quota is exceeded and verifying that the least recently used tag is removed.
-
Your organization is configured to serve as a proxy organization. The following example proxies from quay.io.
-
FEATURE_PROXY_CACHEis set toTruein yourconfig.yamlfile. -
FEATURE_QUOTA_MANAGEMENTis set toTruein yourconfig.yamlfile. -
Your organization is configured with a quota limit, for example,
150 MB.
-
Pull an image to your repository from your proxy organization, for example:
$ podman pull quay-server.example.com/proxytest/projectquay/quay:3.7.9
-
Depending on the space left in your repository, you might need to pull additional images from your proxy organization, for example:
$ podman pull quay-server.example.com/proxytest/projectquay/quay:3.6.2
-
In the Project Quay registry UI, click the name of your repository.
-
Click Tags in the navigation pane and ensure that
quay:3.7.9andquay:3.6.2are tagged.
-
-
Pull the last image that will result in your repository exceeding the allotted quota, for example:
$ podman pull quay-server.example.com/proxytest/projectquay/quay:3.5.1
-
Refresh the Tags page of your Project Quay registry. The first image that you pushed, for example,
quay:3.7.9should have been auto-pruned. The Tags page should now showquay:3.6.2andquay:3.5.1.
Integrate Quay object storage with AWS
Integrate Red Hat Quay object storage with AWS STS, IAM roles, and CloudFront for cloud-native access patterns.
Configuring AWS STS for Project Quay
You can configure AWS Security Token Service (STS) with Project Quay to authenticate to Amazon S3 by using temporary credentials. STS is available for standalone deployments, Red Hat Quay on OpenShift Container Platform, and Project Quay on Red Hat OpenShift Service on AWS (ROSA).
AWS STS provides temporary, limited-privilege credentials for AWS Identity and Access Management (IAM) users. When Project Quay uses Amazon S3 as object storage, STS protocols can authenticate access so that sensitive data remains properly authenticated and authorized.
Configuring AWS STS for OpenShift Container Platform or ROSA requires creating an AWS IAM user, creating an S3 role, and configuring your Project Quay config.yaml file to include the proper resources.
Creating an IAM user
To configure AWS STS authentication for your Project Quay deployment, you can create an IAM user in the AWS console, copy the user ARN, and create access keys. This procedure sets up the IAM user that Project Quay uses to authenticate with Amazon S3 using temporary credentials.
-
Log in to the Amazon Web Services (AWS) console and navigate to the Identity and Access Management (IAM) console.
-
In the navigation pane, under Access management click Users.
-
Click Create User and enter the following information:
-
Enter a valid username, for example,
quay-user. -
For Permissions options, click Add user to group.
-
-
On the review and create page, click Create user. You are redirected to the Users page.
-
Click the username, for example, quay-user.
-
Copy the ARN of the user, for example,
arn:aws:iam::123456:user/quay-user. -
On the same page, click the Security credentials tab.
-
Navigate to Access keys.
-
Click Create access key.
-
On the Access key best practices & alternatives page, click Command Line Interface (CLI), then, check the confirmation box. Then click Next.
-
Optional. On the Set description tag - optional page, enter a description.
-
Click Create access key.
-
Copy and store the access key and the secret access key.
ImportantThis is the only time that the secret access key can be viewed or downloaded. You cannot recover it later. However, you can create a new access key any time.
-
Click Done.
Creating an S3 role
To enable AWS STS authentication for your Project Quay deployment, you can create an S3 role in the AWS IAM console with a custom trust policy that allows your IAM user to assume the role. This procedure sets up the role that grants S3 access permissions for temporary credential authentication.
-
You have created an IAM user and stored the access key and the secret access key.
-
Navigate to the IAM dashboard.
-
In the navigation pane, click Roles under Access management.
-
Click Create role → Custom Trust Policy.
-
Under the
Principalconfiguration field, add your AWS ARN information. For example:{ "Version": "2012-10-17", "Statement": [ { "Sid": "Statement1", "Effect": "Allow", "Principal": { "AWS": "arn:aws:iam::123456:user/quay-user" }, "Action": "sts:AssumeRole" } ] } -
Click Next.
-
On the Add permissions page, type
AmazonS3FullAccessin the search box. Check the box to add that policy to the S3 role, then click Next. -
On the Name, review, and create page, enter the following information:
-
Enter a role name, for example,
example-role. -
Optional. Add a description.
-
-
Click the Create role button. You are navigated to the Roles page. Under Role name, the newly created S3 should be available.
Configuring Red Hat Quay on OpenShift Container Platform to use AWS STS
To configure your Red Hat Quay on OpenShift Container Platform deployment to use AWS STS for S3 authentication, you can edit the config.yaml file through the OpenShift Container Platform UI and update the DISTRIBUTED_STORAGE_CONFIG fields with your role ARN, bucket name, and access keys.
This procedure enables temporary credential authentication for object storage access.
|
Note
|
You can also edit and re-deploy your Red Hat Quay on OpenShift Container Platform |
-
You have configured a Role ARN.
-
You have generated a User Access Key.
-
You have generated a User Secret Key.
-
On the Home page of your OpenShift Container Platform deployment, click Operators → Installed Operators.
-
Click Red Hat Quay.
-
Click Quay Registry and then the name of your Project Quay registry.
-
Under Config Bundle Secret, click the name of your registry configuration bundle, for example, quay-registry-config-bundle-qet56.
-
On the configuration bundle page, click Actions to reveal a drop-down menu. Then click Edit Secret.
-
Update your the
DISTRIBUTED_STORAGE_CONFIGfields of yourconfig.yamlfile with the following information:# ... DISTRIBUTED_STORAGE_CONFIG: default: - STSS3Storage - sts_role_arn: <role_arn> s3_bucket: <s3_bucket_name> storage_path: <storage_path> s3_region: <region> sts_user_access_key: <s3_user_access_key> sts_user_secret_key: <s3_user_secret_key> # ...where:
DISTRIBUTED_STORAGE_CONFIG.default.sts_role_arn-
Specifies the unique Amazon Resource Name (ARN) required when configuring AWS STS.
DISTRIBUTED_STORAGE_CONFIG.default.s3_bucket-
Specifies the name of your s3 bucket.
DISTRIBUTED_STORAGE_CONFIG.default.storage_path-
Specifies the storage path for data. Usually
/datastorage. DISTRIBUTED_STORAGE_CONFIG.default.s3_region-
Specifies the Amazon Web Services region. Defaults to
us-east-1. DISTRIBUTED_STORAGE_CONFIG.default.sts_user_access_key-
Specifies the generated AWS S3 user access key required when configuring AWS STS.
DISTRIBUTED_STORAGE_CONFIG.default.sts_user_secret_key-
Specifies the generated AWS S3 user secret key required when configuring AWS STS.
-
Click Save.
-
Tag a sample image, for example,
busybox, that will be pushed to the repository. For example:$ podman tag docker.io/library/busybox <quay-server.example.com>/<organization_name>/busybox:test -
Push the sample image by running the following command:
$ podman push <quay-server.example.com>/<organization_name>/busybox:test -
Verify that the push was successful by navigating to the Organization that you pushed the image to in your Project Quay registry → Tags.
-
Navigate to the Amazon Web Services (AWS) console and locate your s3 bucket.
-
Click the name of your s3 bucket.
-
On the Objects page, click datastorage/.
-
On the datastorage/ page, the following resources should seen:
-
sha256/
-
uploads/
These resources indicate that the push was successful, and that AWS STS is properly configured.
-
Configuring Project Quay on Red Hat OpenShift Service on AWS to use AWS STS
To configure your Project Quay deployment on Red Hat OpenShift Service on AWS to use AWS STS for S3 authentication, you can update the IAM role trust policy to use federated identity, configure the config.yaml file, and annotate the service account with the role ARN.
This procedure enables web identity federation for temporary credential authentication.
-
You have created an IAM user.
-
You have created an s3 Role ARN.
-
You have created a Custom Trust Policy that uses the Role ARN.
-
Get the
serviceAccountIssuerresource by entering the following command:$ oc get authentication.config.openshift.io cluster -o json | jq -r .spec.serviceAccountIssuer | sed -e "s/^https:\/\///"Example outputoidc.op1.openshiftapps.com/123456 -
On the Identity and Access Management (IAM) console of the Amazon Web Services (AWS) console:
-
Click Roles.
-
Click the name of the Role to be used with AWS STS, for example,
example-role. -
Click the Trust relationships tab, which shows the JSON policy created during "Creating an S3 role". Update the JSON policy as follows:
{
	"Version": "2012-10-17",
	"Statement": [
    	{
        	"Sid": "Statement1",
        	"Effect": "Allow",
        	"Principal": {
            	"Federated": "arn:aws:iam::123456:oidc-provider/oidc.op1.openshiftapps.com/123456"
        	},
        	"Action": "sts:AssumeRoleWithWebIdentity",
        	"Condition": {
            	"StringEquals": {
                	"oidc.op1.openshiftapps.com/123456:sub": "system:serviceaccount:quay:registry-quay-app"
            	}
        	}
    	}
	]
}
where:
Statement.Principal.Federated-
Specifies that the
Principalparameter of the JSON policy is updated toFederated:<your_user_ARN>:<serviceAccountIssuer_domain_path>. Statement.Action-
Specifies that the
Actionparameter of the JSON policy is updated tosts:AssumeRoleWithWebIdentity. Statement.Condition-
Specifies that the
Conditionparameter of the JSON policy is updated toStringEquals”: “<serviceAccountIssuer>:sub”: “system:serviceAccount:<quay_namespace>:<quay_registry_using_serviceAccount>.
-
Verify that your User ARN is configured correct, then click Next.
-
On the Add permissions page, select AmazonS3FullAccess, then click Next.
-
On the Name, review, and create page, provide your role a name, a description, verify your configuration, add any optional tags. Then, click Create Role.
-
-
On the Roles page, click the new role and store the
Role ARNresource. For example:arn:aws:iam::123456:role/test_s3_access -
On the Project Quay web console:
-
Click Operators → Installed Operators.
-
Click Red Hat Quay.
-
Click Quay Registry and then the name of your Project Quay registry.
-
Under Config Bundle Secret, click the name of your registry configuration bundle, for example, quay-registry-config-bundle-12345.
-
On the configuration bundle page, click Actions to reveal a drop-down menu. Then click Edit Secret.
-
Update your the
DISTRIBUTED_STORAGE_CONFIGfields of yourconfig.yamlfile with the following information:# ... DISTRIBUTED_STORAGE_CONFIG: default: - STSS3Storage s3_bucket: <s3_bucket_name> storage_path: <storage_path> s3_region: <region> # ...where:
DISTRIBUTED_STORAGE_CONFIG.default.s3_bucket-
Specifies the name of your s3 bucket.
DISTRIBUTED_STORAGE_CONFIG.default.storage_path-
Specifies the storage path for data. Usually
/datastorage. DISTRIBUTED_STORAGE_CONFIG.default.s3_region-
Specifies the Amazon Web Services region. Defaults to
us-east-1.
-
-
Click Save. Your
QuayRegistrycustom resource (CR) automatically restarts. -
Annotate the Service Account (SA) that executes pods with the EKS configuration values. For example:
$ oc annotate sa registry-quay-app "eks.amazonaws.com/role-arn"="arn:aws:iam::123456:role/test_s3_access" "eks.amazonaws.com/audience"="sts.amazonaws.com" "eks.amazonaws.com/sts-regional-endpoints"="true"
-
Tag a sample image, for example,
busybox, that will be pushed to the repository. For example:$ podman tag docker.io/library/busybox <quay-server.example.com>/<organization_name>/busybox:test -
Push the sample image by running the following command:
$ podman push <quay-server.example.com>/<organization_name>/busybox:test -
Verify that the push was successful by navigating to the Organization that you pushed the image to in your Project Quay registry → Tags.
-
Navigate to the Amazon Web Services (AWS) console and locate your s3 bucket.
-
Click the name of your s3 bucket.
-
On the Objects page, click datastorage/.
-
On the datastorage/ page, the following resources should seen:
-
sha256/
-
uploads/
These resources indicate that the push was successful, and that AWS STS is properly configured.
-
AWS S3 CloudFront
To configure AWS S3 CloudFront for your Project Quay backend registry storage, you can create a secret that includes your config.yaml file and the CloudFront signing key. This enables CloudFront content delivery for your registry storage.
-
Create a secret that includes your
config.yamlfile and the CloudFront signing key by entering the following command:$ oc create secret generic --from-file config.yaml=./config_awss3cloudfront.yaml --from-file default-cloudfront-signing-key.pem=./default-cloudfront-signing-key.pem test-config-bundle