Manage user accounts in the registry
Create and delete user accounts by using the Red Hat Quay UI or API.
Creating a user account by using the UI
To create a new user account in Project Quay, you can use the Super User Admin Panel in the UI.
-
You are logged into your Project Quay deployment as a superuser.
-
Log in to your Project Quay repository as the superuser.
-
In the navigation pane, select your account name, and then click Super User Admin Panel.
-
Click the Users icon in the column.
-
Click the Create User button.
-
Enter the new user’s Username and Email address, and then click the Create User button.
-
You are redirected to the Users page, where there is now another Project Quay user.
NoteYou might need to refresh the Users page to show the additional user.
-
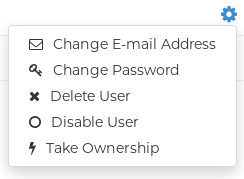
On the Users page, click the Options cogwheel associated with the new user. A drop-down menu appears, as shown in the following figure:
-
Click Change Password.
-
Add the new password, and then click Change User Password.
The new user can now use that username and password to log in using the web UI or through their preferred container client, like Podman.
Creating a user account by using the Project Quay API
To create a user account in Project Quay as a superuser, you can use the Project Quay API.
-
You are logged into your Project Quay deployment as a superuser.
-
You have created an OAuth access token.
-
Enter the following command to create a new user by using the
POST /api/v1/superuser/users/endpoint:$ curl -X POST -H "Authorization: Bearer <bearer_token>" -H "Content-Type: application/json" -d '{ "username": "newuser", "email": "newuser@example.com" }' "https://<quay-server.example.com>/api/v1/superuser/users/"Example output{"username": "newuser", "email": "newuser@example.com", "password": "123456789", "encrypted_password": "<example_encrypted_password>/JKY9pnDcsw="} -
Navigate to your Project Quay registry endpoint, for example,
quay-server.example.comand log in with the username and password generated from the API call. In this scenario, the username isnewuserand the password is123456789. Alternatively, you can log in to the registry with the CLI. For example:$ podman login <quay-server.example.com>Example outputusername: newuser password: 123456789 -
Optional. You can obtain a list of all users, including superusers, by using the
GET /api/v1/superuser/users/endpoint:$ curl -X GET -H "Authorization: Bearer <bearer_token>" "https://<quay-server.example.com>/api/v1/superuser/users/"NoteThe
GET /api/v1/superuser/users/endpoint only returns users and superusers ifAUTHENTICATION_TYPE: Databaseis set in yourconfig.yamlfile. It does not work forLDAPauthentication types.Example output{"users": [{"kind": "user", "name": "quayadmin", "username": "quayadmin", "email": "quay@quay.com", "verified": true, "avatar": {"name": "quayadmin", "hash": "b28d563a6dc76b4431fc7b0524bbff6b810387dac86d9303874871839859c7cc", "color": "#17becf", "kind": "user"}, "super_user": true, "enabled": true}, {"kind": "user", "name": "newuser", "username": "newuser", "email": "newuser@example.com", "verified": true, "avatar": {"name": "newuser", "hash": "f338a2c83bfdde84abe2d3348994d70c34185a234cfbf32f9e323e3578e7e771", "color": "#9edae5", "kind": "user"}, "super_user": false, "enabled": true}]}
Deleting a user by using the UI
To delete a user account from Project Quay, you can use the Super User Admin Panel in the UI.
After you delete the user, any repositories that the user had in their private account become unavailable.
|
Note
|
In some cases, when accessing the Users tab in the Superuser Admin Panel of the Project Quay UI, you might encounter a situation where no users are listed. Instead, a message appears, indicating that Project Quay is configured to use external authentication, and users can only be created in that system. This error occurs for one of two reasons:
When this happens, you must delete the user using the Project Quay API. |
-
You are logged into your Project Quay deployment as a superuser.
-
Log in to your Project Quay repository as the superuser.
-
In the navigation pane, select your account name, and then click Super User Admin Panel.
-
Click the Users icon in the navigation pane.
-
Click the Options cogwheel beside the user to be deleted.
-
Click Delete User, and then confirm deletion by clicking Delete User.
Deleting a user by using the Project Quay API
To delete a user account from Project Quay as a superuser, you can use the Project Quay API.
|
Important
|
After deleting the user, any repositories that this user had in their private account become unavailable. |
-
You are logged into your Project Quay deployment as a superuser.
-
You have created an OAuth access token.
-
Enter the following
DELETE /api/v1/superuser/users/{username}command to delete a user from the command line:$ curl -X DELETE -H "Authorization: Bearer <insert token here>" https://<quay-server.example.com>/api/v1/superuser/users/<username> -
The CLI does not return information when deleting a user from the CLI. To confirm deletion, you can check the Project Quay UI by navigating to Superuser Admin Panel → Users, or by entering the following
GET /api/v1/superuser/users/command. You can then check to see if they are present.NoteThe
GET /api/v1/superuser/users/endpoint only returns users and superusers ifAUTHENTICATION_TYPE: Databaseis set in yourconfig.yamlfile. It does not work forLDAPauthentication types.$ curl -X GET -H "Authorization: Bearer <bearer_token>" "https://<quay-server.example.com>/api/v1/superuser/users/"
Group repositories by team or project
Create and delete organizations and manage organization settings by using the UI or API.
Creating an organization by using the UI
To create an organization in Quay, you can use the UI. You set an organization name and then manage repositories and teams under that namespace.
In context of organizations, the contact email is used for the following purposes:
-
Quota warnings notifications
-
Quota errors notifications
-
Organization account recovery
-
Billing notifications
Use the following procedure to create a new organization by using the UI.
-
Log in to your Project Quay registry.
-
Click Organization in the navigation pane.
-
Click Create Organization.
-
Enter an Organization Name, for example,
testorg. -
Optional: Enter an Email for the organization. If not specified, notifications default to the organization owners.
NoteMultiple organizations can share the same organization email address, such as a team distribution list. By default, the address cannot match a user account email unless
FEATURE_ORG_SHARED_EMAILis enabled. -
Click Create.
Now, your example organization should populate under the Organizations page.
Creating an organization by using the Project Quay API
To create an organization in Project Quay, you can call the organization API endpoint with an OAuth access token.
-
You have created an OAuth access token.
-
Enter the following command to create a new organization by using the
POST /api/v1/organization/endpoint:$ curl -X POST -H "Authorization: Bearer <bearer_token>" -H "Content-Type: application/json" -d '{ "name": "<new_organization_name>" }' "https://<quay-server.example.com>/api/v1/organization/"Example output"Created" -
After creation, you can change organization details, such as adding an email address, with the
PUT /api/v1/organization/{orgname}command. For example:$ curl -X PUT "https://<quay-server.example.com>/api/v1/organization/<orgname>" \ -H "Authorization: Bearer <access_token>" \ -H "Content-Type: application/json" \ -d '{ "email": "<org_email>", "invoice_email": <true/false>, "invoice_email_address": "<billing_email>" }'Example output{"name": "test", "email": "new-contact@test-org.com", "avatar": {"name": "test", "hash": "a15d479002b20f211568fd4419e76686d2b88a4980a5b4c4bc10420776c5f6fe", "color": "#aec7e8", "kind": "user"}, "is_admin": true, "is_member": true, "teams": {"owners": {"name": "owners", "description": "", "role": "admin", "avatar": {"name": "owners", "hash": "6f0e3a8c0eb46e8834b43b03374ece43a030621d92a7437beb48f871e90f8d90", "color": "#c7c7c7", "kind": "team"}, "can_view": true, "repo_count": 0, "member_count": 1, "is_synced": false}}, "ordered_teams": ["owners"], "invoice_email": true, "invoice_email_address": "billing@test-org.com", "tag_expiration_s": 1209600, "is_free_account": true, "quotas": [{"id": 2, "limit_bytes": 10737418240, "limits": [{"id": 1, "type": "Reject", "limit_percent": 90}]}], "quota_report": {"quota_bytes": 0, "configured_quota": 10737418240, "running_backfill": "complete", "backfill_status": "complete"}}
Organization settings
To manage organization settings in Quay, you can use the v2 UI. You can update organization details and related configuration options.
With Quay, some basic organization settings can be adjusted by using the UI. This includes adjusting general settings, such as the e-mail address associated with the organization, and time machine settings, which allows administrators to adjust when a tag is garbage collected after it is permanently deleted.
Use the following procedure to alter your organization settings by using the v2 UI.
-
On the v2 UI, click Organizations.
-
Click the name of the organization that you will create the robot account for, for example,
test-org. -
Click the Settings tab.
-
Optional. Enter or update the organization Email for the organization in the Email field. This email receives automated system alerts including quota warnings, security notifications, and build failures.
NoteMultiple organizations can share the same organization email address. By default, the address cannot match a user account email unless
FEATURE_ORG_SHARED_EMAILis enabled. -
Optional. Set the allotted time for the Time Machine feature to one of the following:
-
A few seconds
-
A day
-
7 days
-
14 days
-
A month
-
-
Click Save.
Deleting an organization by using the UI
To permanently delete an organization in Quay, you can use the v2 UI.
-
On the Organizations page, select the name of the organization you want to delete, for example,
testorg. -
Click the More Actions drop down menu.
-
Click Delete.
NoteOn the Delete page, there is a Search input box. With this box, users can search for specific organizations to ensure that they are properly scheduled for deletion. For example, if a user is deleting 10 organizations and they want to ensure that a specific organization was deleted, they can use the Search input box to confirm said organization is marked for deletion.
-
Confirm that you want to permanently delete the organization by typing confirm in the box.
-
Click Delete.
After deletion, you are returned to the Organizations page.
NoteYou can delete more than one organization at a time by selecting multiple organizations, and then clicking More Actions → Delete.
Deleting an organization by using the Project Quay API
To delete an organization in Project Quay, you can call the organization API endpoint with an OAuth access token.
-
You have created an OAuth access token.
-
Enter the following command to delete an organization by using the
DELETE /api/v1/organization/{orgname}endpoint:$ curl -X DELETE \ -H "Authorization: Bearer <bearer_token>" \ "https://<quay-server.example.com>/api/v1/organization/<organization_name>" -
The CLI does not return information when you delete an organization. To confirm deletion, you can check the Project Quay UI, or you can enter the
GET /api/v1/organization/{orgname}command to see if details are returned for the deleted organization:$ curl -X GET \ -H "Authorization: Bearer <bearer_token>" \ "<quay-server.example.com>/api/v1/organization/<organization_name>"Example output{"detail": "Not Found", "error_message": "Not Found", "error_type": "not_found", "title": "not_found", "type": "http://<quay-server.example.com>/api/v1/error/not_found", "status": 404}
Manage image repositories
Create repositories by using the UI, Podman, Skopeo, or API, and delete repositories when content is no longer needed.
Creating a repository by using the UI
To create an image repository in Quay, you can use the UI. You select a namespace and set a repository name and visibility.
Use the following procedure to create a repository using the Quay UI.
-
Click Repositories on the navigation pane.
-
Click Create Repository.
-
Select a namespace, for example, quayadmin, and then enter a Repository name, for example,
testrepo.ImportantDo not use the following words in your repository name: *
build*trigger*tag*notificationWhen these words are used for repository names, users are unable access the repository, and are unable to permanently delete the repository. Attempting to delete these repositories returns the following error:
Failed to delete repository <repository_name>, HTTP404 - Not Found. -
Click Create.
Now, your example repository should populate under the Repositories page.
-
Optional. Click Settings → Repository visibility → Make private to set the repository to private.
Creating a repository by using Podman
To create a repository in Project Quay, you can push an image with Podman. The push creates the repository if it does not already exist.
If you push an image through the command-line interface (CLI) without first creating a repository on the UI, the created repository is set to Private.
-
You have download and installed the
podmanCLI. -
You have logged into your registry.
-
You have pulled an image, for example, busybox.
-
Tag the image on your local system with the new repository and image name. For example:
-
Push the image to the registry. Following this step, you can use your browser to see the tagged image in your repository.
+ .Example output
Getting image source signatures
Copying blob 6b245f040973 done
Copying config 22667f5368 done
Writing manifest to image destination
Storing signatures
Creating a repository by using Skopeo
To create a repository in Project Quay when Podman cannot pull an artifact type, you can use the skopeo copy command to copy the artifact from a source registry.
In some cases, the podman CLI tool is unable to pull certain artifact types, for example, application/x-mlmodel, or other AI/ML artifacts. Attempting to use podman pull with this artifact type results in the following error:
Error: parsing image configuration: unsupported image-specific operation on artifact with type "application/x-mlmodel"As an alternative, you can use skopeo copy to copy an artifact from one location to your Project Quay repository.
-
You have installed the
skopeoCLI. -
You have logged in to a source registry (in this example,
\registry.redhat.io) and have a valid authentication file (~/.docker/config.json). Alternatively, you can provide credentials by using the--src-usernameand--src-passwordparameters when running a command with theskopeoCLI. -
You have logged in to your Project Quay repository.
-
Depending on the size of your AI/ML artifact, you might have to prepare your registry to accept large artifacts.
-
Use the
skopeo copycommand on an artifact to copy the artifact to your Project Quay repository. For example:$ sudo skopeo copy --dest-tls-verify=false --all \ --src-username <source_username> --src-password <source_password> \ --src-authfile ~/.docker/config.json \ --dest-username <username> --dest-password <password> \ docker://registry.redhat.io/rhelai1/granite-8b-code-instruct:1.4-1739210683 \ docker://quay-server.example.com/<namespace>/granite-8b-code-instruct:latestwhere:
--dest-tls-verify=false-
Specifies that SSL/TLS verification for the destination registry is disabled. This parameter is optional.
--all-
Specifies that all image manifests are copied, including multi-architecture images. This parameter is optional.
--src-username/--src-password-
Specifies the source registry credentials. This parameter is optional. If you are not logged into a registry, you can pass in the source registry credentials with these parameters.
--src-authfile-
Specifies the path to your Docker authentication file. Typically located at
~/.docker/config.json. This parameter is optional. --dest-username/--dest-password-
Specifies your Project Quay registry username and password.
docker://registry.redhat.io/…-
Specifies the source image or artifact from the Red Hat container registry. Ensure that you are logged in to the registry and that you can pull the image.
docker://quay-server.example.com/…-
Specifies the URL of your Project Quay repository appended with a namespace and the name of the image.
Example outputGetting image source signatures Checking if image destination supports signatures Copying blob 9538fa2b8ad9 done | Copying blob 491ae95f59a2 done | Copying blob 01196d075d77 done | Copying blob e53a4633c992 done | Copying blob c266e9cfa731 done | Copying blob dae0e701d9b2 done | Copying blob 1e227a2c78d8 done | Copying blob 94ff9338861b done | Copying blob 2f2bba45146f done | Copying blob d3b4df07a0ce done | Copying blob f533a8dbb852 done | Copying config 44136fa355 done | Writing manifest to image destination Storing signatures
-
After you have pushed a machine learning artifact to your Project Quay repository, you can view tag information by using the UI or view model card information by using the UI.
Creating a repository by using the API
To create an image repository in Project Quay, you can use the API.
-
You have Created an OAuth access token.
-
Enter the following command to create a repository using the
POST /api/v1/repositoryendpoint:$ curl -X POST \ -H "Authorization: Bearer <bearer_token>" \ -H "Content-Type: application/json" \ -d '{ "repository": "<new_repository_name>", "visibility": "<private>", "description": "<This is a description of the new repository>." }' \ "https://quay-server.example.com/api/v1/repository"Example output{"namespace": "quayadmin", "name": "<new_repository_name>", "kind": "image"}
Deleting a repository by using the UI
To delete an image repository in Quay, you can use the UI. You remove the repository and its tags from the selected namespace.
-
You have created a repository.
-
On the Repositories page of the v2 UI, check the box of the repository that you want to delete, for example,
quayadmin/busybox. -
Click the Actions drop-down menu.
-
Click Delete.
-
Type confirm in the box, and then click Delete.
After deletion, you are returned to the Repositories page.
Deleting a repository by using the Project Quay API
To delete a repository from Project Quay, you can use the API.
-
You have Created an OAuth access token.
-
Enter the following command to delete a repository using the
DELETE /api/v1/repository/{repository}endpoint:$ curl -X DELETE -H "Authorization: Bearer <bearer_token>" "<quay-server.example.com>/api/v1/repository/<namespace>/<repository_name>" -
The CLI does not return information when deleting a repository from the CLI. To confirm deletion, you can check the Project Quay UI, or you can enter the following
GET /api/v1/repository/{repository}command to see if details are returned for the deleted repository:$ curl -X GET -H "Authorization: Bearer <bearer_token>" "<quay-server.example.com>/api/v1/repository/<namespace>/<repository_name>"Example output
{"detail": "Not Found", "error_message": "Not Found", "error_type": "not_found", "title": "not_found", "type": "http://quay-server.example.com/api/v1/error/not_found", "status": 404}
Manage robot accounts
Create, disable, regenerate, and delete robot accounts and bulk-manage repository access for CI/CD pipelines.
Creating a robot account by using the UI
To automate access to your repositories, you can create a robot account by using the UI. Robot accounts generate credentials that container clients can use to push and pull images without a personal login.
-
On the v2 UI, click Organizations.
-
Click the name of the organization that you create the robot account for, for example,
test-org. -
Click the Robot accounts tab → Create robot account.
-
In the Provide a name for your robot account box, enter a name, for example,
robot1. The name of your Robot Account becomes a combination of your username plus the name of the robot, for example,quayadmin+robot1 -
Optional. The following options are available if desired:
-
Add the robot account to a team.
-
Add the robot account to a repository.
-
Adjust the robot account’s permissions.
-
-
On the Review and finish page, review the information you have provided, then click Review and finish. The following alert appears: Successfully created robot account with robot name: <organization_name> + <robot_name>.
Alternatively, if you tried to create a robot account with the same name as another robot account, you might receive the following error message: Error creating robot account.
-
Optional. You can click Expand or Collapse to reveal descriptive information about the robot account.
-
Optional. You can change permissions of the robot account by clicking the kebab menu → Set repository permissions. The following message appears: Successfully updated repository permission.
-
Optional. You can click the name of your robot account to obtain the following information:
-
Robot Account: Select this obtain the robot account token. You can regenerate the token by clicking Regenerate token now.
-
Kubernetes Secret: Select this to download credentials in the form of a Kubernetes pull secret YAML file.
-
Podman: Select this to copy a full
podman logincommand line that includes the credentials. -
Docker Configuration: Select this to copy a full
docker logincommand line that includes the credentials.
-
Creating a robot account by using the Project Quay API
To automate access to your repositories, you can create a robot account by using the Project Quay API. You can create robot accounts for an organization or for your own user account.
-
You have created an OAuth access token.
-
Enter the following command to create a new robot account for an organization by using the
PUT /api/v1/organization/{orgname}/robots/{robot_shortname}endpoint:$ curl -X PUT -H "Authorization: Bearer <bearer_token>" "https://<quay-server.example.com>/api/v1/organization/<organization_name>/robots/<robot_name>"Example output{"name": "orgname+robot-name", "created": "Fri, 10 May 2024 15:11:00 -0000", "last_accessed": null, "description": "", "token": "<example_secret>", "unstructured_metadata": null} -
Enter the following command to create a new robot account for the current user with the
PUT /api/v1/user/robots/{robot_shortname}endpoint:$ curl -X PUT -H "Authorization: Bearer <bearer_token>" "https://<quay-server.example.com>/api/v1/user/robots/<robot_name>"Example output{"name": "quayadmin+robot-name", "created": "Fri, 10 May 2024 15:24:57 -0000", "last_accessed": null, "description": "", "token": "<example_secret>", "unstructured_metadata": null}
Bulk managing robot account repository access
To grant a robot account access to several repositories at once, you can set its permissions in bulk by using the UI.
-
You have created a robot account.
-
You have created multiple repositories under a single organization.
-
On the Project Quay v2 UI landing page, click Organizations in the navigation pane.
-
On the Organizations page, select the name of the organization that has multiple repositories. The number of repositories under a single organization can be found under the Repo Count column.
-
On your organization’s page, click Robot accounts.
-
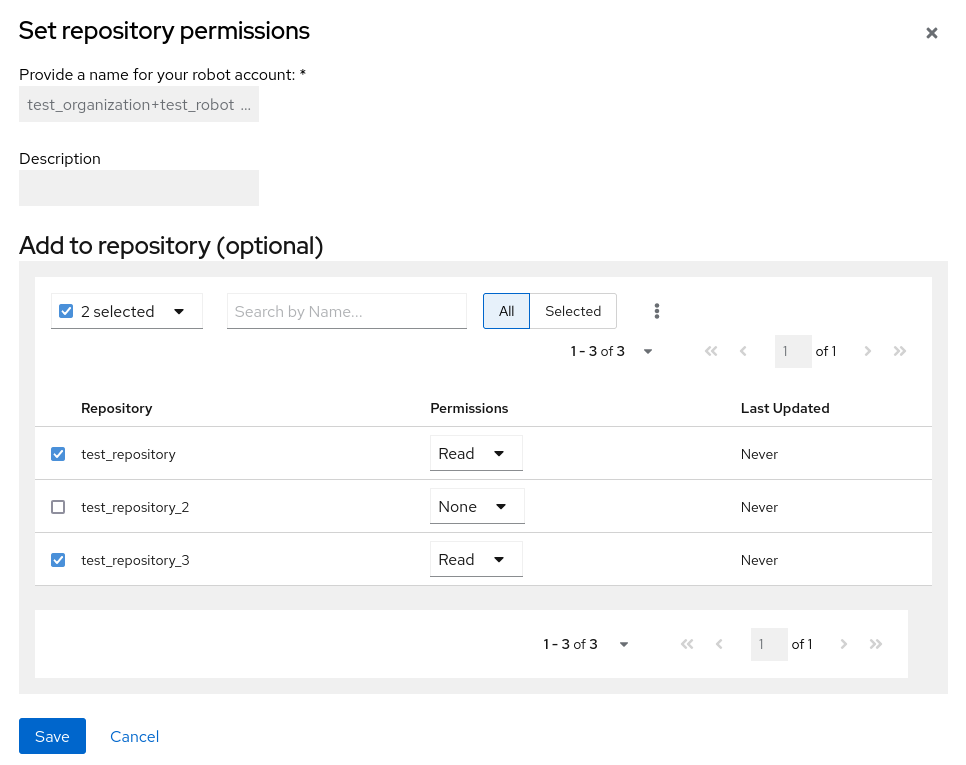
For the robot account that you want to add to multiple repositories, click the kebab icon → Set repository permissions.
-
On the Set repository permissions page, check the boxes of the repositories that you want to add the robot account to. For example:
-
Set the permissions for the robot account, for example, None, Read, Write, Admin.
-
Click save. An alert that says Success alert: Successfully updated repository permission appears on the Set repository permissions page, confirming the changes.
-
Return to the Organizations → Robot accounts page. Now, the Repositories column of your robot account shows the number of repositories that the robot account has been added to.
Disabling robot accounts
To prevent users from creating new robot accounts, you can disable robot account creation in your Project Quay configuration file. This setting also blocks robot accounts required for repository mirroring, so review your mirroring setup first.
|
Important
|
Robot accounts are mandatory for repository mirroring. Setting the |
-
You have created multiple robot accounts.
-
Update your
config.yamlfield to add theROBOTS_DISALLOWvariable, for example:ROBOTS_DISALLOW: true -
Restart your Project Quay deployment.
-
Navigate to your Project Quay repository.
-
Click the name of a repository.
-
In the navigation pane, click Robot Accounts.
-
Click Create Robot Account.
-
Enter a name for the robot account, for example,
<organization-name/username>+<robot-name>. -
Click Create robot account to confirm creation. The following message appears:
Cannot create robot account. Robot accounts have been disabled. Please contact your administrator.
-
On the command-line interface (CLI), attempt to log in as one of the robot accounts by entering the following command:
$ podman login -u="<organization-name/username>+<robot-name>" -p="KETJ6VN0WT8YLLNXUJJ4454ZI6TZJ98NV41OE02PC2IQXVXRFQ1EJ36V12345678" <quay-server.example.com>The following error message is returned:
Error: logging into "<quay-server.example.com>": invalid username/password -
You can pass in the
log-level=debugflag to confirm that robot accounts have been deactivated:$ podman login -u="<organization-name/username>+<robot-name>" -p="KETJ6VN0WT8YLLNXUJJ4454ZI6TZJ98NV41OE02PC2IQXVXRFQ1EJ36V12345678" --log-level=debug <quay-server.example.com>... DEBU[0000] error logging into "quay-server.example.com": unable to retrieve auth token: invalid username/password: unauthorized: Robot accounts have been disabled. Please contact your administrator.
Regenerating a robot account token by using the Project Quay API
To replace a compromised or outdated robot account credential, you can regenerate a robot account token by using the Project Quay API for organization or user robots.
-
You have created an OAuth access token.
-
Enter the following command to regenerate a robot account token for an organization by using the
POST /api/v1/organization/{orgname}/robots/{robot_shortname}/regenerateendpoint:$ curl -X POST \ -H "Authorization: Bearer <bearer_token>" \ "<quay-server.example.com>/api/v1/organization/<orgname>/robots/<robot_shortname>/regenerate"Example output{"name": "test-org+test", "created": "Fri, 10 May 2024 17:46:02 -0000", "last_accessed": null, "description": "", "token": "<example_secret>"} -
Enter the following command to regenerate a robot account token for the current user by using the
POST /api/v1/user/robots/{robot_shortname}/regenerateendpoint:$ curl -X POST \ -H "Authorization: Bearer <bearer_token>" \ "<quay-server.example.com>/api/v1/user/robots/<robot_shortname>/regenerate"Example output{"name": "quayadmin+test", "created": "Fri, 10 May 2024 14:12:11 -0000", "last_accessed": null, "description": "", "token": "<example_secret>"}
Deleting a robot account by using the UI
To remove a robot account that you no longer need, you can delete it by using the Project Quay UI.
-
Log into your Project Quay registry:
-
Click the name of the Organization that has the robot account.
-
Click Robot accounts.
-
Check the box of the robot account to be deleted.
-
Click the kebab menu.
-
Click Delete.
-
Type
confirminto the textbox, then click Delete.
Deleting a robot account by using the Project Quay API
To remove a robot account that you no longer need, you can delete it by using the Project Quay API. You can delete robot accounts that belong to an organization or to your own user account.
-
You have created an OAuth access token.
-
Enter the following command to delete a robot account for an organization by using the
DELETE /api/v1/organization/{orgname}/robots/{robot_shortname}endpoint:$ curl -X DELETE \ -H "Authorization: Bearer <bearer_token>" \ "<quay-server.example.com>/api/v1/organization/<organization_name>/robots/<robot_shortname>" -
The CLI does not return information when deleting a robot account with the API. To confirm deletion, you can check the Project Quay UI, or you can enter the following
GET /api/v1/organization/{orgname}/robotscommand to see if details are returned for the robot account:$ curl -X GET -H "Authorization: Bearer <bearer_token>" "https://<quay-server.example.com>/api/v1/organization/<organization_name>/robots"Example output{"robots": []} -
Enter the following command to delete a robot account for the current user with the
DELETE /api/v1/user/robots/{robot_shortname}endpoint:$ curl -X DELETE \ -H "Authorization: Bearer <bearer_token>" \ "<quay-server.example.com>/api/v1/user/robots/<robot_shortname>" -
The CLI does not return information when deleting a robot account for the current user with the API. To confirm deletion, you can check the Project Quay UI, or you can enter the following
GET /api/v1/user/robots/{robot_shortname}command to see if details are returned for the robot account:$ curl -X GET \ -H "Authorization: Bearer <bearer_token>" \ "<quay-server.example.com>/api/v1/user/robots/<robot_shortname>"Example output{"message":"Could not find robot with specified username"}
Scale access control with teams and roles
Create teams, add members, set team roles, and manage repository permissions by using the UI or API.
Creating a team by using the UI
To create a team in Project Quay, you can use the UI. You add a team under an organization and then assign members and roles.
When you create a team for your organization you can select the team name, choose which repositories to make available to the team, and decide the level of access to the team.
Use the following procedure to create a team for your organization repository.
-
You have created an organization.
-
On the Project Quay v2 UI, click the name of an organization.
-
On your organization’s page, click Teams and membership.
-
Click the Create new team box.
-
In the Create team popup window, provide a name for your new team.
-
Optional. Provide a description for your new team.
-
Click Proceed. A new popup window appears.
-
Optional. Add this team to a repository, and set the permissions to one of the following:
-
None. Team members have no permission to the repository.
-
Read. Team members can view and pull from the repository.
-
Write. Team members can read (pull) from and write (push) to the repository.
-
Admin. Full access to pull from, and push to, the repository, plus the ability to do administrative tasks associated with the repository.
-
-
Optional. Add a team member or robot account. To add a team member, enter the name of their Project Quay account.
-
Review and finish the information, then click Review and Finish. The new team appears under the Teams and membership page.
Creating a team by using the API
To create a team for an organization in Project Quay, you can use the API. You can set the team name, repository access, and permission level.
-
You have created an organization.
-
You have Created an OAuth access token.
-
Enter the following
PUT /api/v1/organization/{orgname}/team/{teamname}command to create a team for your organization:$ curl -k -X PUT -H 'Accept: application/json' -H 'Content-Type: application/json' -H "Authorization: Bearer <bearer_token>" --data '{"role": "creator"}' https://<quay-server.example.com>/api/v1/organization/<organization_name>/team/<team_name>Example output{"name": "example_team", "description": "", "can_view": true, "role": "creator", "avatar": {"name": "example_team", "hash": "dec209fd7312a2284b689d4db3135e2846f27e0f40fa126776a0ce17366bc989", "color": "#e7ba52", "kind": "team"}, "new_team": true}
Managing a team by using the UI
After you create a team in Quay, you can manage members, repository permissions, and team details in the UI. You can also delete a team that you no longer need.
Adding users to a team by using the UI
To add users to a team in Quay, you can use the UI. You invite members so they inherit the team’s repository permissions.
With administrative privileges to an Organization, you can add users and robot accounts to a team. When you add a user, Quay sends an email to that user. The user remains pending until they accept the invitation.
Use the following procedure to add users or robot accounts to a team.
-
On the Project Quay landing page, click the name of your Organization.
-
In the navigation pane, click Teams and Membership.
-
Select the menu kebab of the team that you want to add users or robot accounts to. Then, click Manage team members.
-
Click Add new member.
-
In the textbox, enter information for one of the following:
-
A username from an account on the registry.
-
The email address for a user account on the registry.
-
The name of a robot account. The name must be in the form of <organization_name>+<robot_name>.
NoteRobot Accounts are immediately added to the team. For user accounts, an invitation to join is mailed to the user. Until the user accepts that invitation, the user remains in the INVITED TO JOIN state. After the user accepts the email invitation to join the team, they move from the INVITED TO JOIN list to the MEMBERS list for the Organization.
-
-
Click Add member.
Setting a team role by using the UI
To assign a role to a team within a Quay organization, you can use the UI. Team roles determine a member’s permissions, such as administrative or contributor access.
-
You have created a team.
-
On the Project Quay landing page, click the name of your Organization.
-
In the navigation pane, click Teams and Membership.
-
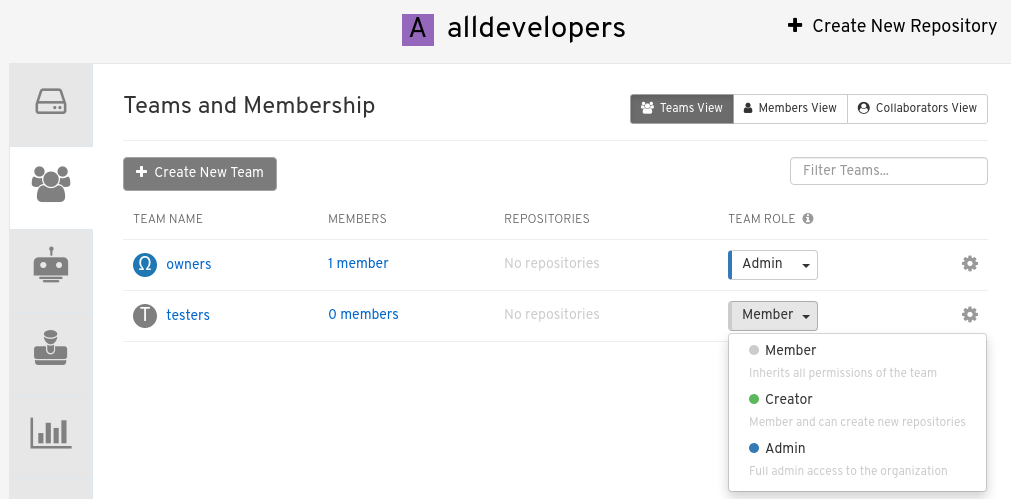
Select the TEAM ROLE drop-down menu, as shown in the following figure:
-
For the selected team, choose one of the following roles:
-
Admin. Full administrative access to the organization, including the ability to create teams, add members, and set permissions.
-
Member. Inherits all permissions set for the team.
-
Creator. All member permissions, plus the ability to create new repositories.
-
Managing team members and repository permissions
To manage team members and set repository permissions for a team, you can use the Quay UI. You can add or remove members, and adjust access levels for each repository.
-
On the Teams and membership page of your organization, you can also manage team members and set repository permissions.
-
Click the kebab menu, and select one of the following options:
-
Manage Team Members. On this page, you can view all members, team members, robot accounts, or users who have been invited. You can also add a new team member by clicking Add new member.
-
Set repository permissions. On this page, you can set the repository permissions to one of the following:
-
None. Team members have no permission to the repository.
-
Read. Team members can view and pull from the repository.
-
Write. Team members can read (pull) from and write (push) to the repository.
-
Admin. Full access to pull from, and push to, the repository, plus the ability to do administrative tasks associated with the repository.
-
-
Delete. This popup window allows you to delete the team by clicking Delete.
-
Viewing additional information about a team
To review team details in Quay, you can use the Teams and membership page. You can switch among team, members, and collaborators views.
Use the following procedure to view general information about the team.
-
On the Teams and membership page of your organization, you can click the one of the following options to reveal more information about teams, members, and collaborators:
-
Team View. This menu shows all team names, the number of members, the number of repositories, and the role for each team.
-
Members View. This menu shows all usernames of team members, the teams that they are part of, the repository permissions of the user.
-
Collaborators View. This menu shows repository collaborators. Collaborators are users that do not belong to any team in the organization, but who have direct permissions on one or more repositories belonging to the organization.
-
Managing a team by using the Project Quay API
You can manage teams in Project Quay by using the API. You can view permissions, add or remove members, and delete organization teams.
The following modules show you how to manage a team by using the Project Quay API.
Managing team members and repository permissions by using the API
To add, invite, or remove members of an organization team in Project Quay, you can use the team member API endpoints with an OAuth access token.
-
You have created an OAuth access token.
-
Enter the
PUT /api/v1/organization/{orgname}/team/{teamname}/members/{membername}command to add or invite a member to an existing team:$ curl -X PUT \ -H "Authorization: Bearer <your_access_token>" \ "<quay-server.example.com>/api/v1/organization/<organization_name>/team/<team_name>/members/<member_name>"Example output{"name": "testuser", "kind": "user", "is_robot": false, "avatar": {"name": "testuser", "hash": "d51d17303dc3271ac3266fb332d7df919bab882bbfc7199d2017a4daac8979f0", "color": "#5254a3", "kind": "user"}, "invited": false} -
Enter the
DELETE /api/v1/organization/{orgname}/team/{teamname}/members/{membername}command to remove a member of a team:$ curl -X DELETE \ -H "Authorization: Bearer <your_access_token>" \ "<quay-server.example.com>/api/v1/organization/<organization_name>/team/<team_name>/members/<member_name>"This command does not return output in the CLI. To ensure that a member has been deleted, you can enter the
GET /api/v1/organization/{orgname}/team/{teamname}/memberscommand and ensure that the member is not returned in the output.$ curl -X GET \ -H "Authorization: Bearer <your_access_token>" \ "<quay-server.example.com>/api/v1/organization/<organization_name>/team/<team_name>/members"Example output{"name": "owners", "members": [{"name": "quayadmin", "kind": "user", "is_robot": false, "avatar": {"name": "quayadmin", "hash": "b28d563a6dc76b4431fc7b0524bbff6b810387dac86d9303874871839859c7cc", "color": "#17becf", "kind": "user"}, "invited": false}, {"name": "test-org+test", "kind": "user", "is_robot": true, "avatar": {"name": "test-org+test", "hash": "aa85264436fe9839e7160bf349100a9b71403a5e9ec684d5b5e9571f6c821370", "color": "#8c564b", "kind": "robot"}, "invited": false}], "can_edit": true} -
You can enter the
PUT /api/v1/organization/{orgname}/team/{teamname}/invite/{email}command to invite a user, by email address, to an existing team:$ curl -X PUT \ -H "Authorization: Bearer <your_access_token>" \ "<quay-server.example.com>/api/v1/organization/<organization_name>/team/<team_name>/invite/<email>" -
You can enter the
DELETE /api/v1/organization/{orgname}/team/{teamname}/invite/{email}command to delete the invite of an email address to join a team. For example:$ curl -X DELETE \ -H "Authorization: Bearer <your_access_token>" \ "<quay-server.example.com>/api/v1/organization/<organization_name>/team/<team_name>/invite/<email>"
Setting the role of a team within an organization by using the API
To view repository permissions for a team or set a team’s role in an Project Quay organization, you can use the organization team API endpoints with an OAuth access token.
-
You have created an OAuth access token.
-
Enter the following
GET /api/v1/organization/{orgname}/team/{teamname}/permissionscommand to return a list of repository permissions for the organization’s team. Note that your team must have been added to a repository for this command to return information.$ curl -X GET \ -H "Authorization: Bearer <your_access_token>" \ "<quay-server.example.com>/api/v1/organization/<organization_name>/team/<team_name>/permissions"Example output{"permissions": [{"repository": {"name": "api-repo", "is_public": true}, "role": "admin"}]} -
You can create or update a team within an organization to have a specified role of admin, member, or creator using the
PUT /api/v1/organization/{orgname}/team/{teamname}command. For example:$ curl -X PUT \ -H "Authorization: Bearer <your_access_token>" \ -H "Content-Type: application/json" \ -d '{ "role": "<role>" }' \ "<quay-server.example.com>/api/v1/organization/<organization_name>/team/<team_name>"Example output{"name": "testteam", "description": "", "can_view": true, "role": "creator", "avatar": {"name": "testteam", "hash": "827f8c5762148d7e85402495b126e0a18b9b168170416ed04b49aae551099dc8", "color": "#ff7f0e", "kind": "team"}, "new_team": false}
Deleting a team within an organization by using the API
To delete a team from an organization in Project Quay, you can use the organization team API endpoint with an OAuth access token.
-
You have created an OAuth access token.
-
You can delete a team within an organization by entering the
DELETE /api/v1/organization/{orgname}/team/{teamname}command:$ curl -X DELETE \ -H "Authorization: Bearer <your_access_token>" \ "<quay-server.example.com>/api/v1/organization/<organization_name>/team/<team_name>"This command does not return output in the CLI.
Inspect image tags, labels, and history
View, add, label, and trace image tag history by using the Red Hat Quay UI or API.
Viewing image tag information by using the UI
To review details about an image tag, such as its digest, size, and vulnerabilities, you can open the tag’s Details page in the Project Quay v2 UI. You can also view the tag’s security report and package list from the same page.
-
You have pushed an image tag to a repository.
-
On the v2 UI, click Repositories.
-
Click the name of a repository.
-
Click the name of a tag. You are taken to the Details page of that tag. The page reveals the following information:
-
Name
-
Repository
-
Digest
-
Vulnerabilities
-
Creation
-
Modified
-
Size
-
Labels
-
How to fetch the image tag
-
-
Click Security Report to view the tag’s vulnerabilities. You can expand an advisory column to open up CVE data.
-
Click Packages to view the tag’s packages.
-
Click the name of the repository to return to the Tags page.
Viewing image tag information by using the API
To view image tag details for a repository in Project Quay, you can use the API.
-
You have pushed an image tag to a Project Quay repository.
-
You have Created an OAuth access token.
-
To obtain tag information, you must use the
GET /api/v1/repository/{repository}API endpoint and pass in theincludeTagsparameter. For example:$ curl -X GET \ -H "Authorization: Bearer <bearer_token>" \ -H "Accept: application/json" \ https://<quay-server.example.com>/api/v1/repository/<namespace>/<repository_name>?includeTags=trueExample output{"namespace": "quayadmin", "name": "busybox", "kind": "image", "description": null, "is_public": false, "is_organization": false, "is_starred": false, "status_token": "d8f5e074-690a-46d7-83c8-8d4e3d3d0715", "trust_enabled": false, "tag_expiration_s": 1209600, "is_free_account": true, "state": "NORMAL", "tags": {"example": {"name": "example", "size": 2275314, "last_modified": "Tue, 14 May 2024 14:48:51 -0000", "manifest_digest": "sha256:57583a1b9c0a7509d3417387b4f43acf80d08cdcf5266ac87987be3f8f919d5d"}, "test": {"name": "test", "size": 2275314, "last_modified": "Tue, 14 May 2024 14:04:48 -0000", "manifest_digest": "sha256:57583a1b9c0a7509d3417387b4f43acf80d08cdcf5266ac87987be3f8f919d5d"}}, "can_write": true, "can_admin": true} -
Alternatively, you can use the
GET /api/v1/repository/{repository}/tag/endpoint. For example:$ curl -X GET \ -H "Authorization: Bearer <bearer_token>" \ -H "Accept: application/json" \ https://<quay-server.example.com>/api/v1/repository/<namespace>/<repository_name>/tag/Example output{"tags": [{"name": "test-two", "reversion": true, "start_ts": 1718737153, "manifest_digest": "sha256:57583a1b9c0a7509d3417387b4f43acf80d08cdcf5266ac87987be3f8f919d5d", "is_manifest_list": false, "size": 2275314, "last_modified": "Tue, 18 Jun 2024 18:59:13 -0000"}, {"name": "test-two", "reversion": false, "start_ts": 1718737029, "end_ts": 1718737153, "manifest_digest": "sha256:0cd3dd6236e246b349e63f76ce5f150e7cd5dbf2f2f1f88dbd734430418dbaea", "is_manifest_list": false, "size": 2275317, "last_modified": "Tue, 18 Jun 2024 18:57:09 -0000", "expiration": "Tue, 18 Jun 2024 18:59:13 -0000"}, {"name": "test-two", "reversion": false, "start_ts": 1718737018, "end_ts": 1718737029, "manifest_digest": "sha256:0cd3dd6236e246b349e63f76ce5f150e7cd5dbf2f2f1f88dbd734430418dbaea", "is_manifest_list": false, "size": 2275317, "last_modified": "Tue, 18 Jun 2024 18:56:58 -0000", "expiration": "Tue, 18 Jun 2024 18:57:09 -0000"}, {"name": "sample_tag", "reversion": false, "start_ts": 1718736147, "manifest_digest": "sha256:57583a1b9c0a7509d3417387b4f43acf80d08cdcf5266ac87987be3f8f919d5d", "is_manifest_list": false, "size": 2275314, "last_modified": "Tue, 18 Jun 2024 18:42:27 -0000"}, {"name": "test-two", "reversion": false, "start_ts": 1717680780, "end_ts": 1718737018, "manifest_digest": "sha256:57583a1b9c0a7509d3417387b4f43acf80d08cdcf5266ac87987be3f8f919d5d", "is_manifest_list": false, "size": 2275314, "last_modified": "Thu, 06 Jun 2024 13:33:00 -0000", "expiration": "Tue, 18 Jun 2024 18:56:58 -0000"}, {"name": "tag-test", "reversion": false, "start_ts": 1717680378, "manifest_digest": "sha256:57583a1b9c0a7509d3417387b4f43acf80d08cdcf5266ac87987be3f8f919d5d", "is_manifest_list": false, "size": 2275314, "last_modified": "Thu, 06 Jun 2024 13:26:18 -0000"}, {"name": "example", "reversion": false, "start_ts": 1715698131, "manifest_digest": "sha256:57583a1b9c0a7509d3417387b4f43acf80d08cdcf5266ac87987be3f8f919d5d", "is_manifest_list": false, "size": 2275314, "last_modified": "Tue, 14 May 2024 14:48:51 -0000"}], "page": 1, "has_additional": false}
Adding a new image tag to an image by using the UI
To create an alias for an existing image, you can add a new tag to it from the Repositories page of the Project Quay v2 UI. The new tag points to the same image and appears immediately in the repository’s tag list.
-
On the Project Quay v2 UI dashboard, click Repositories in the navigation pane.
-
Click the name of a repository that has image tags.
-
Click the menu kebab, then click Add new tag.
-
Enter a name for the tag, then, click Create tag.
The new tag is now listed on the Repository Tags page.
Adding a new tag to an image tag to an image by using the API
To add a new tag or restore an older tag on an image in Project Quay, you can use the API.
-
You have Created an OAuth access token.
-
You can change which image a tag points to or create a new tag by using the
PUT /api/v1/repository/{repository}/tag/{tag}command:$ curl -X PUT \ -H "Authorization: Bearer <bearer_token>" \ -H "Content-Type: application/json" \ --data '{ "manifest_digest": "<manifest_digest>" }' \ https://<quay-server.example.com>/api/v1/repository/<namespace>/<repository_name>/tag/<tag>Example output"Updated" -
You can restore a repository tag to its previous image by using the
POST /api/v1/repository/{repository}/tag/{tag}/restorecommand. For example:$ curl -X POST \ -H "Authorization: Bearer <bearer_token>" \ -H "Content-Type: application/json" \ --data '{ "manifest_digest": <manifest_digest> }' \ quay-server.example.com/api/v1/repository/quayadmin/busybox/tag/test/restoreExample output{} -
To see a list of tags after creating a new tag you can use the
GET /api/v1/repository/{repository}/tag/command. For example:$ curl -X GET \ -H "Authorization: Bearer <bearer_token>" \ -H "Accept: application/json" \ https://<quay-server.example.com>/api/v1/repository/<namespace>/<repository_name>/tagExample output{"tags": [{"name": "test", "reversion": false, "start_ts": 1716324069, "manifest_digest": "sha256:57583a1b9c0a7509d3417387b4f43acf80d08cdcf5266ac87987be3f8f919d5d", "is_manifest_list": false, "size": 2275314, "last_modified": "Tue, 21 May 2024 20:41:09 -0000"}, {"name": "example", "reversion": false, "start_ts": 1715698131, "manifest_digest": "sha256:57583a1b9c0a7509d3417387b4f43acf80d08cdcf5266ac87987be3f8f919d5d", "is_manifest_list": false, "size": 2275314, "last_modified": "Tue, 14 May 2024 14:48:51 -0000"}, {"name": "example", "reversion": false, "start_ts": 1715697708, "end_ts": 1715698131, "manifest_digest": "sha256:57583a1b9c0a7509d3417387b4f43acf80d08cdcf5266ac87987be3f8f919d5d", "is_manifest_list": false, "size": 2275314, "last_modified": "Tue, 14 May 2024 14:41:48 -0000", "expiration": "Tue, 14 May 2024 14:48:51 -0000"}, {"name": "test", "reversion": false, "start_ts": 1715695488, "end_ts": 1716324069, "manifest_digest": "sha256:57583a1b9c0a7509d3417387b4f43acf80d08cdcf5266ac87987be3f8f919d5d", "is_manifest_list": false, "size": 2275314, "last_modified": "Tue, 14 May 2024 14:04:48 -0000", "expiration": "Tue, 21 May 2024 20:41:09 -0000"}, {"name": "test", "reversion": false, "start_ts": 1715631517, "end_ts": 1715695488, "manifest_digest": "sha256:57583a1b9c0a7509d3417387b4f43acf80d08cdcf5266ac87987be3f8f919d5d", "is_manifest_list": false, "size": 2275314, "last_modified": "Mon, 13 May 2024 20:18:37 -0000", "expiration": "Tue, 14 May 2024 14:04:48 -0000"}], "page": 1, "has_additional": false}
Adding and managing labels by using the UI
You can add key-value labels to an image tag in the Project Quay v2 UI to record metadata such as a release date or build source. Administrators can add, edit, or remove labels for any tag in a repository.
-
On the v2 UI dashboard, click Repositories in the navigation pane.
-
Click the name of a repository that has image tags.
-
Click the menu kebab for an image and select Edit labels.
-
In the Edit labels window, click Add new label.
-
Enter a label for the image tag using the
key=valueformat, for example,com.example.release-date=2023-11-14.NoteThe following error is returned when failing to use the
key=valueformat:Invalid label format, must be key value separated by =. -
Click the whitespace of the box to add the label.
-
Optional. Add a second label.
-
Click Save labels to save the label to the image tag. The following notification is returned:
Created labels successfully. -
Optional. Click the same image tag’s menu kebab → Edit labels → X on the label to remove it; alternatively, you can edit the text. Click Save labels. The label is now removed or edited.
Adding and managing labels by using the API
To add, list, retrieve, or delete labels on image manifests in Project Quay, you can use the repository manifest labels API endpoints with an OAuth 2 access token.
-
You have created an OAuth access token.
-
Use the
GET /api/v1/repository/{repository}/manifest/{manifestref}command to retrieve the details of a specific manifest in a repository:$ curl -X GET \ -H "Authorization: Bearer <bearer_token>" \ -H "Accept: application/json" \ https://<quay-server.example.com>/api/v1/repository/<repository>/manifest/<manifestref> -
Use the
GET /api/v1/repository/{repository}/manifest/{manifestref}/labelscommand to retrieve a list of labels for a specific manifest:$ curl -X GET \ -H "Authorization: Bearer <bearer_token>" \ -H "Accept: application/json" \ https://<quay-server.example.com>/api/v1/repository/<repository>/manifest/<manifestref>/labelsExample output{"labels": [{"id": "e9f717d2-c1dd-4626-802d-733a029d17ad", "key": "org.opencontainers.image.url", "value": "https://github.com/docker-library/busybox", "source_type": "manifest", "media_type": "text/plain"}, {"id": "2d34ec64-4051-43ad-ae06-d5f81003576a", "key": "org.opencontainers.image.version", "value": "1.36.1-glibc", "source_type": "manifest", "media_type": "text/plain"}]} -
Use the
GET /api/v1/repository/{repository}/manifest/{manifestref}/labels/{labelid}command to obtain information about a specific manifest:$ curl -X GET \ -H "Authorization: Bearer <bearer_token>" \ -H "Accept: application/json" \ https://<quay-server.example.com>/api/v1/repository/<repository>/manifest/<manifestref>/labels/<label_id>Example output{"id": "e9f717d2-c1dd-4626-802d-733a029d17ad", "key": "org.opencontainers.image.url", "value": "https://github.com/docker-library/busybox", "source_type": "manifest", "media_type": "text/plain"} -
Add an additional label to a manifest in a given repository with the
POST /api/v1/repository/{repository}/manifest/{manifestref}/labelscommand. For example:$ curl -X POST \ -H "Authorization: Bearer <bearer_token>" \ -H "Content-Type: application/json" \ --data '{ "key": "<key>", "value": "<value>", "media_type": "<media_type>" }' \ https://<quay-server.example.com>/api/v1/repository/<repository>/manifest/<manifestref>/labelsExample output{"label": {"id": "346593fd-18c8-49db-854f-4cb1fb76ff9c", "key": "example-key", "value": "example-value", "source_type": "api", "media_type": "text/plain"}} -
Delete a label by using the
DELETE /api/v1/repository/{repository}/manifest/{manifestref}/labels/{labelid}command:$ curl -X DELETE \ -H "Authorization: Bearer <bearer_token>" \ https://<quay-server.example.com>/api/v1/repository/<repository>/manifest/<manifestref>/labels/<labelid>This command does not return output in the CLI. You can list labels again to confirm that the label was removed.
Viewing model card information by using the UI
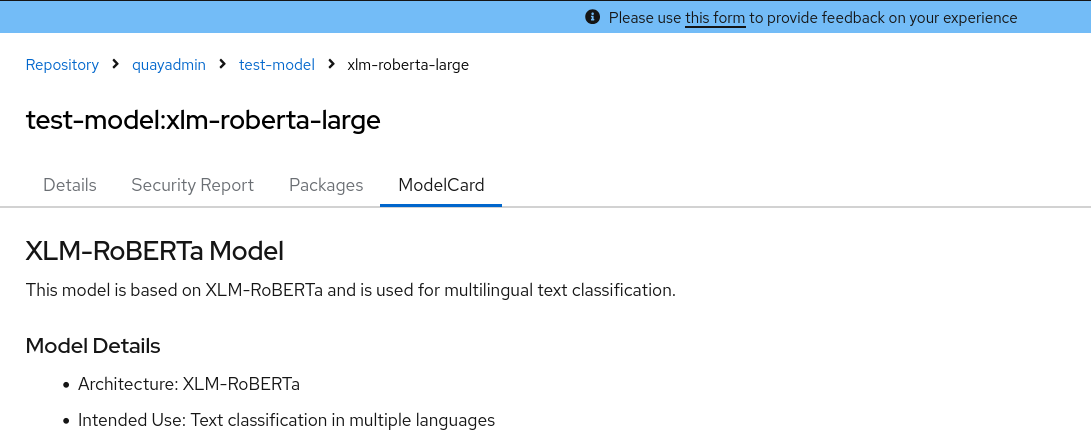
To view model card information for a machine learning artifact in Project Quay, you can open the Model Card tab on the tag Details page in the UI.
Model cards are essentially markdown (.md) files with additional metadata that provide information about a machine learning application. To view model card information, a manifest must have an annotation that is defined in your config.yaml file (for example, application/x-mlmodel) and include a model card stored as a layer in the manifest. When these conditions are met, a Model Card tab appears on the Details page of a tag.
-
You have pushed an artifact of that annotation type, and it includes a model card (
.md) file.
-
Update your
config.yamlfile to include the following information:Example model card YAMLFEATURE_UI_MODELCARD: true UI_MODELCARD_ARTIFACT_TYPE: application/x-mlmodel UI_MODELCARD_ANNOTATION: org.opencontainers.image.description: "Model card metadata" UI_MODELCARD_LAYER_ANNOTATION: org.opencontainers.image.title: README.mdwhere:
FEATURE_UI_MODELCARD-
Specifies that the Model Card image tab in the UI is enabled.
UI_MODELCARD_ARTIFACT_TYPE-
Specifies the model card artifact type. In this example, the artifact type is
application/x-mlmodel. UI_MODELCARD_ANNOTATION-
Specifies that if an image does not have an
artifactTypedefined, this field is checked at the manifest level. If a matching annotation is found, the system then searches for a layer with an annotation matchingUI_MODELCARD_LAYER_ANNOTATION. This field is optional. UI_MODELCARD_LAYER_ANNOTATION-
Specifies that if an image has an
artifactTypedefined and multiple layers, this field is used to locate the specific layer containing the model card. This field is optional.
-
Push an artifact of that annotation type, and one that includes a model card (
.md) file, to your repository. -
On the v2 UI, click Repositories.
-
Click the name of a repository.
-
Click the name of a tag. You are taken to the Details page of that tag.
-
Click ModelCard to view information about the image. For example:
Fetching an image by tag or digest
To fetch an image from Project Quay, you can pull by tag or by digest. Digests provide an immutable reference to a specific image manifest.
-
Navigate to the Tags page of a repository.
-
Under Manifest, click the Fetch Tag icon.
-
When the popup box appears, users are presented with the following options:
-
Podman Pull (by tag)
-
Docker Pull (by tag)
-
Podman Pull (by digest)
-
Docker Pull (by digest)
Selecting any one of the four options returns a command for the respective client that allows users to pull the image.
-
-
Click Copy Command to copy the command, which can be used on the command-line interface (CLI). For example:
= Viewing Project Quay tag history by using the UI
To review changes made to an image over time, you can open its Tag History page in the Project Quay v2 UI. You can search by tag name, filter by date range, and see when each tag was modified.
-
On the Project Quay v2 UI dashboard, click Repositories in the navigation pane.
-
Click the name of a repository that has image tags.
-
Click Tag History. On this page, you can perform the following actions:
-
Search by tag name
-
Select a date range
-
View tag changes
-
View tag modification dates and the time at which they were changed
-
Viewing Project Quay tag history by using the API
To review the history of image tags in a Project Quay repository, you can use the API.
-
You have Created an OAuth access token.
-
Enter the following command to view tag history by using the
GET /api/v1/repository/{repository}/tag/command and passing in one of the following queries:-
onlyActiveTags=<true/false>: Filters to only include active tags.
-
page=<number>: Specifies the page number of results to retrieve.
-
limit=<number>: Limits the number of results per page.
-
specificTag=<tag_name>: Filters the tags to include only the tag with the specified name.
$ curl -X GET \ -H "Authorization: Bearer <bearer_token>" \ -H "Accept: application/json" \ "https://<quay-server.example.com>/api/v1/repository/<namespace>/<repository>/tag/?onlyActiveTags=true&page=1&limit=10"Example output{"tags": [{"name": "test-two", "reversion": false, "start_ts": 1717680780, "manifest_digest": "sha256:57583a1b9c0a7509d3417387b4f43acf80d08cdcf5266ac87987be3f8f919d5d", "is_manifest_list": false, "size": 2275314, "last_modified": "Thu, 06 Jun 2024 13:33:00 -0000"}, {"name": "tag-test", "reversion": false, "start_ts": 1717680378, "manifest_digest": "sha256:57583a1b9c0a7509d3417387b4f43acf80d08cdcf5266ac87987be3f8f919d5d", "is_manifest_list": false, "size": 2275314, "last_modified": "Thu, 06 Jun 2024 13:26:18 -0000"}, {"name": "example", "reversion": false, "start_ts": 1715698131, "manifest_digest": "sha256:57583a1b9c0a7509d3417387b4f43acf80d08cdcf5266ac87987be3f8f919d5d", "is_manifest_list": false, "size": 2275314, "last_modified": "Tue, 14 May 2024 14:48:51 -0000"}], "page": 1, "has_additional": false}
-
-
By using the
specificTag=<tag_name>query, you can filter results for a specific tag. For example:$ curl -X GET -H "Authorization: Bearer <bearer_token>" -H "Accept: application/json" "<quay-server.example.com>/api/v1/repository/quayadmin/busybox/tag/?onlyActiveTags=true&page=1&limit=20&specificTag=test-two"Example output{"tags": [{"name": "test-two", "reversion": true, "start_ts": 1718737153, "manifest_digest": "sha256:57583a1b9c0a7509d3417387b4f43acf80d08cdcf5266ac87987be3f8f919d5d", "is_manifest_list": false, "size": 2275314, "last_modified": "Tue, 18 Jun 2024 18:59:13 -0000"}], "page": 1, "has_additional": false}
Retire image tags on a schedule
Set tag expiration from repositories, Dockerfiles, or annotations, and delete or undo tags by using the UI or API.
Setting tag expirations
You can set image tags in Project Quay to expire at a chosen date and time. Expired tags are deleted from the repository according to your time machine retention settings.
This feature includes the following characteristics:
-
When an image tag expires, it is deleted from the repository. If it is the last tag for a specific image, the image is also set to be deleted.
-
Expiration is set on a per-tag basis. It is not set for a repository as a whole.
-
After a tag is expired or deleted, it is not immediately removed from the registry. This is contingent upon the allotted time designed in the time machine feature, which defines when the tag is permanently deleted, or garbage collected. By default, this value is set at 14 days, however the administrator can adjust this time to one of multiple options. Up until the point that garbage collection occurs, tags changes can be reverted.
Tag expiration can be set up in one of three ways:
-
By setting the
quay.expires-after=label in the Dockerfile when the image is created. This sets a time to expire from when the image is built. This label only works for image manifests. -
By setting the
quay.expires-after=annotation label in the Dockerfile when the image is created.--annotationcan be passed in for both image manifests and image indexes. -
By selecting an expiration date on the UI. For example:
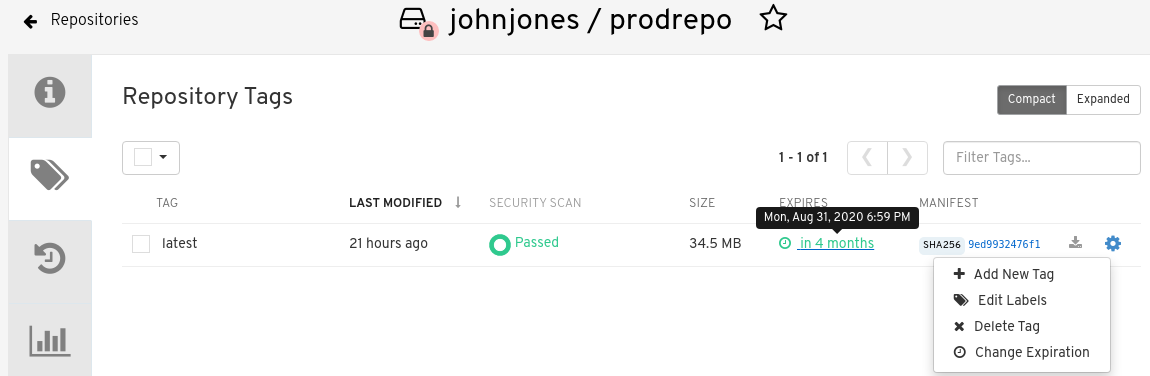
Setting tag expirations can help automate the cleanup of older or unused tags, helping to reduce storage space.
|
Note
|
Immutable tags are excluded from auto-pruning, but they can still expire. To retire a locked production tag, use per-tag expiration instead of an auto-prune policy. |
Setting tag expiration from a repository
To set a tag expiration date in Project Quay, you can use the repository Tags page. You can change expiration for one tag or for multiple tags at once.
-
On the Project Quay v2 UI dashboard, click Repositories in the navigation pane.
-
Click the name of a repository that has image tags.
-
Click the menu kebab for an image and select Change expiration.
-
Optional. Alternatively, you can bulk add expiration dates by clicking the box of multiple tags, and then select Actions → Set expiration.
-
In the Change Tags Expiration window, set an expiration date, specifying the day of the week, month, day of the month, and year. For example,
Wednesday, November 15, 2023. Alternatively, you can click the calendar button and manually select the date. -
Set the time, for example,
2:30 PM. -
Click Change Expiration to confirm the date and time. The following notification is returned:
Successfully set expiration for tag test to Nov 15, 2023, 2:26 PM. -
On the Project Quay v2 UI Tags page, you can see when the tag is set to expire. For example:
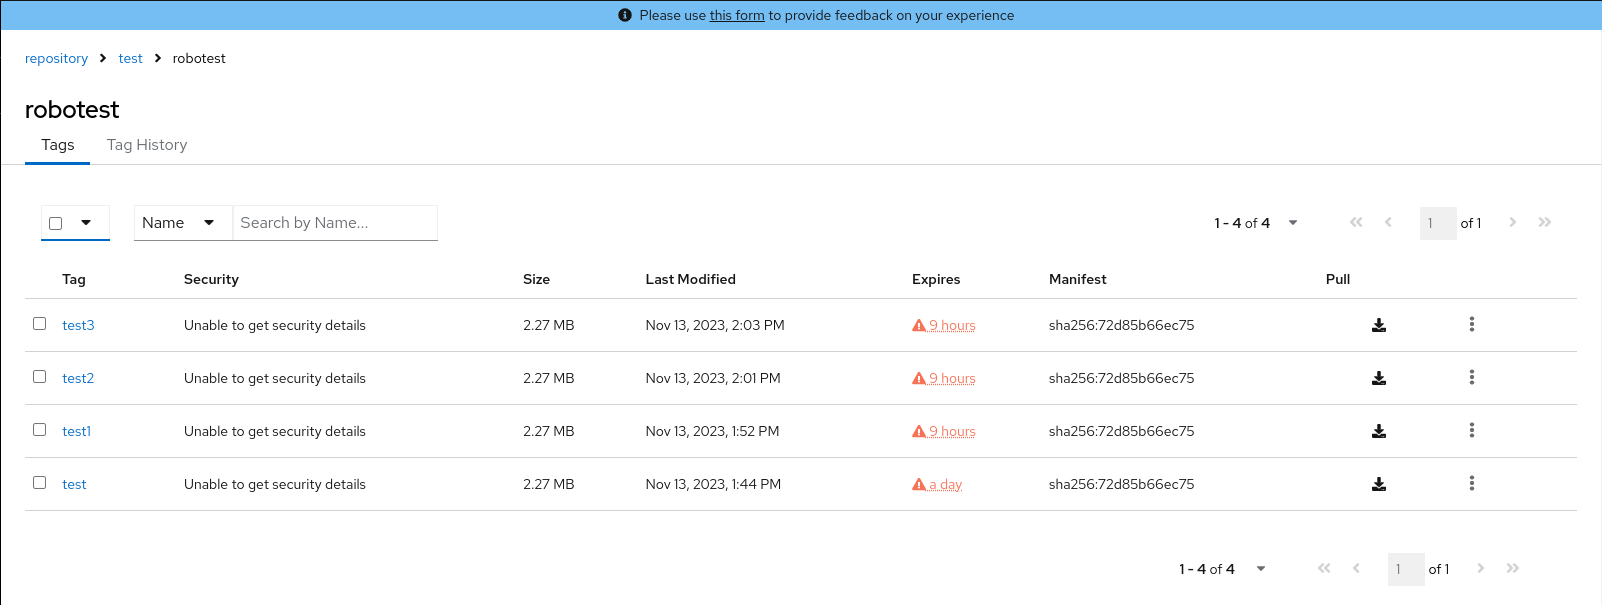
Setting tag expiration from a Dockerfile
To expire an image tag automatically in Project Quay, you can add a quay.expires-after label in a Dockerfile. Expiration starts when you push the image to the registry.
You can add a label, for example, quay.expires-after=20h to an image tag by using the docker label command to cause the tag to automatically expire after the time that is indicated. The following values for hours, days, or weeks are accepted:
-
1h -
2d -
3w
Expiration begins from the time that the image is pushed to the registry.
-
Enter the following
docker labelcommand to add a label to the desired image tag. The label should be in the formatquay.expires-after=20hto indicate that the tag should expire after 20 hours. Replace20hwith the desired expiration time. For example:$ docker label quay.expires-after=20h quay-server.example.com/quayadmin/<image>:<tag>
Setting tag expiration using annotations
To expire an image tag automatically in Project Quay, you can push an image with a quay.expires-after annotation. You can apply the annotation to manifests and indexes.
You can add an annotation, for example, quay.expires-after=20h, by using the --annotation flag when you push an image. The following values for hours, days, or weeks are accepted:
-
1h -
2d -
3w
Expiration begins from the time that the image is pushed to the registry.
|
Note
|
Using the |
-
You have downloaded the
orasCLI.
-
Enter the following
oras push --annotationcommand to add an annotation to the desired image tag. The annotation should be in the formatquay.expires-after=<value>to indicate that the tag should expire the set time. For example:$ oras push --annotation quay.expires-after=<value> \ <quay-server.example.com>/<organization>/<repository>:<tag> \ <file_path>:<media_type>Example output✓ Uploaded hello.txt 12/12 B 100.00% 321ms └─ sha256:74b9e308133afb3bceae961097cb2aa481483869d695ce1414cd2bc7f046027c ✓ Uploaded application/vnd.oci.empty.v1+json 2/2 B 100.00% 328ms └─ sha256:44136fa355b3678a1146ad16f7e8649e94fb4fc21fe77e8310c060f61caaff8a ✓ Uploaded application/vnd.oci.image.manifest.v1+json 620/620 B 100.00% 0s └─ sha256:c370e931b5eca44fd753bd92e6991ed3be70008e8df15078083359409111f8c3 Pushed [registry] quay-server.example.com/fortestuser/busybox:test2 ArtifactType: application/vnd.unknown.artifact.v1 -
Confirm that the expiration date has been applied by checking the Project Quay UI, or by entering the following command:
$ curl -X GET \ -H "Authorization: Bearer <bearer_token>" \ -H "Accept: application/json" \ https://<quay-server.example.com>/api/v1/repository/<namespace>/<repository_name>/tag/?specificTag=<tag>" \Example output{"tags": [{"name": "test2", "reversion": false, "start_ts": 1743706344, "end_ts": 1743778344, "manifest_digest": "sha256:c370e931b5eca44fd753bd92e6991ed3be70008e8df15078083359409111f8c3", "is_manifest_list": false, "size": 12, "last_modified": "Thu, 03 Apr 2025 18:52:24 -0000", "expiration": "Fri, 04 Apr 2025 14:52:24 -0000"}, {"name": "test2", "reversion": false, "start_ts": 1742493776, "end_ts": 1743706344, "manifest_digest": "sha256:d80aa3d7f5f5388cfae543b990d3cd3d47ff51c48ef29ff66102427bf7bc0a88", "is_manifest_list": false, "size": 2266046, "last_modified": "Thu, 20 Mar 2025 18:02:56 -0000", "expiration": "Thu, 03 Apr 2025 18:52:24 -0000"}], "page": 1, "has_additional": false}
Removing tag expiration using annotations
To clear a tag expiration annotation in Project Quay, you can push the image again with quay.expires-after set to never. The latest manifest no longer carries an expiration time.
With the oras CLI tool, you can unset previously established expiration times.
-
You have downloaded the
orasCLI. -
You have pushed an image with the
quay.expires-after=<value>annotation.
-
Enter the following
oras push --annotationcommand to remove an annotation to the desired image tag. The annotation should be in the formatquay.expires-after=never. For example:$ oras push --annotation quay.expires-after=never \ <quay-server.example.com>/<organization>/<repository>:<tag> \ <file_path>:<media_type>Example output✓ Uploaded hello.txt 12/12 B 100.00% 321ms └─ sha256:74b9e308133afb3bceae961097cb2aa481483869d695ce1414cd2bc7f046027c ✓ Uploaded application/vnd.oci.empty.v1+json 2/2 B 100.00% 328ms └─ sha256:44136fa355b3678a1146ad16f7e8649e94fb4fc21fe77e8310c060f61caaff8a ✓ Uploaded application/vnd.oci.image.manifest.v1+json 620/620 B 100.00% 0s └─ sha256:c370e931b5eca44fd753bd92e6991ed3be70008e8df15078083359409111f8c3 Pushed [registry] quay-server.example.com/fortestuser/busybox:test2 ArtifactType: application/vnd.unknown.artifact.v1 -
The latest manifest will no longer have an expiration time. Confirm that the expiration date has been removed by checking the Project Quay UI, or by entering the following command:
{"tags": [{"name": "test2", "reversion": false, "start_ts": 1743708135, "manifest_digest": "sha256:19e3a3501b4125cce9cb6bb26ac9207c325259bef94dc66490b999f93c4c83a9", "is_manifest_list": false, "size": 12, "last_modified": "Thu, 03 Apr 2025 19:22:15 -0000"}, {"name": "test2", "reversion": false, "start_ts": 1743706344, "end_ts": 1743708135}]}Note that no expiration time is listed.
Setting tag expirations by using the API
To set when an image tag expires in Project Quay, you can use the API.
-
You have Created an OAuth access token.
-
You can set when an image a tag expires by using the
PUT /api/v1/repository/{repository}/tag/{tag}command and passing in the expiration field:$ curl -X PUT \ -H "Authorization: Bearer <bearer_token>" \ -H "Content-Type: application/json" \ --data '{ "expiration": "<seconds since epoch>" }' \ https://<quay-server.example.com>/api/v1/repository/<namespace>/<repository_name>/tag/<tag>Example output"Updated"
Deleting an image tag
To remove a specific version of a container image from a repository, you can delete its tag from the Project Quay v2 UI. Depending on your time machine retention settings, you might be able to revert a deleted tag later.
-
On the Repositories page of the v2 UI, click the name of the image you want to delete, for example,
quay/admin/busybox. -
Click the More Actions drop-down menu.
-
Click Delete.
NoteIf desired, you could click Make Public or Make Private.
-
Type confirm in the box, and then click Delete.
-
After deletion, you are returned to the Repositories page.
NoteDeleting an image tag can be reverted based on the amount of time allotted assigned to the time machine feature. For more information, see "Reverting tag changes".
Deleting an image by using the API
To remove an image tag from a Project Quay repository, you can use the API.
-
You have Created an OAuth access token.
-
You can delete an image tag by using the
DELETE /api/v1/repository/{repository}/tag/{tag}command:$ curl -X DELETE \ -H "Authorization: Bearer <bearer_token>" \ https://<quay-server.example.com>/api/v1/repository/<namespace>/<repository_name>/tag/<tag>This command does not return output in the CLI. Continue on to the next step to return a list of tags.
-
To see a list of tags after deleting a tag, you can use the
GET /api/v1/repository/{repository}/tag/command. For example:$ curl -X GET \ -H "Authorization: Bearer <bearer_token>" \ -H "Accept: application/json" \ https://<quay-server.example.com>/api/v1/repository/<namespace>/<repository_name>/tagExample output{"tags": [{"name": "test", "reversion": false, "start_ts": 1716324069, "manifest_digest": "sha256:57583a1b9c0a7509d3417387b4f43acf80d08cdcf5266ac87987be3f8f919d5d", "is_manifest_list": false, "size": 2275314, "last_modified": "Tue, 21 May 2024 20:41:09 -0000"}, {"name": "example", "reversion": false, "start_ts": 1715698131, "manifest_digest": "sha256:57583a1b9c0a7509d3417387b4f43acf80d08cdcf5266ac87987be3f8f919d5d", "is_manifest_list": false, "size": 2275314, "last_modified": "Tue, 14 May 2024 14:48:51 -0000"}, {"name": "example", "reversion": false, "start_ts": 1715697708, "end_ts": 1715698131, "manifest_digest": "sha256:57583a1b9c0a7509d3417387b4f43acf80d08cdcf5266ac87987be3f8f919d5d", "is_manifest_list": false, "size": 2275314, "last_modified": "Tue, 14 May 2024 14:41:48 -0000", "expiration": "Tue, 14 May 2024 14:48:51 -0000"}, {"name": "test", "reversion": false, "start_ts": 1715695488, "end_ts": 1716324069, "manifest_digest": "sha256:57583a1b9c0a7509d3417387b4f43acf80d08cdcf5266ac87987be3f8f919d5d", "is_manifest_list": false, "size": 2275314, "last_modified": "Tue, 14 May 2024 14:04:48 -0000", "expiration": "Tue, 21 May 2024 20:41:09 -0000"}, {"name": "test", "reversion": false, "start_ts": 1715631517, "end_ts": 1715695488, "manifest_digest": "sha256:57583a1b9c0a7509d3417387b4f43acf80d08cdcf5266ac87987be3f8f919d5d", "is_manifest_list": false, "size": 2275314, "last_modified": "Mon, 13 May 2024 20:18:37 -0000", "expiration": "Tue, 14 May 2024 14:04:48 -0000"}], "page": 1, "has_additional": false}
Reverting tag changes by using the UI
To revert tag changes in Project Quay, you can use the UI within the time machine window. You restore a previous tag state before permanent deletion.
-
On the Repositories page of the v2 UI, click the name of the image you want to revert.
-
Click the Tag History tab.
-
Find the point in the timeline at which image tags were changed or removed. Next, click the option under Revert to restore a tag to its image.
Reverting tag changes by using the API
To restore a previous image for a tag in Project Quay, you can use the API.
offers a comprehensive time machine feature that allows older images tags to remain in the repository for set periods of time so that they can revert changes made to tags. This feature allows users to revert tag changes, like tag deletions.
-
You have Created an OAuth access token.
-
You can restore a repository tag to its previous image by using the
POST /api/v1/repository/{repository}/tag/{tag}/restorecommand. For example:$ curl -X POST \ -H "Authorization: Bearer <bearer_token>" \ -H "Content-Type: application/json" \ --data '{ "manifest_digest": <manifest_digest> }' \ quay-server.example.com/api/v1/repository/quayadmin/busybox/tag/test/restoreExample output{} -
To see a list of tags after restoring an old tag you can use the
GET /api/v1/repository/{repository}/tag/command. For example:$ curl -X GET \ -H "Authorization: Bearer <bearer_token>" \ -H "Accept: application/json" \ https://<quay-server.example.com>/api/v1/repository/<namespace>/<repository_name>/tagExample output{"tags": [{"name": "test", "reversion": false, "start_ts": 1716324069, "manifest_digest": "sha256:57583a1b9c0a7509d3417387b4f43acf80d08cdcf5266ac87987be3f8f919d5d", "is_manifest_list": false, "size": 2275314, "last_modified": "Tue, 21 May 2024 20:41:09 -0000"}, {"name": "example", "reversion": false, "start_ts": 1715698131, "manifest_digest": "sha256:57583a1b9c0a7509d3417387b4f43acf80d08cdcf5266ac87987be3f8f919d5d", "is_manifest_list": false, "size": 2275314, "last_modified": "Tue, 14 May 2024 14:48:51 -0000"}, {"name": "example", "reversion": false, "start_ts": 1715697708, "end_ts": 1715698131, "manifest_digest": "sha256:57583a1b9c0a7509d3417387b4f43acf80d08cdcf5266ac87987be3f8f919d5d", "is_manifest_list": false, "size": 2275314, "last_modified": "Tue, 14 May 2024 14:41:48 -0000", "expiration": "Tue, 14 May 2024 14:48:51 -0000"}, {"name": "test", "reversion": false, "start_ts": 1715695488, "end_ts": 1716324069, "manifest_digest": "sha256:57583a1b9c0a7509d3417387b4f43acf80d08cdcf5266ac87987be3f8f919d5d", "is_manifest_list": false, "size": 2275314, "last_modified": "Tue, 14 May 2024 14:04:48 -0000", "expiration": "Tue, 21 May 2024 20:41:09 -0000"}, {"name": "test", "reversion": false, "start_ts": 1715631517, "end_ts": 1715695488, "manifest_digest": "sha256:57583a1b9c0a7509d3417387b4f43acf80d08cdcf5266ac87987be3f8f919d5d", "is_manifest_list": false, "size": 2275314, "last_modified": "Mon, 13 May 2024 20:18:37 -0000", "expiration": "Tue, 14 May 2024 14:04:48 -0000"}], "page": 1, "has_additional": false}
Protect production tags from overwrite
Create, list, update, and delete tag immutability policies by using the Red Hat Quay v2 UI or API.
Immutable tags overview
Immutable tags allow users to lock specific image tags to prevent them from being overwritten, modified, manually deleted, or auto-pruned. Per-tag expiration can still retire an immutable tag.
Immutable tabs help ensure a stable, trusted reference for builds and releases, meeting strict regulatory and compliance requirements. When a tag is marked as immutable, the system blocks tag overwrites, manual or API deletions, and auto-pruning by background workers. Auto-prune exclusion is permanent and is not configurable. Per-tag expiration still applies: an immutable tag can expire and be deleted by expiration, including the quay.expires-after label or annotation, even though auto-prune will never remove it. Manifest labels associated with an immutable tag cannot be changed.
Immutability can be applied to tags in organizations and organization-owned repositories through three methods:
-
Individual Tag Settings: Users with write access can manually toggle the immutable status of a specific tag via the Project Quay v2 UI or the API.
-
Immutability Policies: Administrators can define regex patterns (for example,
release-*) at the organization or repository level. Any tag pushed that matches the pattern is automatically marked as immutable. -
Manifest Labels: Developers can trigger immutability during the build process by including the
quay.immutable=truelabel in their Dockerfile or Containerfile.
|
Note
|
Immutable tags are not available for personal user namespaces. |
Managing tag immutability by using the UI
To prevent a tag from being changed or deleted, you can manage its immutability by using the UI. Use the Tag menu to set or remove immutability for a tag.
-
You have logged into Project Quay.
-
You have set
FEATURE_IMMUTABLE_TAGStoTruein yourconfig.yamlfile.
-
On the Project Quay v2 UI, click Organizations and then the name of the organization where the tag is located.
-
Click the name of the repository where the tag is located.
-
Click Tags in the navigation pane.
-
For the tag that you want to make immutable, click the menu kebab icon and then click Make immutable.
-
Optional: To remove the immutability policy, click the menu kebab icon and then click Remove immutability.
Managing tag immutability by using the Project Quay API
To prevent a tag from being changed or deleted, you can manage its immutability by using the Project Quay API. Use the PUT /api/v1/repository/{repository}/tag/{tag} endpoint to set or remove immutability for a tag.
-
You have logged into Project Quay.
-
You have set
FEATURE_IMMUTABLE_TAGStoTruein yourconfig.yamlfile.
-
Use the
PUT /api/v1/repository/{repository}/tag/{tag}endpoint to set immutability for a tag. For example:$ curl -X PUT \ -H "Authorization: Bearer <bearer_token>" \ -H "Content-Type: application/json" \ --data '{ "immutable": true }' \ https://<quay-server.example.com>/api/v1/repository/<namespace>/<repository_name>/tag/<tag>Example output"Updated" -
Use the
PUT /api/v1/repository/{repository}/tag/{tag}endpoint to remove immutability for a tag. For example:$ curl -X PUT \ -H "Authorization: Bearer <bearer_token>" \ -H "Content-Type: application/json" \ --data '{ "immutable": false }' \ https://<quay-server.example.com>/api/v1/repository/<namespace>/<repository_name>/tag/<tag>Example output"Updated"
Setting immutability policy by using the UI
To protect image tags from overwrite or deletion, you can set an immutability policy for an organization or a repository in {product-title} by using the v2 UI.
-
You have logged into Project Quay.
-
You have set
FEATURE_IMMUTABLE_TAGStoTruein yourconfig.yamlfile.
-
On the Project Quay v2 UI, click Repositories or Organization.
-
Click the name of the repository or organization.
-
Click Settings → Immutability Policies.
-
Click Add policy.
-
Add a tag pattern, for example,
release-*. -
Select a pattern behavior. The following options are available:
-
Tags matching pattern are immutable - With this option, tags that match the pattern will be immutable and cannot be modified or deleted.
-
Tags NOT matching pattern are immutable - With this option, tags that do NOT match the pattern will be immutable and cannot be modified or deleted.
-
-
Click Save.
-
Optional. Update the policy by clicking the Edit (pencil icon) icon.
-
Optional. Delete the policy by clicking the Delete (trash icon) icon.
-
Optional. Add an additional policy by clicking Add policy.
Creating an immutability policy by using the Project Quay API
To protect image tags from overwrite or deletion, you can create an immutability policy for an organization or a repository in Project Quay by using the API. Send a POST request with your bearer token and a JSON body that includes the tag pattern and match rule.
-
You have created an OAuth access token.
-
You have set
FEATURE_IMMUTABLE_TAGStoTruein yourconfig.yamlfile.
-
Create an immutability policy for an organization by using the
POST /api/v1/organization/{orgname}/immutabilitypolicy/endpoint. For example:$ curl -X POST -H "Authorization: Bearer <access_token>" -H "Content-Type: application/json" -d '{"tagPattern": ".*", "tagPatternMatches": true}' http://<quay-server.example.com>/api/v1/organization/<organization_name>/immutabilitypolicy/ -
Create an immutability policy for an organization repository by using the
POST /api/v1/repository/{repository}/immutabilitypolicy/endpoint. For example:$ curl -X POST -H "Authorization: Bearer <access_token>" -H "Content-Type: application/json" -d '{"tagPattern": ".*", "tagPatternMatches": true}' http://<quay-server.example.com>/api/v1/repository/<namespace>/<repository_name>/immutabilitypolicy/Example output{"uuid": "ce2bdcc0-ced2-4a1a-ac36-78a9c1bed8c7"}
Listing an immutability policy by using the Project Quay API
To view or audit which tags are protected, you can list immutability policies for an organization or a repository in Project Quay by using the API. Send GET requests with your bearer token to retrieve all policies or a single policy by UUID.
-
You have created an OAuth access token.
-
You have set
FEATURE_IMMUTABLE_TAGStoTruein yourconfig.yamlfile.
-
Retrieve all immutability policies for an organization by using the
GET /api/v1/organization/{orgname}/immutabilitypolicy/endpoint. For example:$ curl -X GET -H "Authorization: Bearer <access_token>" http://<quay-server.example.com>/api/v1/organization/<organization_name>/immutabilitypolicy/Example output{"policies": [{"uuid": "3aae3390-de53-4b82-a2b7-4da8fe5dbe11", "tagPattern": ".*", "tagPatternMatches": true}]} -
Retrieve all immutability policies for a repository by using the
GET /api/v1/repository/{repository}/immutabilitypolicy/endpoint. For example:$ curl -X GET -H "Authorization: Bearer <access_token>" http://<quay-server.example.com>/api/v1/repository/<namespace>/<repository_name>/immutabilitypolicy/Example output{"policies": [{"uuid": "87f75fb5-d023-4054-87b4-469f37a59638", "tagPattern": ".*", "tagPatternMatches": true}]} -
List information about a specific immutability policy for an organization by using the
GET /api/v1/organization/{orgname}/immutabilitypolicy/{policy_uuid}/endpoint. For example:$ curl -X GET -H "Authorization: Bearer <access_token>" http://<quay-server.example.com>/api/v1/organization/<organization_name>/immutabilitypolicy/<policy_uuid>/Example output{"policies": [{"uuid": "87f75fb5-d023-4054-87b4-469f37a59638", "tagPattern": ".*", "tagPatternMatches": true}]} -
List information about a specific immutability policy for a repository by using the
GET /api/v1/repository/{repository}/immutabilitypolicy/{policy_uuid}/endpoint. For example:$ curl -X GET -H "Authorization: Bearer <access_token>" http://<quay-server.example.com>/api/v1/repository/<namespace>/<repository_name>/immutabilitypolicy/<policy_uuid>/Example output{"uuid": "87f75fb5-d023-4054-87b4-469f37a59638", "tagPattern": ".*", "tagPatternMatches": true}
Updating an immutability policy by using the Project Quay API
To change the tag pattern or match rule of an existing policy, you can update an immutability policy for an organization or a repository in {product-title} by using the API. Send a PUT request with your bearer token and the policy UUID, and a JSON body with the new tag pattern and match rule.
-
You have created an OAuth access token.
-
You have set
FEATURE_IMMUTABLE_TAGStoTruein yourconfig.yamlfile.
-
Update an immutability policy for an organization by using the
PUT /api/v1/organization/{orgname}/immutabilitypolicy/{policy_uuid}/endpoint. For example:curl -X PUT \ -H "Authorization: Bearer <bearer_token>" \ -H "Content-Type: application/json" \ -d '{"tagPattern": ".*", "tagPatternMatches": true}' \ "https://<quay-server.example.com>/api/v1/organization/test/immutabilitypolicy/3aae3390-de53-4b82-a2b7-4da8fe5dbe11" -
Update an immutability policy for a repository by using the
PUT /api/v1/repository/{repository}/immutabilitypolicy/{policy_uuid}/endpoint. For example:$ curl -X PUT -H "Authorization: Bearer <access_token>" -H "Content-Type: application/json" -d '{"tagPattern": ".*", "tagPatternMatches": true}' http://<quay-server.example.com>/api/v1/repository/<repository_name>/<namespace>/immutabilitypolicy/<policy_uuid>/
Deleting an immutability policy by using the Project Quay API
To remove an immutability policy so that tags can be modified or deleted again, you can delete the policy for an organization or a repository in Project Quay by using the API. Send a DELETE request with your bearer token and the policy UUID.
-
You have created an OAuth access token.
-
You have set
FEATURE_IMMUTABLE_TAGStoTruein yourconfig.yamlfile.
-
Delete an immutability policy for an organization by using the
DELETE /api/v1/organization/{orgname}/immutabilitypolicy/{policy_uuid}/endpoint. For example:$ curl -X DELETE -H "Authorization: Bearer <access_token>" http://<quay-server.example.com>/api/v1/organization/<organization_name>/immutabilitypolicy/<policy_uuid>/Example output{"uuid": "3aae3390-de53-4b82-a2b7-4da8fe5dbe11"} -
Delete an immutability policy for a repository by using the
DELETE /api/v1/repository/{repository}/immutabilitypolicy/{policy_uuid}/endpoint. For example:$ curl -X DELETE -H "Authorization: Bearer <access_token>" http://<quay-server.example.com>/api/v1/repository/<namespace>/<repository_name>/immutabilitypolicy/<policy_uuid>/Example output{"uuid": "87f75fb5-d023-4054-87b4-469f37a59638"}
Cap storage per organization
Configure organization storage quotas, system defaults, notifications, and API limits to prevent any tenant from exhausting registry capacity.
Project Quay quota management and enforcement overview
With Project Quay quota management, superusers can track storage consumption and set soft or hard limits for organizations, repositories, or the entire registry.
Project Quay superusers can manage capacity limits in the following ways:
-
Quota reporting: An administrator can track the storage consumption of all organizations. Users can track the storage consumption of their assigned organization.
-
Quota management: An administrator can define soft and hard checks for Project Quay users. Soft checks tell users if the storage consumption of an organization reaches their configured threshold. Hard checks prevent users from pushing to the registry when storage consumption reaches the configured limit.
These features help service owners of a Project Quay registry define service level agreements and support a healthy resource budget.
Quota management limitations
Quota management in Project Quay has limits related to push-time calculation and database-backed maximum sizes. Review these constraints before you set organization quotas.
One limitation of the quota management feature is that calculating resource consumption on the push of an artifact results in the calculation becoming part of the push’s critical path. Without this, usage data might drift.
The maximum storage quota size depends on the selected database:
| Database | Maximum quota size |
|---|---|
Postgres |
8388608 TB |
MySQL |
8388608 TB |
SQL Server |
16777216 TB |
Setting a system-wide default quota
To specify a system-wide default storage quota that is applied to every organization and user, you can use the DEFAULT_SYSTEM_REJECT_QUOTA_BYTES configuration flag.
When the DEFAULT_SYSTEM_REJECT_QUOTA_BYTES field is set, and the quota limit has been met, the system automatically rejects new artifacts. By default, this configuration field is disabled.
If you configure a specific quota for an organization or user, and then delete that quota, the system-wide default quota applies if one has been set. Similarly, if you have configured a specific quota for an organization or user, and then modify the system-wide default quota, the updated system-wide default overrides any specific settings.
The following procedure shows you how to configure a system-wide default quota.
-
Set a system-wide default storage quota by including the
DEFAULT_SYSTEM_REJECT_QUOTA_BYTESfield in yourconfig.yamlfile. For example:# ... DEFAULT_SYSTEM_REJECT_QUOTA_BYTES: 107374182400 # ... -
Restart your Project Quay registry.
Establishing quota for an organization by using the Project Quay UI
To establishing quota for an organization by using the Red Hat Quay UI in Project Quay, you can follow the steps in this procedure.
The following procedure describes how you can report storage consumption and establish storage quota limits for a repository.
-
A superuser account.
-
Enough storage to meet the demands of quota limitations.
-
Set
FEATURE_QUOTA_MANAGEMENT: Truein yourconfig.yamlfile and then restart your registry. For example:# ... FEATURE_QUOTA_MANAGEMENT: True # ... -
Create a new organization or choose an existing one.
-
Log in to the registry as a superuser and navigate to the Manage Organizations tab on the Super User Admin Panel. Click the Options icon of the organization for which you want to create storage quota limits.
-
Click Configure Quota.
-
For Set storage quota, enter the initial quota, for example, 10 MiB. You can then click Apply.
-
Optional: For Quota policy select one of the following Actions. You can then enter a Quota Threshold and click Add Limit.
-
Reject: When this option is selected, any artifact that exceeds the established quota is rejected.
-
Warning: When this option is selected, users are notified of pushed artifacts that exceed the configured quota, however, the artifact successfully pushes.
NoteThe quota threshold percent determines when Project Quay starts warning users that the repository is approaching its assigned storage quota.
-
-
Pull a sample artifact by entering the following command:
$ podman pull busybox -
Tag the sample artifact by entering the following command:
$ podman tag docker.io/library/busybox quay-server.example.com/testorg/busybox:test -
Push the sample artifact to the organization by entering the following command:
$ podman push --tls-verify=false quay-server.example.com/testorg/busybox:test -
Navigate to the Super User Admin Panel on the Project Quay UI, then click Manage Organizations. The Organizations page shows the total proportion of the quota used by the artifact.
-
Optional: Pull a second sample artifact with intentions of exceeding the established quota by entering the following command:
$ podman pull nginx -
Optional: Tag the second artifact by entering the following command:
$ podman tag docker.io/library/nginx quay-server.example.com/testorg/nginx -
Optional: Push the second artifact to the organization by entering the following command:
$ podman push --tls-verify=false quay-server.example.com/testorg/nginxIf the artifact exceeds the defined quota, and you set the Quota policy to Reject, the following error message is returned:
denied: Quota has been exceeded on namespaceIf the artifact exceeds the defined quota, and you set the Quota policy to Warning, no error message is returned, and the image is successfully pushed.
Notifications for both Reject and Warning policies are also returned on the Project Quay UI by clicking the bell icon.
Configuring quota notifications
After you set FEATURE_QUOTA_NOTIFICATIONS to true, you can configure external notification channels to receive alerts when quota thresholds are reached.
-
You have a superuser account so that you can configure the
config.yamlfile. -
You have an account with
org:adminaccess so that you can configure notifications. -
You have administrative privileges for the organization or user namespace.
-
Set
FEATURE_QUOTA_NOTIFICATIONS: truein yourconfig.yamlfile and then restart your registry.# ... FEATURE_QUOTA_NOTIFICATIONS: true # ... -
Configure quota limits for your organization or user namespace. See "Establishing quota for an organization by using the Project Quay UI".
-
In the Project Quay UI, open your organization or user settings page.
-
Click Create Notification.
-
Select one of the following notification events:
-
Quota Warning: Triggers when storage usage crosses a Warning quota limit (
quota_warningevent). -
Quota Error: Triggers when storage usage crosses a Reject quota limit (
quota_errorevent).
-
-
Select one of the following notification methods:
-
Email: Sends a notification to an organization contact email or admin email address.
-
Slack: Sends a notification to a Slack webhook.
-
Webhook: Sends a notification to a custom webhook URL.
-
Quay Notification: Creates an in-app notification in Project Quay.
-
-
Configure the method-specific settings for your chosen notification method.
-
Click the Create Notification button.
-
Verify that the notification shows in the Notifications list for your namespace.
-
If quota thresholds are exceeded, notifications get sent to configured channels. Check the Failures count to verify notification delivery status.
Resetting notification failures
You can resume delivery on a notification channel that has been automatically suspended because of repeated endpoint failures. To do this, reset the failure counter to zero after resolving the underlying connectivity issue.
-
To reset an organization notification failure count to
0, enter a command similar to the following example:$ curl -X POST \ -H "Authorization: Bearer <bearer_token>" \ https://<quay-server.example.com>/api/v1/organization/<orgname>/notifications/<uuid>A successful request returns HTTP
204with an empty body. -
To reset a user namespace notification failure count to
0, enter a command similar to the following example:$ curl -X POST \ -H "Authorization: Bearer <bearer_token>" \ https://<quay-server.example.com>/api/v1/user/namespacenotifications/<uuid>A successful request returns HTTP
204with an empty body.
Deleting quota notifications
To stop tracking storage thresholds or remove an inactive alerting endpoint in Project Quay, you can delete quota notifications from organization or user namespaces.
|
Note
|
Deleting a namespace quota also automatically deletes associated |
-
Delete an organization notification by entering a command similar to the following example:
$ curl -X DELETE \ -H "Authorization: Bearer <bearer_token>" \ https://<quay-server.example.com>/api/v1/organization/<orgname>/notifications/<uuid> -
Delete a user notification by entering a command similar to the following example:
$ curl -X DELETE \
-H "Authorization: Bearer <bearer_token>" \
https://<quay-server.example.com>/api/v1/user/namespacenotifications/<uuid>
-
Verify that the notification was deleted. List notifications with the following command:
$ curl -X GET \
-H "Authorization: Bearer <bearer_token>" \
-H "Accept: application/json" \
https://<quay-server.example.com>/api/v1/organization/<orgname>/notifications
Example output{"notifications": []}
Managing quota limits by using the API
You can use the Project Quay API to check, create, change, or delete organization quota limits when an organization does not yet have a quota configured.
Before you begin, you must have generated an OAuth access token.
Setting quota by using the API
To create, view, or update an organization storage quota in Project Quay, you can call the organization quota API endpoints with an OAuth access token.
-
To set a quota for an organization, you can use the
POST /api/v1/organization/{orgname}/quotaendpoint:$ curl -X POST "https://<quay-server.example.com>/api/v1/organization/<orgname>/quota" \ -H "Authorization: Bearer <access_token>" \ -H "Content-Type: application/json" \ -d '{ "limit_bytes": 10737418240, "limits": "10 Gi" }'Example output:"Created" -
Use the
GET /api/v1/organization/{orgname}/quotacommand to see if your organization already has an established quota:$ curl -k -X GET -H "Authorization: Bearer <token>" -H 'Content-Type: application/json' https://<quay-server.example.com>/api/v1/organization/<organization_name>/quota | jqExample output:[{"id": 1, "limit_bytes": 10737418240, "limit": "10.0 GiB", "default_config": false, "limits": [], "default_config_exists": false}] -
You can use the
PUT /api/v1/organization/{orgname}/quota/{quota_id}command to modify the existing quota limitation. For example:$ curl -X PUT "https://<quay-server.example.com>/api/v1/organization/<orgname>/quota/<quota_id>" \ -H "Authorization: Bearer <access_token>" \ -H "Content-Type: application/json" \ -d '{ "limit_bytes": <limit_in_bytes> }'Example output:{"id": 1, "limit_bytes": 21474836480, "limit": "20.0 GiB", "default_config": false, "limits": [], "default_config_exists": false}
Viewing quota usage by using the API
To view organization and repository storage consumption in Project Quay, you can query the repository list and organization API endpoints.
-
To view storage consumed by repositories in an organization, send a
GETrequest to the/api/v1/repositoryendpoint:$ curl -k -X GET -H "Authorization: Bearer <token>" -H 'Content-Type: application/json' 'https://<quay-server.example.com>/api/v1/repository?last_modified=true&namespace=<organization_name>&popularity=true&public=true' | jqExample output:
{ "repositories": [ { "namespace": "testorg", "name": "ubuntu", "description": null, "is_public": false, "kind": "image", "state": "NORMAL", "quota_report": { "quota_bytes": 27959066, "configured_quota": 104857600 }, "last_modified": 1651225630, "popularity": 0, "is_starred": false } ] } -
To view the quota report for multiple repositories in the organization, send a
GETrequest to the/api/v1/repositoryendpoint:$ curl -k -X GET -H "Authorization: Bearer <token>" -H 'Content-Type: application/json' 'https://<quay-server.example.com>/api/v1/repository?last_modified=true&namespace=<organization_name>&popularity=true&public=true'Example output:
{ "repositories": [ { "namespace": "testorg", "name": "ubuntu", "description": null, "is_public": false, "kind": "image", "state": "NORMAL", "quota_report": { "quota_bytes": 27959066, "configured_quota": 104857600 }, "last_modified": 1651225630, "popularity": 0, "is_starred": false }, { "namespace": "testorg", "name": "nginx", "description": null, "is_public": false, "kind": "image", "state": "NORMAL", "quota_report": { "quota_bytes": 59231659, "configured_quota": 104857600 }, "last_modified": 1651229507, "popularity": 0, "is_starred": false } ] } -
To view quota information in the organization details, send a
GETrequest to the/api/v1/organization/<organization_name>endpoint:$ curl -k -X GET -H "Authorization: Bearer <token>" -H 'Content-Type: application/json' 'https://<quay-server.example.com>/api/v1/organization/<organization_name>' | jqExample output:
{
  "name": "testorg",
  ...
  "quotas": [
    {
      "id": 1,
      "limit_bytes": 104857600,
      "limits": []
    }
  ],
  "quota_report": {
    "quota_bytes": 87190725,
    "configured_quota": 104857600
  }
}
Enforce quota limits when tenants fill capacity
Set reject and warning limits, calculate total registry size, and permanently delete image tags to enforce quotas and reclaim storage.
Setting reject and warning limits by using the API
To configure reject and warning thresholds for an organization quota in Project Quay, you can post limit definitions to the organization quota limit API endpoint.
-
To set a reject limit, send a
POSTrequest to the/api/v1/organization/<organization_name>/quota/<quota_id>/limitendpoint. For example:$ curl -k -X POST -H "Authorization: Bearer <token>" -H 'Content-Type: application/json' -d '{"type":"Reject","threshold_percent":80}' https://<quay-server.example.com>/api/v1/organization/<organization_name>/quota/1/limit-
To set a warning limit, send a
POSTrequest to the same endpoint. For example:$ curl -k -X POST -H "Authorization: Bearer <token>" -H 'Content-Type: application/json' -d '{"type":"Warning","threshold_percent":50}' https://<quay-server.example.com>/api/v1/organization/<organization_name>/quota/1/limit
-
Viewing reject and warning limits by using the API
To view reject and warning thresholds configured for an organization quota in Project Quay, you can send a GET request to the organization quota API endpoint.
-
View the reject and warning limits by using the
/api/v1/organization/<organization_name>/quotaendpoint. For example:$ curl -k -X GET -H "Authorization: Bearer <token>" -H 'Content-Type: application/json' https://<quay-server.example.com>/api/v1/organization/<organization_name>/quota | jqExample output:[ { "id": 1, "limit_bytes": 104857600, "default_config": false, "limits": [ { "id": 2, "type": "Warning", "limit_percent": 50 }, { "id": 1, "type": "Reject", "limit_percent": 80 } ], "default_config_exists": false } ]
Calculating the total registry size
To calculate the total size of a Project Quay registry, you can run an on-demand calculation from the Super User Admin Panel.
|
Note
|
This feature is done on-demand. Calculating a registry total is database intensive. Use with caution. |
-
You are logged in as a Project Quay superuser.
-
On the Project Quay UI, click your username → Super User Admin Panel.
-
In the navigation pane, click Manage Organizations.
-
Click Calculate → Ok.
-
After a few minutes, depending on the size of your registry, refresh the page. The Total Registry Size is now calculated.
Permanently deleting an image tag
In Project Quay, you can permanently delete an image tag outside of the time machine window when soft deletion is not enough.
|
Important
|
Permanent tag deletion cannot be undone. Use with caution. |
Permanently deleting an image tag using the Project Quay v2 UI
To permanently delete an image tag in Project Quay by using the v2 UI, you can select the tag in a repository and choose Permanently Delete.
-
You have set
FEATURE_UI_V2totruein yourconfig.yamlfile.
-
Ensure that the
PERMANENTLY_DELETE_TAGSandRESET_CHILD_MANIFEST_EXPIRATIONparameters are set totruein yourconfig.yamlfile. For example:PERMANENTLY_DELETE_TAGS: true RESET_CHILD_MANIFEST_EXPIRATION: true -
In the navigation pane, click Repositories.
-
Click the name of the repository, for example, quayadmin/busybox.
-
Select the check box of the image tag that you want to delete, for example, test.
-
Click Actions → Permanently Delete.
ImportantThis action is permanent and cannot be undone.
Enable automatic cleanup of stale tags
Review auto-pruning prerequisites, regular expressions, and pull activity tracking, then enable automatic tag pruning for your registry.
Project Quay auto-pruning overview
Project Quay auto-pruning deletes image tags in organizations and repositories by tag count or age so that owners can stay under storage quotas. You can configure policies at the organization, repository, or registry level.
Project Quay administrators can configure multiple auto-pruning policies on organizations and repositories. Administrators can also configure auto-pruning policies at the registry level so that they apply to all organizations, including newly created organizations.
Currently, two policies are available:
-
Prune images by the number of tags. For this policy, when the actual number of tags exceeds the desired number of tags, the auto-pruner deletes the oldest tags by creation date until the desired number of tags is achieved.
-
Prune image tags by creation date. For this policy, any tags with a creation date older than the given time span, for example, 10 days, are deleted.
After tags are automatically pruned, they go into the Project Quay time machine, or the amount of time after a tag is deleted that the tag is accessible before being garbage collected. The expiration time of an image tag depends on your organization’s settings.
Users can configure multiple policies per namespace or repository through the Project Quay v2 UI. Policies can also be set by using the API endpoints through the command-line interface (CLI).
Prerequisites and limitations for auto-pruning and multiple policies
Review these prerequisites and limitations before you configure Project Quay auto-pruning policies for organizations or repositories.
The following prerequisites and limitations apply to the auto-pruning feature:
-
Auto-pruning is not available when using the Project Quay legacy UI. You must use the v2 UI to create, view, or modify auto-pruning policies.
-
Auto-pruning is only supported in databases that support the
FOR UPDATE SKIP LOCKEDSQL command. -
Auto-pruning is unavailable on mirrored repositories and read-only repositories.
-
Immutable tags are excluded from auto-prune policies and cannot be opted back in. They can still be removed by per-tag expiration, including the
quay.expires-afterlabel or annotation. -
If you are configuring multiple auto-prune policies, rules are processed without particular order, and individual result sets are processed immediately before moving on to the next rule.
-
For example, if an image is already subject to garbage collection by one rule, it cannot be excluded from pruning by another rule.
-
-
If you have both an auto-pruning policy for an organization and a repository, the auto-pruning policies set at the organization level are executed first.
Regular expressions with auto-pruning
You can use regular expressions with organization- and repository-level auto-pruning policies in Project Quay to match a subset of tags for removal.
Consider the following when using regular expressions with the auto-pruning feature:
-
Regular expressions are optional.
-
If a regular expression is not provided, the auto-pruner defaults to pruning all image tags in the organization or the repository. These are user-supplied and must be protected against ReDoS attacks.
-
Registry-wide policies do not currently support regular expressions. Only organization- and repository-level auto-pruning policies support regular expressions.
-
Regular expressions can be configured to prune images that either do, or do not, match the provided regex pattern.
Some of the following procedures provide example auto-pruning policies that use regular expressions that you can use as a reference when creating an auto-prune policy.
Enabling image pull activity tracking
To enable image pull activity tracking in Project Quay, you can set FEATURE_IMAGE_PULL_STATS in your config.yaml file and configure Redis for pull metrics.
-
In your Project Quay
config.yamlfile, setFEATURE_IMAGE_PULL_STATS: true. For example:# ... FEATURE_IMAGE_PULL_STATS: true REDIS_FLUSH_INTERVAL_SECONDS: 30 PULL_METRICS_REDIS: host: <redis_host> password: <redis_password> port: 6379 db: 1 # ...where:
FEATURE_IMAGE_PULL_STATS-
Specifies whether image pull tracking activity is enabled.
REDIS_FLUSH_INTERVAL_SECONDS-
Specifies the time, in seconds, at which the Redis flush worker clears old data. Shorter intervals keep data fresher and help prevent Redis from bloating, while longer intervals reduce flush frequency.
PULL_METRICS_REDIS-
Specifies the connection settings for the Redis database used to store image pull metrics.
-
Restart your Project Quay deployment.
-
Push an image to your registry by entering the following command. Following this step, you can use your browser to see the tagged image in your repository.
$ podman push <quay-server.example.com>/<organization>/<image>:<tag> -
Pull the image from your Project Quay registry by entering the following command:
$ podman pull <quay-server.example.com>/<organization>/<image>:<tag> -
On the Project Quay UI, navigate to Repositories, and then click the name of your repository.
-
Click Tags. The Last Pulled and Pull Count categories show you information about when the image was last pulled, and how many times it has been pulled, respectively. For example:
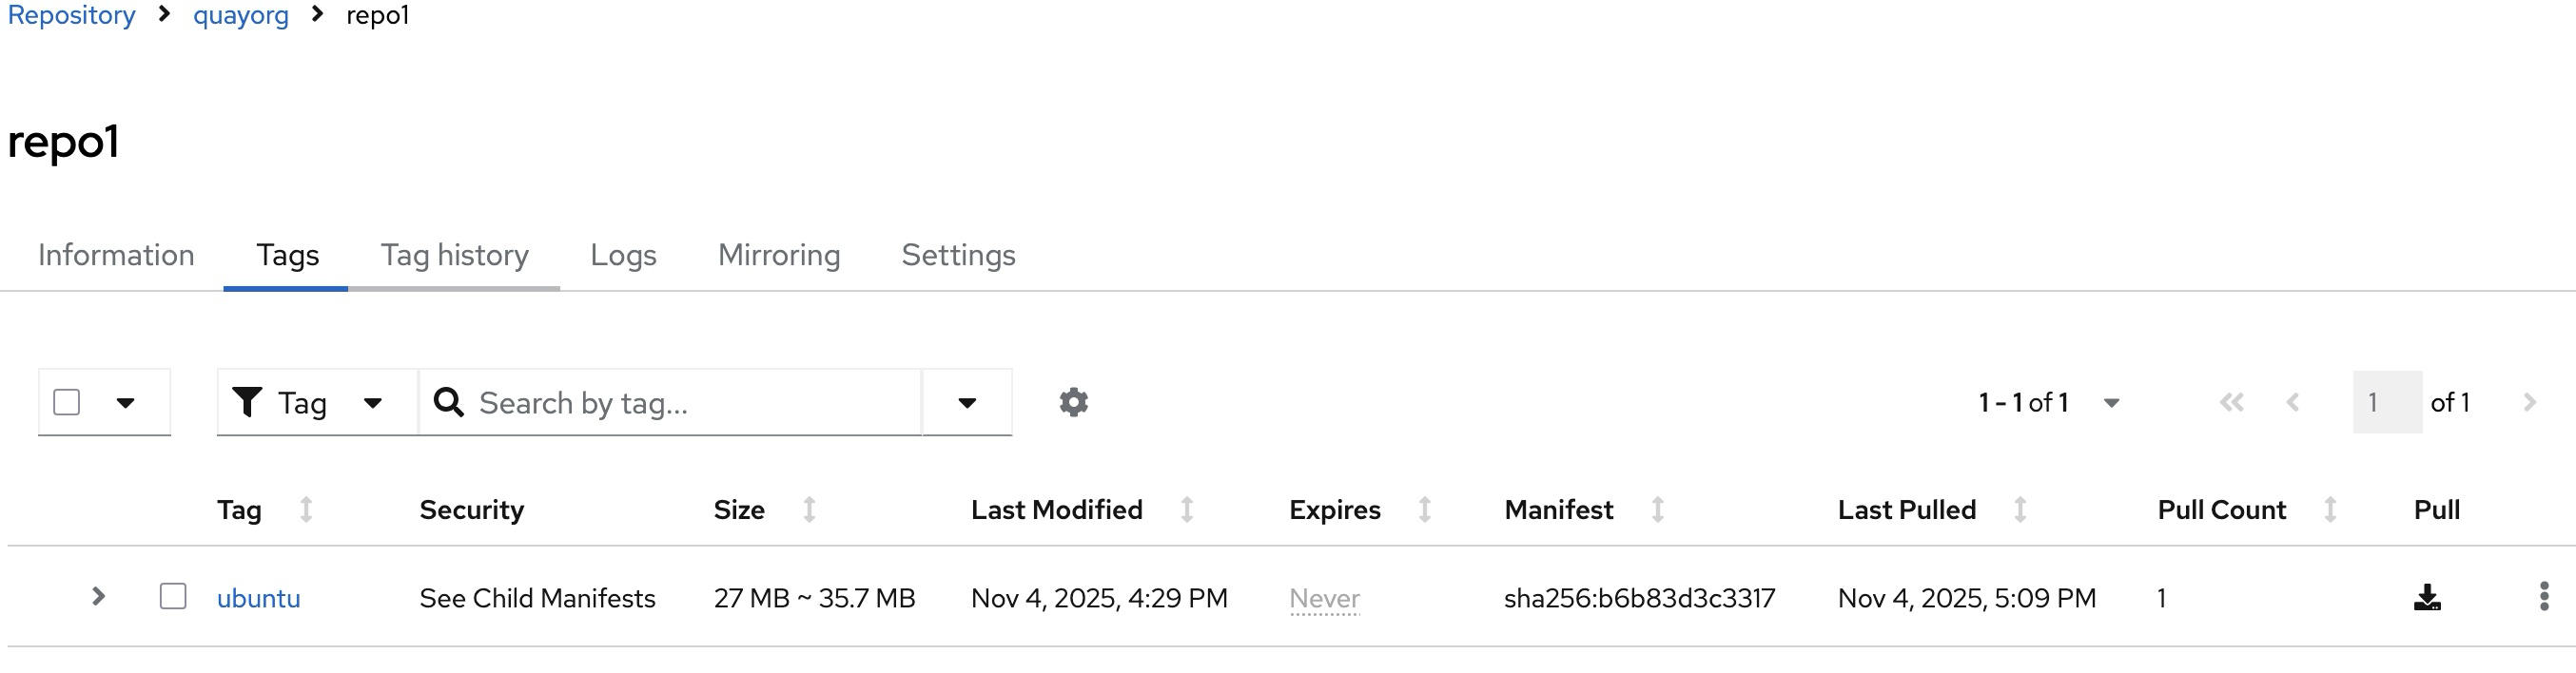
Configuring the Project Quay auto-pruning feature
To enable auto-pruning in Project Quay, you can set FEATURE_AUTO_PRUNE to true in your config.yaml file.
-
You have set
FEATURE_UI_V2totruein yourconfig.yamlfile.
-
In your Project Quay
config.yamlfile, add and set theFEATURE_AUTO_PRUNEenvironment variable totrue. For example:# ... FEATURE_AUTO_PRUNE: true # ...
Set auto-prune policies at the right scope
Create registry-wide, organization, and repository auto-pruning policies by using the Red Hat Quay UI or API.
Creating a registry-wide auto-pruning policy
To apply an auto-prune policy to all organizations in a Project Quay registry, you can configure DEFAULT_NAMESPACE_AUTOPRUNE_POLICY in your config.yaml file.
Registry-wide auto-pruning policies can apply to new and existing organizations. Project Quay administrators enable this feature by adding the DEFAULT_NAMESPACE_AUTOPRUNE_POLICY configuration field with either the number_of_tags or creation_date method. Currently, you cannot enable this feature by using the v2 UI or the API.
-
You have enabled the
FEATURE_AUTO_PRUNEfeature.
-
Update your
config.yamlfile to add theDEFAULT_NAMESPACE_AUTOPRUNE_POLICYconfiguration field:-
To set the policy method to remove the oldest tags by their creation date until the number of tags provided is left, use the
number_of_tagsmethod:# ... DEFAULT_NAMESPACE_AUTOPRUNE_POLICY: method: number_of_tags value: 2 # ...where:
value:: Specifies the number of tags to keep. In this example, two tags remain. -
To set the policy method to remove tags with a creation date older than the provided time span, for example,
5d, use thecreation_datemethod:DEFAULT_NAMESPACE_AUTOPRUNE_POLICY: method: creation_date value: 5d
-
-
Restart your Project Quay deployment.
-
Optional. If you need to tag and push images to test this feature:
-
Tag four sample images that you push to a Project Quay registry. For example:
$ podman tag docker.io/library/busybox <quay-server.example.com>/<quayadmin>/busybox:test$ podman tag docker.io/library/busybox <quay-server.example.com>/<quayadmin>/busybox:test2$ podman tag docker.io/library/busybox <quay-server.example.com>/<quayadmin>/busybox:test3$ podman tag docker.io/library/busybox <quay-server.example.com>/<quayadmin>/busybox:test4 -
Push the four sample images to the registry with auto-pruning enabled by entering the following commands:
$ podman push <quay-server.example.com>/quayadmin/busybox:test$ podman push <quay-server.example.com>/<quayadmin>/busybox:test2$ podman push <quay-server.example.com>/<quayadmin>/busybox:test3$ podman push <quay-server.example.com>/<quayadmin>/busybox:test4
-
-
Check that the registry that you pushed the images to shows four tags.
-
By default, the auto-pruner worker at the registry level runs every 24 hours. After 24 hours, the two oldest image tags are removed, leaving the
test3andtest4tags if you followed these instructions. Check your Project Quay organization to ensure that the two oldest tags were removed.
Creating an auto-prune policy for an organization by using the UI
To create an organization auto-prune policy in Project Quay, you can configure Auto-Prune Policies on the organization Settings page in the v2 UI.
-
You have enabled the
FEATURE_AUTO_PRUNEfeature. -
Your organization has image tags that have been pushed to it.
-
On the Project Quay v2 UI, click Organizations in the navigation pane.
-
Select the name of an organization to which you apply the auto-pruning feature, for example,
test_organization. -
Click Settings.
-
Click Auto-Prune Policies. For example:
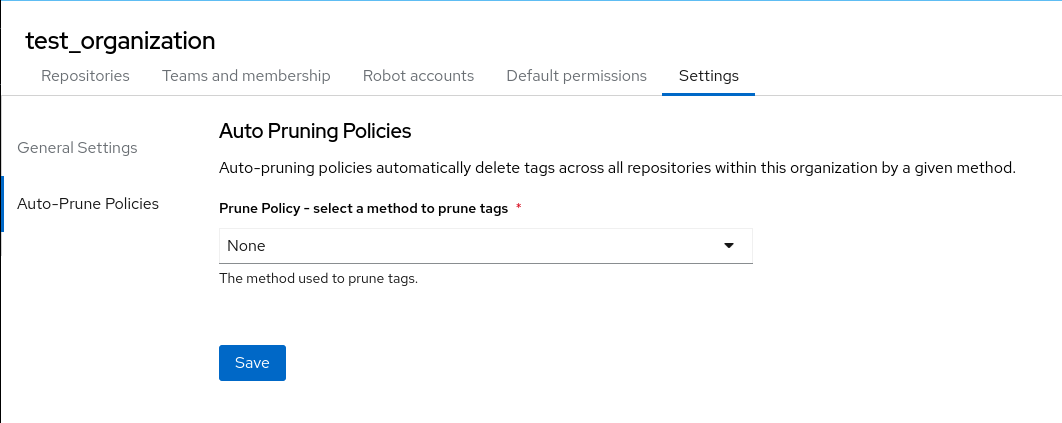
-
Click the drop-down menu and select the desired policy, for example, By number of tags.
-
Select the desired number of tags to keep. By default, this is set at 20 tags. For this example, the number of tags to keep is set at 3.
-
Optional. With the introduction of regular expressions, you are provided the following options to fine-tune your auto-pruning policy:
-
Match: When selecting this option, the auto-pruner prunes all tags that match the given regex pattern.
-
Does not match: When selecting this option, the auto-pruner prunes all tags that do not match the regex pattern.
If you do not select an option, the auto-pruner defaults to pruning all image tags.
For this example, click the Tag pattern box and select match. In the regex box, enter a pattern to match tags against. For example, to automatically prune all
testtags, enter^test.*.
-
-
Optional. You can create a second auto-prune policy by clicking Add Policy and entering the required information.
-
Click Save. A notification that your auto-prune policy has been updated appears.
With this example, the organization is configured to keep the three latest tags that are named
^test.*.
-
Navigate to the Tags page of your Organization’s repository. After a few minutes, the auto-pruner worker removes tags that no longer fit within the established criteria. In this example, it removes the
busybox:testtag, and keeps thebusybox:test2,busybox:test3, andbusybox:test4tag.After tags are automatically pruned, they go into the Project Quay time machine, or the amount of time after a tag is deleted that the tag is accessible before being garbage collected. The expiration time of an image tag depends on your organization’s settings.
Creating an auto-prune policy for an organization namespace by using the Project Quay API
To create, update, view, or delete an organization auto-prune policy in Project Quay, you can use the organization autoprunepolicy API endpoints with an OAuth access token.
-
You have created an OAuth access token.
-
You have logged into Project Quay.
-
Enter the following
POST /api/v1/organization/{orgname}/autoprunepolicy/command to create a new policy that limits the number of tags allowed in an organization:$ curl -X POST -H "Authorization: Bearer <access_token>" -H "Content-Type: application/json" -d '{"method": "number_of_tags", "value": 10}' http://<quay-server.example.com>/api/v1/organization/<organization_name>/autoprunepolicy/Alternatively, you can set tags to expire for a specified time after their creation date:
$ curl -X POST -H "Authorization: Bearer <access_token>" -H "Content-Type: application/json" -d '{
"method": "creation_date", "value": "7d"}' http://<quay-server.example.com>/api/v1/organization/<organization_name>/autoprunepolicy/
Example output{"uuid": "73d64f05-d587-42d9-af6d-e726a4a80d6e"} -
Optional. You can add an additional policy to an organization and pass in the
tagPatternandtagPatternMatchesfields to prune only tags that match the given regex pattern. For example:$ curl -X POST \ -H "Authorization: Bearer <bearer_token>" \ -H "Content-Type: application/json" \ -d '{ "method": "creation_date", "value": "7d", "tagPattern": "^v*", "tagPatternMatches": true }' \ "https://<quay-server.example.com>/api/v1/organization/<organization_name>/autoprunepolicy/"where:
tagPatternMatches-
Specifies that the
truevalue prunes tags that match the given regex pattern. In this example, tags that match^v*are pruned.
-
You can update your organization’s auto-prune policy by using the
PUT /api/v1/organization/{orgname}/autoprunepolicy/{policy_uuid}command. For example:$ curl -X PUT -H "Authorization: Bearer <bearer_token>" -H "Content-Type: application/json" -d '{ "method": "creation_date", "value": "4d", "tagPattern": "^v*", "tagPatternMatches": true }' "<quay-server.example.com>/api/v1/organization/<organization_name>/autoprunepolicy/<uuid>"This command does not return output. Continue to the next step.
-
Check your auto-prune policy by entering the following command:
$ curl -X GET -H "Authorization: Bearer <access_token>" http://<quay-server.example.com>/api/v1/organization/<organization_name>/autoprunepolicy/Example output{"policies": [{"uuid": "ebf7448b-93c3-4f14-bf2f-25aa6857c7b0", "method": "creation_date", "value": "4d", "tagPattern": "^v*", "tagPatternMatches": true}, {"uuid": "da4d0ad7-3c2d-4be8-af63-9c51f9a501bc", "method": "number_of_tags", "value": 10, "tagPattern": null, "tagPatternMatches": true}, {"uuid": "17b9fd96-1537-4462-a830-7f53b43f94c2", "method": "creation_date", "value": "7d", "tagPattern": "^v*", "tagPatternMatches": true}]} -
You can delete the auto-prune policy for your organization by entering the following command. Note that deleting the policy requires the UUID.
$ curl -X DELETE -H "Authorization: Bearer <access_token>" http://<quay-server.example.com>/api/v1/organization/<organization_name>/autoprunepolicy/73d64f05-d587-42d9-af6d-e726a4a80d6e
Creating an auto-prune policy for an organization namespace by using an alternate API endpoint
To create, update, view, or delete an organization auto-prune policy in Project Quay, you can use the organization autoprunepolicy API endpoints.
-
You have created an OAuth access token.
-
You have logged into Project Quay.
-
Enter the following
POST /api/v1/organization/<organization_name>/autoprunepolicy/command to create a new policy that limits the number of tags allowed in an organization:$ curl -X POST -H "Authorization: Bearer <access_token>" -H "Content-Type: application/json" -d '{"method": "number_of_tags", "value": 10}' http://<quay-server.example.com>/api/v1/organization/<organization_name>/autoprunepolicy/Alternatively, you can set tags to expire for a specified time after their creation date:
$ curl -X POST -H "Authorization: Bearer <access_token>" -H "Content-Type: application/json" -d '{
"method": "creation_date", "value": "7d"}' http://<quay-server.example.com>/api/v1/organization/<organization_name>/autoprunepolicy/
Example output:{"uuid": "73d64f05-d587-42d9-af6d-e726a4a80d6e"} -
Optional. You can add an additional policy to an organization and pass in the
tagPatternandtagPatternMatchesfields to prune only tags that match the given regex pattern. For example:$ curl -X POST \ -H "Authorization: Bearer <bearer_token>" \ -H "Content-Type: application/json" \ -d '{ "method": "creation_date", "value": "7d", "tagPattern": "^v*", "tagPatternMatches": <true> }' \ "https://<quay-server.example.com>/api/v1/organization/<organization_name>/autoprunepolicy/"where:
tagPatternMatches-
Specifies whether tags that match the regex pattern are pruned. Set to
trueto prune matching tags. In this example, tags that match^v*are pruned.Example output:{"uuid": "ebf7448b-93c3-4f14-bf2f-25aa6857c7b0"}
-
You can update your organization’s auto-prune policy by using the
PUT /api/v1/organization/<organization_name>/autoprunepolicy/<policy_uuid>command. For example:$ curl -X PUT -H "Authorization: Bearer <bearer_token>" -H "Content-Type: application/json" -d '{ "method": "creation_date", "value": "4d", "tagPattern": "^v*", "tagPatternMatches": true }' "<quay-server.example.com>/api/v1/organization/<organization_name>/autoprunepolicy/<uuid>"This command does not return output. Continue to the next step.
-
Check your auto-prune policy by entering the following command:
$ curl -X GET -H "Authorization: Bearer <access_token>" http://<quay-server.example.com>/api/v1/organization/<organization_name>/autoprunepolicy/Example output:{"policies": [{"uuid": "ebf7448b-93c3-4f14-bf2f-25aa6857c7b0", "method": "creation_date", "value": "4d", "tagPattern": "^v*", "tagPatternMatches": true}, {"uuid": "da4d0ad7-3c2d-4be8-af63-9c51f9a501bc", "method": "number_of_tags", "value": 10, "tagPattern": null, "tagPatternMatches": true}, {"uuid": "17b9fd96-1537-4462-a830-7f53b43f94c2", "method": "creation_date", "value": "7d", "tagPattern": "^v*", "tagPatternMatches": true}]} -
You can delete the auto-prune policy for your organization by entering the following command. Note that deleting the policy requires the UUID.
$ curl -X DELETE -H "Authorization: Bearer <access_token>" http://<quay-server.example.com>/api/v1/organization/<organization_name>/autoprunepolicy/73d64f05-d587-42d9-af6d-e726a4a80d6e
Creating an auto-prune policy for a namespace for the current user by using the API
To manage auto-prune policies for your own user namespace in Project Quay, you can use the /api/v1/user/autoprunepolicy/ API endpoints.
|
Note
|
The use of |
-
You have created an OAuth access token.
-
You have logged into Project Quay.
-
Enter the following
POSTcommand to create a new policy that limits the number of tags for the current user:$ curl -X POST -H "Authorization: Bearer <access_token>" -H "Content-Type: application/json" -d '{"method": "number_of_tags", "value": 10}' http://<quay-server.example.com>/api/v1/user/autoprunepolicy/Example output{"uuid": "8c03f995-ca6f-4928-b98d-d75ed8c14859"} -
Check your auto-prune policy by entering the following command:
$ curl -X GET -H "Authorization: Bearer <access_token>" http://<quay-server.example.com>/api/v1/user/autoprunepolicy/Alternatively, you can include the UUID:
$ curl -X GET -H "Authorization: Bearer <access_token>" http://<quay-server.example.com>/api/v1/user/autoprunepolicy/8c03f995-ca6f-4928-b98d-d75ed8c14859Example output{"policies": [{"uuid": "8c03f995-ca6f-4928-b98d-d75ed8c14859", "method": "number_of_tags", "value": 10}]} -
You can delete the auto-prune policy by entering the following command. Note that deleting the policy requires the UUID.
$ curl -X DELETE -H "Authorization: Bearer <access_token>" http://<quay-server.example.com>/api/v1/user/autoprunepolicy/8c03f995-ca6f-4928-b98d-d75ed8c14859Example output{"uuid": "8c03f995-ca6f-4928-b98d-d75ed8c14859"}
Creating an auto-prune policy for a repository using the Project Quay v2 UI
To create a repository auto-prune policy in Project Quay, you can configure Repository Auto-Prune Policies on the repository Settings page in the v2 UI.
-
You have enabled the
FEATURE_AUTO_PRUNEfeature. -
You have pushed image tags to your repository.
-
On the Project Quay v2 UI, click Repository in the navigation pane.
-
Select the name of a repository to which you apply the auto-pruning feature, for example,
<organization_name>/<repository_name>. -
Click Settings.
-
Click Repository Auto-Prune Policies.
-
Click the drop-down menu and select the desired policy, for example, By age of tags.
-
Set a time, for example,
5and an interval, for exampleminutesto delete tags older than the specified time frame. For this example, tags older than 5 minutes are marked for deletion. -
Optional. With the introduction of regular expressions, you are provided the following options to fine-tune your auto-pruning policy:
-
Match: When selecting this option, the auto-pruner prunes all tags that match the given regex pattern.
-
Does not match: When selecting this option, the auto-pruner prunes all tags that do not match the regex pattern.
If you do not select an option, the auto-pruner defaults to pruning all image tags.
For this example, click the Tag pattern box and select Does not match. In the regex box, enter a pattern to match tags against. For example, to automatically prune all tags that do not match the
testtag, enter^test.*.
-
-
Optional. You can create a second auto-prune policy by clicking Add Policy and entering the required information.
-
Click Save. A notification that your auto-prune policy has been updated appears.
-
Navigate to the Tags page of your Organization’s repository. With this example, Tags that are older than 5 minutes that do not match the
^test.*regex tag are automatically pruned when the pruner runs.After tags are automatically pruned, they go into the Project Quay time machine, or the amount of time after a tag is deleted that the tag is accessible before being garbage collected. The expiration time of an image tag depends on your organization’s settings.
Creating an auto-prune policy for a repository using the Project Quay API
To create, update, view, or delete a repository auto-prune policy in Project Quay, you can use the repository autoprunepolicy API endpoints.
-
You have created an OAuth access token.
-
You have logged into Project Quay.
-
Enter the following
POST /api/v1/repository/<repository>/autoprunepolicy/command to create a new policy that limits the number of tags allowed in a repository:$ curl -X POST -H "Authorization: Bearer <access_token>" -H "Content-Type: application/json" -d '{"method": "number_of_tags","value": 2}' http://<quay-server.example.com>/api/v1/repository/<organization_name>/<repository_name>/autoprunepolicy/Alternatively, you can set tags to expire for a specified time after their creation date:
$ curl -X POST -H "Authorization: Bearer <access_token>" -H "Content-Type: application/json" -d '{"method": "creation_date", "value": "7d"}' http://<quay-server.example.com>/api/v1/repository/<organization_name>/<repository_name>/autoprunepolicy/Example output{"uuid": "ce2bdcc0-ced2-4a1a-ac36-78a9c1bed8c7"} -
Optional. You can add an additional policy and pass in the
tagPatternandtagPatternMatchesfields to prune only tags that match the given regex pattern. For example:$ curl -X POST \ -H "Authorization: Bearer <access_token>" \ -H "Content-Type: application/json" \ -d '{ "method": "creation_date", "value": "7d", "tagPattern": "^test.", "tagPatternMatches": false }' \ "https://<quay-server.example.com>/api/v1/repository/<organization_name>/<repository_name>/autoprunepolicy/"Where:
tagPatternMatches-
Specifies that the
falsevalue prunes tags that do not match the given regex pattern. In this example, all tags except those that match^test.are pruned.
-
You can update your policy for the repository by using the
PUT /api/v1/repository/<repository>/autoprunepolicy/<policy_uuid>command and passing in the UUID. For example:$ curl -X PUT \ -H "Authorization: Bearer <bearer_token>" \ -H "Content-Type: application/json" \ -d '{ "method": "number_of_tags", "value": "5", "tagPattern": "^test.*", "tagPatternMatches": true }' \ "https://quay-server.example.com/api/v1/repository/<namespace>/<repo_name>/autoprunepolicy/<uuid>"This command does not return output. Continue to the next step to check your auto-prune policy.
-
Check your auto-prune policy by entering the following command:
$ curl -X GET -H "Authorization: Bearer <access_token>" http://<quay-server.example.com>/api/v1/repository/<organization_name>/<repository_name>/autoprunepolicy/Alternatively, you can include the UUID:
$ curl -X GET -H "Authorization: Bearer <access_token>" http://<quay-server.example.com>/api/v1/repository/<organization_name>/<repository_name>/autoprunepolicy/ce2bdcc0-ced2-4a1a-ac36-78a9c1bed8c7Example output{"policies": [{"uuid": "ce2bdcc0-ced2-4a1a-ac36-78a9c1bed8c7", "method": "number_of_tags", "value": 10}]} -
You can delete the auto-prune policy by entering the following command. Note that deleting the policy requires the UUID.
$ curl -X DELETE -H "Authorization: Bearer <access_token>" http://<quay-server.example.com>/api/v1/repository/<organization_name>/<repository_name>/autoprunepolicy/ce2bdcc0-ced2-4a1a-ac36-78a9c1bed8c7Example output{"uuid": "ce2bdcc0-ced2-4a1a-ac36-78a9c1bed8c7"}
Creating an auto-prune policy on a repository for a user with the API
To manage auto-prune policies on another user repository in Project Quay, you can use the repository autoprunepolicy API endpoints when you have admin privileges.
-
You have created an OAuth access token.
-
You have logged into Project Quay.
-
You have
adminprivileges on the repository that you are creating the policy for.
-
Enter the following
POST /api/v1/repository/<user_account>/<user_repository>/autoprunepolicy/command to create a new policy that limits the number of tags for the user:$ curl -X POST -H "Authorization: Bearer <access_token>" -H "Content-Type: application/json" -d '{"method": "number_of_tags","value": 2}' https://<quay-server.example.com>/api/v1/repository/<user_account>/<user_repository>/autoprunepolicy/Example output{"uuid": "7726f79c-cbc7-490e-98dd-becdc6fefce7"} -
Optional. You can add an additional policy for the current user and pass in the
tagPatternandtagPatternMatchesfields to prune only tags that match the given regex pattern. For example:$ curl -X POST \ -H "Authorization: Bearer <bearer_token>" \ -H "Content-Type: application/json" \ -d '{ "method": "creation_date", "value": "7d", "tagPattern": "^v*", "tagPatternMatches": true }' \ "http://<quay-server.example.com>/api/v1/repository/<user_account>/<user_repository>/autoprunepolicy/"Example output{"uuid": "b3797bcd-de72-4b71-9b1e-726dabc971be"} -
You can update your policy for the current user by using the
PUT /api/v1/repository/<user_account>/<user_repository>/autoprunepolicy/<policy_uuid>command. For example:$ curl -X PUT -H "Authorization: Bearer <bearer_token>" -H "Content-Type: application/json" -d '{ "method": "creation_date", "value": "4d", "tagPattern": "^test.", "tagPatternMatches": true }' "https://<quay-server.example.com>/api/v1/repository/<user_account>/<user_repository>/autoprunepolicy/<policy_uuid>"Updating a policy does not return output in the CLI.
-
Check your auto-prune policy by entering the following command:
$ curl -X GET -H "Authorization: Bearer <access_token>" http://<quay-server.example.com>/api/v1/repository/<user_account>/<user_repository>/autoprunepolicy/Alternatively, you can include the UUID:
$ curl -X GET -H "Authorization: Bearer <access_token>" http://<quay-server.example.com>/api/v1/repository/<user_account>/<user_repository>/autoprunepolicy/7726f79c-cbc7-490e-98dd-becdc6fefce7Example output{"uuid": "81ee77ec-496a-4a0a-9241-eca49437d15b", "method": "creation_date", "value": "7d", "tagPattern": "^v*", "tagPatternMatches": true} -
You can delete the auto-prune policy by entering the following command. Note that deleting the policy requires the UUID.
$ curl -X DELETE -H "Authorization: Bearer <access_token>" http://<quay-server.example.com>/api/v1/repository/<user_account>/<user_repository>/autoprunepolicy/<policy_uuid>Example output{"uuid": "7726f79c-cbc7-490e-98dd-becdc6fefce7"}
Reclaim disk space after tags are deleted
Configure and run garbage collection, review quota interactions, and monitor garbage collection metrics to reclaim storage.
Garbage collection in practice
Project Quay runs garbage collection continuously in the background. Namespace and repository workers process queues under a global lock, while tagged-image workers search for inactive or expired tags.
Currently, all garbage collection happens discreetly, and Project Quay does not provide commands to manually run garbage collection. Project Quay provides metrics that track the status of the different garbage collection workers.
For namespace and repository garbage collection, the progress is tracked based on the size of their respective queues. Namespace and repository garbage collection workers require a global lock to work. As a result, and for performance reasons, only one worker runs at a time.
|
Note
|
Project Quay shares blobs between namespaces and repositories in order to conserve disk space. For example, if the same image is pushed 10 times, only one copy of that image is stored. |
Tags can share their layers with different images already stored somewhere in Project Quay. In that case, blobs stay in storage, because deleting shared blobs would make other images unusable.
Blob expiration is independent of the time machine. If you push a tag to Project Quay and the time machine is set to 0 seconds, and then you delete a tag immediately, garbage collection deletes the tag and everything related to that tag, but does not delete the blob storage until the blob expiration time is reached.
Garbage collecting tagged images works differently than garbage collection on namespaces or repositories. Rather than having a queue of items to work with, the garbage collection workers for tagged images actively search for a repository with inactive or expired tags to clean up. Each instance of garbage collection workers grabs a repository lock, which results in one worker per repository.
-
In Project Quay, inactive or expired tags are manifests without tags because the last tag was deleted or it expired. The manifest stores information about how the image is composed and stored in the database for each individual tag. When a tag is deleted and the allotted time from Time Machine has been met, Project Quay garbage collects the blobs that are not connected to any other manifests in the registry. If a particular blob is connected to a manifest, Project Quay preserves that blob in storage and removes only its connection to the manifest that is being deleted.
-
Expired images disappear after the allotted time, but are still stored in Project Quay. The time in which an image is completely deleted, or collected, depends on the Time Machine setting of your organization. The default time for garbage collection is 14 days unless otherwise specified. Until that time, tags can be pointed to an expired or deleted image.
-
For each type of garbage collection, Project Quay provides metrics for the number of rows per table deleted by each garbage collection worker. The following image shows an example of how Project Quay monitors garbage collection with the same metrics:
Project Quay does not have a way to track how much space is freed up by garbage collection. Currently, the best indicator of this is by checking how many blobs have been deleted in the provided metrics.
|
Note
|
The |
Garbage collection configuration fields
Use these configuration fields to enable or disable Project Quay garbage collection features and to control how often garbage collection workers run.
| Name | Description | Schema |
|---|---|---|
FEATURE_GARBAGE_COLLECTION |
Whether garbage collection is enabled for image tags. Defaults to |
Boolean |
FEATURE_NAMESPACE_GARBAGE_COLLECTION |
Whether garbage collection is enabled for namespaces. Defaults to |
Boolean |
FEATURE_REPOSITORY_GARBAGE_COLLECTION |
Whether garbage collection is enabled for repositories. Defaults to |
Boolean |
GARBAGE_COLLECTION_FREQUENCY |
The frequency, in seconds, at which the garbage collection worker runs. Affects only garbage collection workers. Defaults to 30 seconds. |
String |
PUSH_TEMP_TAG_EXPIRATION_SEC |
The number of seconds that blobs are not garbage collected after being uploaded. This feature prevents garbage collection from cleaning up blobs that are not referenced yet, but still used as part of an ongoing push. |
String |
TAG_EXPIRATION_OPTIONS |
List of valid tag expiration values. |
String |
DEFAULT_TAG_EXPIRATION |
Tag expiration time for time machine. |
String |
CLEAN_BLOB_UPLOAD_FOLDER |
Automatically cleans stale blobs left over from an S3 multipart upload. By default, blob files older than two days are cleaned up every hour. Default: |
Boolean |
Disabling garbage collection
You can disable Project Quay garbage collection features in config.yaml when you need to control when dangling images, repositories, and blobs are removed.
The garbage collection features for image tags, namespaces, and repositories are stored in the config.yaml file. These features default to true.
In rare cases, you might want to disable garbage collection, for example, to control when garbage collection is performed. You can disable garbage collection by setting the GARBAGE_COLLECTION features to false. When disabled, dangling or untagged images, repositories, namespaces, layers, and manifests are not removed. This might increase the downtime of your environment.
|
Note
|
Project Quay does not provide a command to manually run garbage collection. Instead, disable and then re-enable the garbage collection feature. |
Garbage collection and quota management
With Project Quay quota management, reported storage consumption can differ from disk usage because garbage collection reclaims space after deletion.
Project Quay introduced quota management in 3.7. With quota management, users have the ability to report storage consumption and to contain registry growth by establishing configured storage quota limits.
As of Project Quay 3.7, garbage collection reclaims memory that was allocated to images, repositories, and blobs after deletion. Because the garbage collection feature reclaims memory after deletion, disk usage can differ from the total consumption that quota management reports. No workaround is currently available for this issue.
Checking garbage collection in practice
To verify that Project Quay garbage collection is running, you can review registry logs after you delete an image tag.
-
Enter the following command to ensure that garbage collection is properly working:
$ sudo podman logs <container_id>Example output:gcworker stdout | 2022-11-14 18:46:52,458 [63] [INFO] [apscheduler.executors.default] Job "GarbageCollectionWorker._garbage_collection_repos (trigger: interval[0:00:30], next run at: 2022-11-14 18:47:22 UTC)" executed successfully -
Delete an image tag.
-
Enter the following command to ensure that the tag was deleted:
$ podman logs quay-appExample output:gunicorn-web stdout | 2022-11-14 19:23:44,574 [233] [INFO] [gunicorn.access] 192.168.0.38 - - [14/Nov/2022:19:23:44 +0000] "DELETE /api/v1/repository/quayadmin/busybox/tag/test HTTP/1.0" 204 0 "http://quay-server.example.com/repository/quayadmin/busybox?tab=tags" "Mozilla/5.0 (X11; Linux x86_64; rv:102.0) Gecko/20100101 Firefox/102.0"
Project Quay garbage collection metrics
Use these metrics to track how often Project Quay garbage collection workers run and how many namespaces, repositories, and blobs they remove.
| Metric name | Description |
|---|---|
quay_gc_iterations_total |
Number of iterations by the GCWorker |
quay_gc_namespaces_purged_total |
Number of namespaces purged by the NamespaceGCWorker |
quay_gc_repos_purged_total |
Number of repositories purged by the RepositoryGCWorker or NamespaceGCWorker |
quay_gc_storage_blobs_deleted_total |
Number of storage blobs deleted |
# TYPE quay_gc_iterations_created gauge
quay_gc_iterations_created{host="example-registry-quay-app-6df87f7b66-9tfn6",instance="",job="quay",pid="208",process_name="secscan:application"} 1.6317823190189714e+09
...

# HELP quay_gc_iterations_total number of iterations by the GCWorker
# TYPE quay_gc_iterations_total counter
quay_gc_iterations_total{host="example-registry-quay-app-6df87f7b66-9tfn6",instance="",job="quay",pid="208",process_name="secscan:application"} 0
...

# TYPE quay_gc_namespaces_purged_created gauge
quay_gc_namespaces_purged_created{host="example-registry-quay-app-6df87f7b66-9tfn6",instance="",job="quay",pid="208",process_name="secscan:application"} 1.6317823190189433e+09
...

# HELP quay_gc_namespaces_purged_total number of namespaces purged by the NamespaceGCWorker
# TYPE quay_gc_namespaces_purged_total counter
quay_gc_namespaces_purged_total{host="example-registry-quay-app-6df87f7b66-9tfn6",instance="",job="quay",pid="208",process_name="secscan:application"} 0
....

# TYPE quay_gc_repos_purged_created gauge
quay_gc_repos_purged_created{host="example-registry-quay-app-6df87f7b66-9tfn6",instance="",job="quay",pid="208",process_name="secscan:application"} 1.631782319018925e+09
...

# HELP quay_gc_repos_purged_total number of repositories purged by the RepositoryGCWorker or NamespaceGCWorker
# TYPE quay_gc_repos_purged_total counter
quay_gc_repos_purged_total{host="example-registry-quay-app-6df87f7b66-9tfn6",instance="",job="quay",pid="208",process_name="secscan:application"} 0
...

# TYPE quay_gc_storage_blobs_deleted_created gauge
quay_gc_storage_blobs_deleted_created{host="example-registry-quay-app-6df87f7b66-9tfn6",instance="",job="quay",pid="208",process_name="secscan:application"} 1.6317823190189059e+09
...

# HELP quay_gc_storage_blobs_deleted_total number of storage blobs deleted
# TYPE quay_gc_storage_blobs_deleted_total counter
quay_gc_storage_blobs_deleted_total{host="example-registry-quay-app-6df87f7b66-9tfn6",instance="",job="quay",pid="208",process_name="secscan:application"} 0
...
Protect a standalone registry from data loss
Back up and restore standalone Red Hat Quay deployments, including service keys, read-only mode, and database configuration.
Backing up and restoring Project Quay on a standalone deployment
You can back up and restore a standalone Project Quay deployment, including optional read-only mode during maintenance.
Creating service keys for standalone Project Quay
To create service keys for standalone Project Quay read-only mode, you can generate a key pair inside the Quay container or in a local Python virtual environment.
Project Quay uses service keys to communicate with various components. These keys are used to sign completed requests, such as requesting to scan images, login, storage access, and so on.
-
If you are using Red Hat Enterprise Linux (RHEL) 7.x:
-
You have enabled the Red Hat Software Collections List (RHSCL).
-
You have installed Python 3.6.
-
You have downloaded the
virtualenvpackage. -
You have installed the
gitCLI.
-
-
If you are using Red Hat Enterprise Linux (RHEL) 8:
-
You have installed Python 3 on your machine.
-
You have downloaded the
python3-virtualenvpackage. -
You have installed the
gitCLI.
-
-
You have cloned the
quay/quayrepository from GitHub.
-
If your Project Quay registry is readily available, you can generate service keys inside of the
Quayregistry container.-
Enter the following command to generate a key pair inside of the
Quaycontainer:$ podman exec quay python3 tools/generatekeypair.py quay-readonly
-
-
If your Project Quay is not readily available, you must generate your service keys inside of a virtual environment.
-
Change into the directory of your Project Quay deployment and create a virtual environment inside of that directory:
$ cd <$QUAY>/quay && virtualenv -v venv -
Activate the virtual environment by entering the following command:
$ source venv/bin/activate -
Optional. Install the
pipCLI tool if you do not have it installed:$ venv/bin/pip install --upgrade pip -
In your Project Quay directory, create a
requirements-generatekeys.txtfile with the following content:$ cat << EOF > requirements-generatekeys.txt cryptography==3.4.7 pycparser==2.19 pycryptodome==3.9.4 pycryptodomex==3.9.4 pyjwkest==1.4.2 PyJWT==1.7.1 Authlib==1.0.0a2 EOF -
Enter the following command to install the Python dependencies defined in the
requirements-generatekeys.txtfile:$ venv/bin/pip install -r requirements-generatekeys.txt -
Enter the following command to create the necessary service keys:
$ PYTHONPATH=. venv/bin/python /<path_to_cloned_repo>/tools/generatekeypair.py quay-readonlyExample output:Writing public key to quay-readonly.jwk Writing key ID to quay-readonly.kid Writing private key to quay-readonly.pem -
Enter the following command to deactivate the virtual environment:
$ deactivate
-
Adding keys to the PostgreSQL database
To register read-only service keys with Project Quay, you can insert the key and approval records into the PostgreSQL database.
-
You have created the service keys.
-
Enter the following command to enter your Project Quay database environment:
$ podman exec -it postgresql-quay psql -U postgres -d quay -
Display the approval types and associated notes of the
servicekeyapprovalby entering the following command:quay=# select * from servicekeyapproval;Example output:id | approver_id | approval_type | approved_date | notes ----+-------------+----------------------------------+----------------------------+------- 1 | | ServiceKeyApprovalType.AUTOMATIC | 2024-05-07 03:47:48.181347 | 2 | | ServiceKeyApprovalType.AUTOMATIC | 2024-05-07 03:47:55.808087 | 3 | | ServiceKeyApprovalType.AUTOMATIC | 2024-05-07 03:49:04.27095 | 4 | | ServiceKeyApprovalType.AUTOMATIC | 2024-05-07 03:49:05.46235 | 5 | 1 | ServiceKeyApprovalType.SUPERUSER | 2024-05-07 04:05:10.296796 | ... -
Add the service key to your Project Quay database by entering the following query:
quay=# INSERT INTO servicekey
  (name, service, metadata, kid, jwk, created_date, expiration_date)
  VALUES ('quay-readonly',
           'quay',
           '{}',
           '<contents_of_.kid_file>',
           '<contents_of_.jwk_file>',
           '<created_date_of_read-only>',
           '<expiration_date_of_read-only>');
Example output:INSERT 0 1 -
Next, add the key approval with the following query:
quay=# INSERT INTO servicekeyapproval ('approval_type', 'approved_date', 'notes')
  VALUES ("ServiceKeyApprovalType.SUPERUSER", "CURRENT_DATE",
           <include_notes_here_on_why_this_is_being_added>);
Example output:INSERT 0 1 -
Set the
approval_idfield on the created service key row to theidfield from the created service key approval. You can use the followingSELECTstatements to get the necessary IDs:UPDATE servicekey SET approval_id = (SELECT id FROM servicekeyapproval WHERE approval_type = 'ServiceKeyApprovalType.SUPERUSER') WHERE name = 'quay-readonly';UPDATE 1
Configuring read-only mode for standalone Project Quay
To put a standalone Project Quay deployment into read-only mode, you can add the service key files and REGISTRY_STATE settings to your configuration bundle and restart Quay.
After the service keys have been created and added to your PostgreSQL database, you must restart the Quay container on your standalone deployment.
-
You have created the service keys and added them to your PostgreSQL database.
-
Shut down all Project Quay instances on all virtual machines. For example:
$ podman stop <quay_container_name_on_virtual_machine_a>$ podman stop <quay_container_name_on_virtual_machine_b> -
Enter the following command to copy the contents of the
quay-readonly.kidfile and thequay-readonly.pemfile to the directory that holds your Project Quay configuration bundle:$ cp quay-readonly.kid quay-readonly.pem $Quay/config -
Enter the following command to set file permissions on all files in your configuration bundle folder:
$ setfacl -m user:1001:rw $Quay/config/* -
Modify your Project Quay
config.yamlfile and add the following information:# ... REGISTRY_STATE: readonly INSTANCE_SERVICE_KEY_KID_LOCATION: 'conf/stack/quay-readonly.kid' INSTANCE_SERVICE_KEY_LOCATION: 'conf/stack/quay-readonly.pem' # ... -
Distribute the new configuration bundle to all Project Quay instances.
-
Start Project Quay by entering the following command:
$ podman run -d --rm -p 80:8080 -p 443:8443 \ --name=quay-main-app \ -v $QUAY/config:/conf/stack:Z \ -v $QUAY/storage:/datastorage:Z \ {productrepo}/{quayimage}:{productminv} -
After starting Project Quay, a banner inside your instance informs users that Project Quay is running in read-only mode. Pushes should be rejected and a 405 error should be logged. You can test this by running the following command:
$ podman push <quay-server.example.com>/quayadmin/busybox:testExample output:613be09ab3c0: Preparing denied: System is currently read-only. Pulls will succeed but all write operations are currently suspended.With your Project Quay deployment on read-only mode, you can safely manage your registry’s operations and perform such actions as backup and restore.
-
Optional. After you finish with read-only mode, you can return to normal operations by removing the following information from your
config.yamlfile. Then, restart your Project Quay deployment:# ... REGISTRY_STATE: readonly INSTANCE_SERVICE_KEY_KID_LOCATION: 'conf/stack/quay-readonly.kid' INSTANCE_SERVICE_KEY_LOCATION: 'conf/stack/quay-readonly.pem' # ...$ podman restart <container_id>
Updating read-only expiration time
To extend the lifetime of a Project Quay read-only service key, you can update the key expiration date in the PostgreSQL database.
The Project Quay read-only key has an expiration date, and when that date passes the key is deactivated. Before the key expires, you can update its expiration time in the database.
-
Connect to your Project Quay production database by using the methods described earlier.
-
Optional. List service key IDs by running the following query:
SELECT id, name, expiration_date FROM servicekey; -
Update the key expiration by issuing the following query:
quay=# UPDATE servicekey SET expiration_date = 'new-date' WHERE id = servicekey_id;
Backing up Project Quay on standalone deployments
To back up a standalone Project Quay deployment, you can archive configuration files, dump the PostgreSQL database, and sync object storage blobs.
-
Create a temporary backup directory, for example,
quay-backup:$ mkdir /tmp/quay-backup -
The following example command denotes the local directory that the Project Quay was started in, for example,
/opt/quay-install:$ podman run --name quay-app \ -v /opt/quay-install/config:/conf/stack:Z \ -v /opt/quay-install/storage:/datastorage:Z \ {productrepo}/{quayimage}:{productminv}Change into the directory that bind-mounts to
/conf/stackinside of the container, for example,/opt/quay-install, by running the following command:$ cd /opt/quay-install -
Compress the contents of your Project Quay deployment into an archive in the
quay-backupdirectory by entering the following command:$ tar cvf /tmp/quay-backup/quay-backup.tar.gz *Example output:config.yaml config.yaml.bak extra_ca_certs/ extra_ca_certs/ca.crt ssl.cert ssl.key -
Back up the Quay container service by entering the following command:
$ podman inspect quay-app | jq -r '.[0].Config.CreateCommand | .[]' | paste -s -d ' ' - /usr/bin/podman run --name quay-app \ -v /opt/quay-install/config:/conf/stack:Z \ -v /opt/quay-install/storage:/datastorage:Z \ {productrepo}/{quayimage}:{productminv} -
Redirect the contents of your
conf/stack/config.yamlfile to your temporaryquay-config.yamlfile by entering the following command:$ podman exec -it quay cat /conf/stack/config.yaml > /tmp/quay-backup/quay-config.yaml -
Obtain the
DB_URIlocated in your temporaryquay-config.yamlby entering the following command:$ grep DB_URI /tmp/quay-backup/quay-config.yamlExample output:$ postgresql://<username>:test123@172.24.10.50/quay
-
Extract the PostgreSQL contents to your temporary backup directory in a backup
.sqlfile by entering the following command:$ pg_dump -h 172.24.10.50 -p 5432 -d quay -U <username> -W -O > /tmp/quay-backup/quay-backup.sql -
Print the contents of your
DISTRIBUTED_STORAGE_CONFIGby entering the following command:DISTRIBUTED_STORAGE_CONFIG: default: - S3Storage - s3_bucket: <bucket_name> storage_path: /registry s3_access_key: <s3_access_key> s3_secret_key: <s3_secret_key> host: <host_name> s3_region: <region> -
Export the
AWS_ACCESS_KEY_IDby using theaccess_keycredential obtained in Step 7:$ export AWS_ACCESS_KEY_ID=<access_key> -
Export the
AWS_SECRET_ACCESS_KEYby using thesecret_keyobtained in Step 7:$ export AWS_SECRET_ACCESS_KEY=<secret_key> -
Sync the
quaybucket to the/tmp/quay-backup/blob-backup/directory from thehostnameof yourDISTRIBUTED_STORAGE_CONFIG:$ aws s3 sync s3://<bucket_name> /tmp/quay-backup/blob-backup/ --source-region us-east-2Example output:download: s3://<user_name>/registry/sha256/9c/9c3181779a868e09698b567a3c42f3744584ddb1398efe2c4ba569a99b823f7a to registry/sha256/9c/9c3181779a868e09698b567a3c42f3744584ddb1398efe2c4ba569a99b823f7a download: s3://<user_name>/registry/sha256/e9/e9c5463f15f0fd62df3898b36ace8d15386a6813ffb470f332698ecb34af5b0d to registry/sha256/e9/e9c5463f15f0fd62df3898b36ace8d15386a6813ffb470f332698ecb34af5b0d
NoteDelete the
quay-config.yamlfile after syncing thequaybucket because that file contains sensitive information. Thequay-config.yamlfile remains available in thequay-backup.tar.gzarchive.
Restoring Project Quay on standalone deployments
To restore a standalone Project Quay deployment from backup, you can restore configuration files, recreate the PostgreSQL database, and sync blobs to object storage.
-
You have backed up your Project Quay deployment.
-
Create a new directory that bind-mounts to
/conf/stackinside of the Project Quay container:$ mkdir /opt/new-quay-install -
Copy the contents of your temporary backup directory created in the backup procedure to the
new-quay-installdirectory created in Step 1:$ cp /tmp/quay-backup/quay-backup.tar.gz /opt/new-quay-install/ -
Change into the
new-quay-installdirectory by entering the following command:$ cd /opt/new-quay-install/ -
Extract the contents of your Project Quay directory:
$ tar xvf /tmp/quay-backup/quay-backup.tar.gz *Example output:config.yaml config.yaml.bak extra_ca_certs/ extra_ca_certs/ca.crt ssl.cert ssl.key
-
Recall the
DB_URIfrom your backed-upconfig.yamlfile by entering the following command:$ grep DB_URI config.yamlExample output:postgresql://<username>:test123@172.24.10.50/quay -
Run the following command to enter the PostgreSQL database server:
$ sudo postgres -
Enter psql and create a new database in 172.24.10.50 to restore the quay databases, for example,
example_restore_registry_quay_database, by entering the following command:$ psql "host=172.24.10.50 port=5432 dbname=postgres user=<username> password=test123" postgres=> CREATE DATABASE example_restore_registry_quay_database;Example output:CREATE DATABASE
-
Connect to the database by running the following command:
postgres=# \c "example-restore-registry-quay-database";Example output:You are now connected to database "example-restore-registry-quay-database" as user "postgres". -
Create a
pg_trgmextension of your Quay database by running the following command:example_restore_registry_quay_database=> CREATE EXTENSION IF NOT EXISTS pg_trgm;Example output:CREATE EXTENSION -
Exit the postgres CLI by entering the following command:
\q -
Import the database backup to your new database by running the following command:
$ psql "host=172.24.10.50 port=5432 dbname=example_restore_registry_quay_database user=<username> password=test123" -W < /tmp/quay-backup/quay-backup.sqlExample output:SET SET SET SET SET
Update the value of
DB_URIin yourconfig.yamlfrompostgresql://<username>:test123@172.24.10.50/quaytopostgresql://<username>:test123@172.24.10.50/example-restore-registry-quay-databasebefore restarting the Project Quay deployment.NoteThe DB_URI format is
DB_URI postgresql://<login_user_name>:<login_user_password>@<postgresql_host>/<quay_database>. If you are moving from one PostgreSQL server to another PostgreSQL server, update the value of<login_user_name>,<login_user_password>and<postgresql_host>at the same time. -
In the
/opt/new-quay-installdirectory, print the contents of yourDISTRIBUTED_STORAGE_CONFIGbundle:$ cat config.yaml | grep DISTRIBUTED_STORAGE_CONFIG -A10Example output:DISTRIBUTED_STORAGE_CONFIG: default: DISTRIBUTED_STORAGE_CONFIG: default: - S3Storage - s3_bucket: <bucket_name> storage_path: /registry s3_access_key: <s3_access_key> s3_region: <region> s3_secret_key: <s3_secret_key> host: <host_name>NoteYour
DISTRIBUTED_STORAGE_CONFIGin/opt/new-quay-installmust be updated before restarting your Project Quay deployment. -
Export the
AWS_ACCESS_KEY_IDby using theaccess_keycredential obtained in Step 13:$ export AWS_ACCESS_KEY_ID=<access_key> -
Export the
AWS_SECRET_ACCESS_KEYby using thesecret_keyobtained in Step 13:$ export AWS_SECRET_ACCESS_KEY=<secret_key> -
Create a new s3 bucket by entering the following command:
$ aws s3 mb s3://<new_bucket_name> --region us-east-2Example output:$ make_bucket: quay -
Upload all blobs to the new s3 bucket by entering the following command:
$ aws s3 sync --no-verify-ssl \
--endpoint-url <example_endpoint_url>
/tmp/quay-backup/blob-backup/. s3://quay/
where:
<example_endpoint_url>-
Specifies the Project Quay registry endpoint. The endpoint must be the same before backup and after restore.
Example output:upload: ../../tmp/quay-backup/blob-backup/datastorage/registry/sha256/50/505edb46ea5d32b5cbe275eb766d960842a52ee77ac225e4dc8abb12f409a30d to s3://quay/datastorage/registry/sha256/50/505edb46ea5d32b5cbe275eb766d960842a52ee77ac225e4dc8abb12f409a30d upload: ../../tmp/quay-backup/blob-backup/datastorage/registry/sha256/27/27930dc06c2ee27ac6f543ba0e93640dd21eea458eac47355e8e5989dea087d0 to s3://quay/datastorage/registry/sha256/27/27930dc06c2ee27ac6f543ba0e93640dd21eea458eac47355e8e5989dea087d0 upload: ../../tmp/quay-backup/blob-backup/datastorage/registry/sha256/8c/8c7daf5e20eee45ffe4b36761c4bb6729fb3ee60d4f588f712989939323110ec to s3://quay/datastorage/registry/sha256/8c/8c7daf5e20eee45ffe4b36761c4bb6729fb3ee60d4f588f712989939323110ec ...
-
Before restarting your Project Quay deployment, update the storage settings in your
config.yamlfile:DISTRIBUTED_STORAGE_CONFIG: default: DISTRIBUTED_STORAGE_CONFIG: default: - S3Storage - s3_bucket: <new_bucket_name> storage_path: /registry s3_access_key: <s3_access_key> s3_secret_key: <s3_secret_key> s3_region: <region> host: <host_name>
Protect an Operator-managed registry from data loss
Back up Operator-managed Red Hat Quay on OpenShift Container Platform, including configuration, managed database, and object storage data.
Enabling read-only mode for Red Hat Quay on OpenShift Container Platform
Read-only mode keeps your Red Hat Quay on OpenShift Container Platform registry online during backup and restore by blocking write operations. You can use this mode when scaling down the deployment is unacceptable.
When backing up and restoring, you are required to scale down your Red Hat Quay on OpenShift Container Platform deployment. This results in service unavailability during the backup period which, in some cases, might be unacceptable. Enabling read-only mode ensures service availability during the backup and restore procedure for Red Hat Quay on OpenShift Container Platform deployments.
|
Note
|
In some cases, you cannot enable read-only mode for Project Quay because it requires inserting a service key and other manual configuration changes. As an alternative to read-only mode, Project Quay administrators might consider enabling the This field might be useful in some situations such as when Project Quay administrators want to calculate their registry’s quota and disable image pushing until after calculation has completed. With this method, administrators can avoid putting the whole registry in |
Prerequisites for enabling read-only mode
You must meet the following prerequisites to enable read-only mode for Red Hat Quay on OpenShift Container Platform:
-
If you are using Red Hat Enterprise Linux (RHEL) 7.x:
-
You have enabled the Red Hat Software Collections List (RHSCL).
-
You have installed Python 3.6.
-
You have downloaded the
virtualenvpackage. -
You have installed the
gitCLI.
-
-
If you are using Red Hat Enterprise Linux (RHEL) 8:
-
You have installed Python 3 on your machine.
-
You have downloaded the
python3-virtualenvpackage. -
You have installed the
gitCLI.
-
-
You have cloned the quay/quay repository.
-
You have installed the
ocCLI. -
You have access to the cluster with
cluster-adminprivileges.
Creating service keys for Red Hat Quay on OpenShift Container Platform
To enable Project Quay to communicate with components and sign completed requests such as image scanning and login, you can create service keys. Access the Quay container pod and run the keypair generation script to create the necessary keys.
-
Enter the following command to obtain a list of Project Quay pods:
$ oc get pods -n <namespace>Example outputexample-registry-clair-app-7dc7ff5844-4skw5 0/1 Error 0 70d example-registry-clair-app-7dc7ff5844-nvn4f 1/1 Running 0 31d example-registry-clair-app-7dc7ff5844-x4smw 0/1 ContainerStatusUnknown 6 (70d ago) 70d example-registry-clair-app-7dc7ff5844-xjnvt 1/1 Running 0 60d example-registry-clair-postgres-547d75759-75c49 1/1 Running 0 70d example-registry-quay-app-76c8f55467-52wjz 1/1 Running 0 70d example-registry-quay-app-76c8f55467-hwz4c 1/1 Running 0 70d example-registry-quay-app-upgrade-57ghs 0/1 Completed 1 70d example-registry-quay-database-7c55899f89-hmnm6 1/1 Running 0 70d example-registry-quay-mirror-6cccbd76d-btsnb 1/1 Running 0 70d example-registry-quay-mirror-6cccbd76d-x8g42 1/1 Running 0 70d example-registry-quay-redis-85cbdf96bf-4vk5m 1/1 Running 0 70d -
Open a remote shell session to the
Quaycontainer by entering the following command:$ oc rsh example-registry-quay-app-76c8f55467-52wjz -
Create the necessary service keys by entering the following command:
sh-4.4$ python3 tools/generatekeypair.py quay-readonlyExample outputWriting public key to quay-readonly.jwk Writing key ID to quay-readonly.kid Writing private key to quay-readonly.pem
Configuring read-only mode Red Hat Quay on OpenShift Container Platform
To enable read-only mode in Project Quay and safely manage registry operations such as backup and restore, you can modify the configuration secret and restart the Quay container.
|
Important
|
Deploying Red Hat Quay on OpenShift Container Platform in read-only mode requires you to modify the secrets stored inside of your OpenShift Container Platform cluster. It is highly recommended that you create a backup of the secret prior to making changes to it. |
-
You have created the service keys and added them to your PostgreSQL database.
-
Read the secret name of your Red Hat Quay on OpenShift Container Platform deployment by entering the following command:
$ oc get deployment -o yaml <quay_main_app_deployment_name> -
Use the
base64command to encode thequay-readonly.kidandquay-readonly.pemfiles by entering the following commands:$ base64 -w0 quay-readonly.kidExample outputZjUyNDFm...$ base64 -w0 quay-readonly.pemExample output<example_secret>... -
Obtain the current configuration bundle and secret by entering the following command. Save the output to a file called
config.yaml:$ oc get secret quay-config-secret-name -o json | jq '.data."config.yaml"' | cut -d '"' -f2 | base64 -d -w0 > config.yaml -
Edit the
config.yamlfile and add the following information to enable read-only mode:# ... REGISTRY_STATE: readonly INSTANCE_SERVICE_KEY_KID_LOCATION: 'conf/stack/quay-readonly.kid' INSTANCE_SERVICE_KEY_LOCATION: 'conf/stack/quay-readonly.pem' # ... -
Save the file and
base64encode it by entering the following command:$ base64 -w0 quay-config.yaml -
Scale down the Project Quay Operator pods to
0by entering the following command. This ensures that the Operator does not reconcile the secret after editing it.$ oc scale --replicas=0 deployment quay-operator -n openshift-operators -
Edit the secret to include the new content by entering the following command:
$ oc edit secret quay-config-secret-name -n quay-namespace# ... data: "quay-readonly.kid": "ZjUyNDFm..." "quay-readonly.pem": "<example_secret>..." "config.yaml": "QUNUSU9OX0xPR19..." # ...With your Red Hat Quay on OpenShift Container Platform deployment on read-only mode, you can safely manage your registry’s operations and perform such actions as backup and restore.
Scaling up the Project Quay from a read-only deployment
To exit read-only mode and restore normal operations in Project Quay, you can remove the read-only settings from the config.yaml file and scale the Operator deployment back up.
|
Note
|
Depending on your needs, you might wait to scale up the Project Quay deployment after backing up and restoring your regisry. |
-
Edit the
config.yamlfile and remove the following information:# ... REGISTRY_STATE: readonly INSTANCE_SERVICE_KEY_KID_LOCATION: 'conf/stack/quay-readonly.kid' INSTANCE_SERVICE_KEY_LOCATION: 'conf/stack/quay-readonly.pem' # ... -
Scale the Project Quay Operator back up by entering the following command:
$ oc scale --replicas=1 deployment quay-operator -n openshift-operators
Backing up Red Hat Quay on OpenShift Container Platform
To create backups of your Red Hat Quay on OpenShift Container Platform deployment for disaster recovery, you can back up the configuration, PostgreSQL database, and object storage. Regular backups ensure you can restore your registry to a previous state if needed.
Database backups should be performed regularly using either the supplied tools on the PostgreSQL image or your own backup infrastructure. The Project Quay Operator does not ensure that the PostgreSQL database is backed up.
|
Important
|
PostgreSQL and S3 object storage backups must be taken at the same time to avoid desynchronization. If backups are taken at different times, the database might contain references to storage blobs that are not present in the storage backup, which can cause data inconsistency and restore failures. |
|
Note
|
This procedure covers backing up your Project Quay PostgreSQL database. It does not cover backing up the Clair PostgreSQL database. Backing up the Clair PostgreSQL database is not needed because it can be recreated. If you opt to recreate it from scratch, you wait for the information to be repopulated after all images inside of your Project Quay deployment are scanned. During this downtime, security reports are unavailable. If you are considering backing up the Clair PostgreSQL database, you must consider that its size is dependent upon the number of images stored inside of Project Quay. As a result, the database can be extremely large. |
Prerequisites for backing up Red Hat Quay on OpenShift Container Platform
-
A healthy Project Quay deployment on OpenShift Container Platform using the Project Quay Operator. The status condition
Availableis set toTrue. -
The components
quay,postgresandobjectstorageare set tomanaged: true -
If the component
clairis set tomanaged: truethe componentclairpostgresis also set tomanaged: true(starting with Project Quay v3.7 or later)
|
Note
|
If your deployment contains partially unmanaged database or storage components and you are using external services for PostgreSQL or S3-compatible object storage to run your Project Quay deployment, you must refer to the service provider or vendor documentation to create a backup of the data. You can refer to the tools described in this guide as a starting point on how to backup your external PostgreSQL database or object storage. |
Project Quay configuration backup
To back up your Project Quay configuration for disaster recovery, you can export the QuayRegistry custom resource, back up the managed secret keys, and save the config bundle and config.yaml files. This procedure creates backup files that you can use to restore your registry configuration.
-
To back the
QuayRegistrycustom resource by exporting it, enter the following command:$ oc get quayregistry <quay_registry_name> -n <quay_namespace> -o yaml > quay-registry.yaml -
Edit the resulting
quayregistry.yamland remove the status section and the following metadata fields:metadata.creationTimestamp metadata.finalizers metadata.generation metadata.resourceVersion metadata.uid -
Backup the managed keys secret by entering the following command:
NoteIf you are running a version older than Project Quay 3.7.0, this step can be skipped. Some secrets are automatically generated while deploying Project Quay for the first time. These are stored in a secret called
<quay_registry_name>-quay-registry-managed-secret-keysin the namespace of theQuayRegistryresource.$ oc get secret -n <quay_namespace> <quay_registry_name>-quay-registry-managed-secret-keys -o yaml > managed_secret_keys.yaml -
Edit the resulting
managed_secret_keys.yamlfile and remove the entrymetadata.ownerReferences. Yourmanaged_secret_keys.yamlfile should look similar to the following:apiVersion: v1 kind: Secret type: Opaque metadata: name: <quay_registry_name>-quay-registry-managed-secret-keys namespace: <quay_namespace> data: CONFIG_EDITOR_PW: <redacted> DATABASE_SECRET_KEY: <redacted> DB_ROOT_PW: <redacted> DB_URI: <redacted> SECRET_KEY: <redacted> SECURITY_SCANNER_V4_PSK: <redacted>All information under the
dataproperty should remain the same. -
Redirect the current
Quayconfiguration file by entering the following command:$ oc get secret -n <quay-namespace> $(oc get quayregistry <quay_registry_name> -n <quay_namespace> -o jsonpath='{.spec.configBundleSecret}') -o yaml > config-bundle.yaml -
Backup the
/conf/stack/config.yamlfile mounted inside of theQuaypods:$ oc exec -it quay_pod_name -- cat /conf/stack/config.yaml > quay_config.yaml -
Obtain the
Quaydatabase name:$ oc -n <quay_namespace> rsh $(oc get pod -l app=quay -o NAME -n <quay_namespace> |head -n 1) cat /conf/stack/config.yaml|awk -F"/" '/^DB_URI/ {print $4}'Example outputquayregistry-quay-database
Scaling down the Project Quay deployment
To create a consistent backup of your Project Quay deployment, you must scale down the deployment by disabling auto scaling and setting replica counts to zero. This ensures the registry is in a quiescent state before backing up.
|
Important
|
This step is needed to create a consistent backup of the state of your Project Quay deployment. Do not omit this step, including in setups where PostgreSQL databases and/or S3-compatible object storage are provided by external services (unmanaged by the Project Quay Operator). |
-
Scale down the Project Quay deployment by disabling auto scaling and overriding the replica count for Project Quay, mirror workers, and Clair (if managed). For example:
apiVersion: quay.redhat.com/v1
kind: QuayRegistry
metadata:
  name: registry
  namespace: ns
spec:
  components:
    …
    - kind: horizontalpodautoscaler
      managed: false
    - kind: quay
      managed: true
      overrides:
        replicas: 0
    - kind: clair
      managed: true
      overrides:
        replicas: 0
    - kind: mirror
      managed: true
      overrides:
        replicas: 0
    …
where:
managed: false-
Disables auto scaling of Quay, Clair and Mirroring workers.
overrides-
Sets the replica count to 0 for components accessing the database and objectstorage.
-
Wait for the
registry-quay-app,registry-quay-mirrorandregistry-clair-apppods (depending on which components you set to be managed by the Project Quay Operator) to disappear. You can check their status by entering the following command:$ oc get pods -n <quay_namespace>Example output:$ oc get podExample outputquay-operator.v3.7.1-6f9d859bd-p5ftc 1/1 Running 0 12m quayregistry-clair-postgres-7487f5bd86-xnxpr 1/1 Running 1 (12m ago) 12m quayregistry-quay-app-upgrade-xq2v6 0/1 Completed 0 12m quayregistry-quay-database-859d5445ff-cqthr 1/1 Running 0 12m quayregistry-quay-redis-84f888776f-hhgms 1/1 Running 0 12m
Backing up the Project Quay managed database
To back up your Project Quay managed database for disaster recovery, you can identify the PostgreSQL pod and use pg_dump to create a backup SQL file. This procedure creates a backup that you can use to restore your database.
|
Note
|
If your Project Quay deployment is configured with external, or unmanged, PostgreSQL database(s), refer to your vendor’s documentation on how to create a consistent backup of these databases. |
-
Identify the Project Quay PostgreSQL pod name by entering the following command:
$ oc get pod -l quay-component=postgres -n <quay_namespace> -o jsonpath='{.items[0].metadata.name}'Example output:quayregistry-quay-database-59f54bb7-58xs7 -
Download a backup database by entering the following command:
$ oc -n <quay_namespace> exec quayregistry-quay-database-59f54bb7-58xs7 -- /usr/bin/pg_dump -C quayregistry-quay-database > backup.sql
Backing up the Project Quay managed object storage
To back up your Project Quay managed object storage for disaster recovery, you can export AWS credentials from secrets and use the aws s3 sync command to copy all blobs to a local directory. This procedure creates a backup of your registry’s object storage data.
The instructions in this section apply to the following configurations:
-
Standalone, multi-cloud object gateway configurations
-
OpenShift Data Foundations storage requires that the Project Quay Operator provisioned an S3 object storage bucket from, through the
ObjectStorageBucketClaimAPI.
-
Decode and export the
AWS_ACCESS_KEY_IDby entering the following command:$ export AWS_ACCESS_KEY_ID=$(oc get secret -l app=noobaa -n <quay-namespace> -o jsonpath='{.items[0].data.AWS_ACCESS_KEY_ID}' |base64 -d) -
Decode and export the
AWS_SECRET_ACCESS_KEY_IDby entering the following command:$ export AWS_SECRET_ACCESS_KEY=$(oc get secret -l app=noobaa -n <quay-namespace> -o jsonpath='{.items[0].data.AWS_SECRET_ACCESS_KEY}' |base64 -d) -
Create a new directory by entering the following command:
$ mkdir blobs -
Copy all blobs to the directory by entering the following command:
$ aws s3 sync --no-verify-ssl --endpoint https://$(oc get route s3 -n openshift-storage -o jsonpath='{.spec.host}') s3://$(oc get cm -l app=noobaa -n <quay-namespace> -o jsonpath='{.items[0].data.BUCKET_NAME}') ./blobs
Restore an Operator-managed registry after failure
Restore Operator-managed Red Hat Quay from backup, including scaling deployments and restoring database and object storage data.
Scaling up the Project Quay deployment
To restore your Project Quay deployment to normal operation after scaling down, you can re-enable auto scaling and remove replica overrides for quay, mirror workers, and Clair. This restores your registry to full capacity after completing backup or maintenance tasks.
-
Scale up the Project Quay deployment by re-enabling auto scaling, if desired, and removing the replica overrides for Quay, mirror workers and Clair as applicable. For example:
apiVersion: quay.redhat.com/v1
kind: QuayRegistry
metadata:
  name: registry
  namespace: ns
spec:
  components:
    …
    - kind: horizontalpodautoscaler
      managed: true
    - kind: quay
      managed: true
    - kind: clair
      managed: true
    - kind: mirror
      managed: true
    …
where:
spec.components.horizontalpodautoscaler.managed-
Specifies re-enabling auto scaling of Quay, Clair and Mirroring workers again.
spec.components.quay-
Specifies that replica overrides are removed again to scale the Quay components back up.
-
Check the status of the Project Quay deployment by entering the following command:
$ oc wait quayregistry registry --for=condition=Available=true -n <quay_namespace>Example output:apiVersion: quay.redhat.com/v1 kind: QuayRegistry metadata: ... name: registry namespace: <quay-namespace> ... spec: ... status: - lastTransitionTime: '2022-06-20T05:31:17Z' lastUpdateTime: '2022-06-20T17:31:13Z' message: All components reporting as healthy reason: HealthChecksPassing status: 'True' type: Available
Restoring Project Quay
To restore your Project Quay registry when the Operator manages the database, you can restore the configuration, database, and object storage from backups. This procedure restores your registry to a previous state after performing the backup process.
Prerequisites for restoring Project Quay
The following prerequisites are required to restore Project Quay:
-
Project Quay is deployed on OpenShift Container Platform using the Project Quay Operator.
-
A backup of the Project Quay configuration managed by the Project Quay Operator has been created following the instructions in the Backing up Project Quay section.
-
The object storage bucket used by Project Quay has been backed up.
-
The components
quay,postgresandobjectstorageare set tomanaged: true -
If the component
clairis set tomanaged: true, the componentclairpostgresis also set tomanaged: true. -
There is no running Project Quay deployment managed by the Project Quay Operator in the target namespace on your OpenShift Container Platform cluster
|
Note
|
If your deployment contains partially unmanaged database or storage components and you are using external services for PostgreSQL or S3-compatible object storage to run your Project Quay deployment, you must refer to the service provider or vendor documentation to restore their data from a backup prior to restore Project Quay |
Restoring Project Quay from a backup
To restore your Project Quay registry and configuration from a backup, you can restore the configuration bundle, managed secret keys, and QuayRegistry custom resource. This procedure restores your registry to a previous state using backup files created with the backup process.
-
You have backed up your Project Quay registry and configuration.
-
You have the backup files
config-bundle.yaml,managed-secret-keys.yaml, andquay-registry.yaml.
-
Restore the backed up Project Quay configuration by entering the following command:
$ oc create -f ./config-bundle.yamlImportantIf you receive the error
Error from server (AlreadyExists): error when creating "./config-bundle.yaml": secrets "config-bundle-secret" already exists, you must delete your existing resource with$ oc delete Secret config-bundle-secret -n <quay-namespace>and recreate it with$ oc create -f ./config-bundle.yaml. -
Restore the generated keys from the backup by entering the following command:
$ oc create -f ./managed-secret-keys.yaml -
Restore the
QuayRegistrycustom resource by entering the following command:$ oc create -f ./quay-registry.yaml -
Check the status of the Project Quay deployment by entering the following command. Wait for it to be available:
$ oc wait quayregistry registry --for=condition=Available=true -n <quay-namespace>
Scaling down the Project Quay deployment before restore
To scale down your Project Quay deployment, you can disable auto scaling and set replica counts to zero. This reduces resource consumption and stops registry operations temporarily.
-
Scale down the Project Quay deployment by disabling auto scaling and overriding the replica count for Quay, mirror workers and Clair (if managed). For example:
apiVersion: quay.redhat.com/v1
kind: QuayRegistry
metadata:
  name: registry
  namespace: ns
spec:
  components:
    …
    - kind: horizontalpodautoscaler
      managed: false
    - kind: quay
      managed: true
      overrides:
        replicas: 0
    - kind: clair
      managed: true
      overrides:
        replicas: 0
    - kind: mirror
      managed: true
      overrides:
        replicas: 0
    …
where:
spec.components.horizontalpodautoscaler.managed-
Specifies that the component is not managed by the Project Quay Operator.
spec.components.quay.overrides-
Specifies the replica count for the component.
-
Wait for the
registry-quay-app,registry-quay-mirrorandregistry-clair-apppods (depending on which components you set to be managed by Project Quay Operator) to disappear. You can check their status by running the following command:$ oc get pods -n <quay-namespace>Example output:
registry-quay-config-editor-77847fc4f5-nsbbv   1/1     Running            0          9m1s
registry-quay-database-66969cd859-n2ssm        1/1     Running            0          6d1h
registry-quay-redis-7cc5f6c977-956g8           1/1     Running            0          5d21h
Restoring your Project Quay database
To restore your Project Quay database from a backup, you can identify the database pod, upload the backup file, drop the existing database, and restore from the backup using psql. This procedure restores your database to a previous state using a backup SQL file.
-
Identify your
Quaydatabase pod by entering the following command:$ oc get pod -l quay-component=postgres -n <quay_namespace> -o jsonpath='{.items[0].metadata.name}'Example output:quayregistry-quay-database-59f54bb7-58xs7
-
Upload the backup by copying it from the local environment and into the pod by entering the following command:
$ oc cp ./backup.sql -n <quay_namespace> registry-quay-database-66969cd859-n2ssm:/tmp/backup.sql
-
Open a remote terminal to the database by entering the following command:
$ oc rsh -n <quay_namespace> registry-quay-database-66969cd859-n2ssm -
Enter psql by entering the following command:
bash-4.4$ psql -
You can list the database by entering the following command:
postgres=# \lExample outputList of databases Name | Owner | Encoding | Collate | Ctype | Access privileges ----------------------------+----------------------------+----------+------------+------------+----------------------- postgres | postgres | UTF8 | en_US.utf8 | en_US.utf8 | quayregistry-quay-database | quayregistry-quay-database | UTF8 | en_US.utf8 | en_US.utf8 | -
Drop the existing database by entering the following command:
postgres=# DROP DATABASE "quayregistry-quay-database";Example outputDROP DATABASE -
Exit the postgres CLI by entering the following command:
\q -
Redirect your PostgreSQL database to your backup database by entering the following command:
sh-4.4$ psql < /tmp/backup.sql -
Exit bash by entering the following command:
sh-4.4$ exit
Restoring the Project Quay object storage data
To restore your Project Quay object storage data from a backup, you can export AWS credentials from secrets and use the aws s3 sync command to upload blobs to your storage bucket. This procedure restores your registry’s object storage data using backup files.
-
Export the
AWS_ACCESS_KEY_IDby entering the following command:$ export AWS_ACCESS_KEY_ID=$(oc get secret -l app=noobaa -n <quay-namespace> -o jsonpath='{.items[0].data.AWS_ACCESS_KEY_ID}' |base64 -d) -
Export the
AWS_SECRET_ACCESS_KEYby entering the following command:$ export AWS_SECRET_ACCESS_KEY=$(oc get secret -l app=noobaa -n <quay-namespace> -o jsonpath='{.items[0].data.AWS_SECRET_ACCESS_KEY}' |base64 -d) -
Upload all blobs to the bucket by running the following command:
$ aws s3 sync --no-verify-ssl --endpoint https://$(oc get route s3 -n openshift-storage -o jsonpath='{.spec.host}') ./blobs s3://$(oc get cm -l app=noobaa -n <quay-namespace> -o jsonpath='{.items[0].data.BUCKET_NAME}')
Scaling up the Project Quay deployment after restore
To scale up your Project Quay deployment, you can re-enable auto scaling and remove replica overrides. This restores your registry to normal operation after scaling down.
-
Scale up the Project Quay deployment by re-enabling auto scaling, if desired, and removing the replica overrides for Quay, mirror workers and Clair as applicable. For example:
apiVersion: quay.redhat.com/v1
kind: QuayRegistry
metadata:
  name: registry
  namespace: ns
spec:
  components:
    …
    - kind: horizontalpodautoscaler
      managed: true
    - kind: quay
      managed: true
    - kind: clair
      managed: true
    - kind: mirror
      managed: true
    …
where:
spec.components.horizontalpodautoscaler.managed-
Specifies re-enabling auto scaling of Project Quay, Clair and mirroring workers again.
spec.components.quay-
Specifies that replica overrides are removed again to scale the Project Quay components back up.
Perform health checks on deployments
Run a quick health check on a registry by using the instance endpoint. For the full health check reference, see the Observe documentation.
Navigating to a Project Quay health check endpoint
To check the health of your Project Quay instance and view service status, you can navigate to the health/instance endpoint in your browser. The endpoint returns JSON with status_code 200 for healthy or 503 when your deployment has an issue.
-
On your web browser, navigate to
https://{quay-ip-endpoint}/health/instance. -
You are taken to the health instance page, which returns information like the following:
{"data":{"services":{"auth":true,"database":true,"disk_space":true,"registry_gunicorn":true,"service_key":true,"web_gunicorn":true}},"status_code":200}For Project Quay,
"status_code": 200means that the instance is healthy. Conversely, if you receive"status_code": 503, your deployment has an issue.
Change Operator-managed features after deployment
Modify the QuayRegistry custom resource and enable features after deployment on OpenShift Container Platform.
Modifying the QuayRegistry CR after deployment
Modifying the QuayRegistry custom resource (CR) in Project Quay after deployment lets you customize or reconfigure aspects of your Project Quay environment.
Project Quay administrators might modify the QuayRegistry CR for the following reasons:
-
To change component management: Switch components from
managed: truetomanaged: falsein order to bring your own infrastructure. For example, you might setkind: objectstorageto unmanaged to integrate external object storage platforms such as Google Cloud Storage or Nutanix. -
To apply custom configuration: Update or replace the
configBundleSecretto apply new configuration settings, for example, authentication providers, external SSL/TLS settings, feature flags. -
To enable or disable features: Toggle features like repository mirroring, Clair scanning, or horizontal pod autoscaling by modifying the
spec.componentslist. -
To scale the deployment: Adjust environment variables or replica counts for the Quay application.
-
To integrate with external services: Provide configuration for external PostgreSQL, Redis, or Clair databases, and update endpoints or credentials.
Modifying the QuayRegistry CR by using the OpenShift Container Platform web console
To modify the QuayRegistry custom resource in Project Quay, you can use the OpenShift Container Platform web console to change component management settings. You can set managed components to unmanaged and use your own infrastructure.
-
You are logged into OpenShift Container Platform as a user with admin privileges.
-
You have installed the Project Quay Operator.
-
On the OpenShift Container Platform web console, click Operators → Installed Operators.
-
Click Red Hat Quay.
-
Click Quay Registry.
-
Click the name of your Project Quay registry, for example, example-registry.
-
Click YAML.
-
Adjust the
managedfield of the desired component to eitherTrueorFalse. -
Click Save.
NoteSetting a component to unmanaged (
managed: false) might require additional configuration. For more information about setting unmanaged components in theQuayRegistryCR, see Using unmanaged components for dependencies.
Modifying the QuayRegistry CR by using the CLI
To modify the QuayRegistry custom resource in Project Quay, you can use the CLI to change component management settings. You can set managed components to unmanaged and use your own infrastructure.
-
You are logged in to your OpenShift Container Platform cluster as a user with admin privileges.
-
Edit the
QuayRegistryCR by entering the following command:$ oc edit quayregistry <registry_name> -n <namespace> -
Make the desired changes to the
QuayRegistryCR.NoteSetting a component to unmanaged (
managed: false) might require additional configuration. For more information about setting unmanaged components in theQuayRegistryCR, see Using unmanaged components for dependencies. -
Save the changes.
Enabling features after deployment on OpenShift Container Platform
To enable new features for your Project Quay registry after deployment, you can edit the configBundleSecret resource. You can use the OpenShift Container Platform web console or the CLI to make these changes.
|
Note
|
Using the OpenShift Container Platform web console to enable features is generally considered a simpler method. |
Enabling features by using the OpenShift Container Platform web console
To enable features for your Project Quay registry, you can edit the configBundleSecret resource using the OpenShift Container Platform web console. The Operator automatically reconciles changes by restarting Quay-related pods.
-
You have have administrative privileges to the cluster.
-
On the OpenShift Container Platform web console, click Operators → Installed Operators → Red Hat Quay.
-
Click Quay Registry and then the name of your registry.
-
Under Config Bundle Secret, click the name of your secret, for example,
quay-config-bundle. -
On the Secret details page, click Actions → Edit secret.
-
In the Value text box, add the new configuration fields for the features that you want to enable. For a list of all configuration fields, see Configure Project Quay.
-
Click Save. The Project Quay Operator automatically reconciles the changes by restarting all Quay-related pods. After all pods are restarted, the features are enabled.
Modifying the configuration file by using the CLI
To modify the config.yaml file for your Project Quay registry and enable new features, you can download the existing configuration from the configBundleSecret by using the CLI. After making changes, you can re-upload the configBundleSecret resource to apply the changes.
|
Note
|
Modifying the |
-
You are logged in to the OpenShift Container Platform cluster as a user with admin privileges.
-
Describe the
QuayRegistryresource by entering the following command:$ oc describe quayregistry -n <quay_namespace># ... Config Bundle Secret: example-registry-config-bundle-v123x # ... -
Obtain the secret data by entering the following command:
$ oc get secret -n <quay_namespace> <example-registry-config-bundle-v123x> -o jsonpath='{.data}'{ "config.yaml": "RkVBVFVSRV9VU0 ... MDAwMAo=" } -
Decode the data into a YAML file into the current directory by passing in the
>> config.yamlflag. For example:$ echo 'RkVBVFVSRV9VU0 ... MDAwMAo=' | base64 --decode >> config.yaml -
Make the desired changes to your
config.yamlfile, and then save the file asconfig.yaml. -
Create a new
configBundleSecretYAML by entering the following command.$ touch <new_configBundleSecret_name>.yaml -
Create the new
configBundleSecretresource, passing in theconfig.yamlfile` by entering the following command:$ oc -n <namespace> create secret generic <secret_name> \ --from-file=config.yaml=</path/to/config.yaml> \ --dry-run=client -o yaml > <new_configBundleSecret_name>.yamlwhere:
- </path/to/config.yaml>
-
Specifies your base64 decoded
config.yamlfile.
-
Create the
configBundleSecretresource by entering the following command:$ oc create -n <namespace> -f <new_configBundleSecret_name>.yamlsecret/config-bundle created -
Update the
QuayRegistryYAML file to reference the newconfigBundleSecretobject by entering the following command:$ oc patch quayregistry <registry_name> -n <namespace> --type=merge -p '{"spec":{"configBundleSecret":"<new_configBundleSecret_name>"}}'quayregistry.quay.redhat.com/example-registry patched
-
Verify that the
QuayRegistryCR has been updated with the newconfigBundleSecret:$ oc describe quayregistry -n <quay_namespace># ... Config Bundle Secret: <new_configBundleSecret_name> # ...After patching the registry, the Project Quay Operator automatically reconciles the changes.
Keep geo-replicated sites running correctly
Manage geo-replicated sites by enabling storage preferences, running with replication settings, and adding or removing sites on standalone or OpenShift Container Platform deployments.
Geo-replication
Geo-replication connects multiple geographically distributed Project Quay deployments so that clients use them as a single registry. Standalone and Operator-based deployments support geo-replication.
With geo-replication, regions share one database and one Redis instance while each region keeps local object storage. Clients push and pull through a common entrypoint, typically a global load balancer, and blob data replicates asynchronously between storage backends.
Geo-replication storage preference environment variable
Use the QUAY_DISTRIBUTED_STORAGE_PREFERENCE environment variable to set the preferred storage engine for a geo-replicated Project Quay deployment in each region.
Project Quay supports multi-region deployments where multiple instances operate across geographically distributed sites. In these scenarios, each site shares the same configuration and metadata, but storage backends might vary between regions.
To accommodate this, Project Quay allows specifying a preferred storage engine for each deployment using an environment variable. This ensures that while metadata remains synchronized across all regions, each region can use its own optimized storage backend without requiring separate configuration files.
| Variable | Type | Description |
|---|---|---|
QUAY_DISTRIBUTED_STORAGE_PREFERENCE |
String |
The preferred storage engine (by ID in DISTRIBUTED_STORAGE_CONFIG) to use. |
Enabling storage replication for standalone Project Quay
To enable storage replication for a standalone Project Quay deployment, you can configure distributed storage engines in config.yaml and backfill existing image data.
-
Update your
config.yamlfile to include the storage engines to which data is replicated. You must list all storage engines to be used:# ... FEATURE_STORAGE_REPLICATION: true # ... DISTRIBUTED_STORAGE_CONFIG: usstorage: - RHOCSStorage - access_key: <access_key> bucket_name: <example_bucket> hostname: my.noobaa.hostname is_secure: false port: "443" secret_key: <secret_key> storage_path: /datastorage/registry eustorage: - S3Storage - host: s3.amazon.com port: "443" s3_access_key: <access_key> s3_bucket: <example bucket> s3_secret_key: <secret_key> storage_path: /datastorage/registry DISTRIBUTED_STORAGE_DEFAULT_LOCATIONS: [] DISTRIBUTED_STORAGE_PREFERENCE: - usstorage - eustorage # ... -
Optional. If complete replication of all images to all storage engines is required, you can replicate images to the storage engine by manually setting the
DISTRIBUTED_STORAGE_DEFAULT_LOCATIONSfield. This ensures that all images are replicated to that storage engine. For example:# ... DISTRIBUTED_STORAGE_DEFAULT_LOCATIONS: - usstorage - eustorage # ...NoteTo enable per-namespace replication, contact Project Quay support.
-
After adding storage and enabling Replicate to storage engine by default for geo-replication, you must sync existing image data across all storage. To do this, you must execute into the container by running the following command:
$ podman exec -it <container_id> -
To sync the content after adding new storage, enter the following commands:
# scl enable python27 bash# python -m util.backfillreplicationNoteThis is a one time operation to sync content after adding new storage.
Run Project Quay with storage preferences
To run a standalone Project Quay instance with a regional storage preference, you can set the QUAY_DISTRIBUTED_STORAGE_PREFERENCE environment variable when you start the container.
-
Copy the
config.yamlfile to all machines running Project Quay. -
For each machine in each region, add a
QUAY_DISTRIBUTED_STORAGE_PREFERENCEenvironment variable with the preferred storage engine for the region in which the machine is running.For example, for a machine running in Europe with the config directory on the host available from
$QUAY/config:$ sudo podman run -d --rm -p 80:8080 -p 443:8443 \ --name=quay \ -v $QUAY/config:/conf/stack:Z \ -e QUAY_DISTRIBUTED_STORAGE_PREFERENCE=europestorage \ {productrepo}/{quayimage}:{productminv}NoteThe value of the environment variable specified must match the name of a Location ID as defined in the config panel.
-
Restart all Project Quay containers.
Removing a geo-replicated site from your standalone Project Quay deployment
To remove a geo-replicated site from a standalone Project Quay deployment, you can sync blobs between sites, update config.yaml, and run the removelocation utility.
-
You have configured Project Quay geo-replication with at least two sites, for example,
usstorageandeustorage. -
Each site has its own Organization, Repository, and image tags.
-
Sync the blobs between all of your defined sites by running the following command:
$ python -m util.backfillreplicationWarningPrior to removing storage engines from your Project Quay
config.yamlfile, you must ensure that all blobs are synced between all defined sites. Complete this step before proceeding. -
In your Project Quay
config.yamlfile for siteusstorage, remove theDISTRIBUTED_STORAGE_CONFIGentry for theeustoragesite. -
Enter the following command to obtain a list of running containers:
$ podman psExample output:CONTAINER ID IMAGE COMMAND CREATED STATUS PORTS NAMES 92c5321cde38 registry.redhat.io/rhel8/redis-5:1 run-redis 11 days ago Up 11 days ago 0.0.0.0:6379->6379/tcp redis 4e6d1ecd3811 registry.redhat.io/rhel8/postgresql-13:1-109 run-postgresql 33 seconds ago Up 34 seconds ago 0.0.0.0:5432->5432/tcp postgresql-quay d2eadac74fda registry-proxy.engineering.redhat.com/rh-osbs/quay-quay-rhel8:v3.9.0-131 registry 4 seconds ago Up 4 seconds ago 0.0.0.0:80->8080/tcp, 0.0.0.0:443->8443/tcp quay -
Enter the following command to execute a shell inside of the PostgreSQL container:
$ podman exec -it postgresql-quay -- /bin/bash -
Enter psql by running the following command:
bash-4.4$ psql -
Enter the following command to reveal a list of sites in your geo-replicated deployment:
quay=# select * from imagestoragelocation;Example output:id | name ----+------------------- 1 | usstorage 2 | eustorage -
Enter the following command to exit the postgres CLI to re-enter bash-4.4:
\q -
Enter the following command to permanently remove the
eustoragesite:ImportantThe following action cannot be undone. Use with caution.
bash-4.4$ python -m util.removelocation eustorageExample output:WARNING: This is a destructive operation. Are you sure you want to remove eustorage from your storage locations? [y/n] y Deleted placement 30 Deleted placement 31 Deleted placement 32 Deleted placement 33 Deleted location eustorage
Removing a geo-replicated site from your Red Hat Quay on OpenShift Container Platform deployment
To remove a geo-replicated site from a Red Hat Quay on OpenShift Container Platform deployment, you can sync blobs between sites, update storage configuration, and run the removelocation utility.
-
You are logged into OpenShift Container Platform.
-
You have configured Project Quay geo-replication with at least two sites, for example,
usstorageandeustorage. -
Each site has its own Organization, Repository, and image tags.
-
Sync the blobs between all of your defined sites by running the following command:
$ python -m util.backfillreplicationWarningPrior to removing storage engines from your Project Quay
config.yamlfile, you must ensure that all blobs are synced between all defined sites.When running this command, replication jobs are created which are picked up by the replication worker. If blobs need to be replicated, the script returns UUIDs of blobs that are replicated. If you run this command multiple times, and the output from the return script is empty, it does not mean that the replication process is done; it means that no more blobs remain to be queued for replication. Customers should use appropriate judgement before proceeding, as the allotted time replication takes depends on the number of blobs detected.
Alternatively, you could use a third party cloud tool, such as Microsoft Azure, to check the synchronization status.
This step must be completed before proceeding.
-
In your Project Quay
config.yamlfile for siteusstorage, remove theDISTRIBUTED_STORAGE_CONFIGentry for theeustoragesite. -
Identify your Project Quay application pods by entering the following command:
$ oc get pod -n <quay_namespace>Example output:quay390usstorage-quay-app-5779ddc886-2drh2 quay390eustorage-quay-app-66969cd859-n2ssm -
Open an interactive shell session in the
usstoragepod by entering the following command:$ oc rsh quay390usstorage-quay-app-5779ddc886-2drh2 -
Permanently remove the
eustoragesite by entering the following command:ImportantThe following action cannot be undone. Use with caution.
sh-4.4$ python -m util.removelocation eustorageExample output:WARNING: This is a destructive operation. Are you sure you want to remove eustorage from your storage locations? [y/n] y Deleted placement 30 Deleted placement 31 Deleted placement 32 Deleted placement 33 Deleted location eustorage
Manage bootstrap tokens for initial automation setup
Enable programmatic bootstrap, use the bootstrap token for automation, and renew or revoke it as needed.
Programmatic OAuth token provisioning
To create and manage organization application tokens without the UI, you can use programmatic OAuth token provisioning through the REST API. You can also enable a Tech Preview bootstrap token for zero-touch automation.
Organization OAuth applications previously required administrators to create API tokens in the Project Quay UI. With programmatic token provisioning, automation tools can manage the token life cycle.
When FEATURE_PROGRAMMATIC_BOOTSTRAP is enabled, Project Quay also creates a high-privilege bootstrap OAuth token on startup and writes it to a local file or Kubernetes Secret. Use the bootstrap token to create organizations, applications, and narrower-scoped tokens without interactive UI access.
|
Important
|
Programmatic bootstrap token provisioning is a Tech Preview feature in Project Quay {producty}. Tech Preview features are not supported with Red Hat production service-level agreements (SLAs) and might not be functionally complete. Red Hat does not recommend using Tech Preview features in production environments. These features provide early access to upcoming product features, enabling customers to test functionality and provide feedback during the development process. |
Configuring programmatic bootstrap on standalone deployments
To configure filesystem-based bootstrap OAuth token provisioning in a standalone Project Quay deployment, you can set FEATURE_PROGRAMMATIC_BOOTSTRAP and related fields in the config.yaml file, then restart the registry.
-
You have a standalone Project Quay deployment with at least one superuser account created.
-
You can modify the Project Quay
config.yamlfile.
-
Set the following fields in your Project Quay
config.yamlfile:FEATURE_PROGRAMMATIC_BOOTSTRAP: true SUPER_USERS: - quayadmin BOOTSTRAP_TOKEN_OWNER: quayadmin BOOTSTRAP_TOKEN_EXPIRATION: 7776000 BOOTSTRAP_TOKEN_SCOPE: "org:admin repo:admin repo:create repo:read repo:write super:user user:admin user:read" BOOTSTRAP_TOKEN_PATH: /datastorage/bootstrap-token.jsonSet
BOOTSTRAP_TOKEN_PATHto a directory that the Project Quay process can write. In containerized standalone deployments, use a mounted storage path such as/datastorage/bootstrap-token.json. Quote theBOOTSTRAP_TOKEN_SCOPEvalue so YAML does not misparse scopes that contain:. -
Restart Project Quay after you update the configuration.
NoteIf you enable
FEATURE_PROGRAMMATIC_BOOTSTRAPon a deployment that is already running, you must restart Project Quay so the bootstrap token is provisioned and thePOST /api/v1/bootstrap/renewendpoint is registered. A full restart is required; reloading configuration without restarting does not register the bootstrap API endpoints. -
Verify bootstrap provisioning:
-
Check Project Quay startup logs for a
Bootstrap token provisionedmessage. -
Confirm that the bootstrap token file exists at the configured storage location. For example:
$ ls -l <BOOTSTRAP_TOKEN_PATH>
-
Configuring programmatic bootstrap on OpenShift Container Platform
To enable filesystem-independent bootstrap OAuth token provisioning for Red Hat Quay on OpenShift Container Platform, you can add the programmatic bootstrap fields to the configBundleSecret resource.
|
Important
|
Programmatic bootstrap token provisioning is a Tech Preview feature in Project Quay {producty}. Tech Preview features are not supported with Red Hat production service-level agreements (SLAs) and might not be functionally complete. Red Hat does not recommend using Tech Preview features in production environments. These features provide early access to upcoming product features, enabling customers to test functionality and provide feedback during the development process. |
-
You have deployed a Project Quay registry on OpenShift Container Platform by using the Project Quay Operator.
-
You have created at least one superuser account. For more information, see Creating the first user.
-
You can edit the
configBundleSecretresource that is referenced by yourQuayRegistrycustom resource (CR).
-
Retrieve the name of the
configBundleSecretresource:$ oc get quayregistry <quayregistry_name> -n <quay_namespace> \ -o jsonpath='{.spec.configBundleSecret}{"\n"}'Example outputexample-registry-config-bundle-abc12 -
Export the current
config.yamlfile from the secret:$ oc get secret -n <quay_namespace> <config_bundle_secret_name> \ -o jsonpath='{.data.config\.yaml}' | base64 -d > config.yaml -
Edit
config.yamland add the programmatic bootstrap fields. For example:FEATURE_PROGRAMMATIC_BOOTSTRAP: true SUPER_USERS: - quayadmin BOOTSTRAP_TOKEN_OWNER: quayadmin BOOTSTRAP_TOKEN_EXPIRATION: 7776000 BOOTSTRAP_TOKEN_SCOPE: "org:admin repo:admin repo:create repo:read repo:write super:user user:admin user:read"Important-
BOOTSTRAP_TOKEN_OWNERmust be an existing superuser that is also listed underSUPER_USERS. -
Quote the
BOOTSTRAP_TOKEN_SCOPEvalue. Unquoted scope strings that contain:can be misparsed by YAML. -
Do not set
BOOTSTRAP_TOKEN_PATHfor Operator deployments. The Operator stores the token in a Kubernetes Secret. -
You do not need to set
PROGRAMMATIC_TOKEN_K8S_SECRET,PROGRAMMATIC_TOKEN_K8S_KEY, orPROGRAMMATIC_TOKEN_K8S_NAMESPACE. The Operator injects those values and creates the Secret named<quayregistry_name>-bootstrap-token.
-
-
Create a new config bundle secret that includes the updated
config.yamlfile:$ oc create secret generic <new_config_bundle_secret_name> \ --from-file=config.yaml=./config.yaml \ -n <quay_namespace> -
Update the
QuayRegistryCR to reference the new secret:$ oc patch quayregistry <quayregistry_name> -n <quay_namespace> \ --type=merge -p '{"spec":{"configBundleSecret":"<new_config_bundle_secret_name>"}}'The Operator reconciles the change, creates the
<quayregistry_name>-bootstrap-tokenSecret with accompanying Role and RoleBinding resources, mounts the Secret into the Quay application pods, and restarts Quay-related pods. -
Wait for the Quay application pods to become ready:
$ oc get pods -n <quay_namespace> -l quay-component=quay-app -
Verify that the Operator created the bootstrap token Secret:
$ oc get secret <quayregistry_name>-bootstrap-token -n <quay_namespace> -
Read the bootstrap token from the Secret:
$ BOOTSTRAP_TOKEN=$(oc get secret <quayregistry_name>-bootstrap-token -n <quay_namespace> \ -o jsonpath='{.data.token\.json}' | base64 -d | jq -r '.access_token')NoteSecret propagation can take up to 60 seconds after the Quay pods start. If
token.jsonis missing, wait and retry the command. -
Optional. Confirm that Quay startup logs include a bootstrap provisioning message:
$ oc logs -n <quay_namespace> deploy/<quayregistry_name>-quay-app -c quay-app \
  | grep -i 'bootstrap token'
Reading the bootstrap token
To obtain the bootstrap OAuth token after Project Quay starts with programmatic bootstrap enabled, you can read the token from the configured local file or Kubernetes Secret.
-
For standalone or virtual machine deployments, read the token from the
BOOTSTRAP_TOKEN_PATHfile:$ BOOTSTRAP_TOKEN=$(jq -r '.access_token' /var/lib/quay/quay-machine-token.json)NoteProject Quay writes the bootstrap token file with
0600permissions owned by the Project Quay process user. If you cannot read the file from the host, read it from inside the Project Quay container instead. For example:$ BOOTSTRAP_TOKEN=$(docker exec quay cat /datastorage/bootstrap-token.json | jq -r '.access_token') -
For Red Hat Quay on OpenShift Container Platform Operator deployments, read the token from the Operator-managed Secret. The Secret name is
<quayregistry_name>-bootstrap-token:$ BOOTSTRAP_TOKEN=$(oc get secret <quayregistry_name>-bootstrap-token -n <quay_namespace> \ -o jsonpath='{.data.token\.json}' | base64 -d | jq -r '.access_token')Example$ BOOTSTRAP_TOKEN=$(oc get secret example-registry-bootstrap-token -n quay-operator \ -o jsonpath='{.data.token\.json}' | base64 -d | jq -r '.access_token')NoteSecret propagation can take up to 60 seconds after renewal or initial provisioning. If the
token.jsonkey is missing, wait for the Quay application pods to finish starting and retry the command.
Using the bootstrap token for zero-touch deployment
To provision Project Quay resources without using the UI, you can use the bootstrap OAuth token as Bearer authentication for organization, application, and token API calls.
-
Export the bootstrap token. For example:
$ export BOOTSTRAP_TOKEN=<bootstrap_token_value> -
Create an organization:
$ curl -H "Authorization: Bearer $BOOTSTRAP_TOKEN" -X POST \ -H "Content-Type: application/json" \ -d '{"name": "myorg", "email": "admin@example.com"}' \ https://<quay-server.example.com>/api/v1/organization/ -
Create an OAuth application in the organization:
$ curl -H "Authorization: Bearer $BOOTSTRAP_TOKEN" -X POST \ -H "Content-Type: application/json" \ -d '{"name": "ci-automation", "description": "CI/CD token source"}' \ https://<quay-server.example.com>/api/v1/organization/myorg/applications -
Create a scoped OAuth API token for the application:
$ curl -H "Authorization: Bearer $BOOTSTRAP_TOKEN" -X POST \ -H "Content-Type: application/json" \ -d '{"name": "ci-job-token", "scope": "repo:read repo:write", "expiration": 2592000}' \ https://<quay-server.example.com>/api/v1/organization/myorg/applications/<client_id>/tokens -
Store the
tokenvalue from the response for your automation workflow. The token secret is returned only in the create response.
Managing OAuth application tokens by using the API
To manage organization application OAuth tokens without using the UI, you can list, create, and revoke tokens through the Project Quay REST API when your token has org:admin scope.
The bootstrap token includes org:admin by default. Scoped tokens that you create for automation must also include org:admin to list, create, or revoke application tokens through these endpoints.
-
List existing tokens for an application:
$ curl -H "Authorization: Bearer <access_token>" -X GET \ https://<quay-server.example.com>/api/v1/organization/myorg/applications/<client_id>/tokens -
Create a token with a custom expiration and scope:
$ curl -H "Authorization: Bearer <access_token>" -X POST \ -H "Content-Type: application/json" \ -d '{"name": "short-lived-token", "scope": "repo:read", "expiration": 3600}' \ https://<quay-server.example.com>/api/v1/organization/myorg/applications/<client_id>/tokens -
Revoke a token by UUID:
$ curl -H "Authorization: Bearer <access_token>" -X DELETE \
  https://<quay-server.example.com>/api/v1/organization/myorg/applications/<client_id>/tokens/<token_uuid>
Renewing the bootstrap token
To keep automation running when the bootstrap OAuth token approaches expiry, you can renew it through the Project Quay REST API before the previous token is invalidated.
-
Renew the token by using the bootstrap token as Bearer authentication:
$ curl -H "Authorization: Bearer $BOOTSTRAP_TOKEN" -X POST \
  https://<quay-server.example.com>/api/v1/bootstrap/renew
The following example shows a successful response:
{"status": "rotated"} -
Read the new token value from
BOOTSTRAP_TOKEN_PATHor the configured Kubernetes Secret. The previous bootstrap token is invalidated immediately.NoteIf the bootstrap token is already expired, renewal is accepted only from localhost. On Kubernetes and OpenShift Container Platform, use port forwarding to send the renewal request through the local ingress path.
Revoking the bootstrap token
You can revoke the Project Quay bootstrap OAuth token by disabling FEATURE_PROGRAMMATIC_BOOTSTRAP and restarting the registry. Project Quay does not provide a separate API endpoint for instant revocation.
To revoke the bootstrap token, set FEATURE_PROGRAMMATIC_BOOTSTRAP: false and restart Project Quay. Project Quay deletes bootstrap-managed applications and tokens during startup.
Security considerations for programmatic bootstrap
Apply these practices when you use the Project Quay bootstrap OAuth token so that automation remains limited to provisioning and uses narrower-scoped tokens for day-to-day work.
-
Use the bootstrap token only for initial provisioning and token minting. Create narrower-scoped OAuth tokens for CI/CD and day-2 automation.
-
Set
BOOTSTRAP_TOKEN_EXPIRATIONaccording to your security policy. The default is 60 minutes. -
On standalone deployments, the bootstrap token file is written with
0600permissions. Restrict access to the directory that contains the token file. -
On Kubernetes and OpenShift Container Platform, store the bootstrap token in a dedicated Secret with scoped RBAC.
-
Schedule bootstrap token renewal by using
POST /api/v1/bootstrap/renewbefore expiry. -
Monitor Project Quay action logs for bootstrap and OAuth token life cycle events.
Troubleshooting programmatic bootstrap
Use these checks when programmatic bootstrap token provisioning fails in Project Quay, including missing token files, authorization errors, and renewal failures.
If the token file or Secret is empty after startup:
-
Verify that
FEATURE_PROGRAMMATIC_BOOTSTRAPistrue. -
Verify that
BOOTSTRAP_TOKEN_OWNERis set and listed inSUPER_USERS. -
Verify that the bootstrap token owner exists in the Project Quay database.
-
Check Project Quay startup logs for bootstrap provisioning errors.
-
If the bootstrap token file or Secret is still missing after the first restart, restart Project Quay again or run
python3 /quay-registry/boot.pyinside the Project Quay container after confirmingBOOTSTRAP_TOKEN_OWNERexists in the database. -
On Red Hat Quay on OpenShift Container Platform, confirm that the Operator created the
<quayregistry_name>-bootstrap-tokenSecret, Role, and RoleBinding, and that Quay application pods have rolled out with the updatedconfigBundleSecret. An empty Secret before the pods restart is expected; the Quay process writestoken.jsonafter startup. -
Confirm that
BOOTSTRAP_TOKEN_SCOPEis a quoted YAML string. Unquoted scope values that contain:can be misparsed.
If you receive 403 Forbidden when using the bootstrap token:
-
Confirm that the token has not expired.
-
Confirm that bootstrap provisioning was not disabled and the token revoked.
-
Confirm that the target API endpoint is authorized by the bootstrap token scope.
If renewal returns 401 Unauthorized:
-
If the token is expired, send the renewal request from localhost or through a port-forwarded local ingress path.
-
Confirm that you are passing the bootstrap token value, not a different OAuth token.
If rate limiting returns 429 Too Many Requests:
-
Bootstrap and token management endpoints are subject to existing rate limiting when
FEATURE_RATE_LIMITSis enabled. Adjust request frequency or review your rate limit configuration.
Administer the registry as a superuser
Use superuser API endpoints to manage organizations, quotas, build information, service keys, and recovery actions across the deployment.
Managing organizations as a superuser with the Project Quay API
To list, update, or delete organizations in Project Quay, you can use the superuser organization API endpoints.
-
You have created an OAuth access token.
-
You are logged into your Project Quay deployment as a superuser.
-
Use the
GET /api/v1/superuser/organizationsendpoint to list all organizations:$ curl -L -X GET \ -H "Authorization: Bearer <bearer_token>" \ "https://<quay_server>/api/v1/superuser/organizations?name=<organization_name>"Example output{"organizations": [{"name": "fed_test", "email": "fe11fc59-bd09-459a-a21c-b57692d151c9", "avatar": {"name": "fed_test", "hash": "e2ce1fb42ec2e0602362beb64b5ebd1e6ad291b710a0355f9296c16157bef3cb", "color": "#ff7f0e", "kind": "org"}, "quotas": [{"id": 3, "limit_bytes": 10737418240, "limits": []}], "quota_report": {"quota_bytes": 0, "configured_quota": 10737418240, "running_backfill": "complete", "backfill_status": "complete"}}, {"name": "test", "email": "new-contact@test-org.com", "avatar": {"name": "test", "hash": "a15d479002b20f211568fd4419e76686d2b88a4980a5b4c4bc10420776c5f6fe", "color": "#aec7e8", "kind": "org"}, "quotas": [{"id": 2, "limit_bytes": 10737418240, "limits": [{"id": 1, "type": "Reject", "limit_percent": 90}]}], "quota_report": {"quota_bytes": 0, "configured_quota": 10737418240, "running_backfill": "complete", "backfill_status": "complete"}}]} -
Use the
PUT /api/v1/superuser/organizations/{name}endpoint to change or update information for an organization:$ curl -X PUT \ -H "Authorization: Bearer <bearer_token>" \ -H "Content-Type: application/json" \ -d '{ "email": "<contact_email>", "invoice_email": <boolean_value>, "invoice_email_address": "<invoice_email_address>", "tag_expiration_s": <expiration_seconds> }' \ "https://<quay_server>/api/v1/superuser/organizations/<organization_name>"Example output{"name": "test", "email": "new-contact@test-org.com", "avatar": {"name": "test", "hash": "a15d479002b20f211568fd4419e76686d2b88a4980a5b4c4bc10420776c5f6fe", "color": "#aec7e8", "kind": "org"}, "quotas": [{"id": 2, "limit_bytes": 10737418240, "limits": [{"id": 1, "type": "Reject", "limit_percent": 90}]}], "quota_report": {"quota_bytes": 0, "configured_quota": 10737418240, "running_backfill": "complete", "backfill_status": "complete"}} -
Use the
DELETE /api/v1/superuser/organizations/{name}endpoint to delete an organization:$ curl -X DELETE \ -H "Authorization: Bearer <bearer_token>" \ "https://<quay_server>/api/v1/superuser/organizations/<organization_name>"This command does not return output in the CLI.
Listing logs as a superuser with the Project Quay API
To list usage logs or obtain registry size information in Project Quay, you can use the superuser logs and registry size API endpoints.
-
You have created an OAuth access token.
-
You are logged into your Project Quay deployment as a superuser.
-
Use the
GET /api/v1/superuser/logsendpoint to list the usage logs for the current system:$ curl -X GET \ -H "Authorization: Bearer <bearer_token>" \ "https://<quay_server>/api/v1/superuser/logs?starttime=<start_time>&endtime=<end_time>&page=<page_number>&next_page=<next_page_token>"Example output{"start_time": "Mon, 17 Feb 2025 19:29:14 -0000", "end_time": "Wed, 19 Feb 2025 19:29:14 -0000", "logs": [{"kind": "login_success", "metadata": {"type": "quayauth", "useragent": "Mozilla/5.0 (X11; Linux x86_64; rv:134.0) Gecko/20100101 Firefox/134.0"}, "ip": "192.168.1.131", "datetime": "Tue, 18 Feb 2025 19:28:15 -0000", "namespace": {"kind": "user", "name": "quayadmin", "avatar": {"name": "quayadmin", "hash": "6d640d802fe23b93779b987c187a4b7a4d8fbcbd4febe7009bdff58d84498fba", "color": "#f7b6d2", "kind": "user"}}}], "next_page": "gAAAAABntN-KbPJDI0PpcHmWjRCmQTLiCprE_KXiOSidbGZ7Ireu8pVTgGUIstijNhmiLzlAv_S3HOsCrKWnuBmoQYZ3F53Uxg=="} -
Use the
GET /api/v1/superuser/registrysize/endpoint to obtain information about the size of the registry:$ curl -X GET \ -H "Authorization: Bearer <bearer_token>" \ "https://<quay_server>/api/v1/superuser/registrysize/"Example output{"size_bytes": 0, "last_ran": null, "running": false, "queued": false} -
Use the
POST /api/v1/superuser/registrysize/endpoint to define registry size information:$ curl -X POST "https://quay-server.example.com/api/v1/superuser/registrysize/" \ -H "Authorization: Bearer <ACCESS_TOKEN>" \ -H "Content-Type: application/json" \ -d '{ "namespace": "<namespace>", "last_ran": 1700000000, "queued": true, "running": false }'This command does not return output in the CLI.
Managing organization quota with the Project Quay API
To manage storage quota for an organization in Project Quay, you can use the organization quota API endpoints. You can check, create, change, or delete quota limitations.
When an organization is first created, it does not have an established quota.
-
You have generated an OAuth access token.
-
To set a quota for an organization, use the
POST /api/v1/organization/{orgname}/quotaendpoint:$ curl -X POST "https://<quay-server.example.com>/api/v1/organization/<orgname>/quota" \ -H "Authorization: Bearer <access_token>" \ -H "Content-Type: application/json" \ -d '{ "limit_bytes": 10737418240, "limits": "10 Gi" }'Example output"Created" -
Use the
GET /api/v1/organization/{orgname}/quotacommand to return information about the policy, including the ID number, which is required for other organization quota endpoints. For example:$ curl -k -X GET -H "Authorization: Bearer <token>" -H 'Content-Type: application/json' https://example-registry-quay-quay-enterprise.apps.docs.gcp.quaydev.org/api/v1/organization/testorg/quota | jqExample output[{"id": 1, "limit_bytes": 10737418240, "limit": "10.0 GiB", "default_config": false, "limits": [], "default_config_exists": false}]After you obtain the ID number, you can use the
GET /api/v1/organization/{orgname}/quota/{quota_id}command to list the quota policy. For example:$ curl -X GET "https://<quay-server.example.com>/api/v1/organization/<orgname>/quota/<quota_id>" \ -H "Authorization: Bearer <access_token>"Example output{"id": 1, "limit_bytes": 10737418240, "limit": "10.0 GiB", "default_config": false, "limits": [], "default_config_exists": false} -
Use the
PUT /api/v1/organization/{orgname}/quota/{quota_id}command to modify the existing quota limitation. Note that this requires the policy ID. For example:$ curl -X PUT "https://<quay-server.example.com>/api/v1/organization/<orgname>/quota/<quota_id>" \ -H "Authorization: Bearer <access_token>" \ -H "Content-Type: application/json" \ -d '{ "limit_bytes": <limit_in_bytes> }'Example output{"id": 1, "limit_bytes": 21474836480, "limit": "20.0 GiB", "default_config": false, "limits": [], "default_config_exists": false} -
Delete an organization’s quota with the
DELETE /api/v1/organization/{orgname}/quota/{quota_id}command. For example:$ curl -X DELETE "https://<quay-server.example.com>/api/v1/organization/<orgname>/quota/<quota_id>" \ -H "Authorization: Bearer <access_token>"This command does not return output.
Managing organization quota as a superuser with the Project Quay API
To create, view, update, or delete organization quota policies in Project Quay, you can use the superuser organization quota API endpoints.
-
You have created an OAuth access token.
-
You are logged into your Project Quay deployment as a superuser.
-
Use the
POST /api/v1/superuser/organization/{namespace}/quotaAPI endpoint to create a quota policy for an organization:$ curl -X POST "https://quay-server.example.com/api/v1/superuser/organization/<namespace>/quota" \ -H "Authorization: Bearer <ACCESS_TOKEN>" \ -H "Content-Type: application/json" \ -d '{ "limit_bytes": 10737418240 }'Example output"Created" -
Use the
GET /api/v1/superuser/organization/{namespace}/quotaAPI endpoint to obtain information about the policy, including the quota ID:$ curl -X GET "https://quay-server.example.com/api/v1/superuser/organization/<namespace>/quota" \ -H "Authorization: Bearer <ACCESS_TOKEN>"Example output[{"id": 2, "limit_bytes": 10737418240, "limit": "10.0 GiB", "default_config": false, "limits": [{"id": 1, "type": "Reject", "limit_percent": 90}], "default_config_exists": false}] -
Use the
PUT /api/v1/superuser/organization/{namespace}/quota/{quota_id}API endpoint to change the quota policy:$ curl -X PUT "https://quay-server.example.com/api/v1/superuser/organization/<namespace>/quota/<quota_id>" \ -H "Authorization: Bearer <ACCESS_TOKEN>" \ -H "Content-Type: application/json" \ -d '{ "limit_bytes": <NEW_QUOTA_LIMIT> }'Example output{"id": 2, "limit_bytes": 10737418240, "limit": "10.0 GiB", "default_config": false, "limits": [{"id": 1, "type": "Reject", "limit_percent": 90}], "default_config_exists": false} -
Use the
DELETE /api/v1/superuser/organization/{namespace}/quota/{quota_id}API endpoint to delete a quota policy for an organization:$ curl -X DELETE "https://quay-server.example.com/api/v1/superuser/organization/<namespace>/quota/<quota_id>" \ -H "Authorization: Bearer <ACCESS_TOKEN>"This command does not return output in the CLI.
Managing user quota with the Project Quay API
To create, view, update, or delete user quota policies in Project Quay, you can use the superuser user quota API endpoints.
-
You have created an OAuth access token.
-
You are logged into your Project Quay deployment as a superuser.
-
Use the
POST /api/v1/superuser/users/{namespace}/quotaendpoint to create a quota policy for specific users within an organization:$ curl -X POST "https://quay-server.example.com/api/v1/superuser/users/<username>/quota" \ -H "Authorization: Bearer <ACCESS_TOKEN>" \ -H "Content-Type: application/json" \ -d '{ "limit_bytes": <QUOTA_LIMIT> }'Example output"Created" -
Use the
GET /api/v1/superuser/users/{namespace}/quotaendpoint to return a list of a user’s allotted quota:$ curl -X GET "https://quay-server.example.com/api/v1/superuser/users/<username>/quota" \ -H "Authorization: Bearer <ACCESS_TOKEN>"Example output[{"id": 6, "limit_bytes": 10737418240, "limit": "10.0 GiB", "default_config": false, "limits": [], "default_config_exists": false}] -
Use the
PUT /api/v1/superuser/users/{namespace}/quota/{quota_id}endpoint to adjust the user’s policy:$ curl -X PUT "https://quay-server.example.com/api/v1/superuser/users/<username>/quota/<quota_id>" \ -H "Authorization: Bearer <ACCESS_TOKEN>" \ -H "Content-Type: application/json" \ -d '{ "limit_bytes": <NEW_QUOTA_LIMIT> }'Example output{"id": 6, "limit_bytes": 10737418240, "limit": "10.0 GiB", "default_config": false, "limits": [], "default_config_exists": false} -
Use the
DELETE /api/v1/superuser/users/{namespace}/quota/{quota_id}endpoint to delete a user’s policy:$ curl -X DELETE "https://quay-server.example.com/api/v1/superuser/users/<username>/quota/<quota_id>" \ -H "Authorization: Bearer <ACCESS_TOKEN>"This command does not return output in the CLI.
Retrieving build information with the Project Quay API
To retrieve build details, status, and logs as a Project Quay superuser, you can use the superuser build API endpoints.
-
You have created an OAuth access token.
-
You have superuser privileges.
-
Enter the following command to return information about a build by using the
GET /api/v1/superuser/{build_uuid}/buildendpoint:$ curl -X GET "https://quay-server.example.com/api/v1/superuser/<build_uuid>/build" \ -H "Authorization: Bearer <ACCESS_TOKEN>" -
Enter the following command to return the status for builds that you specify by UUID by using the
GET /api/v1/superuser/{build_uuid}/statusendpoint:$ curl -X GET "https://quay-server.example.com/api/v1/superuser/<build_uuid>/status" \ -H "Authorization: Bearer <ACCESS_TOKEN>" -
Enter the following command to return the build logs for a build that you specify by UUID by using the
GET /api/v1/superuser/{build_uuid}/logsendpoint:$ curl -X GET "https://quay-server.example.com/api/v1/superuser/<build_uuid>/logs" \ -H "Authorization: Bearer <ACCESS_TOKEN>"
Managing service keys as a superuser with the Project Quay API
To create, list, approve, update, or delete service keys as a Project Quay superuser, you can use the superuser keys API endpoints.
-
You have created an OAuth access token.
-
You have superuser privileges.
-
Enter the following command to create a service key by using the
POST /api/v1/superuser/keysendpoint:$ curl -X POST \ -H "Authorization: Bearer <bearer_token>" \ -H "Content-Type: application/json" \ -d '{ "service": "<service_name>", "expiration": <unix_timestamp> }' \ "<quay_server>/api/v1/superuser/keys"Example output{"message":""} -
Enter the following command to approve a service key by using the
POST /api/v1/superuser/approvedkeys/{kid}endpoint:$ curl -X POST \ -H "Authorization: Bearer <bearer_token>" \ -H "Content-Type: application/json" \ -d '{ "notes": "<approval_notes>" }' \ "https://<quay_server>/api/v1/superuser/approvedkeys/<kid>"This command does not return output in the CLI.
-
Enter the following command to list service keys by using the
GET /api/v1/superuser/keysendpoint:$ curl -X GET \ -H "Authorization: Bearer <bearer_token>" \ "https://<quay_server>/api/v1/superuser/keys"Example output{"keys":[{"approval":{"approval_type":"ServiceKeyApprovalType.AUTOMATIC","approved_date":"Mon, 20 Jan 2025 14:46:01 GMT","approver":null,"notes":""},"created_date":"Mon, 20 Jan 2025 14:46:01 GMT","expiration_date":"Wed, 05 Feb 2025 22:03:37 GMT","jwk":{"e":"AQAB","kid":"<example>","kty":"RSA","n":"<example>"},"kid":"7fr8soqXGgea8JqjwgItjjJT9GKlt-bMyMCDmvzy6WQ","metadata":{"created_by":"CLI tool"},"name":"http://quay-server.example.com:80","rotation_duration":null,"service":"quay"}]} -
Enter the following command to return a list of service account keys by using the
GET /api/v1/superuser/apptokensendpoint:$ curl -X GET \ "https://quay-server.example.com/api/v1/superuser/apptokens" \ -H "Authorization: Bearer <superuser_access_token>" \ -H "Accept: application/json"Alternatively, you can include the
expiring=trueoption. For example:$ curl -X GET \ "https://quay-server.example.com/api/v1/superuser/apptokens?expiring=true" \ -H "Authorization: Bearer <superuser_access_token>" \ -H "Accept: application/json" -
Enter the following command to retrieve information about a service account by its kid by using the
GET /api/v1/superuser/keys/{kid}endpoint:$ curl -X GET \ -H "Authorization: Bearer <bearer_token>" \ "https://<quay_server>/api/v1/superuser/keys/<kid>"Example output{"approval":{"approval_type":"ServiceKeyApprovalType.AUTOMATIC","approved_date":"Mon, 20 Jan 2025 14:46:01 GMT","approver":null,"notes":""},"created_date":"Mon, 20 Jan 2025 14:46:01 GMT","expiration_date":"Wed, 05 Feb 2025 22:03:37 GMT","jwk":{"e":"AQAB","kid":"7fr8soqXGgea8JqjwgItjjJT9GKlt-bMyMCDmvzy6WQ","kty":"RSA","n":"5iMX7RQ_4F_zdb1qonMsuWUDauCOqEyRpD8L_EhgnwDxrgMHuOlJ4_7sEOrOa3Jkx3QhwIW6LJCP69PR5X0wvz6vmC1DoWEaWv41bAq23Knzj7gUU9-N_fkZPZN9NQwZ-D-Zqg9L1c_cJF93Dy93py8_JswWFDj1FxMaThJmrX68wBwjhF-JLYqgCAGFyezzJ3oTpO-esV9v6R7skfkaqtx_cjLZk_0cKB4VKTtxiy2A8D_5nANTOSSbZLXNh2Vatgh3yrOmnTTNLIs0YO3vFIuylEkczHlln-40UMAzRB3HNspUySyzImO_2yGdrA762LATQrOzJN8E1YKCADx5CQ"},"kid":"7fr8soqXGgea8JqjwgItjjJT9GKlt-bMyMCDmvzy6WQ","metadata":{"created_by":"CLI tool"},"name":"http://quay-server.example.com:80","rotation_duration":null,"service":"quay"} -
Enter the following command to update your service key, such as the metadata, by using the
PUT /api/v1/superuser/keys/{kid}endpoint:$ curl -X PUT \ -H "Authorization: Bearer <bearer_token>" \ -H "Content-Type: application/json" \ -d '{ "name": "<service_key_name>", "metadata": {"<key>": "<value>"}, "expiration": <unix_timestamp> }' \ "https://<quay_server>/api/v1/superuser/keys/<kid>"Example output{"approval":{"approval_type":"ServiceKeyApprovalType.AUTOMATIC","approved_date":"Mon, 20 Jan 2025 14:46:01 GMT","approver":null,"notes":""},"created_date":"Mon, 20 Jan 2025 14:46:01 GMT","expiration_date":"Mon, 03 Mar 2025 10:40:00 GMT","jwk":{"e":"AQAB","kid":"7fr8soqXGgea8JqjwgItjjJT9GKlt-bMyMCDmvzy6WQ","kty":"RSA","n":"5iMX7RQ_4F_zdb1qonMsuWUDauCOqEyRpD8L_EhgnwDxrgMHuOlJ4_7sEOrOa3Jkx3QhwIW6LJCP69PR5X0wvz6vmC1DoWEaWv41bAq23Knzj7gUU9-N_fkZPZN9NQwZ-D-Zqg9L1c_cJF93Dy93py8_JswWFDj1FxMaThJmrX68wBwjhF-JLYqgCAGFyezzJ3oTpO-esV9v6R7skfkaqtx_cjLZk_0cKB4VKTtxiy2A8D_5nANTOSSbZLXNh2Vatgh3yrOmnTTNLIs0YO3vFIuylEkczHlln-40UMAzRB3HNspUySyzImO_2yGdrA762LATQrOzJN8E1YKCADx5CQ"},"kid":"7fr8soqXGgea8JqjwgItjjJT9GKlt-bMyMCDmvzy6WQ","metadata":{"created_by":"CLI tool","environment":"production"},"name":"quay-service-key-updated","rotation_duration":null,"service":"quay"} -
Enter the following command to delete a service key by using the
DELETE /api/v1/superuser/keys/{kid}endpoint:$ curl -X DELETE \ -H "Authorization: Bearer <bearer_token>" \ "https://<quay_server>/api/v1/superuser/keys/<kid>"This command does not return output in the CLI.